| Author |
Message |
 |
|
|
|
|
Advert
|
Forum adverts like this one are shown to any user who is not logged in. Join us by filling out a tiny 3 field form and you will get your own, free, dakka user account which gives a good range of benefits to you:
- No adverts like this in the forums anymore.
- Times and dates in your local timezone.
- Full tracking of what you have read so you can skip to your first unread post, easily see what has changed since you last logged in, and easily see what is new at a glance.
- Email notifications for threads you want to watch closely.
- Being a part of the oldest wargaming community on the net.
If you are already a member then feel free to login now. |
|
 |
2010/11/14 23:03:20
Subject: Ruglud's conversions and scratchbuilds [Update: Back in business...]
|
|

Omnious Orc Shaman
A long time ago in a galaxy far, far, away...
|
UPDATE: This blog was originally going to be my attempt at building a Space Marine force from my own home brew chapter, but at the moment I've gone off the idea and instead concentrating on various scratchbuilds and conversions from the 40k world...
So far we have up-armoured Rhino and Predator with LEDs, an AoBR Dreadnought, a converted Stormraven,and scratchbuilds on a Thunderhawk Gunship,Thunderbolt Heavy Fighter, Marauder Bomber and Taurox
ORIGINAL POST:
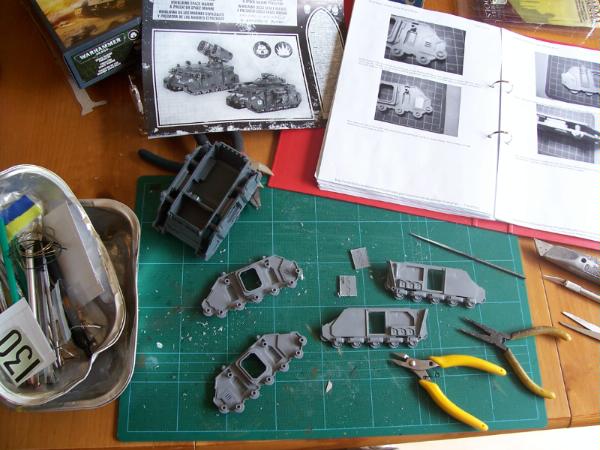
You may have seen a glimpse of this in my Imperial Guard diorama blog Once More Unto the Breach diorama blog. Well, while the filler dries I've moved back to my Rhino and Predator 'Pimp Yo Ride' project. Plan is to fully magentise the Predator so that weapon options can be interchanged and for the Rhino I'll be magentising as well as having all the hatches hinged and openable... Something I saw over on Warseer a while back...
These models will be part of my upcoming Space Marine force and will be a homebrew chapter of which I will reveal more as I go.
Here's some WIP of the initial sponson magentising. I'm going to have the actual sponsons swappable not just the weapon and have got hold of a couple of spares to do this.
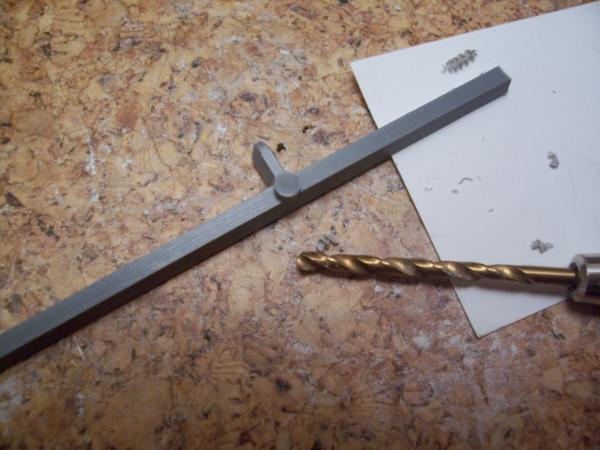
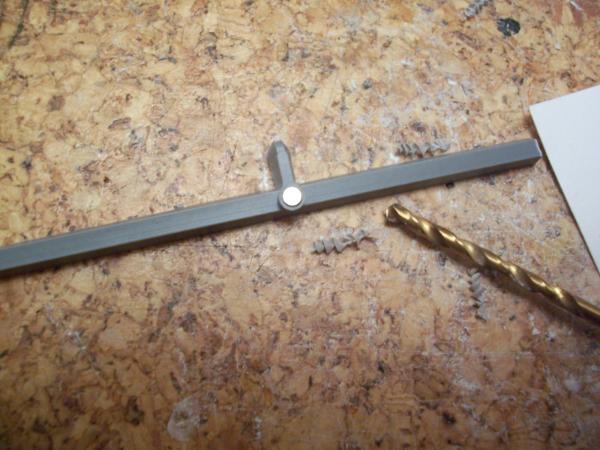
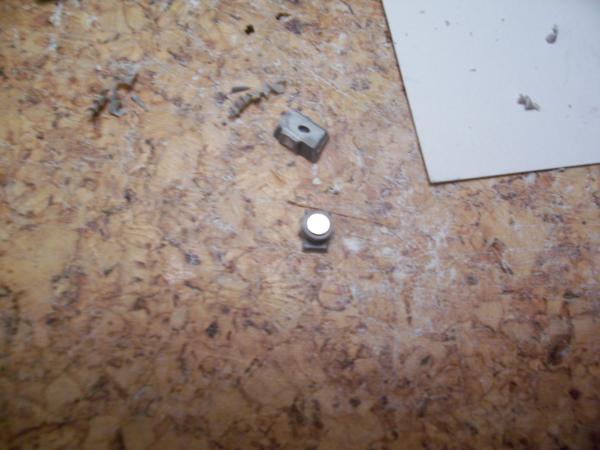
The little circular nubs on plastic sprues are useful for mounting the magnets I have. Just have to drill a hole as deep as the magnet then glue it in place

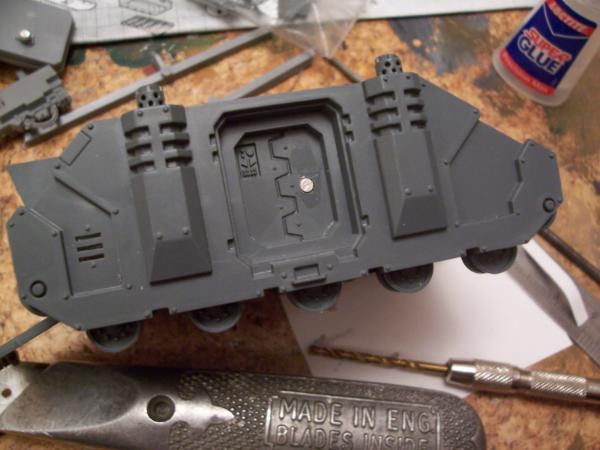

Added magnet to the Rhino door so can change between Predator and Rhino if needed
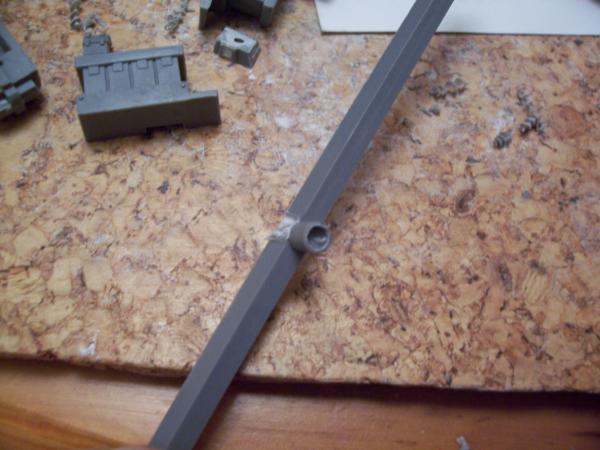
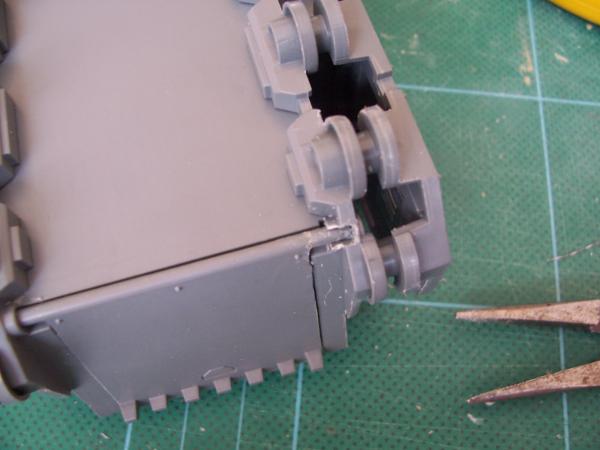
On the Rhino I made the mistake of gluing too soon and as a result managed to get the loading ramp the wrong way round! To fix this I had to cut the damn thing off and then cut a slot to refit the newly glued pivot bar... Lesson learnt !!
Quick note, I don't plan to rush into this, my main focus is still the IG diorama which itself is having to fit around my ongoing house decoration project (maybe the subject for a new blog  ). I will though update as when there has been progress or new purchases, as so far, asides from these tanks, I have the AoBR set plus a couple of sprues of marines and that's it...
Cheers
R
|
|
This message was edited 67 times. Last update was at 2017/04/24 20:07:55
|
|
|
 |
|
2010/11/24 10:59:40
Subject: Re:Ruglud's NEW Space Marine Blog
|
|
Omnious Orc Shaman
A long time ago in a galaxy far, far, away...
|
Been working on the predator turret, magnetising it so that it can be swapped, wont fall off in use but will also pivot... 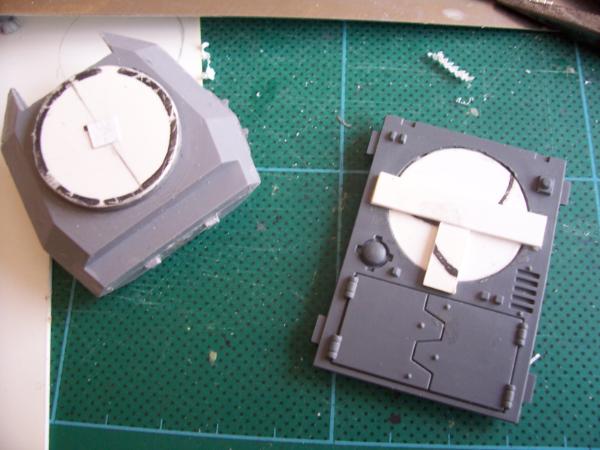 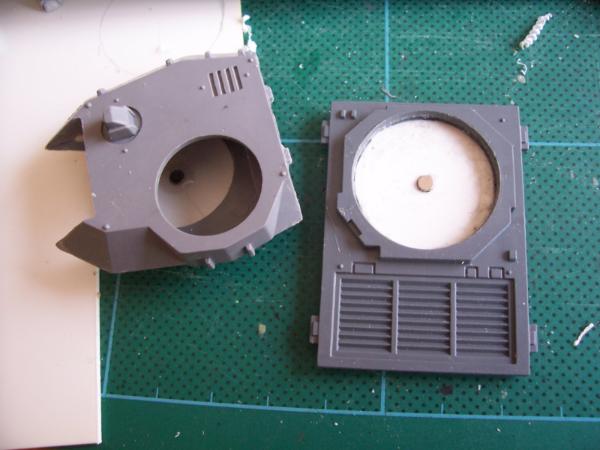 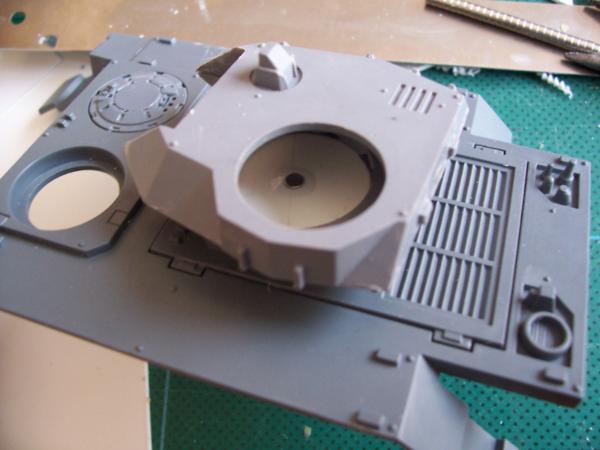 Have also added magnets to the weapons and ammo boxes so is all interchangeable... 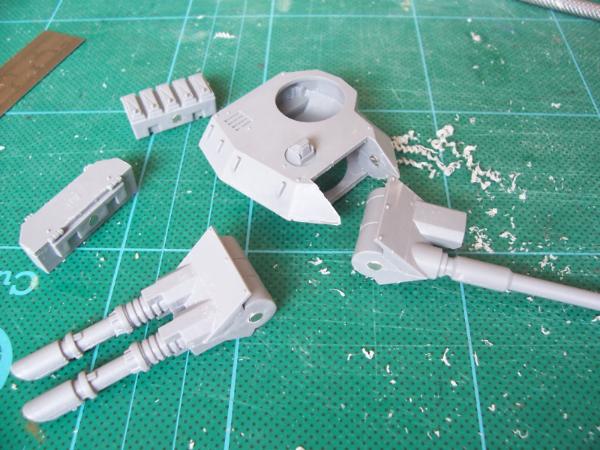 Now back to the IG diorama... R
|
|
This message was edited 2 times. Last update was at 2011/01/27 10:56:11
|
|
|
|
|
2011/01/26 12:48:22
Subject: Re:Ruglud's NEW Space Marine Blog
|
|
Omnious Orc Shaman
A long time ago in a galaxy far, far, away...
|
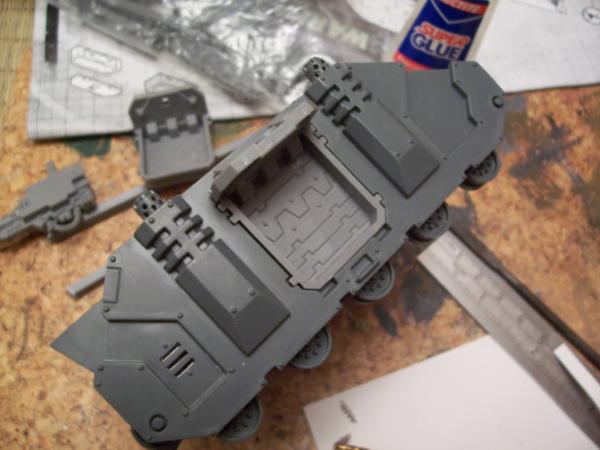
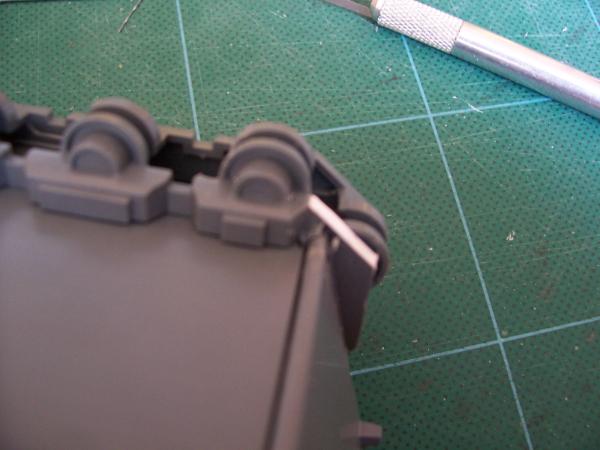
Over to the Rhino now and I've been working on havng all hatches and doors fully hinged, which has been trickier than I thought and am also upgrading the armour by scratch building with plasticard, going for a similar look to the stuff Forgeworld makes, with some slight changes. Here's the photos... 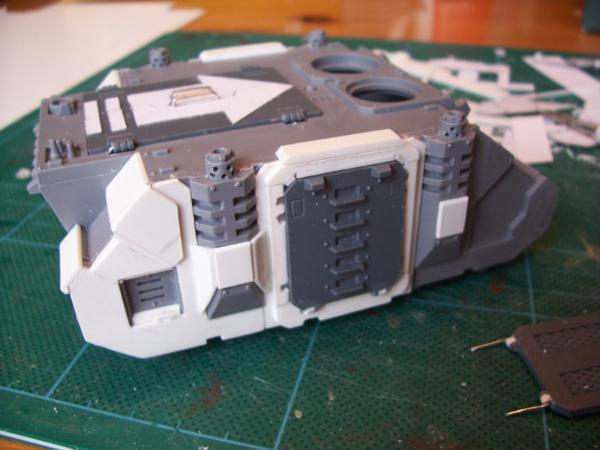 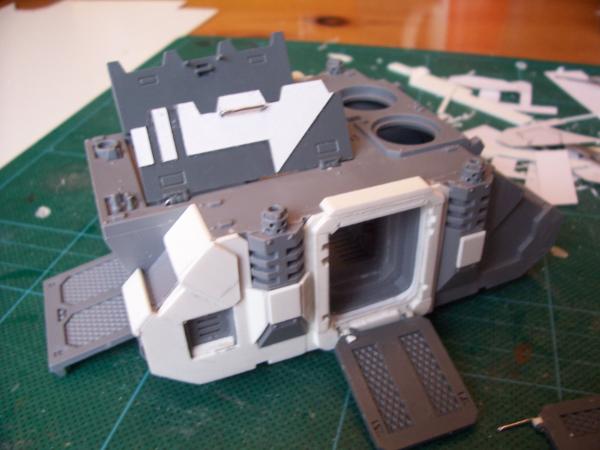 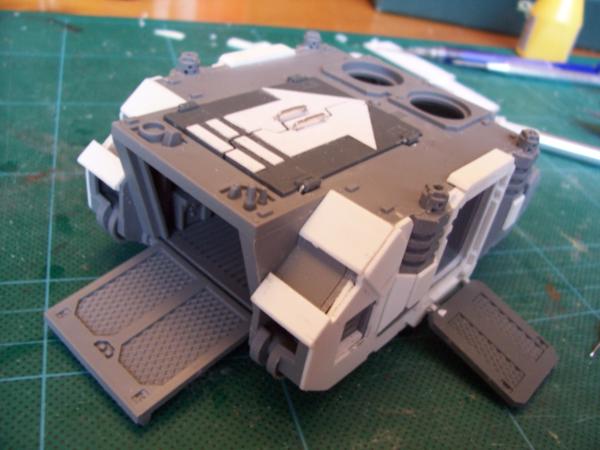 Hinges are just made from thin paperclips cut to size and bent in an L shape with the model hinges drilled out, paperclip passed through and into main body of the Rhino. To secure them I'll bend the clips behind the rhino body, although will be painting them first. See the first photo for the door lying next to the Rhino with clips in place.
|
|
This message was edited 1 time. Last update was at 2011/01/26 12:51:47
|
|
|
|
|
2011/01/26 20:51:40
Subject: Ruglud's NEW Space Marine Blog
|
|
Thunderhawk Pilot Dropping From Orbit
|
Wow lovely plasticard skills, loving the adapted tactical symbol, and the side hatch is amazingly well made. Nice job, look forward to stealing more ideas of you 
|

No trees were hurt in the making of this sig, however many electrons were disturbed.
|
|
|
|
|
2011/01/27 11:02:34
Subject: Re:Ruglud's NEW Space Marine Blog
|
|
Omnious Orc Shaman
A long time ago in a galaxy far, far, away...
|
Cheers Lennysmash, steal away!
The tactical symbol is inspired by PowerPoint! I use this every day at work and it's one of the available block arrows that you can draw. It's made from thin card rather than plasticard but I like the effect of the raised symbol over freehand painted.
Next stage is working pn the front armour than adding my chapter symbol (home brew chapter) to the rear and side doors, plus something on the front.
|
|
|
|
|
|
2011/01/28 01:30:22
Subject: Re:Ruglud's NEW Space Marine Blog
|
|

Strategizing Grey Knight Chapter Master
|
Hey Ruglud,
John Lithgow said it best

|
IceAngel wrote:I must say Knightley, I am very envious of your squiggle ability. I mean, if squiggles were a tactical squad, you'd be the sergeant. If squiggles were an HQ, you'd be the special character. If squiggles were a way of life, you'd be Doctor Phil...
The Cleanest Painting blog ever!
Gitsplitta wrote:I am but a pretender... you are... the father of all squiggles. .
|
|
|
|
|
2011/01/28 01:40:23
Subject: Ruglud's NEW Space Marine Blog
|
|

Adolescent Youth on Ultramar
|
i love the Rhino.
|
|
|
|
|
2011/01/28 01:42:56
Subject: Ruglud's NEW Space Marine Blog
|
|
Road-Raging Blood Angel Biker
|
Lennysmash wrote:Wow lovely plasticard skills, loving the adapted tactical symbol, and the side hatch is amazingly well made. Nice job, look forward to stealing more ideas of you
Totally agreed. There's some great ideas here which I'm taking. Much obliged!
Feel free to make a tutorial detailing exactly how to do all this too. I won't mind.... ^_^
|
|
|
|
|
2011/01/28 05:28:31
Subject: Ruglud's NEW Space Marine Blog
|
|

Focused Fire Warrior
australia
|
Looks as hard as it should be
+1
|
 Moonblade cadre 3400 pts Moonblade cadre 3400 pts
 24th Regiment of Tra 1800 pts 24th Regiment of Tra 1800 pts
Laylith the whites host - High elves 3500 pts
Men of the holy shrine - Bretonnian 3200 pts
Scarsnick;s hoddies -Night gobbos 2100 pts
The guard of the east gate of Mordhiem - 3200pts |
|
|
|
|
2011/01/29 15:26:15
Subject: Re:Ruglud's NEW Space Marine Blog
|
|
Omnious Orc Shaman
A long time ago in a galaxy far, far, away...
|
working on the front armour now, sliced of the lower section on the front panel, added a new piece of plasticard and stuck back together 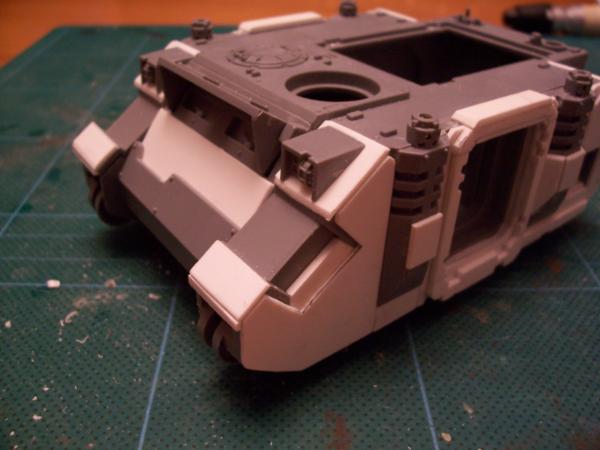 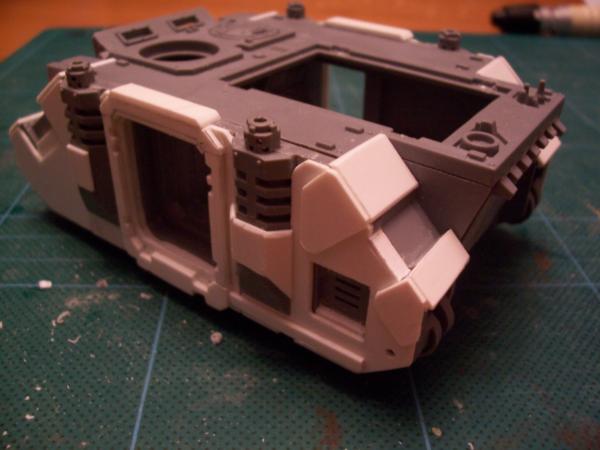 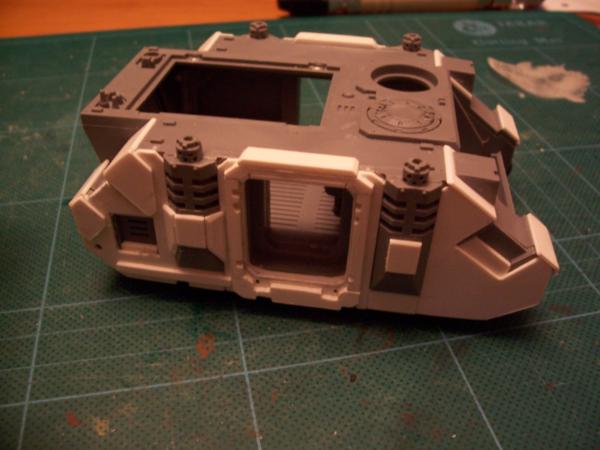 next stage is to add some more details on the front sides and finish the exhaust armour pieces...
|
|
This message was edited 1 time. Last update was at 2011/01/29 15:28:42
|
|
|
|
|
2011/01/29 15:48:34
Subject: Ruglud's NEW Space Marine Blog
|
|

Stabbin' Skarboy
|
Impressive work Ruglud.
|
monkeytroll wrote:
In the grim darkness of the future there is only boar.
 Waagh Nazdreg! Waagh Nazdreg!
|
|
|
|
|
2011/01/29 17:47:19
Subject: Ruglud's NEW Space Marine Blog
|
|
Fixture of Dakka
|
Wow. Really impressive work and great tutorials and finished product.
I hope your painting is as good as this! 
|
Enlist as a virtual Ultramarine! Click here for my Chaos Gate (PC) thread.
"It is the great irony of the Legiones Astartes: engineered to kill to achieve a victory of peace that they can then be no part of."
- Roboute Guilliman
"As I recall, your face was tortured. Imagine that - the Master of the Wolves, his ferocity twisted into grief. And yet you still carried out your duty. You always did what was asked of you. So loyal. So tenacious. Truly you were the attack dog of the Emperor. You took no pleasure in what you did. I knew that then, and I know it now. But all things change, my brother. I'm not the same as I was, and you're... well, let us not mention where you are now."
- Magnus the Red, to a statue of Leman Russ
|
|
|
|
|
2011/01/30 02:22:31
Subject: Re:Ruglud's NEW Space Marine Blog
|
|
Omnious Orc Shaman
A long time ago in a galaxy far, far, away...
|
Thanks for the kind comments folks, the Rhino is a cool model and hopefully my additions will increase the coolness in some way. In terms of a tutorial, I'm making most of this up as I go, but may do a tutorial for the next Rhino I build, watch this space. 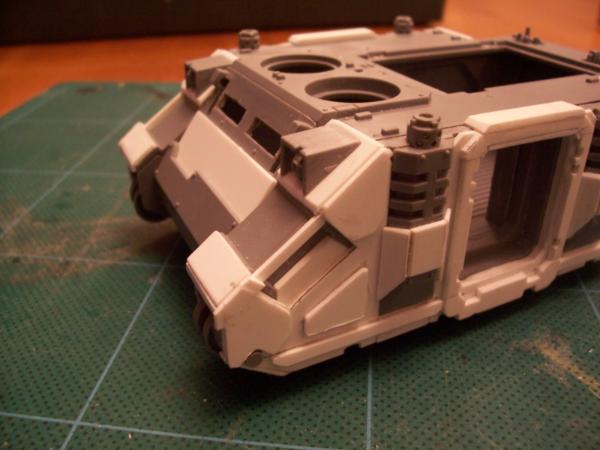  Work has progressed on the front armour plates, have also cut out the windows on the drivers cabin - will replace this with clear pastic so as to get a reflection when looking head on - interior of the drivers cabin will be painted black, not detailing it, just think the clear plastic will look good... Have also been considering adding LEDs for the actual lights, so the cabin may become the battery holder... Thought in progress on this... Rough edges and joins to be worked on next. Cheers, R
|
|
This message was edited 2 times. Last update was at 2011/02/04 01:07:15
|
|
|
|
|
2011/01/30 09:56:58
Subject: Ruglud's NEW Space Marine Blog
|
|
Thunderhawk Pilot Dropping From Orbit
|
Great progress mate. Tutorial wise just keep those pictures coming and it a tutorial in itself. One question though what thickness cards are you using?
|
No trees were hurt in the making of this sig, however many electrons were disturbed.
|
|
|
|
|
2011/01/30 10:36:37
Subject: Re:Ruglud's NEW Space Marine Blog
|
|
Death-Dealing Devastator
London
|
Looks great mate. I would love to see the LED lights on it as well. If this is the standard of your normal rhino's I can't wait to see whatever you do to a centrepiece model!
|
|
|
|
|
|
2011/01/31 00:24:55
Subject: Re:Ruglud's NEW Space Marine Blog
|
|
Omnious Orc Shaman
A long time ago in a galaxy far, far, away...
|
taffiarti wrote:Looks great mate. I would love to see the LED lights on it as well. If this is the standard of your normal rhino's I can't wait to see whatever you do to a centrepiece model!
Cheers, saw the LEDs done in another thread so may steal that one... These are almost my first 40k models in over 20 years of gaming - I was always a Fantasy player, then moved to historical (ww2, Old West, Vikings to name a few). I have dabbled with a few single models but never got immersed in the 40k lore - until a few years back when I started my IG diorama. The plan is for these to be the start of a new force, let's see how it goes... BTW, here's a link to a cool LED rhino build http://www.dakkadakka.com/dakkaforum/posts/list/309917.page Lennysmash wrote:Great progress mate. Tutorial wise just keep those pictures coming and it a tutorial in itself. One question though what thickness cards are you using?
Cheers Lennysmash, more pictures are on the way (see below!) I have two thicknesses of plasticard at the moment, bpught them years and years ago from a model airplane shop, not sure of the measurement, will check in the morning and post - think it'll be something like 2mm & 4mm? I also use a lot of thin card, again not sure but think it is 220gsm grade and is all approx 50mm x 80mm sized (credit card size). Got this from where I used to work in a printing centre, and was the offcuts from where we made name badges for corporate events. So here's the next steps - pretty much finished then decided to add some extra rear armour around the loading ramp and also another plate to the front. Gotta go over the whole lot and add rivets, although haven't decided the best approach to this? I read that shallow drilled holes with the contents of a water filter stuck inside works well, anyone used this approach before or any other suggestions? 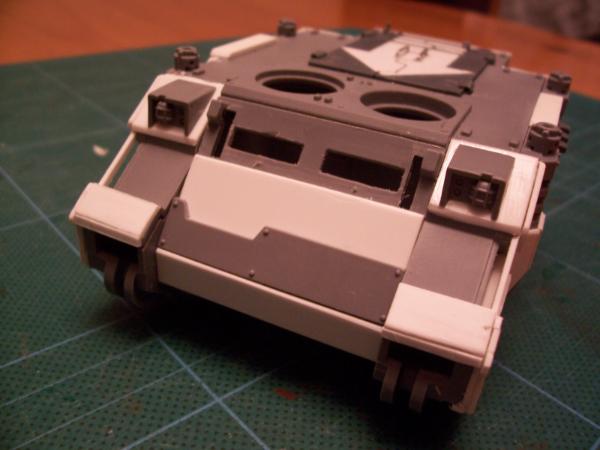 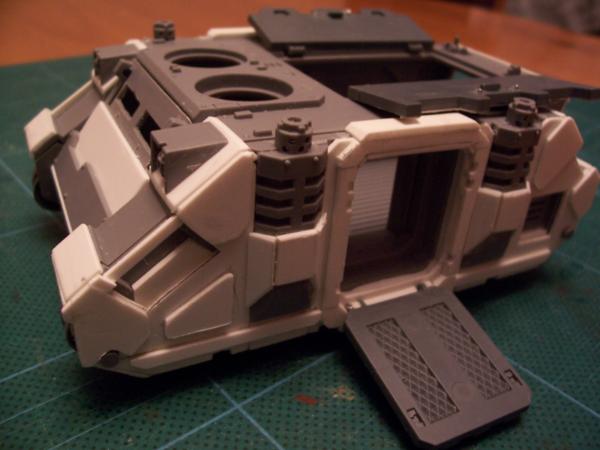 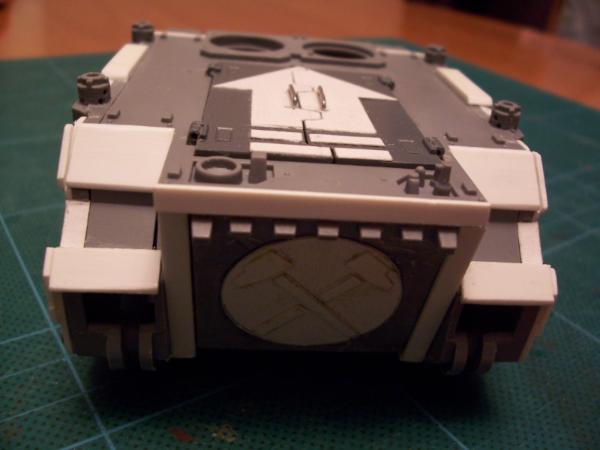 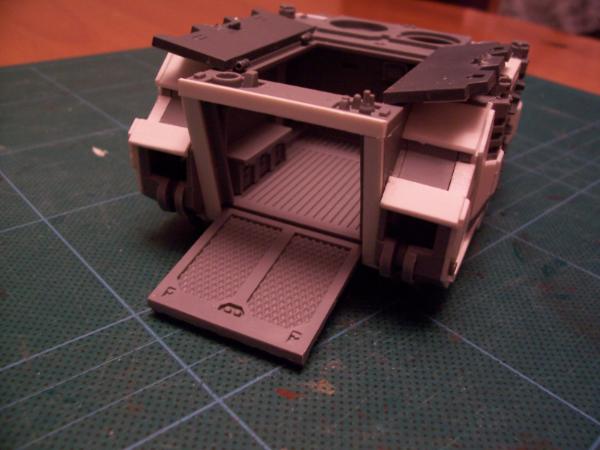 until next time... R
|
|
This message was edited 2 times. Last update was at 2011/01/31 00:52:45
|
|
|
|
|
2011/01/31 01:46:28
Subject: Ruglud's NEW Space Marine Blog
|
|
Regular Dakkanaut
New York, Technocratic People's Republic of Vinnland
|
Nice, great work so far, appreciate the good pics showing how this is all fitting together.
|
|
|
|
|
|
2011/02/01 12:00:58
Subject: Re:Ruglud's NEW Space Marine Blog
|
|
Omnious Orc Shaman
A long time ago in a galaxy far, far, away...
|
Lennysmash wrote:Great progress mate. Tutorial wise just keep those pictures coming and it a tutorial in itself. One question though what thickness cards are you using?
Actually, the plasticard thickness I use are 1mm and 2mm, not 2mm and 4mm as previously stated, sorry about the misinformation!! 
Right, on with the build...
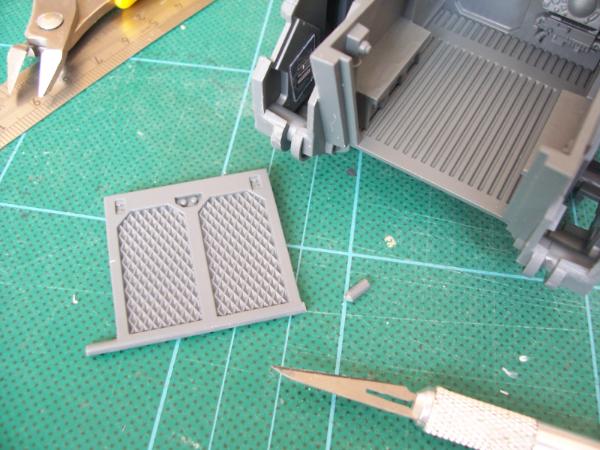
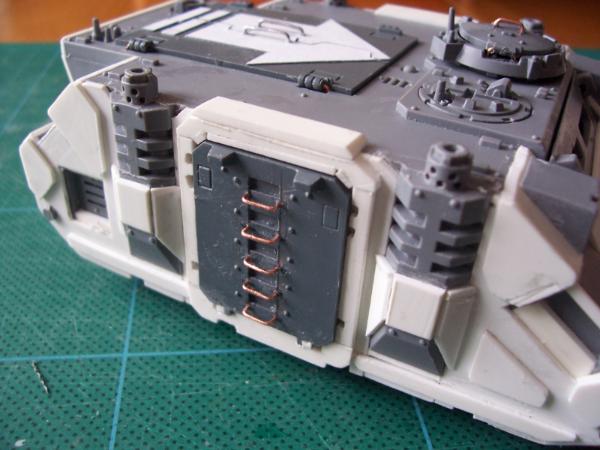
Have added grab handles onto all doors and hatches as well as replacing the hard plastic ladder on the side door with wire rungs - these are all multi use, as they not only look good, but allow me to open the hatches without damaging the (upcoming) paint work. The wire is stripped out from a thin single core electrical roll (copper). Same wire that the door/hatch hinges are made from (the original paperclips proved to be too thick and damaged the soft plastic the rhino is made from).
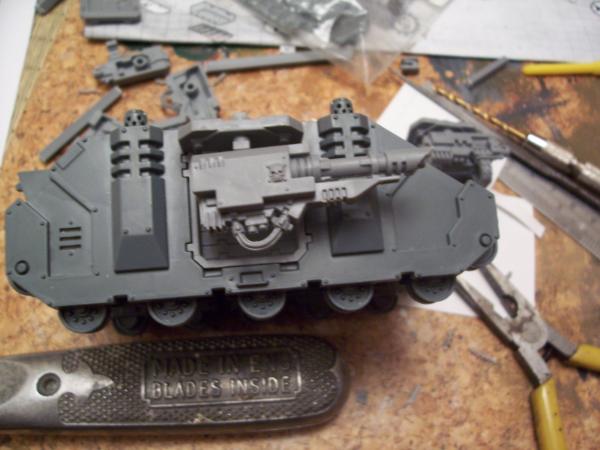
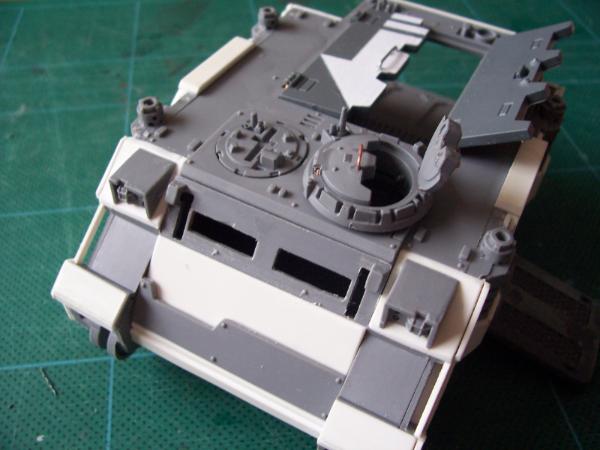
Top hatch hinged, plus rotates. The smaller hatch also rotates freely...
Also added an extra armour plate on the front under the cabin armour, can just about see it in this image...
Here's the workings for the hatches - these wires are paperclips bent and glued into the top hatch but runs free under the body (copper wire was too soft for this)
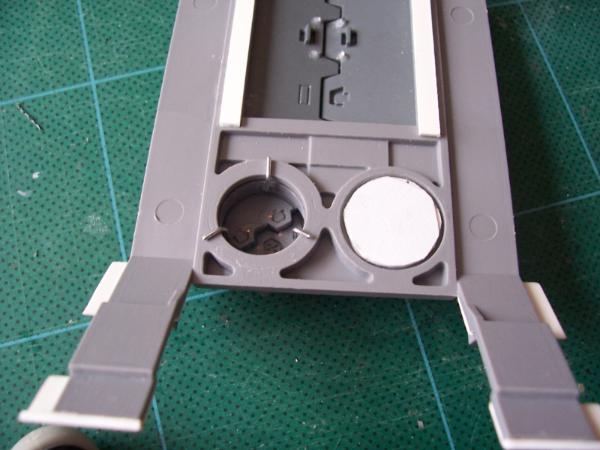
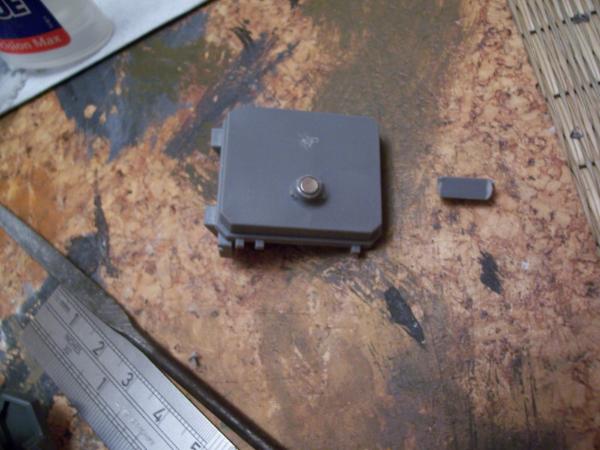
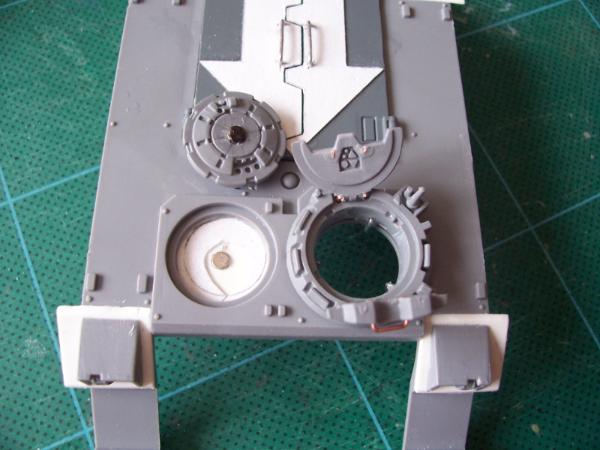
Small hatch is magnetised with the plasticard insert to hold the pivot magnet. I'll be adding the missile launcher on top of this hatch and wanted to have the full 360º rotation, along with the vertical movement of the weapon mount.
To do:
Fill all gaps on the pasticard armour
Add rivets
Add extras such as weapons, smoke launchers, tow cable, tow hook
Add battle damage to armour
Add tracks
Add LEDs (maybe)
PAINT (gotta get an airbrush...)
I may move back the Predator now and although I wasn't going to, add some extra armour to this one, but I may follow the Forge World version a bit closer - plus is less work
Cheers,
R
P.S. Any suggestions for how to add/model rivets are most appreciated - I have lots to do on this Rhino!!
|
|
|
|
|
|
2011/02/01 12:48:32
Subject: Ruglud's NEW Space Marine Blog
|
|

Phanobi
Canada,Prince Edward Island
|
Great work on the extra armour! The small details really set it out from the crowd.
|
|
|
|
|
|
2011/02/01 17:45:09
Subject: Ruglud's NEW Space Marine Blog
|
|
Wrathful Warlord Titan Commander
|
Rivets can be done by drilling a slight divet into the surface and then stcking a carbon bead from a water filter into the divet [carefully break open the plastic filter and you will have thousands of beads].
You can then flatten the bead with a file/sandpaper/knife to taste.
This is all looking great by the way.
|
How do you promote your Hobby? - Legoburner "I run some crappy wargaming website " |
|
|
|
|
2011/02/02 14:27:52
Subject: Ruglud's NEW Space Marine Blog
|
|
Omnious Orc Shaman
A long time ago in a galaxy far, far, away...
|
Commander Cain wrote:Great work on the extra armour! The small details really set it out from the crowd.
Cheers, yeah I reckon it's looking good.
notprop wrote:Rivets can be done by drilling a slight divet into the surface and then stcking a carbon bead from a water filter into the divet [carefully break open the plastic filter and you will have thousands of beads].
You can then flatten the bead with a file/sandpaper/knife to taste.
This is all looking great by the way.
I reckon this is the way to go, thanks for the advice.
Back to the Pred and working on the extra armour a la Forgeworld.
These are what I'm using as the basis for this build
http://www.dakkadakka.com/gallery/50321-Apc%2C%20Rhino%2C%20Space%20Marines%2C%20Ultramarines%2C%20Warhammer%2040%2C000.html
http://www.forgeworld.co.uk/Warhammer-40000/MKIIc-RHINO-DOZER-BLADE.html
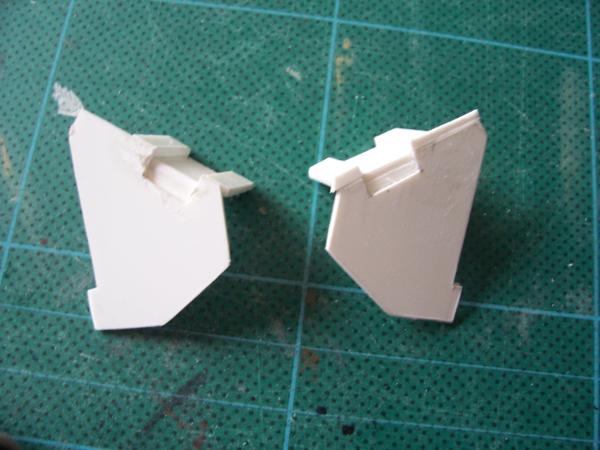
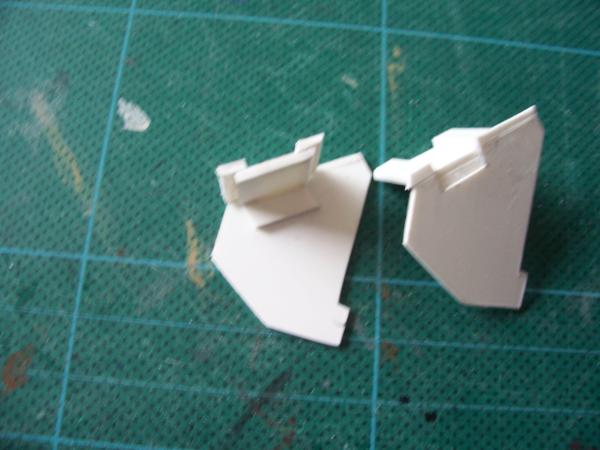
So on to my progress, door surrounds built for both sides (2mm plasticard all round)

Front armour made for both sides as well - mixture of 2mm and 1mm armour. Some further pieces needed to make it look nice and chunky, but it's fitting niccely on the model...

R
|
|
|
|
|
|
2011/02/02 16:20:56
Subject: Ruglud's NEW Space Marine Blog
|
|
Thunderhawk Pilot Dropping From Orbit
|
Nice plans for the dozer blade, personally though I think the repressor dozer would look better.
|
No trees were hurt in the making of this sig, however many electrons were disturbed.
|
|
|
|
|
2011/02/06 11:01:44
Subject: Re:Ruglud's NEW Space Marine Blog
|
|
Omnious Orc Shaman
A long time ago in a galaxy far, far, away...
|
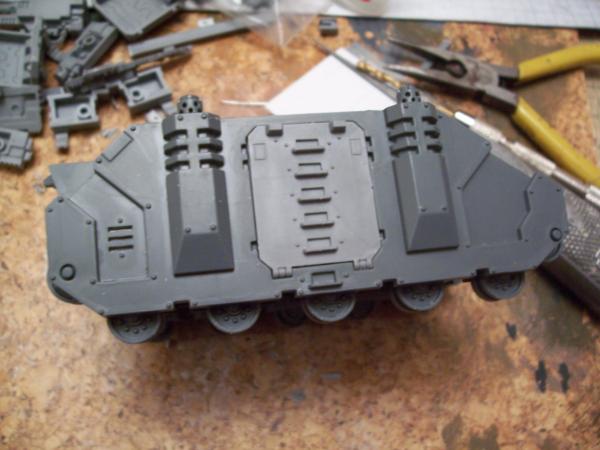
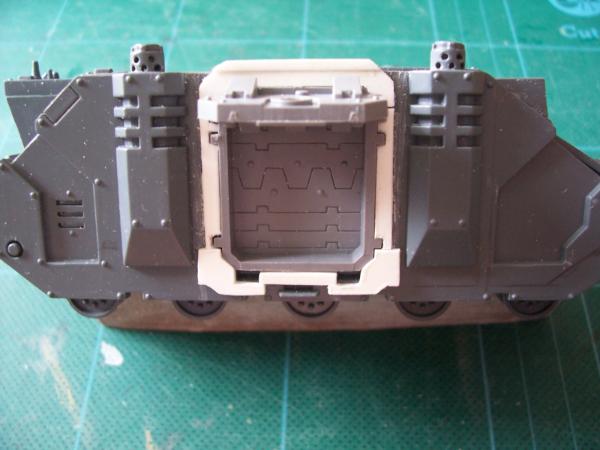
Rear armour finished! 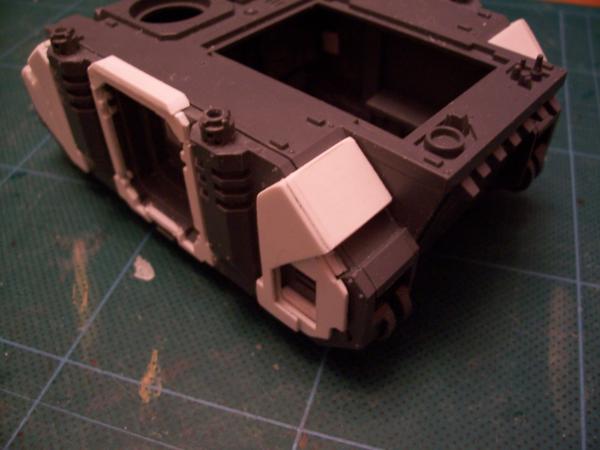 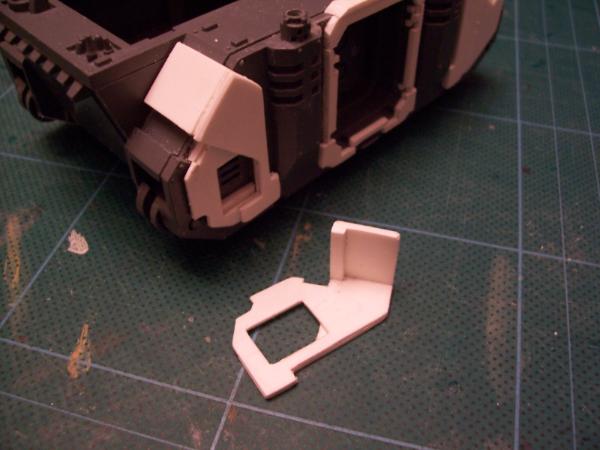 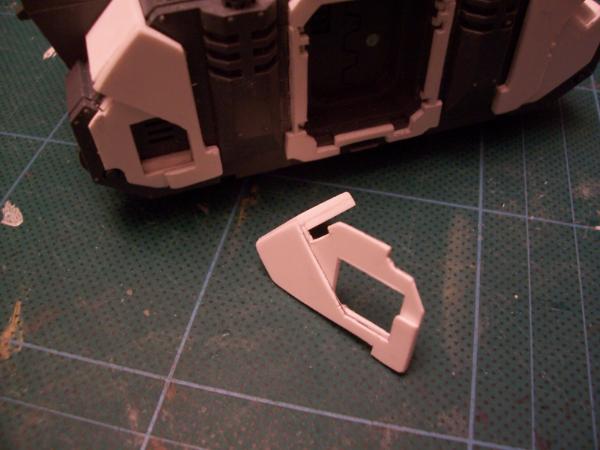 Just blu-tacked on front and rear amour for the photos, have constructed them in one piece so will glue it once the insides of the pred are painted and I've glued down the hull. TO DO: Add armour to exhausts Fill all gaps on the pasticard armour Add rivets Add extras such as weapons, smoke launchers, tow cable, tow hook Add battle damage to armour Add tracks Add LEDs (maybe) PAINT (gotta get an airbrush...) So basically, same as for the Rhino! R
|
|
This message was edited 2 times. Last update was at 2011/02/06 11:03:08
|
|
|
|
|
2011/02/06 12:21:38
Subject: Ruglud's NEW Space Marine Blog
|
|
Thunderhawk Pilot Dropping From Orbit
|
|
No trees were hurt in the making of this sig, however many electrons were disturbed.
|
|
|
|
|
2011/02/06 15:21:25
Subject: Ruglud's NEW Space Marine Blog
|
|
Omnious Orc Shaman
A long time ago in a galaxy far, far, away...
|
LOL, very true (and love the Star Wars comparison!) I guess we all need our Achilles heel, otherwise the SMs would just wipe the board clean of their foe without problem, oh wait, isn't that what all the old fluff used to say about them!!
|
|
|
|
|
|
2011/02/06 16:49:55
Subject: Ruglud's NEW Space Marine Blog
|
|
Thunderhawk Pilot Dropping From Orbit
|
Indeed it did, but now you can run a marine off the board I think. So much for "Death or Glory" lol.
|
|
This message was edited 2 times. Last update was at 2011/02/06 17:22:43
No trees were hurt in the making of this sig, however many electrons were disturbed.
|
|
|
|
|
2011/02/06 17:12:52
Subject: Ruglud's NEW Space Marine Blog
|
|
Blood Angel Terminator with Lightning Claws
|
this looks really cool ive not seen a rhino get pimped before.keep up the quality work.
|
|
|
|
|
|
2011/02/06 18:33:42
Subject: Ruglud's NEW Space Marine Blog
|
|
[SWAP SHOP MOD]
Decrepit Dakkanaut
OH-I Wanna get out of here
|
Very impressive rhino chassis, keep at it! Any plans for more vehicles when done?
|
|
|
|
|
2011/02/06 19:27:49
Subject: Ruglud's NEW Space Marine Blog
|
|
Omnious Orc Shaman
A long time ago in a galaxy far, far, away...
|
Lennysmash wrote:Indeed it did, but now you can run a marine off the board I think. So much for "Death or Glory" lol.
Yeah, I hear you on that one... shingouki wrote:this looks really cool ive not seen a rhino get pimped before.keep up the quality work.
Cheers, I love the working hatches, LEDs would def give it more of the 'pimped' effect, just not sure whether I'm going this route or not. whalemusic360 wrote:Very impressive rhino chassis, keep at it! Any plans for more vehicles when done?
Thanks, yep, there'll definitely be a few more Rhino based tanks - Vindicator, Whirlwind are on my to do list, I'll also armour these up although will be the Pred style rather than the Rhino. Think a Land Raider or two may appear at some point along with some drop pods, bikes and landspeeders. Might also scratchbuild a Thunderhawk or two if / when I get some spare time (although will need to stock up on some foam board and plasticard) Ohh and some troops of course !!
|
|
This message was edited 1 time. Last update was at 2011/02/06 19:28:28
|
|
|
|
|
2011/02/06 19:53:43
Subject: Ruglud's NEW Space Marine Blog
|
|
Violent Space Marine Dedicated to Khorne
Make a right past the Eye of Teror...no a left...wait a right!
|
Awesome conversion work!!!
Can you post photos of how you did the interior rhino doors? (do they swing open or slide?) Thanks.
|
|
|
|
|
|
|
|