Switch Theme:

Lighting a Rhino with LED's  [RSS] Share on facebook Share on Twitter Submit to Reddit
»
Author Message
Advert


Forum adverts like this one are shown to any user who is not logged in. Join us by filling out a tiny 3 field form and you will get your own, free, dakka user account which gives a good range of benefits to you:
  • No adverts like this in the forums anymore.
  • Times and dates in your local timezone.
  • Full tracking of what you have read so you can skip to your first unread post, easily see what has changed since you last logged in, and easily see what is new at a glance.
  • Email notifications for threads you want to watch closely.
  • Being a part of the oldest wargaming community on the net.
If you are already a member then feel free to login now.


Made in us
Last Remaining Whole C'Tan


Pleasant Valley, Iowa

Well, my abnormal fetish for putting lights in 40k models has not abated. Here is my latest work in progress - an Ultramarines Rhino. Obviously, it's only partially painted.


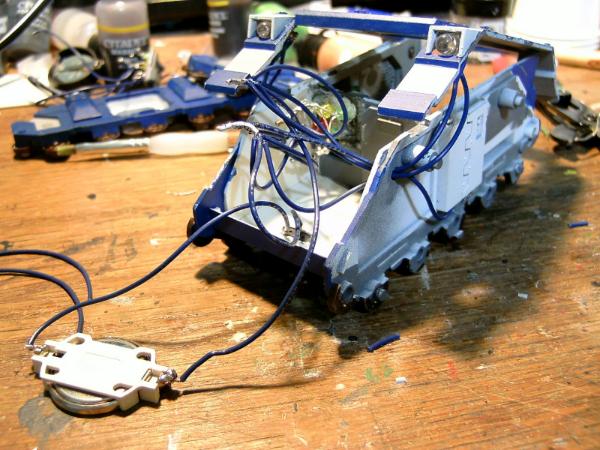
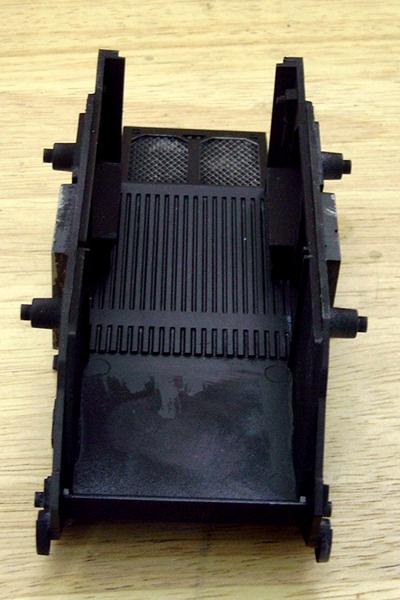
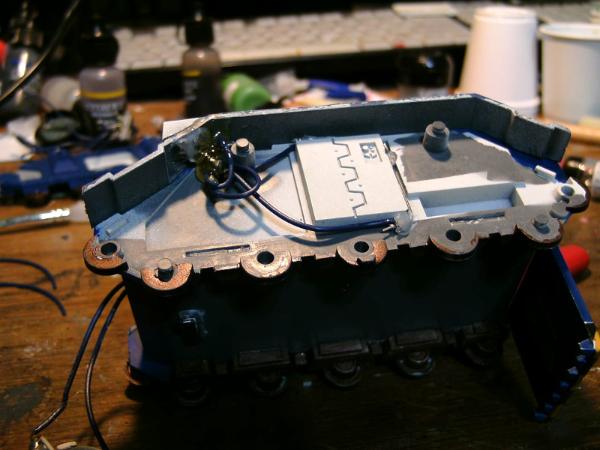
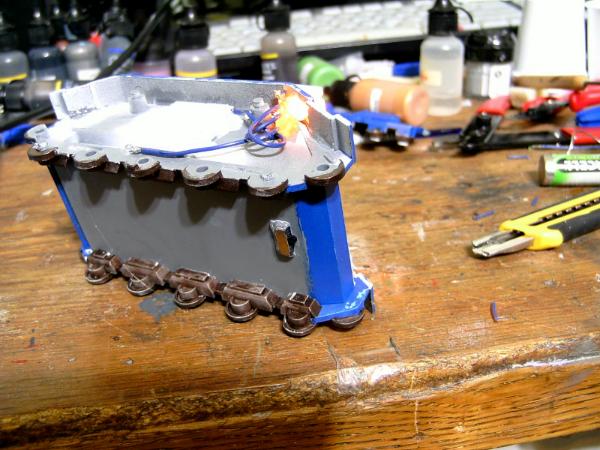
Here it is with all the electrical stuff done. All the joins are soldered. This image gives you an idea of where I situated all the wiring. I first painted the internals and the back door, and assembled the inner sides, inside bulkhead, and outer door together so I still had access for wiring.


Here is the top hatch being lowered into place.


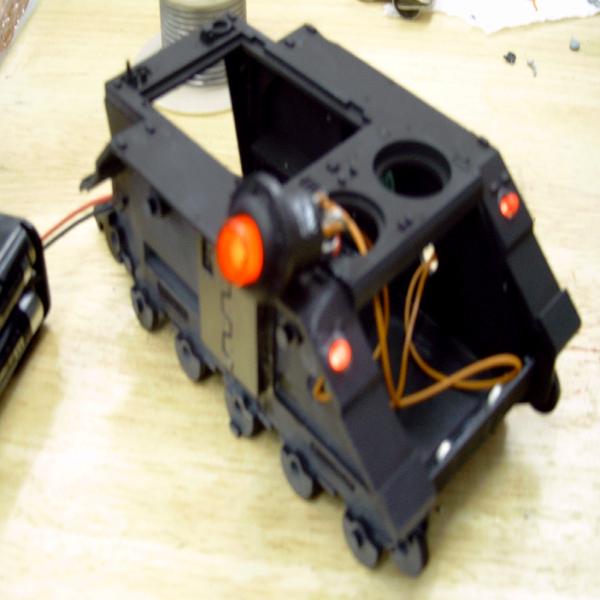
This shows you how I did the headlights. I cut a hole in the top, stuck them in, and used a hot glue gun to fix them in place, as well as keeping the terminals from touching when it gets moved about. To avoid the long terminals from the side LED's from touching, they wrap around the side door frames.


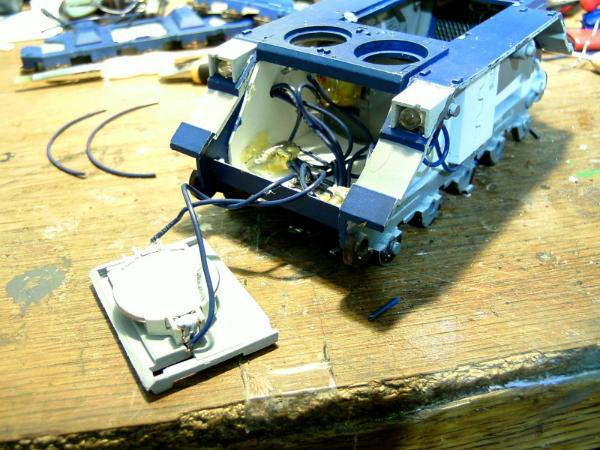
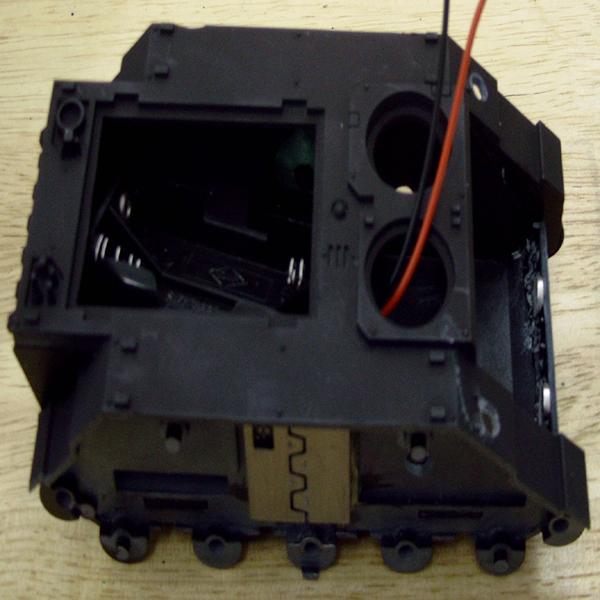
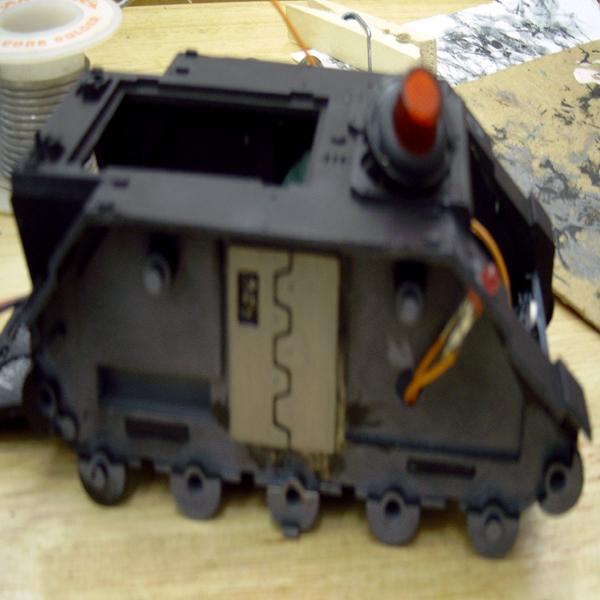
Here is how the battery holder will attach to the front panel, and I've started hot gluing the solders to the model. Unfortunately, I glued the battery cover on, and forgot that I need to prime and paint it, which is a lot more difficult attached to the rhino. Luckily it came off fairly easy with no damage. The chip in the right corner (which you will see in later pictures) is how it arrived from Forge World. Good going, guys, as always.


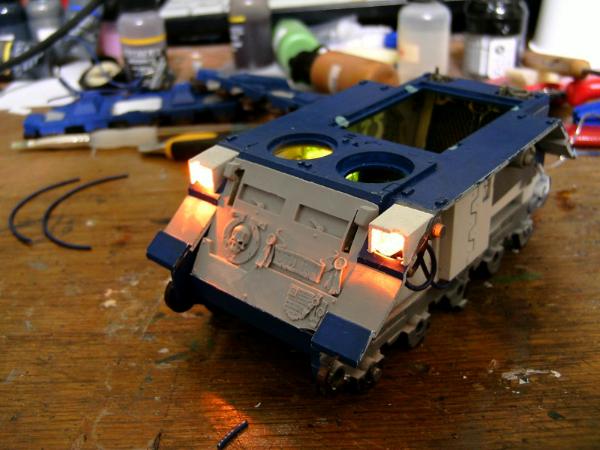
Here is a shot with then top on but not yet glued in place. Headlight test. I still have time to solder in an emergency resistor if need be, but it looks OK without. At this point I glued on the top hatch.


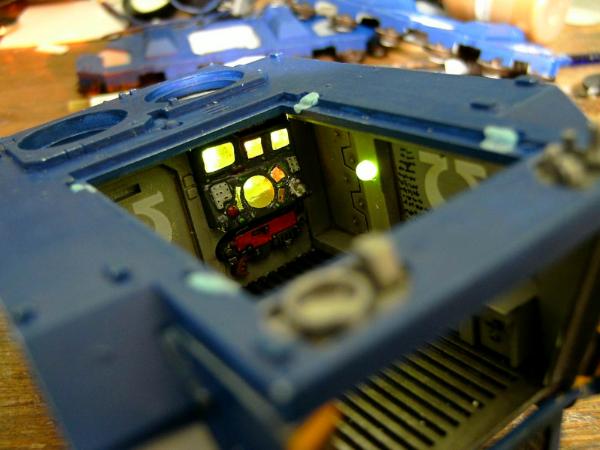
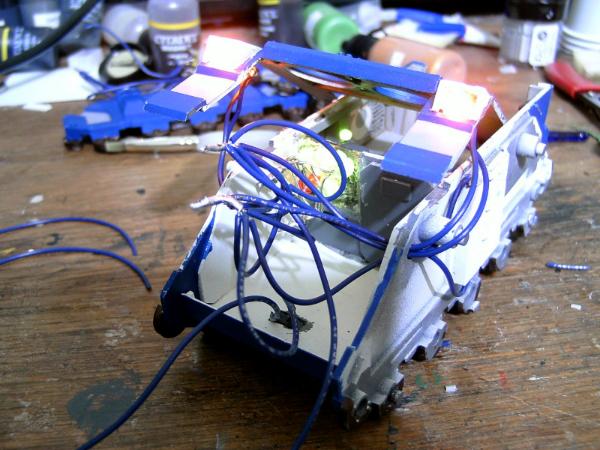
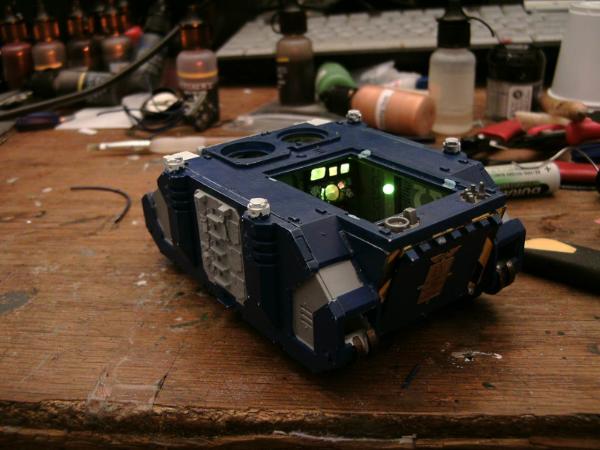
Here is a peek inside the top. I carefully cut out the computer console, made a cast of it, and then recast it in clear polyester resin. Once it cured, I glued it in place and used 4 different LED's to light it. In this picture, the green ones sort of overwhelm the red and orange ones, but it's a lot easier to see the light differences in the actual model (and even here, the orange one stands out well).


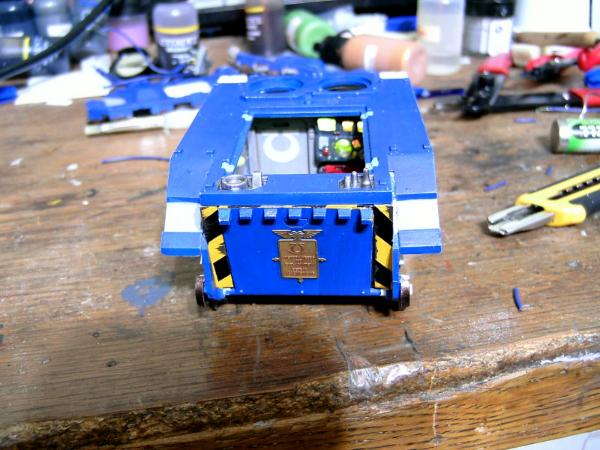
Here is a shot of the back hatch closed. There is a little piece of brass etch on it. On a side note, my brass etch came pretty badly tarnished. I emailed Forge World about how to best clean it, and got their standard answer (no response). I decided to use Brasso, since it's got brass right in the name. As it turns out, I might not use it again. It did remove the tarnish post haste, but it also subtly changed the color and character of the brass - way less shiny and bright. Once I washed it with Gryphonne Sepia (as pictured here) it didn't matter too much, but there might be a better way to clean it. Of course, if the whole model is getting Dullcote anyway, maybe a moot point.


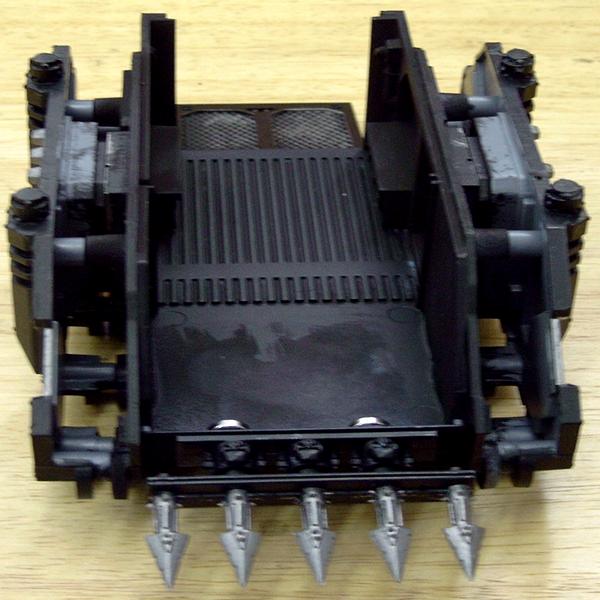
A shot of the underside, showing the power switch.


And here we have the sides on, test fitting. Side doors are also test fit into place with some blue-tac. Not yet primed or painted.


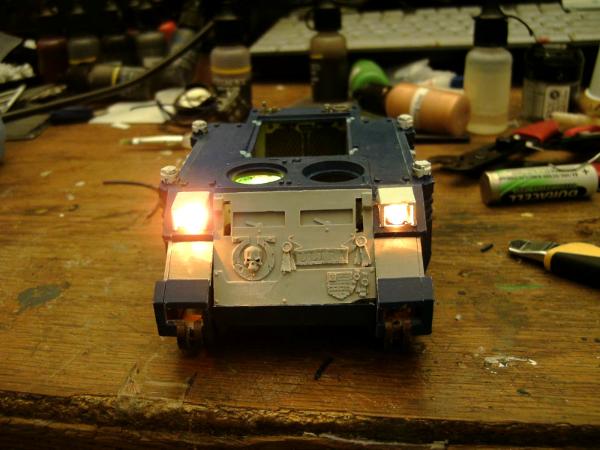
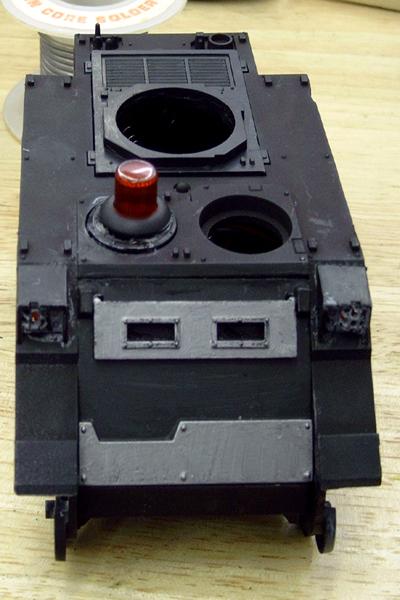
Finally, here is the front-on view. Lights are bright but not too bright. The lights appear far more orange then they actually are - my camera's color correction isn't great, and Ansel Adams I'm not. You can prominent see the chip in the bottom right of the front plate, which will be covered with a purity seal or some other appropriate piece of bling.


I'd like to be able to write a tutorial that explains how to light your models with more emphasis on the electrical, rather then the mechanical. Unfortunately, I don't feel qualified to do so responsibly. I don't have a great feel for such things as correctly calculating voltage for maximum battery life, what sorts of LED's are best, how LED viewing angles work - essentially I take a shotgun approach to ordering electronics like LEDs and batteries (when they are 10 or 12 cents each, I don't feel bad about ordering 6 or 10 of 10 different types) and seeing what works out. Any sort of tutorial I wrote would require a parts list, and I'd hate to think I had someone order LED's that didn't work, or burned out in an hour, or something. So I won't do that. Instead, I will apologize for my lack of detail, and point you towards the vendors I use for the electrical components:

All-Electronics has lots of good kits for blinking lights as well as other basic stuff.

Electronic Goldmine is another good generalized vendor with all sorts of stuff.

Future Electronics I'm very, very hesitant to recommend these guys. They have the best storefront, best item descriptions, and the best inventory - they have everything. One problem with the above two guys is they both tend to have almost everything I want, but are always missing like one battery holder or something. Not a problem with Future Electronics. The problem is - they overcharged me. My order was $33, and they put through a bunch of charges - like 4 - which totaled $44. When I emailed them they prompted refunded the overage without delay or explanation. Normally I would not order from such a company again, but rather then pay 2 different shipping charges for one set of stuff I wanted, I ordered from them again - and the exact same thing happened. I ordered X amount of stuff, and they ran though 4 or 5 charges totalling X + 33% or so. This time I called, and they have a department, apparently, that handles overcharges. I left a message, and got an email later from them explaining the problem was both orders, I ordered lithium batteries - which have a special handling charge (indeed, they were packaged separately, and in a manner which would have been appropriate for a nuclear weapon. She then refunded the money anyway. The batteries are available from drugstores anyway in the hearing aid section. My impression from their site is that they are a multibillion dollar organization that really isn't geared for selling to the public but mostly sells to large organizations and governments which I suspect don't read their invoices as carefully as I do - but that's just speculation. So, if I order from them in the future, I might just forgo the batteries, and give them a "last strike" type order. The site really is nice, and they really do have everything for cheap.


 lord_blackfang wrote:
Respect to the guy who subscribed just to post a massive ASCII dong in the chat and immediately get banned.

 Flinty wrote:
The benefit of slate is that its.actually a.rock with rock like properties. The downside is that it's a rock
 
   
Made in gb
Regular Dakkanaut


what i want to see is a light up razerback with two spinning assault cannons!
   
Made in de
Decrepit Dakkanaut


Impressive! Good work!
Now try to fit 10 sitting Space Marines in it

Hive Fleet Ouroboros (my Tyranid blog): http://www.dakkadakka.com/dakkaforum/posts/list/286852.page
The Dusk-Wraiths of Szith Morcane (my Dark Eldar blog): http://www.dakkadakka.com/dakkaforum/posts/list/364786.page
Kroothawk's Malifaux Blog http://www.dakkadakka.com/dakkaforum/posts/list/455759.page
If you want to understand the concept of the "Greater Good", read this article, and you never again call Tau commies: http://en.wikipedia.org/wiki/Utilitarianism 
   
Made in us
Crafty Bray Shaman


Looks really cool.Anybody want to go Night fighting 'nids ?


Made in us
Regular Dakkanaut


Very cool. If you want really small lights or many lights you can do a central LED and run fiber optic cable from that out to where you want all the lights to be.

This should enable you to have many many lights and very small lights!

Chaos Undivided - The Pyre 
   
Made in us
Violent Space Marine Dedicated to Khorne


Hillsboro, OR

What kind of battery and battery holder do you use? Personally I only do the headlights but wind up having to use 4AAA batteries to power it. But I do have to say that I like my switch design a little better as it is a push button that lights up, effectively turning it into a working searchlight.
   
Made in us
Last Remaining Whole C'Tan


Pleasant Valley, Iowa

hpred wrote:What kind of battery and battery holder do you use? Personally I only do the headlights but wind up having to use 4AAA batteries to power it. But I do have to say that I like my switch design a little better as it is a push button that lights up, effectively turning it into a working searchlight.


All of them are being driven by a 3v button cell. I'd really like to use a push on/off non-momentary switch but hard to find one that's small enough.

 lord_blackfang wrote:
Respect to the guy who subscribed just to post a massive ASCII dong in the chat and immediately get banned.

 Flinty wrote:
The benefit of slate is that its.actually a.rock with rock like properties. The downside is that it's a rock
 
   
Made in gb
Jovial Plaguebearer of Nurgle


Your backlit instrument panel is the tasty, crumbly cheddar made from the milk of the Awesome-Cow.

I was pleased with the oscilloscope I painted on the one in my Vindicator but this is immense.
   
Made in us
Violent Space Marine Dedicated to Khorne


Hillsboro, OR

Ouze wrote:
hpred wrote:What kind of battery and battery holder do you use? Personally I only do the headlights but wind up having to use 4AAA batteries to power it. But I do have to say that I like my switch design a little better as it is a push button that lights up, effectively turning it into a working searchlight.


All of them are being driven by a 3v button cell. I'd really like to use a push on/off non-momentary switch but hard to find one that's small enough.


What's the voltage on your LED's then? That sounds to low for all of the LED's your running.


Photo of what I've done. The LED's are behind the Grill for the Lights so that the lights shine threw the grill. I drilled out the lights with 1MM drill bit to keep the grill's intact.
   
Made in au
Water-Caste Negotiator


Perth, Western Australia

Very nice!

Check out my Tutorial: http://www.dakkadakka.com/dakkaforum/posts/list/302457.page

Necromunda Tally: Chemos' Seekers
W-1 L-1 D-0 
   
Made in us
Last Remaining Whole C'Tan


Pleasant Valley, Iowa

hpred wrote:
What's the voltage on your LED's then? That sounds to low for all of the LED's your running.


Here is the specific battery. So far as the LED's, i used a variety but the average voltage on them was 2.2v with the headlights being 3v. I had originally intended to drive them with a pair of those cells - the battery holder holds 2 stacked - but it turned out a single battery drove them OK, so I went with that instead. Part of the reason I can't write a tutorial for this - I don't understand why 3v was enough when 6v should have been required.

For my next trick, as someone suggested, I got some fiber optic cable, and will do something with that. It came too late to incorporate them into this one.

 lord_blackfang wrote:
Respect to the guy who subscribed just to post a massive ASCII dong in the chat and immediately get banned.

 Flinty wrote:
The benefit of slate is that its.actually a.rock with rock like properties. The downside is that it's a rock
 
   
Made in us
Angelic Adepta Sororitas


Texas AM

Yeah that is pretty awesome. It'd be even cooler if you could get the lights into drop pods.
   
Made in us
Violent Space Marine Dedicated to Khorne


Hillsboro, OR

Ouze wrote:
hpred wrote:
What's the voltage on your LED's then? That sounds to low for all of the LED's your running.


Here is the specific battery. So far as the LED's, i used a variety but the average voltage on them was 2.2v with the headlights being 3v. I had originally intended to drive them with a pair of those cells - the battery holder holds 2 stacked - but it turned out a single battery drove them OK, so I went with that instead. Part of the reason I can't write a tutorial for this - I don't understand why 3v was enough when 6v should have been required.

For my next trick, as someone suggested, I got some fiber optic cable, and will do something with that. It came too late to incorporate them into this one.


I know how that goes. I've had people tell me that I run to much voltage, but when I show them all of the packaging they go...OH?. It's funny how you can wire something up just fine like this. Now if only we could fine a website that can explain to normal people how many volts you need for what lights it would make this a lot easier as I have to ditch the interior of my Rhino's for the power pack.
   
Made in au
Anti-Armour Swiss Guard


Newcastle, OZ

I used to have a site bookmarked.

You plugged in the # of LEDS, their forward voltage (trigger voltage, what it takes to get them to glow), your input voltage and whether you wanted them series or parallel and it spat back wiring diagrams and resistance values.

Wish I could remember what it was called.


Although this one is handy.
http://www.terragenesis.co.uk/infopages/page450.html

This message was edited 2 times. Last update was at 2010/08/10 01:03:46


I'm OVER 50 (and so far over everyone's BS, too).
Old enough to know better, young enough to not give a ****.

That is not dead which can eternal lie ...

... and yet, with strange aeons, even death may die.
 
   
Made in us
Last Remaining Whole C'Tan


Pleasant Valley, Iowa

Wow, that site is really handy. Thank you.

 lord_blackfang wrote:
Respect to the guy who subscribed just to post a massive ASCII dong in the chat and immediately get banned.

 Flinty wrote:
The benefit of slate is that its.actually a.rock with rock like properties. The downside is that it's a rock
 
   
Made in us
Perfect Shot Dark Angels Predator Pilot


california, USA

WOW!! im always obbsessed with LED's in 40K. id tottally pay you for conversion, this is great work!

Follow me if i advance
kill me if i retreat
Avenge me if i die 
   
Made in us
Fighter Pilot


The Ark

Khargrim wrote:what i want to see is a light up razerback with two spinning assault cannons!


+ Over 9000
   
Made in us
Violent Space Marine Dedicated to Khorne


Hillsboro, OR

Well, I just got finished with LED Rhino 3. I did take pics while I was working on it and have them posted in the Gallery. But it would be better to just post them here.

1: Base coated the walls & floor. Then glued them together with the back door able to open and close. Back door was hand base coated instead of spray painted.


2a: I placed the magnetized dosser blade and glued the magnets in front instead of using Green stuff. Personally I like the look of the Chaos dosser blade better then the Space Marine one.


2b: Using side doors that where already magnetized so I can magnetized the doors properly.


3: Inserted the power-box (4AAA) into the chassis to check the room and pulled the wires threw where the switch / searchlight goes.


4: Started to connect the wiring. To this point I have the Right side headlight connected. The holes are made using the standard bit found in the Dremel kit. It's shaped kinda like an auger.


5: Wiring Done and tested. I like red for the searchlight and headlights as it is used by modern combat forces for night operations.


6: Basically finished. Headlight grills are attached, I used a 1MM drillbit to drill out the headlights and leaving the grills as much intact as I could. I also do not glue down the sides so that I can get to the wires if I ever need to replace the LED's. Now I just have to add the Treads and it's finished.


Already finished Light-up Rhino's I've done.


Questions, Comments?
   
Made in jp
Squishy Squighound


Japan

Incredible!
   
Made in us
Sure Space Wolves Land Raider Pilot


I have an LED monolith and Immolator in my gallery. Going to shrink the power source on the immolator after im finished m,oving to alaska.
To OP nice work on the Ultramarines Rhino. I love the interior lights. I havnt done that myself yet. I would suggest though that you keep the wiring shorter. I do a complete fit test before i solder anything and it helps cut back on the clutter.


Automatically Appended Next Post:
@Hpred. Is that the on/off button coming out of the right port? It looks a little awkward. IMHO it takes away from the whole lighting. Nice job but i think you would be able to do better with a smaller more inconspicuous switch.
[Thumb - 66589_md-LED,%20Monolith,%20Necrons.jpg]

[Thumb - 78312_md-LED.jpg]

This message was edited 3 times. Last update was at 2010/09/11 18:16:10


rokitchikin: Successful Trades: 10
With: DemonBunnyMan, Envy89, CptJake(2), 31rls31, jamesessioneinm WingWong, kabniel, !$#, EOD Tech, bobdollio, swcorwyn


Forum Index » Painting & Modeling
Go to: