| Author |
Message |
 |
|
|
|
|
Advert
|
Forum adverts like this one are shown to any user who is not logged in. Join us by filling out a tiny 3 field form and you will get your own, free, dakka user account which gives a good range of benefits to you:
- No adverts like this in the forums anymore.
- Times and dates in your local timezone.
- Full tracking of what you have read so you can skip to your first unread post, easily see what has changed since you last logged in, and easily see what is new at a glance.
- Email notifications for threads you want to watch closely.
- Being a part of the oldest wargaming community on the net.
If you are already a member then feel free to login now. |
|
 |
2010/06/16 16:54:44
Subject: Ultramarines Tactical Squad, from start to finish.. help?
|
|

Fresh-Faced New User
|
Alright, first off, I'm sorry if there's another thread just like this. Tried a bit of searching but all I came up with was people showing off exceptionally goodlooking models..
I'm sitting here with a box of 10 tactical marines, and basically wondering what to do  Used to play Warhammer a bit but was never very good at painting, and figured I'd try to put out at least decent models this time. I recently got a small pack of 3 marines as a gift and used those for exercise, but the result was fairly horrendous.
Due to this, a number of questions arose. So far I've figured the following order out, with said mess of questions included:
1. Remove models from spruce and clean any seams off.
2. Assemble models. How much assembly is enough? Given that if I assemble the entire marine it'll be very difficult to reach some areas, I'm of a mind to just put together legs, torso and head, and keep the rest separate until painting is done. Is this par for the course or is there some better order to do things in?
3. Prime models. This I do understand how to do 
4. Basecoat. Question again: Should I basecoat the entire model in one colour (ultramarine preference being blue) or should I basecoat individual parts with that particular area's colour (red for shoulderpad trimmings, golden for eagle on chest etc). Also wondering if it's a good idea to mix paint with water for this step (or indeed, mix paint with water at all), and whether or not I should paint more than one coat? I tried having multiple coats on my mentioned tiny squad of 3 marines and they just turned out.. very blotchy.
5. Washing/highlighting. Should the entire model be painted before washing/highlighting? Or should I wait to fill out the details until washing/highlighting is done?
6. Basing. Should I do this last?
Alright, that's.. a lot of text and a lot of questions. Very grateful if someone has the time and inclination to read through it and perhaps provide a little insight  I have read a number of guides but the advice is kind of all over the place, so some opinions would be welcome.
|
|
|
 |
|
2010/06/16 17:05:57
Subject: Ultramarines Tactical Squad, from start to finish.. help?
|
|

Eternally-Stimulated Slaanesh Dreadnought
|
RIGHT. Im liking this thread.
First things first: Think about what your squad is taking.
Is it a ten man squad? if so, which heavy weapons are you taking? If you're going for missile launcher (handily provided) you can go straight ahead and assemble. if you want something like a plasma cannon or lascannon or multi=melta you'll need a devastator squad pack.
Sergeant: what weapons is he taking? Note I say weapons cause he can either take just bolter (or combi-bolter) or a whole array of single hand weapons....
Assembly: Assembling the marines so they're not on bases, but with top and bottom halves glued, and all stuff like grenades, scrolls, pistols etc are on their belts (or legs) is fine. Leave the arms off and backpack so you can do the top half fully. You CAN put the helmet in, but be aware you can't paint round the back of it very easily.
Basecoat: one colour. I prefer white cause the detail isn't lost and colours look brighter.
Washing/highlighting.........ALWAYS AFTER YOU'VE PAINTED!
Basing. LAST.
|
|
|
|
|
2010/06/16 17:07:28
Subject: Re:Ultramarines Tactical Squad, from start to finish.. help?
|
|

Yellin' Yoof
|
Your order seems good. Its all personal preference. With my Orks and Tau. I assemble the torso and legs, no base. Then I prime everything. I paint and then assemble. The only thing I can tell you is PRACTICE PRACTICE PRACTICE!
I always base last.
|
 9W-oL-2T 9W-oL-2T
 0W-0L-1T 0W-0L-1T
|
|
|
|
|
2010/06/16 17:10:15
Subject: Ultramarines Tactical Squad, from start to finish.. help?
|
|
Eternally-Stimulated Slaanesh Dreadnought
|
When you're more advanced at painting you can paint the fully assembled model. but doing it in stages always is better.
|
|
|
|
|
2010/06/16 18:04:29
Subject: Ultramarines Tactical Squad, from start to finish.. help?
|
|

Stabbin' Skarboy
|
I paint my ultramarines with black prime, then coat the whole model in mordian blue, and then I paint all the "sun-lit" areas with enchanted blue (ultramarine blue might be better thought). Always wash after you paint all the details.
Hope this helps... Sorry I cant provide any pics right now though :(
EDIT:
regarding armament, this article might prove useful  http://www.dakkadakka.com/dakkaforum/posts/list/297541.page
|
|
This message was edited 1 time. Last update was at 2010/06/16 19:22:13
|
|
|
|
|
2010/06/16 18:26:57
Subject: Ultramarines Tactical Squad, from start to finish.. help?
|
|

Lady of the Lake
|
Asembling the legs torso and head is a good idea. Base the model then prime them. Then after you have finished painting the entire model attach arms and weapon. Go over any spills on the base with the primer colour then paint the base however you want.
Usually drybrushing works with bases as it leaves the detail in. Of course grass and such should probably be left until after the painting is done, painting rocks/sand etc is fine. Painting the bases also gives you a bit more control over the base themselves. Want it to look wet only build up to something like Beastial Brown and stop there, maybe give it some gloss varnish then add some static grass. Dry? Do the same (disincluding the varnish) but add a lighter colour eventually building up to a ligh drybrush of Bleached Bone onto it. Then again you could do ash bases, make it look like rubble, lava, cement, an urban area. What I'm saying is that by painting the bases rather than leaving it as is opens up a lot more options.
Some paints will need watering down though, but then again it might not need watering down. I'd suggest using a bunch of thin coats gradually building up to the colour you want from the primer. Washes aren't always needed, but in the case of metal Badab Black or Devlan Mud helps it a bit. If you accidentally go into the details then you may have to give it a wash though. Generally I use washes for doing bone or simply giving the colour a slight tint.
Finally if you're painting a metal model you'll want a decent Mat/Gloss Varnish to help prevent the paint from chipping away after use. Nothing more annoying than spending ages painting a metal model only to have it chip away over time and eventually look like crap from all the small touch ups. Of course like paint you don't want to use too much as that will make it look bad.
As for what colour to base it all depends on what you're after. White for bright colours, although it will require washes to help the details. Black can do pretty much the same, but it takes a bit more effort and a bunch of thin coats to get close to the brightness white will give you. On the plus side you generally won't need a wash for it, metal still requiring it though.
But the most important thing is practice, after a while you'll figure it all out
|
|
|
|
|
|
2010/06/16 18:34:54
Subject: Re:Ultramarines Tactical Squad, from start to finish.. help?
|
|
Fresh-Faced New User
|
I won't be using any of the harder-to-get weapons for this squad. Missile launcher/flamer for the troops, boltpistol and chainsword for the sergeant, all of which are included in the box
So I should prime (I use white primer), then paint the whole thing white, then paint in appropriate colours? Or have I misunderstood what "basecoat" means (I take it to mean the first layer of paint you apply after having primed with a spray)?
Other than that I think all my questions have been answered, awesome  I'll be assembling and priming tonight then start getting to work on them tomorrow.
|
|
This message was edited 1 time. Last update was at 2010/06/16 18:37:14
 1000 pts - Finally! 1000 pts - Finally! |
|
|
|
|
2010/06/16 18:39:09
Subject: Ultramarines Tactical Squad, from start to finish.. help?
|
|
Decrepit Dakkanaut
|
The easiest way to do ultramarines looks like this:
1.) assemble the entire model and glue it to the base. Glue sand to the base.
2.) prime the model ultramarines blue.
3.) wash the model with really thin black paint (or inks. Inks are easier, but they leave this obnoxious high-gloss sheen). Make sure you wash the base.
4.) pick out any details you want with a brush, like the ridges of shoulderpads, or whatever.
5.) spray seal the model.
6.) drybrush the sand on the base with some dirt color (or grey). If you washed the sand right the recesses will be black and the highlights will be dirt, and there should be no blue showing. Keep applying paint until the blue is gone.
It shouldn't take you more than a half hour per marine, and it really simply gets you to tabletop quality (three color requirements for tournaments being filled by blue, black and dirt, even if you do no detail work).
|
|
|
|
|
|
2010/06/16 19:09:11
Subject: Ultramarines Tactical Squad, from start to finish.. help?
|
|
Furious Fire Dragon
ROK
|
Corennus wrote:RIGHT. Im liking this thread.
Basecoat: one colour. I prefer white cause the detail isn't lost and colours look brighter.
I think you're referring to priming. You always prime in 1 color, witha spray can or whatever you happen to use. Then base witha brush, usually blue if you're doing ultramarines.
|
Nothing currently, got out of the hobby, maybe getting back in? |
|
|
|
|
2010/06/16 20:01:24
Subject: Ultramarines Tactical Squad, from start to finish.. help?
|
|
Longtime Dakkanaut
|
Ailaros has the right idea, imho.
I have to disagree with folks saying to partially assemble, prime, paint, then assemble. Unfortunately, this doesn't give the glue anything to adhere to other than a thin layer of paint, which will lead to a weak bond.
I assemble completely and then prime and paint. Remember that if your brush can't reach certain areas, it's not likely that anyone's going to be looking at them anyway. Use a darker primer if you're worried about this - I prefer a flat dark gray instead of black - since the primer coat will act as a shadow.
If you want to make things very easy (and pricey), use Army Painter to one-step prime/basecoat. A cheaper way to do things would be to use a cheap satin spray paint, like Krylon. Make sure it's a satin though, or your citadel acryllics won't adhere to it. Then it's a matter of washing, highlighting, and detailing: for troops I'd wash over your spray basecoat with Asurmen Blue, highlight (drybrushing is easiest) with Enchanted+Ultramarine 50/50, and (conservatively) hardedge with Spacewolf Gray.
For character models, I'd use Mordian Blue for your basecoats, wash with Asurmen Blue, highlight with Enchanted, Enchanted+Ultramarine, and finally hardedge with Spacewolf Gray.
|
What harm can it do to find out? It's a question that left bruises down the centuries, even more than "It can't hurt if I only take one" and "It's all right if you only do it standing up." Terry Pratchett, Making Money
"Can a magician kill a man by magic?" Lord Wellington asked Strange. Strange frowned. He seemed to dislike the question. "I suppose a magician might," he admitted, "but a gentleman never could." Susanna Clarke Jonathan Strange & Mr. Norrell
DA:70+S+G+M++B++I++Pw40k94-D+++A+++/mWD160R++T(m)DM+
 |
|
|
|
|
2010/06/16 21:22:42
Subject: Re:Ultramarines Tactical Squad, from start to finish.. help?
|
|
One Canoptek Scarab in a Swarm
My Computer
|
I agree with using Army Painter blue. It's very close to UM Blue and removes a lot of time/work if you're just wanting to get tourney ready in a flash.
|
~Sin |
|
|
|
|
2010/06/16 21:29:41
Subject: Re:Ultramarines Tactical Squad, from start to finish.. help?
|
|
Fresh-Faced New User
|
Lots of good (if occasionally conflicting) advice here, thank you all for your help.
I've got 5 marines that I primed in pieces (just assembled torsos and legs), and I'll do the other 5 completely assembled, see which way suits me better (and whether or not the glue will hold up). Will hopefully be back with some insight of my own in a few days
|
1000 pts - Finally! |
|
|
|
|
2010/06/16 21:34:24
Subject: Ultramarines Tactical Squad, from start to finish.. help?
|
|
Decrepit Dakkanaut
|
Whether or not the glue will hold up? You're spraying paint, not acetone...
And I'm sure you will find assembling then painting easier than painting than assembling, at least if you're using the blue primer method. The only time painting first makes sense is if you use a white primer and can't get dark into the creases properly (or you have terrible arthritis).
Make sure to post some pics and let us know how it came out.
|
|
|
|
|
|
2010/06/16 22:13:15
Subject: Ultramarines Tactical Squad, from start to finish.. help?
|
|
Lord Commander in a Plush Chair
|
Ailaros's method is great for Quick and dirty on rank and file troops, no need for extra flash but you may want to add some detail. I mostly use this method for my Guard and most of my marines.
The other major method I reserve for my characters that way I get a higher quality of painting on the flashier models and can get to their fiddly bits.
Both methods work well it just depends on how much quality you want on your models. Marines are an army that lends themselves to High-quality rank and file(do to the low model count) but Guard, Orks, and Nids just about require quick and dirty(My last guard army had pain-staking tiny camo on all the models and over 100 models, needless to say they never got more than a few squads fully painted before I sold them off)
|
This is my Rulebook. There are many Like it, but this one is mine. Without me, my rulebook is useless. Without my rulebook, I am useless.
Stop looking for buzz words and start reading the whole sentences.

|
|
|
|
|
2010/06/16 22:23:12
Subject: Ultramarines Tactical Squad, from start to finish.. help?
|
|
Decrepit Dakkanaut
|
Yeah, it's actually kind of funny that the lowest model count armies also have the most boring, low detail miniatures while the armies that you've got to paint 100 models for are all really detailed and give you the chance to spend hours on them apiece.
|
|
|
|
|
|
2010/06/16 22:47:57
Subject: Ultramarines Tactical Squad, from start to finish.. help?
|
|
[DCM]
Illustrator
|
For paint you should also check out the step by step for Ultramarines by LBursley. You can find that here.
|
-Aaron
Call For Fire
DA:80+S+GM(DPC)B++++I+Pw40k99+D++A++/mWD247R++T(M)DM+++++ |
|
|
|
|
2010/06/16 23:28:03
Subject: Ultramarines Tactical Squad, from start to finish.. help?
|
|
Preacher of the Emperor
|
Ailaros wrote:Yeah, it's actually kind of funny that the lowest model count armies also have the most boring, low detail miniatures while the armies that you've got to paint 100 models for are all really detailed and give you the chance to spend hours on them apiece.
Try collecting a mech SoB army 
As much as i love the models, they are some of the most difficult to paint that GW has ever produced.
@ OP: If you're just beginning, try to get into the habit of thinning your paints. Just add a little water at first; you'll find that the paint goes on smoother and with almost the same opacity. As you improve, you'll find you want to add more water as it improves your control over the colours 
|
 1500pts 1500pts
Gwar! wrote:Debate it all you want, I just report what the rules actually say. It's up to others to tie their panties in a Knot. I stopped caring long ago.
|
|
|
|
|
2010/06/17 00:06:32
Subject: Ultramarines Tactical Squad, from start to finish.. help?
|
|
Chosen Baal Sec Youngblood
Arlington, TX
|
I don't think there is a right or wrong way to do it. Personally I clip them from the sprues, clean them up and build them to completion (including basing).
I then go through and base them all black with krylon flat black spray paint. Then I pick out all the armor plates with my default color (using merc red for my BA's). After that I pick out all the bolt guns and metal parts, then all the eyes and scrolls. Once thats all done I recheck and touch up the model in the areas it needs it.
After that a little badab black cut with some magic wash and wash the fig down. Once washed, toss some pva glue on the base with a brush, dip in sand/grass and your done.
This is my first army I have built and painted as I'm new to the hobby and so far the couple I have done to completion look great. I wish I hadn't put my figs all the way together as it would have been easier to paint, but you would be amazed where a 20 spotter brush will fit.
They key part is the wash though, so many people think the awesome fig they just painted looks like crap....till they hit it with a wash. The wash will tone the paint down and make the paint look more natural.
|
|
This message was edited 1 time. Last update was at 2010/06/17 00:07:50
|
|
|
|
|
2010/06/17 09:27:25
Subject: Ultramarines Tactical Squad, from start to finish.. help?
|
|
Eternally-Stimulated Slaanesh Dreadnought
|
Weird.
I always paint straight on to the white primer spraycoat.
Then again my colour of choice for my marines is mecharius solar orange (which is a foundation paint anyway).,
Personally don't do washes as the purity seal adds a nice gloss to them which brings out the details adequately.
|
|
|
|
|
2010/06/17 22:50:48
Subject: Re:Ultramarines Tactical Squad, from start to finish.. help?
|
|
Fresh-Faced New User
|
Alright, first 5 marines are done! Since I wasn't 100% sure what special weapons I might want to use, I gave them all boltguns. Also, given my newbness, I kept the details to a minimum. No fancy grenades, knives or anything like that.
In order to put things in perspective when I said the first three-pack I painted was a disaster, allow me to present the (aptly named by a friend) Rotten Banana Chapter:
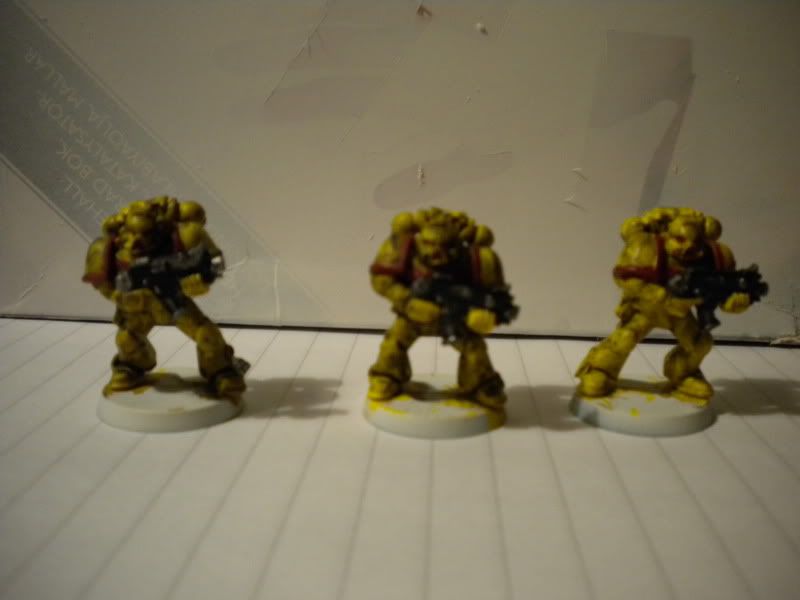
Ugh. Can't even begin to explain how many mistakes I made with those poor guys. But as I said, it's just to put things into perspective. I give you my first five-man squad of Ultramarines:
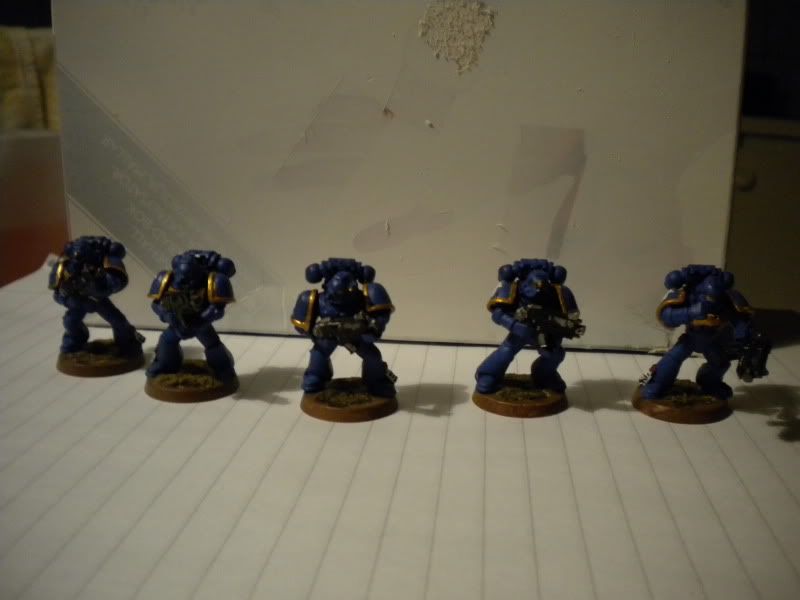
Pics aren't great, and those are still the best of the lot I took.
They're a desert squad, on account of me having some model sand lying around. Also, the guy on the right: He was supposed to be firing his boltgun onehanded and raising his fist in triumph; of course he wound up glaring at his boltgun and trying to beat some sense into it. I found it funny so I left him like that
Some things to note: I didn't wash them. I think the effect from the seal, once I apply it, should be enough. If it isn't, I guess I'll have learned for the next time around. I'm a bit wary of washes following the Rotten Banana fiasco (the horrid colour is the result of mixing sunburst yellow with badab black).
I also didn't do any highlights (apart from drybrushing the base a little), tried a bit and ended up with paint all over the model. I haven't sealed them yet though so I can give it another go I suppose. My cleaning of the seams was extremely rudimentary, couldn't find my hobby knife so tried with a razor. Not the same thing.
For those interested, here's what I did:
1. Assembled legs and torso, not affixed to base.
2. Primed everything Skull White.
3. For some reason changed my mind about painting on spruce and finished assembling, as well as gluing them onto the base. Silly, I know, but the glue held together really well despite having to adhere to a painted surface. I should've just assembled them whole and then primed.
4. Basecoated the entire model with Mordian Blue.
5. Painted the boltguns with Undercoat Black.
6. Picked out Boltgun and backpack (is that what it is?) details with Boltgun Metal. Tried picking out chest eagles, eyes and skulls with Sunburst Yellow, realized it looked like crap, so went out and got Burnished Gold instead.
7. Painted as much of the armour and helmet as I could reach with Ultramarine Blue.
8. Finished off details.
9. Painted over spots where I slipped.
10. Basecoated the base with Calthan Brown.
11. Painted glue onto the bases, dipped them in sand.
12. Washed the sand with Badab Black.
13. Drybrushed the sand with Iyanden Darksun.
14. Stickers.
That's.. quite a list. Posting it as much for my own benefit as anything else, as I still have 5 marines to get done Painting them fully assembled went alright I suppose. Obviously there were places I simply couldn't reach (and others that don't hold up too well to intense scrutiny due to paint in the wrong places), but at tabletop distance they look pretty decent. Actually surprised, it went smoother than I thought I think I'll do the other 4 regular marines the same way, and maybe put some extra effort into the sergeant to make him stand out.
Constructive criticism, ideas for what I can do better, improved order of doing things etc quite welcome.
The thing that stood out to me is I could've probably been a bit more attentive to the details. I didn't fill in joints, for one thing
|
1000 pts - Finally! |
|
|
|
|
2010/06/17 23:01:22
Subject: Ultramarines Tactical Squad, from start to finish.. help?
|
|
Chosen Baal Sec Youngblood
Arlington, TX
|
As long as your method works thats all that matters, stick with it if your happy.
Also try grabbing a 20 spotter to get those hard to reach places. You may have to destroy the bristles here and there but you'll get into those sports for sure.
All in all they look good!
|
|
|
|
|
2010/06/19 09:47:33
Subject: Re:Ultramarines Tactical Squad, from start to finish.. help?
|
|
Fresh-Faced New User
|
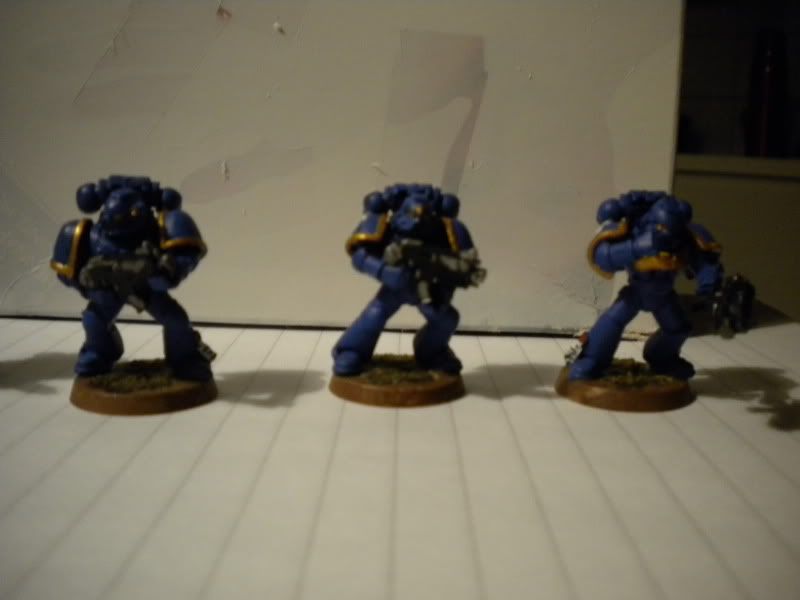
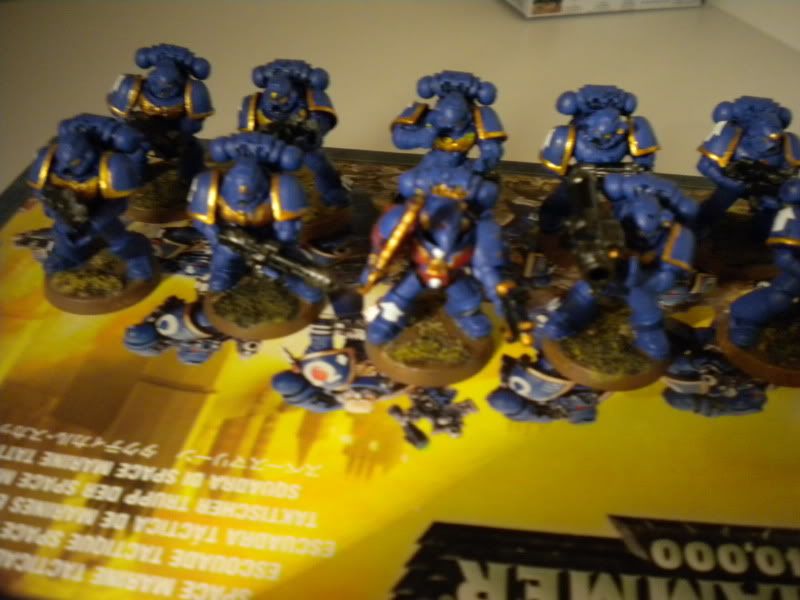
Figured I'd post the entire squad, finished it (very) late last night

The sergeant looks a lot better in person than on pictures.. I spent as much time on him as the other 4 marines combined, but whenever I try to get a good shot of him he just ends up blurry. The only thing I regret is not using a brighter shade of red.. it came out a little muted for my taste. All that remains is to seal them!
Now of course these marines need a ride of some sort, that'll be the next project
|
1000 pts - Finally! |
|
|
|
|
2010/06/19 12:26:29
Subject: Ultramarines Tactical Squad, from start to finish.. help?
|
|
Stabbin' Skarboy
|
You should play around with your camera a bit Like trying flash (or flash modes, some cameras have flash modes that work pretty good) or using another source of light... Cameras tend to focus much better (especially Macro regimes) when the lighting is bright
Anyways your minis look nice, especially for a first squad I can only wish my first ultramarines looked so good, still have to "repair" those
|
|
|
|
|
|
2010/06/19 15:30:08
Subject: Ultramarines Tactical Squad, from start to finish.. help?
|
|
Decrepit Dakkanaut
|
yeah, imperial fists are a tough color scheme to get down for a new painter, your ultramarines look much nicer.
You said you had a problem reaching some of the places with your brush. Does this mean that certain parts in the crevasses of your model are still white? If this is the case, I highly suggest switching to black or blue primer.
Your bases look nice, especially for someone who has just started out. Usually newbie painters just ignore basing alltogether, which is a real shame. Out of curiosity, how does iyanden yellow compare to desert yellow or bleached bone (the colors I use for my desert bases)? I wouldn't be aversed to saving myself a few steps if the color was right. Perhaps you could take some pictures of your guys in muted sunlight (like a slightly cloudy day).
|
|
|
|
|
|
2010/06/19 15:54:38
Subject: Re:Ultramarines Tactical Squad, from start to finish.. help?
|
|
Fresh-Faced New User
|
I was of course able to get in everywhere with the basecoat, what I meant was it's almost impossible to, say, get the chesteagle right on some of them (where the arms block access) without getting gold paint on the backside of their arms in the process.
I can't really say how they compare, I had Iyanden at home so that's what I used They really don't look like desert bases, in fact the closest comparison would probably be a coral reef.. which seems a bit out of place.
I'll probably use a better colour (read Bleached Bone or similar) next time I'm basing.
Pic below, models blurry but you can make out the base pretty decently:
|
1000 pts - Finally! |
|
|
|
|
2010/06/19 16:26:37
Subject: Re:Ultramarines Tactical Squad, from start to finish.. help?
|
|
Decrepit Dakkanaut
|
Aldain wrote:Pic below, models blurry but you can make out the base pretty decently:
No, I can't. Seriously, wait for a cloudy day and go outside and take a picture. That way you get proper color balance AND your pictures won't be blurry.
They definitely look respectable for tabletop quality. Nice job.
|
|
|
|
|
|
2010/06/21 12:16:13
Subject: Ultramarines Tactical Squad, from start to finish.. help?
|
|
Eternally-Stimulated Slaanesh Dreadnought
|
Considering some of the paint jobs that pass for "painted" these days that is a VERY good first go!
|
|
|
|
|
2010/06/21 17:10:36
Subject: Ultramarines Tactical Squad, from start to finish.. help?
|
|

Mutilatin' Mad Dok
|
They do look good for tabletop quality but as said in many a post before me pics are to blurry to make out almost any detail, yet i am biased on this as i completely hate the Ultramarines, for they are over glorified
|
WAAAHG!!! until further notice
|
|
|
|
|
2010/06/21 17:44:44
Subject: Re:Ultramarines Tactical Squad, from start to finish.. help?
|
|
Fresh-Faced New User
|
Think I need a better camera tbh. I've tried every flash-setting, indoors, outdoors, direct sunlight, clouded, lamps from every angle, white backdrop, no backdrop.. pictures just turn out "meh".
As has been noted I wanted to do Imperial Fists but damn, it's quite difficult getting an even coat of Sunburst Yellow. By that I mean, I couldn't pull it off despite numerous attempts.
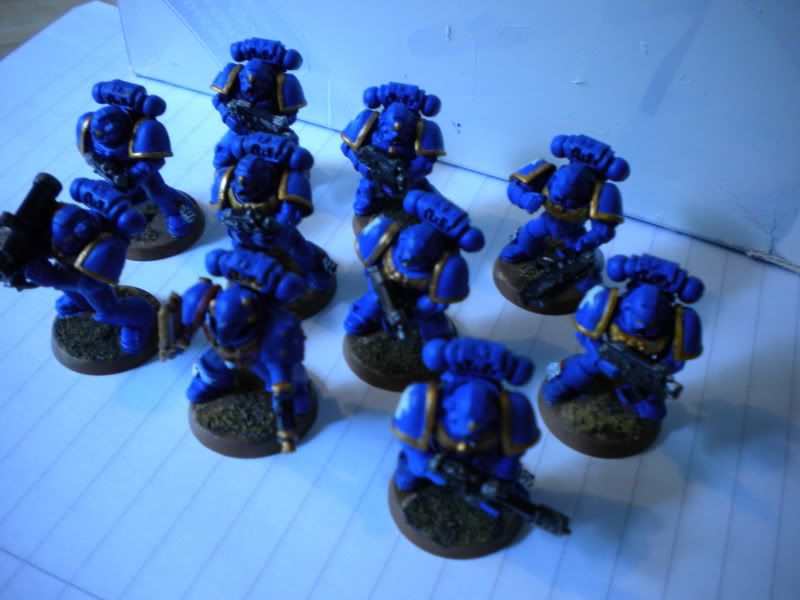
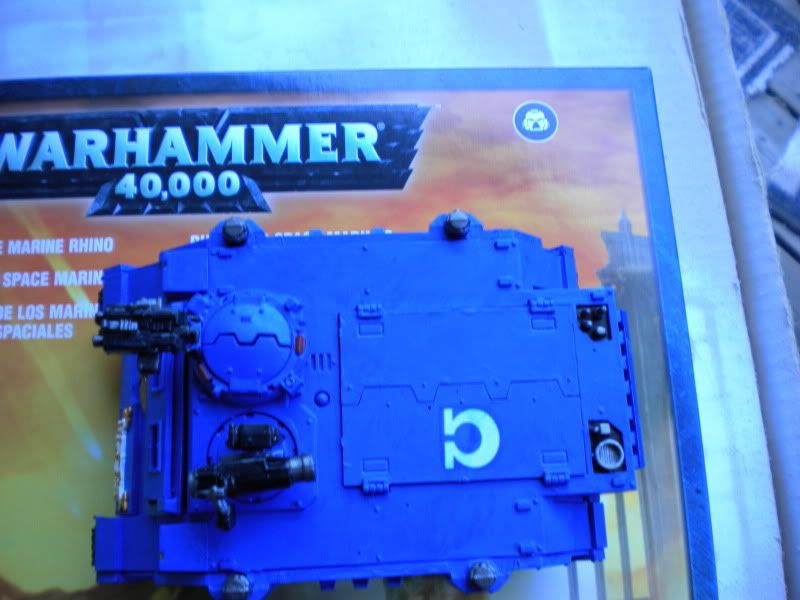
Also finished the Marine's ride. If you have a problem with semi-bad shots, don't look!
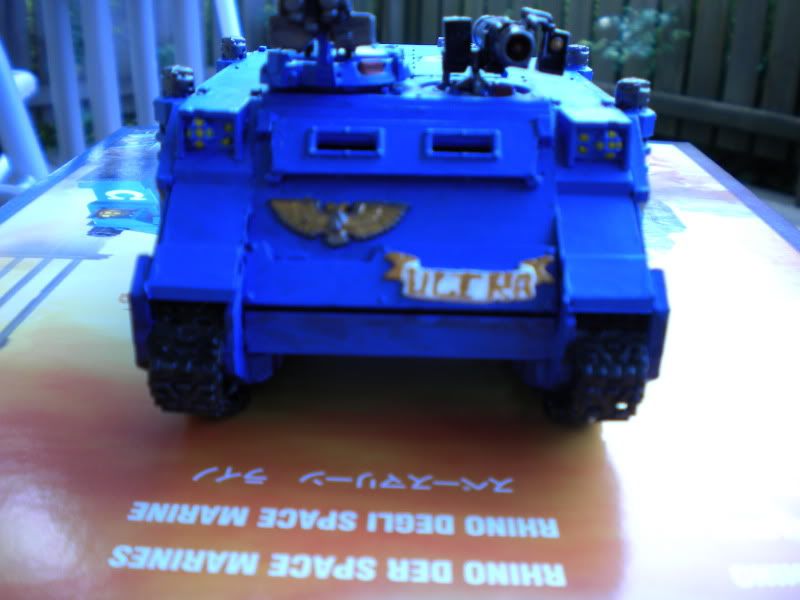
Notice the very corny freehanded ULTRA on the parchment sitting up front
None of these were washed, and no highlights either. I just wanted to get a decent-looking squad together.
I'm going to tackle either a small Scout squad or a Librarian next, think I'll try some washing/highlighting to get some neater effects
|
1000 pts - Finally! |
|
|
|
|
2010/06/21 18:01:01
Subject: Re:Ultramarines Tactical Squad, from start to finish.. help?
|
|
Irked Blood Angel Scout with Combat Knife
Hinckley, Leicestershire.
|
They are some really descent looking models, baring in mind that ive never played against a fully painted army, anyway youre models look loads better than my first attempt which were black templers which i simply just basecoated the hell out of n painted the shoulder pads white n the guns silver.
|
|
|
|
|
|
|
|


 3000
3000  3000
3000 
 In Progress