| Author |
Message |
 |
|
|
|
|
Advert
|
Forum adverts like this one are shown to any user who is not logged in. Join us by filling out a tiny 3 field form and you will get your own, free, dakka user account which gives a good range of benefits to you:
- No adverts like this in the forums anymore.
- Times and dates in your local timezone.
- Full tracking of what you have read so you can skip to your first unread post, easily see what has changed since you last logged in, and easily see what is new at a glance.
- Email notifications for threads you want to watch closely.
- Being a part of the oldest wargaming community on the net.
If you are already a member then feel free to login now. |
|
 |
2010/07/21 21:43:29
Subject: Painting battle damage - the easy way
|
|

Maddening Mutant Boss of Chaos
|
I was requested to show how I did battle damage on my latest so here is the technique I used the most (I'm still learning to paint models so I try out varying techniques on the same model).
What you need:
Precise Paintbrush
Stippling Brush
Chaos Black paint
Boltgun Metal paint
Mithril Silver paint
Model 
Original state
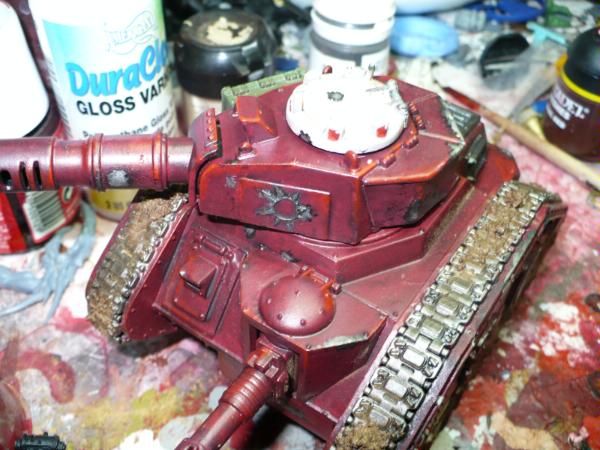 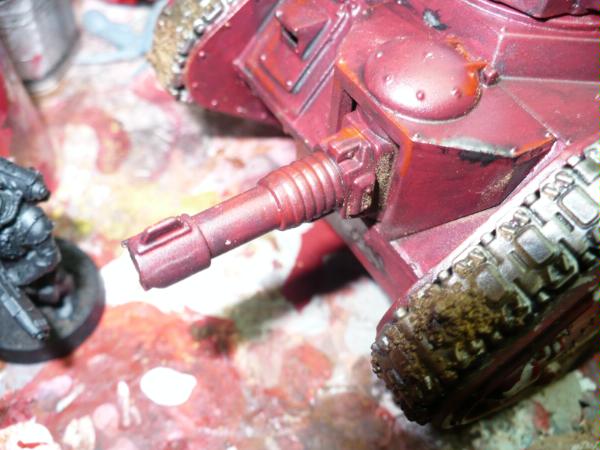
Get a small amount of chaos black on your palette (1 drop for those who have dropper bottles) and make the general shape of the wanted damage.
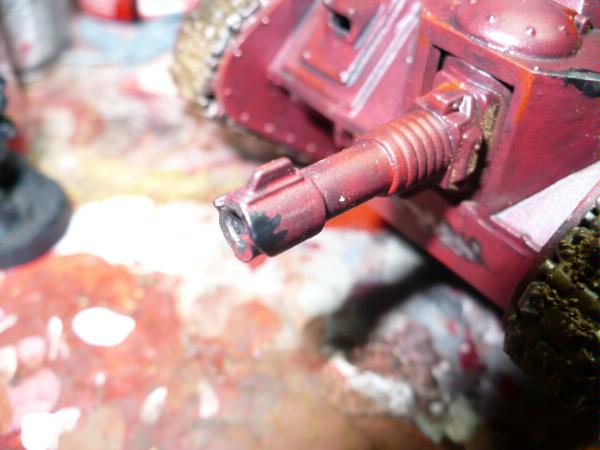
Now add a drop of Boltgun Metal to your Chaos Black and mix it up well.
You will paint your mix in the middle of your Battle Damage spot, leaving an irregular black outline.
[url=http://www.dakkadakka.com/gallery/122523-.html] 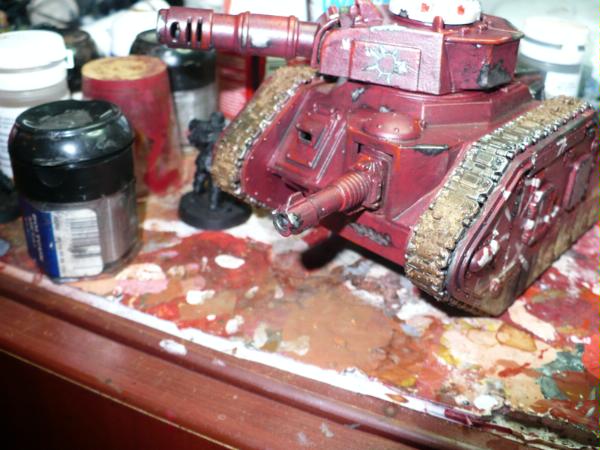
Now, depending on the size of the damage you will add a small center of pure boltgun metal and might stop there.
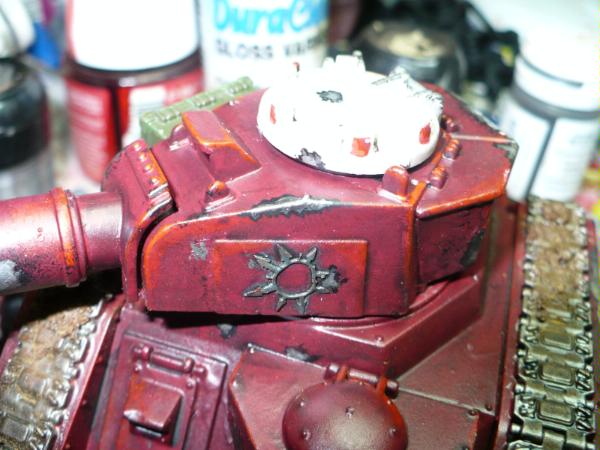
Now, for bigger damage spots you will add stippled (or painted as with a stippling brush) Mithril Silver towards the center of your battle damage.
Not Shown.
This tutorial will be updated with better pictures (and details if needed) when I will paint my next tank.
EDIT: broken link
|
|
This message was edited 1 time. Last update was at 2010/07/21 21:46:05
|
|
|
 |
|
2010/07/21 22:42:04
Subject: Painting battle damage - the easy way
|
|

Lone Wolf Sentinel Pilot
|
Awesome, can't wait to use this, it looks really easy to use. Thanks!
|
 2000 pts 2000 pts |
|
|
|
|
2010/07/21 23:01:16
Subject: Painting battle damage - the easy way
|
|
Maddening Mutant Boss of Chaos
|
You're very welcome.
|
|
|
|
|
|
2010/07/23 12:49:53
Subject: Painting battle damage - the easy way
|
|

Arch Magos w/ 4 Meg of RAM
|
very useful. Good tutorial.
|
|
|
|
|
|
2010/07/23 20:45:52
Subject: Painting battle damage - the easy way
|
|

Daring Dark Eldar Raider Rider
|
Just one thing...
What do you do if your tank was black to begin with???
|
Dark Eldar - Kabal of the Poisoned Tongue
2000
|
|
|
|
|
2010/07/23 22:02:31
Subject: Re:Painting battle damage - the easy way
|
|
Regular Dakkanaut
|
Start the same process only instead of black use codex grey/black mix 50/50
|
|
|
|
|
2010/07/23 23:26:02
Subject: Re:Painting battle damage - the easy way
|
|
Elite Tyranid Warrior
|
Added to "my subribed threads"....not that Nids have "tanks" but it can also work on buildings and a maybe some bug parts can get a little scorched at times
|
|
|
|
|
|
2010/07/26 20:24:11
Subject: Painting battle damage - the easy way
|
|
Slippery Ultramarine Scout Biker
|
SO EASY!! Appreciate the walkthrough!
|
 Ultramarines-First Company. 505 pts Ultramarines-First Company. 505 pts  |
|
|
|
|
2010/08/02 08:55:42
Subject: Painting battle damage - the easy way
|
|

Fresh-Faced New User
|
Thanks man, I used this on my whirlwind and my terminators by adding dints and cuts with a scapel then painting this.
Looks awesome.
Thanks.
|
|
|
|
|
2010/08/02 09:32:20
Subject: Painting battle damage - the easy way
|
|
Fresh-Faced New User
|
Thanks so much. I was really nervous about trying this with my guys, but after reading your explanation it seems so easy. Can't wait to try it out.
|
|
|
|
|
2010/08/03 23:11:46
Subject: Painting battle damage - the easy way
|
|
Maddening Mutant Boss of Chaos
|
Thanks! I'm really happy that you guys like my tutorial.
Brutii11 wrote:Just one thing...
What do you do if your tank was black to begin with???
If your tank is Chaos Black you just had a small portion of grey to your black paint and follow the steps, it should look like a really dark grey or a bit washed out black.
If you added some blue to your black when painting your tank for a more realistic look then you can use simply chaos black.
|
|
|
|
|
|
2010/08/03 23:37:15
Subject: Painting battle damage - the easy way
|
|
Monstrously Massive Big Mutant
|
I do like this method a lot. I have tried this many models and I reccomend doing 3 layers instead of 2. Make the first layer a lighter version of the base colour. Other than that nice tutorial.
|
|
|
|
|
|
2010/08/04 22:04:14
Subject: Re:Painting battle damage - the easy way
|
|
Drop Trooper with Demo Charge
|
Used it on a combat shield on my assault sergeant, and it makes him look much better than if he was pristine looking.
|
An entire society spanning thousands of light years worships a dead guy in a golden throne by killing alien races with genetically mutated supersoldiers dressed in bright blue and gold armor.
And they call religions today stupid. |
|
|
|
|
2010/08/11 23:35:47
Subject: Re:Painting battle damage - the easy way
|
|
Drop Trooper with Demo Charge
|
A great easy way to paint damage
|
  
On, Wisconsin! On, Wisconsin!
Plunge right through that line!
Run the ball clear down the field,
A touchdown sure this time. (U rah rah)
On, Wisconsin! On, Wisconsin!
Fight on for her fame
Fight! Fellows! - fight, fight, fight!
We'll win this game. |
|
|
|
|
2014/06/15 04:58:22
Subject: Painting battle damage - the easy way
|
|
Roarin' Runtherd
|
Stumbled across this tutorial randomly, accidentally navigated away, and spent hours trying to find it again. Great tutorial. I can't wait to try this out on some of my boyz choppas!
|
|
|
|
|
|
|


