Hello everybody, I posted the begining of this treat in "Itroductions" but this is the right place to put it.
Im a member on www.advancedtautactica.com and this
WIP treat is running on there. so I recommend checking it out there!
http://www.advancedtautactica.com/viewtopic.php?t=16530 But to reach as much people as possible the updates will be posted here as well!
Enjoy!
In a world were there is only War you must kill to survive. You must develop skills in order to became the hunter instead of the hunted. It was this simple concept that sparked my imagination. Although the Tau is a young race, there were pioneers in the art of war. Veterans that would become Icons for the following generations of warriors.
"In a landscape torn by endless battles, an engine sounds rumbling in the distance. Vibrating the surroundings with a roaring low-frequency. And a high pitch tune, screaming trough the valley as a Dark shadow skims over the vast lands. Enemies would run and hide only by hearing it. A long body, build for speed. A glimpse of 2 small wings pointing slightly downwards.
A one-man vehicle only earned by the greatest of hunters: The "O Mont'korar". They are build for only 1 thing:
"Search and Destroy". A warrior that earned a
"O Mont'korar" will be given the tittle of:
"O Y'eldi Mont'yr" and is considerate one of the highest honers a Tau warrior can achieve."
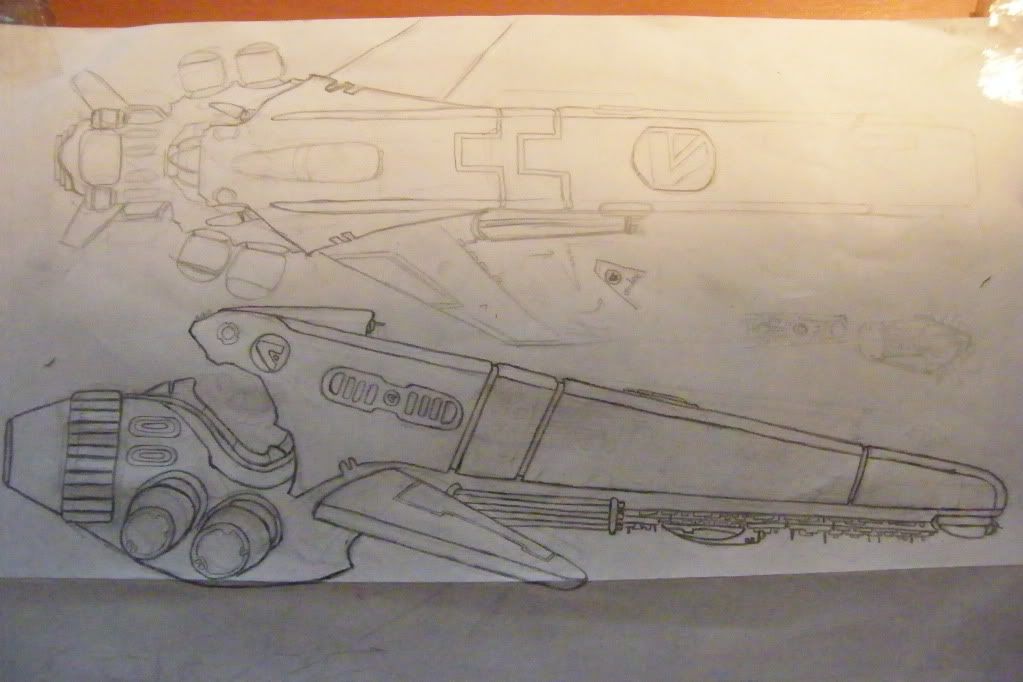
This is the original sketch, updated along with the progress I made in the last few months. A one man Tau combat ship. A long slim body for speed, 2 wings for stabilisation. The ship is powered by an new type of engine that runs on a new mineral. The engineers had
4 things in mind while developing it:
Speed; it needs to be able of outrunning almost everything.
Hovering; it needs to be able to hover in mid-air and engage all weapon systems.
Shield; it needs to sustain heavy fire without a second engine.
Stealth: although it doesn't have a cloaking device the ship can go as silent as the crave and kill from the shadow's. The engine is located in the middle of the hall. Air is sucked in trough the belly underneath. This model has 2 heavy burst cannons witch is standard equipment on any
"O Mont'Korar". The wings have a build-in
SMS rocket system. Tau and technology become 1 because of the build-in Drone that allows for precision movement at high and low speeds. The ship will almost "feel" what his driver wants to do next. The main Drone sensor is located on the top and feeds all battlefield information directly to the control screen of the
"O Y'eldi Mont'yr". And there's a second Drone sensor located under the tip of the nose of the craft. This is the real "Search and destroy" aspect of the the Drone computer. This weapons guide system helps his driver to locate and terminate his prey. The 4 shield generators on the side are powered by the same engine and generates a strong forcefield. Also there's room for an EMP and smoke grenade launcher for tactical warfare. This baby is a personal battle cruiser.
I started this Project in march 2009 and its evolved into what you see here now. This treat will follow, if you guys like it, my work in progress from the first cut till the last brush of paint. I'm planning on making a full Diorama for this, complete with terrain and dynamic pose.
dimensions: 5
cm wide by the seat. hall 3
cm wide. full length: 28
cm. Wingspan: 14
cm. (a tau fire warrior fits perfectly within the seat)
I hope that you like my first project

I'm very curious on what you think/like/don't like/tips/ is this a cool mini or not? :eek:
Feel free to ask me questions.
Daan
ps: I left out 1 aspect of the design. This I will unveil later when the time is right. If you like this concept, then you are going to love thís.
I remember starting with the Skeleton the same night I drew up the concept. It was early in the morning when I finally went to bed.

The following pictures are from the first steps of the project. I needed a soled base to work on so I came up with a plan to build the structural skeleton. I will be building the ship entirely out of plastic card. This is going to be a challenge for me because this is going to be the first time working with the stuff. And as I said before, I'll jump in the deep when I start something new. Exploring ways and new ways to get the pieces I need to assemble the hole thing is an adventure and I'm learning new skills every day. Also I'll be adding some Original Tau and Warhammer bits, as well as anything that I think is suitable to get the job done.There will be a description with each picture on what and how I did the particular piece. Some of my methods you will do differently, this way just worked for me best. All right, here we go: Skeleton.
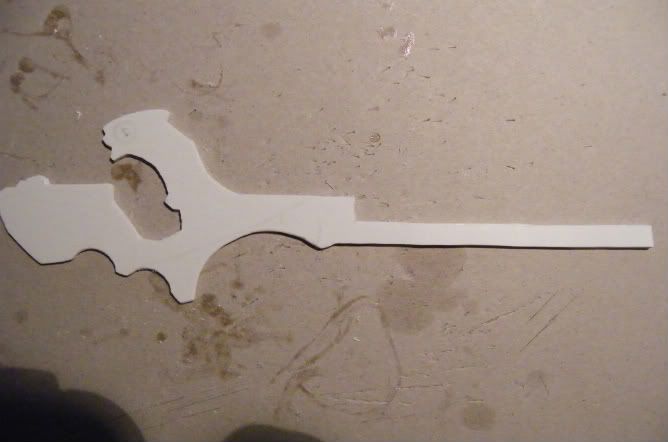
I drew a rough outline on plastic card and cut it out with scissors and using a sharp hobby knife. Very tricky business and a lot of work.

I needed 2 of these pieces. I placed the first piece all sanded and finished up on top of another piece of plastic card and glued them together.
This way I could sand down the second piece to match the first. The next step was to drill 2mm holes. I chose the holes location in a way they wouldn't get in the way of further construction. And if they would I could cut out 1 or 2 without damaging the structural integrity.
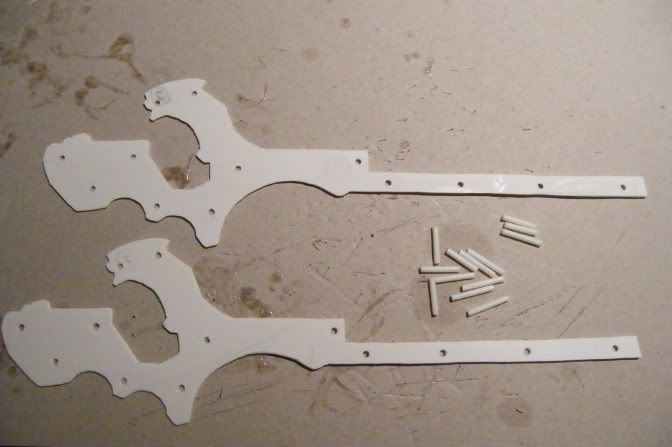
Next was getting the 2 separated to never to touch each other again. And voilà. 2 identical pieces with perfect aligned holes.Next I got myself 13 pieces of pipe of 1
cm long to put in the holes and hold the 2 together.
Finished product:
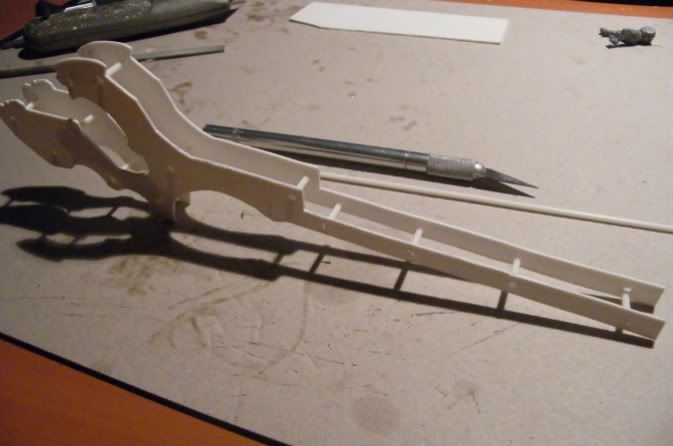
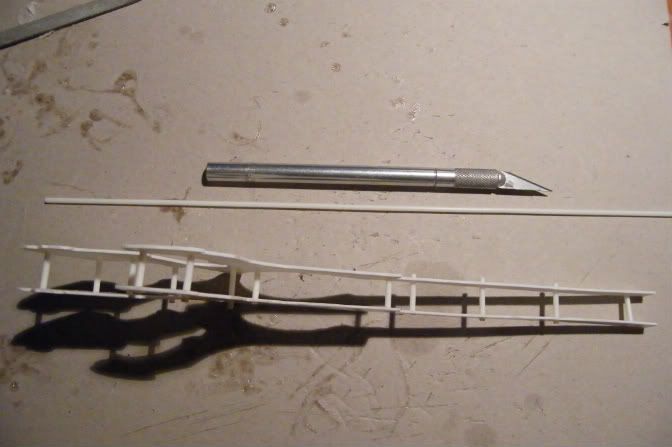
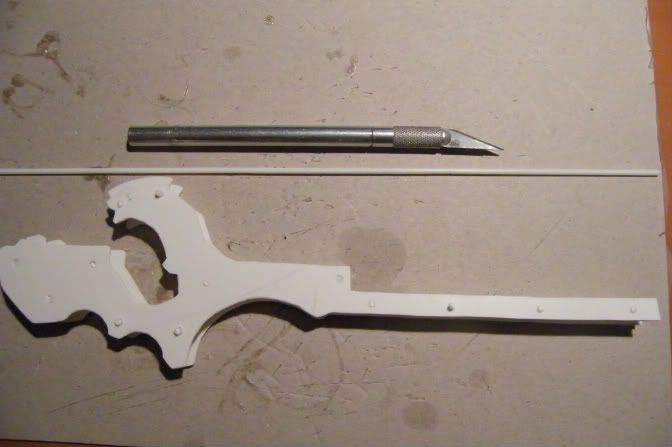
With this Skeleton I could get started. Its exactly 1,2cm wide. This way it would be easier to work with pre-cut existing plastics of all shapes and sizes. Next up: top and side panels.
Hey Shas'vre Shavaun, Well thank you my friend. I was hoping you'd like it

I'm familiar with your work and you are quite the modeller your self mate. You read my little description on the
"O Mont'Korar" veteran one man battleship I see? Its nice of you to say, I put some effort in that so its nice to hear its appreciated :smile: Yeah, I wanted to have a ship that not just looks cool, but also a design that considers what a ship needs and I incorporated that in the concept.
For the, what I call the "glue-on-action-explosion-duplicate-twin-effect-technique" it was new for me too. I guess I used just the right amount of plastic glue on the right places. And of course sanded the 2 pieces down, straight, sharp and equal. And yes, you judged right. 1
mm thick plastic card

Funny this is. I had no Idea there was a vehicle length limitation. Haha. Well, to be honest, the reason the combatship is this "big", is because its more in scale with the firewarrior veteran that is operating it. If you take an Eldar yet-bike for example, those look like a little tricycles to me. If I was a warrior with a yet bike, I would want to have something I feel save on, and not afraid every little Ork can shoot me down with a handshoota..

And yeah, I imagine and understand if your a gamer and you bring tanks as big as the board people are not going to be pleased I guess?

But since this is going to be a display Diorama it just needs to be bad-ass!
 -- -- --
 Al right. Side panels time.

I wanted them to be not just on a 90 degree angle. No, I wanted a more dynamic flow and curve. So this is what I did:
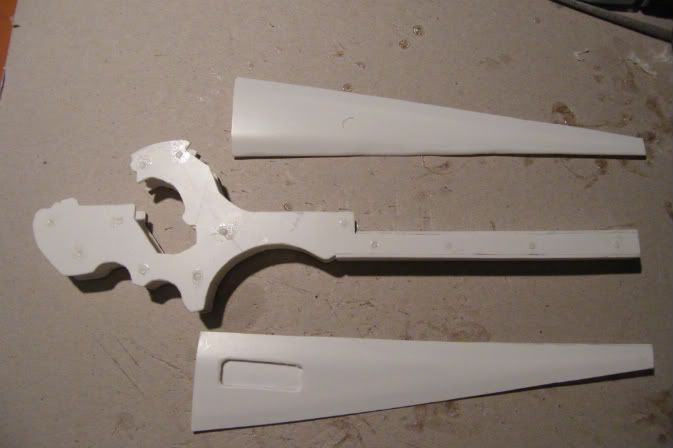
I took measurements from the left top, all the way to the tip. Since I'm a perfectionist I want to do everything as slick and smooth as possible. Especially with the aesthetic of the Tau I think it's essential to be as accurate as you can. I Took the measurements on to the plasticcard and cut them out with scissors. I didn't want to use the "glue-on-duplicate" technique because I didn't want to have to sand to much. Instead I just did the process twice.
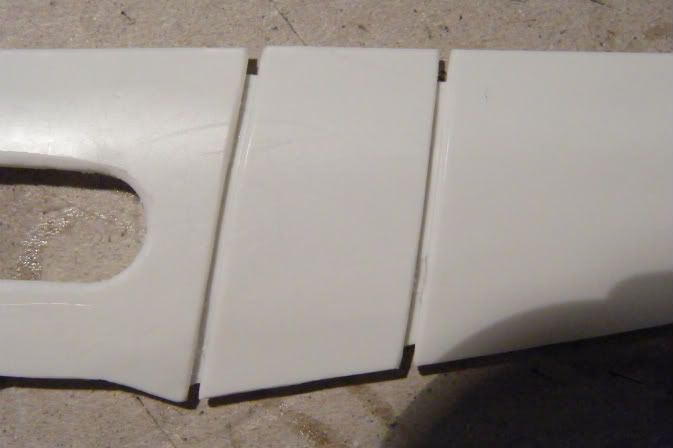
I drew on lines were the 3 ridges needed to come and cut them trough with scissors. Sanded them down with a little curve and placed a piece of plasticcard behind them, leaving a rim of 1mm between one another.
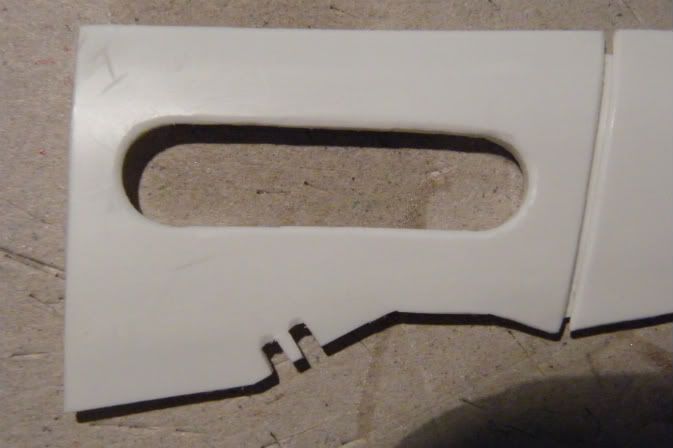
Then cut a space were the side panel would overlap the base of the wing.
(and added the first little detail, quite nice touch aye? they broke off on me, while further working on the engine heat exhaust.. ill fix it later

)
The hole for the engine heat exhaust in the middle of the hall was 1 of the hardest parts of the project and it took me quite some time.
First determinant were the hole needed to be and very carefully, trying not to damage the rest of the surrounding plastic, cut it out with a sharp hobby knife. These panels are very important because they'll cover 1/3 of the hole ship. I think they turned out to be pretty nice.
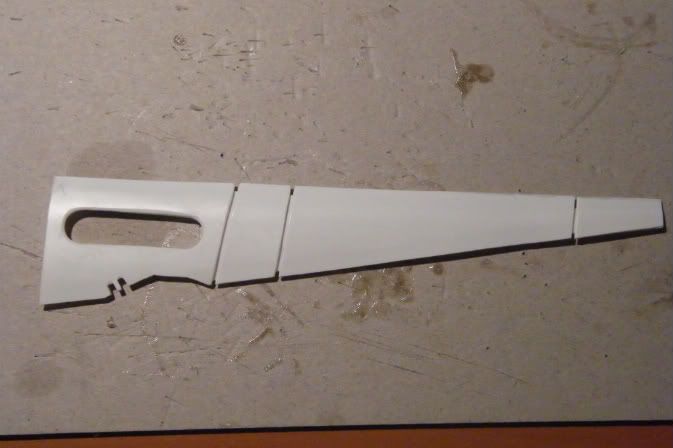
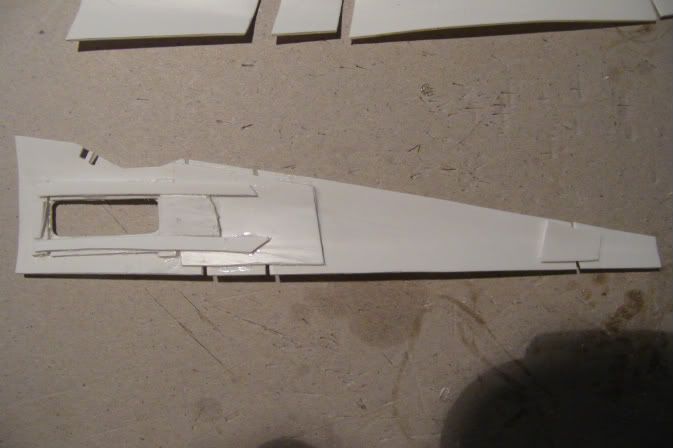
The pieces of plasticcard that holds the 3 pieces together are less wider then upper parts of the panel. This little line of space, about 2mm wide, is the place were the panel is going to be glued to the rest of the model. You'll see what I mean later on.
As you may probably have noticed in the pictures, the side panels have a curve. (the hall will look like this: (""") instead of: [""] if you catch my drift?


I bended the panels horizontally every 1/3 following the top line to the tip. This way the ship will feel more dynamic and streamlined.
little preview? :eek:

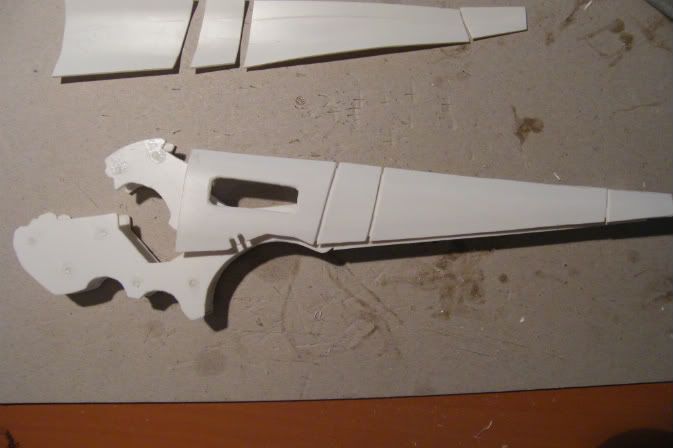
Top:
So far so good, the side panels are looking like I wanted them to. On to the top. This piece was going to be easy. I really got in to it now and got myself some new supply's. My first cutting mat, and some new tools + material. I discovered a hobby store and I was like a little kid in a candy store. I took a piece of plasticcard (really getting tiered typing "piece" and "plasticcard" :crafty: ) haha.
Well, I took 2 pieces of plasticcard and cut it 2,2cm wide, this was essential because this way it would all fit perfectly on the skeleton.
The rims on the side panels were going to flow over the "top" creating that familiar Tau feeling. I'll show you.
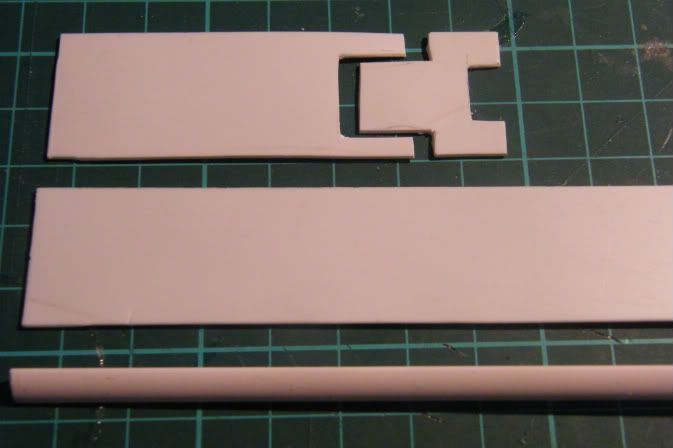
Of course made sure that the pieces were well sanded, sharp and the measurements were correct.
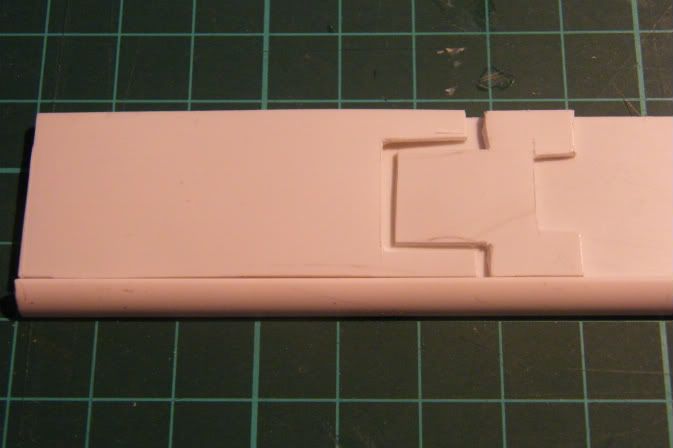
Glue, glue and glue


Top view:

bottom view:
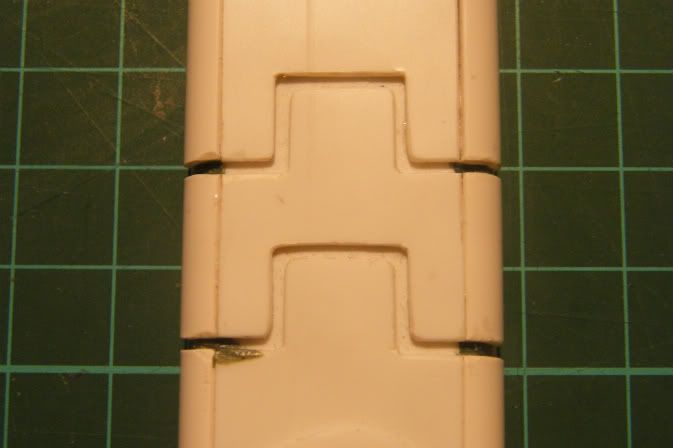
Rims detail:
As you can see I put pieces of curved plastic on the side to give it the "round flow" im looking for. I think on the "how" its officious right? measured the length from rim to rim and cut curved pieces accordingly.
Alright, thats all for now.
tell me what you think of my progress so far.
Daan
ps:
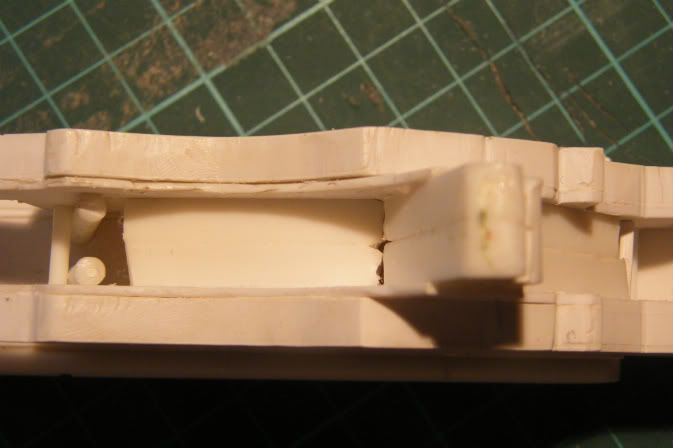
Hope you can see what it is. It shows structural reinforcement between the 2 first layers. Because there is exactly 1cm between them it was fairly easy to put 2 0.5cm pieces together and put it in. its now soled as a kroots skull.
"The big cut" But first:
Sub projects of the "O Mont'Korar":
(random)
-Top Drone sensor
-Top logo
-Nose
-S&D bottom Drone sensor
-Wings
-2 heavy burst cannons
-Bottom
-Belly air vent
-4 shield generators
-4 engine exhausts on the back
-Propulsion exhaust
-Seat
-cockpit/screen
Roughly the "Sub-projects" still to come. some of them are already under way, some of them are already finished.
I'm now at the point I need to finish 1 before I can continue with the rest. So I thought I'll show you what I have bin working lately.
With the "Top" and the "side panels" finished I wanted to get started on the seat. I came to realise that it would be much easier working with the skeleton if I could actually reach the "seat" and the "cockpit/screen" :crafty:
So I decided to cut the "Skeleton" up into 2 pieces. This way I could reach the 2 fairly easy and glueing them back together wasn't going to be a problem. Ill show you what I mean: :roll:
"the Seat" This turned out to be a very fun sub project. Learned a lot from this. to be honest with you, I think it looks really cool and just the way I wanted it to be.
As you can see in the concept sketch, the seat is designed to be comfortable. The "O Y'eldi Mont'yr" is sitting in a laid-back position, with his feet (feet?) resting side to side. I wanted to create a seat that wouldn't feel like a little tricycle, but rather like a big motorcycle.
I used multiple layers of plastic, greenstuff and 4 existing pieces to create this seat. Ill show you how I cracked this sub project:

I started with the skeleton part of the seat. Don't have a accurate picture of this (yes, I sometimes get into the flow and forget making step-by-step pictures) but I think you guys can clearly see what I have done.


Took the shape of the "seat" and put it on my new material 5mm thick plasticcard. Applied the "glue-on-duplicate-technique" so I would end up with 2 identical pieces and glued them right on the "skeleton" (used an electrical saw as experiment because there's NO way I was getting trough this 5mm with a knife. Worked pretty good, although the heat of the saw going up and down made the plastic melt and harden again within seconds, so there was a lot of cutting and sanding involved.... Haven't got the technique down as good as I want, but its going better every time.

Then took a piece of 1,2mm plasticcard and curved it using a scissors and discovered that you can bent and curve the 1mm card fairly easy.
slapped that on and now I had a very good base to do some greenstuffing on.
So that was the first layer. Its time for the next. Used the electric saw with the "glue-on-duplicate-technique" again end made these.

They were going to fit on the "seat" like this:

As you can see I greenstuffed a bit between were the curved plastic meets the first 5mm layers. This way it looks They're flowing into each other.
But before I was able to glue the second layer on, I needed to make the 4 shield generators. These things were on my mind for quite some time now and I finally got all the pieces together.


As you can see the panels have a curve outwards.
 "4 shield generators"
 Alright, these things were going to give a very distinguished look to the model and I had a few idea's for doing them.
But then I found 2 separate pieces who were perfect for the job! ill take you trough it real quick.
These were the ingredients:


Some greenstuff to hold in place. use this technique if I need to make sure something really isn't go anywhere.

 GS
GS has quite nice "sticky" quality's.


since I only have 3 of the shield generators I needed to make 1 myself. I tried using
GS moulds, but they kept failing me. Soo, I got my self this silicone stuff. (don't remember the name, but could look it up if some ones needs it, I'm sure it's German)
You can shape it and make imprints easy. Once hardened it stays flexible so its easy to get the
GS out again. really nice stuff and it works perfect.


Last step: I wanted to put the grew think in the hole of the black thing.. but they weren't evenly big.. hm, that was a problem.
then it hit me... If I could just... would it work?


would it really be this...

easy?
yes it was

haha. good times, good times.
end result:


Before we begin with the next step: I'm posting all these step-by-step pictures so you guys can see what and how I have done some things and so other modellers may get inspired. I'm a picture guy; I like pictures. Hope it's not boring

Ok, Here we go again!
"seat" (part 2) I was trying to find the step-by-step pictures for this, but they're not on my computer nor camera any more..
So, for this ill show you the finished product right away.


There you have it. An Greenstuffed seat. took an hour or 2 to shape it the way I wanted to be. then after letting it dry for an hour carved the little lines you see that indicate the segments with my hobby knife. (also fitted the fire-warrior on it while it was still "wet" so the seat not just looks good, be he can actually sit on it :roll:

) (pictures are not going down in size on the site, don't know why not)
We're now seconds away from the "seat" unveiling. This is something I want you guys to see and to hear what you have the say! :eek:

But first:
"4 shield generators" the mounting I was breaking my head about this one too. They needed to be straight and centred! but how?
then, of course! Greenstuff is my best friend! :evil:


On they go!

On goes the greenstuff! I didn't have to do this very clean (although I really wanted to

) because this was going to be covered by plastic card.


Took some time to position them properly, but the
GS gave me enough flexibility!
(you can see the "top" and "panels" taped in place and the "heat exhaust in the panel sticking out

)

Second pare.
Finished product:

Next up:
"seat" part 3, the sides, nice and curved. To make all the layers come one, I needed to do some good sculpting. Found out using my fingers I could get good results. I needed a really smooth serves with nice rounding and curves. This is what I did:
ah, but first: remember the second layer? cut away the end a bit, and glued it right on.


some good
GS snake on there and sculpting I went.
Finished product:

mostly used my fingers. The big issue was getting the 2 equal!

Alright, here we go.
Next up:
get ready there are a lot of pictures coming, took like 20 of them to show you the almost finished "Seat".
I always like to see figures from all angles, so that's what I did.
I proudly present the (almost) finished "Seat" Now follows a sequence of pictures featuring the "Seat" no further work is being done.
Ofcourse first-off: The man of the hour, the
"O Y'eldi Mont'yr" 


(Some pictures without the operator


And at last the "seat" together with the "skeleton"+"top" and the operator sitting comfortable. (bad quality, buts just a sneak


Aaaaah! the seat is up! finally I can show you what I have bin working on for quite some time!
I learned a lot from this sub project and I'm glad it isn't finished yet.
You can see the sculpts I did on it quite good now I think? (or do we need more pictures

haha)
Getting the "4 shield generators" in place was a pain but doable. It was very nice to see when I put the 2 layers up they really paid off.
In one of the pictures you can clearly see the "skeleton" inside the "seat".
Alright guys, Tell me what you think how this turned out.
Cheers,
Daan