| Author |
Message |
 |
|
|
|
|
Advert
|
Forum adverts like this one are shown to any user who is not logged in. Join us by filling out a tiny 3 field form and you will get your own, free, dakka user account which gives a good range of benefits to you:
- No adverts like this in the forums anymore.
- Times and dates in your local timezone.
- Full tracking of what you have read so you can skip to your first unread post, easily see what has changed since you last logged in, and easily see what is new at a glance.
- Email notifications for threads you want to watch closely.
- Being a part of the oldest wargaming community on the net.
If you are already a member then feel free to login now. |
|
 |
2010/12/15 14:06:17
Subject: Drybrushing Tanks
|
|

Death-Dealing Ultramarine Devastator
|
Hey everyone, I would just like to apologize off the bat because i'm sure this question has been answered somewhere in here but i've spent the last 15-20 minutes looking and was getting fed up so i figued i'd fire this question off again.
I'm finally putting vehicles in my ultramarine army and i was just wondering how to make it faster but maintain an attractive paint job. I know dry brushing is a preffered technique but i'm unsure of how to do it over large areas(ends up looking like just putting paint on)
Any and all tips would be much appreciated. Thanks very much.
Tom
|
|
|
 |
|
2010/12/15 14:18:11
Subject: Drybrushing Tanks
|
|

[ARTICLE MOD]
Huge Hierodule
|
i typically use a very large flat (#4) brush and overbrush. The paint will be applied pretty uniformly, but still be pretty fast.
|
|
|
|
|
|
2010/12/15 14:23:54
Subject: Re:Drybrushing Tanks
|
|
Death-Dealing Ultramarine Devastator
|
Okay thanks for the brush tip, i'll go pick one up today.
|
|
|
|
|
2010/12/15 15:08:40
Subject: Re:Drybrushing Tanks
|
|
Chalice-Wielding Sanguinary High Priest
Arlington TX, but want to be back in Seattle WA
|
I drybrushed an Ultra LR once and it turned out nicely. Basically, buy yourself a decent size brush (not to big as you want the bristles to able to reach all the details and crevases of the tank), then take a small amount of the color you wish to work with, apply it to the brush and mix it around into the bristles. Then wipe the brush off on a paper towel or some type of cloth until you have removed most of the excess paint. When you start to apply the paint to the model, you want to keep you brush strokes all going in the same direction. This was my finished product below, you can really make it look great by adding a highlight to the edges, I chose Ice Blue. To drybrush my Ultramarine tank I started with regal blue (heavy application), then I drybrushed Ultramarine Blue, next I did a medium application of Ultramarine blue/spacewolves grey. I think it turned out alright. Best of luck!
|
 4250 points of Blood Angels goodness, sweet and silky W12-L6-D4 4250 points of Blood Angels goodness, sweet and silky W12-L6-D4
 1000 points of Teil-Shan (my own scheme) Eldar Craftworld in progress 1000 points of Teil-Shan (my own scheme) Eldar Craftworld in progress
 800 points of unassembled Urban themed Imperial Guard 800 points of unassembled Urban themed Imperial Guard
 650 points of my do-it-yourself Tempest Guard 650 points of my do-it-yourself Tempest Guard
 675 points of Commoraghs finest! 675 points of Commoraghs finest!
The Dude - "Jackie Treehorn treats objects like women, man."
Lord Helmet - "I bet she gives great helmet."
|
|
|
|
|
2010/12/15 15:11:48
Subject: Re:Drybrushing Tanks
|
|
Death-Dealing Ultramarine Devastator
|
Wow yea i can really see the drybrushing at work now and it looks great. Good job on that land raider and thanks for the tips.
|
|
|
|
|
2010/12/15 15:20:25
Subject: Drybrushing Tanks
|
|
[ARTICLE MOD]
Huge Hierodule
|
Here's the last tank I did. Camo brown spray as an undercoat, Mechrite Red overbrushed, then Red Gore

|
|
|
|
|
|
2010/12/15 15:22:04
Subject: Drybrushing Tanks
|
|
Member of the Malleus
|
Very nice Land Raider! What color did you basecoat with?
|
|
|
|
|
2010/12/15 15:24:08
Subject: Re:Drybrushing Tanks
|
|
Regular Dakkanaut
|
So far I tend not to do extensive dry brushing on my vehicles for my Space Marines. However, when I do it I like other posters use a larger brush. Try to find two larger brushes, one that is pointed and one that is almost flat tipped.
To speed up painting my vehicles for my base coats I use very thin GW paint, which is being thinned with liquitex flow aid. Then apply the paint with a larger brush in several coats. The thinned paint will more easily reach into details without building up excessive amounts of paint. Your first coat will look like crap as if you prime black you will still see it showing through the paint, which is what you want. Then each coat after words will slowly make that disappear.
Here is an example of one of my not yet completed Predators;
 http://www.flickr.com/photos/inzeos/3716337155/in/set-72157619873974608/
|
|
|
|
|
2010/12/15 15:39:25
Subject: Drybrushing Tanks
|
|

Ork-Hunting Inquisitorial Xenokiller
|
I've been wondering how to work with bigger surfaces myself, such as those on rhinos and the alike. My friend plays Ultramarines, so i've been meaning to help him out with the paintjobs. But i haven't got a clue on how to paint those tanks, else than to the standard approach; - primer - base coat - shadows - re-basecoat (lighter color?) - highlights - details (which i have got NO clue on how to make) @E-206 - can you explain a little how you got the fine details down on the model, such as the dirt/mud? Ifurita wrote:Here's the last tank I did. Camo brown spray as an undercoat, Mechrite Red overbrushed, then Red Gore
Those mud effects looks really good. How did you manage to make those?
|
|
This message was edited 1 time. Last update was at 2010/12/15 15:40:56
:: I'm not suffering from insanity; I'm enjoying every minute of it! :: |
|
|
|
|
2010/12/15 15:39:56
Subject: Drybrushing Tanks
|
|
Chalice-Wielding Sanguinary High Priest
Arlington TX, but want to be back in Seattle WA
|
Maxstreel wrote:Very nice Land Raider! What color did you basecoat with?
Black Primer then laid down a heavy drybrush of Regal Blue to get the basecoat started
|
4250 points of Blood Angels goodness, sweet and silky W12-L6-D4
1000 points of Teil-Shan (my own scheme) Eldar Craftworld in progress
800 points of unassembled Urban themed Imperial Guard
650 points of my do-it-yourself Tempest Guard
675 points of Commoraghs finest!
The Dude - "Jackie Treehorn treats objects like women, man."
Lord Helmet - "I bet she gives great helmet."
|
|
|
|
|
2010/12/15 18:14:56
Subject: Drybrushing Tanks
|
|

Rotting Sorcerer of Nurgle
|
|
Check out my gallery here
Also I've started taking photos to use as reference for weathering which can be found here. Please send me your photos so they can be found all in one place!! |
|
|
|
|
2010/12/15 18:44:18
Subject: Drybrushing Tanks
|
|
Jovial Plaguebearer of Nurgle
|
These methods work great. The only thing I do different is no matter the final color, I use black as a base. I know the brown for red, etc is more accurate but I like the look that comes from a black base.
|
|
|
|
|
|
2010/12/15 20:41:22
Subject: Drybrushing Tanks
|
|
Chalice-Wielding Sanguinary High Priest
Arlington TX, but want to be back in Seattle WA
|
Billinator wrote:@E-206 - can you explain a little how you got the fine details down on the model, such as the dirt/mud?
This is a tank I painted almost 5 years ago now. I dont think it has any mud on it, but I did weather it some. There are a few simple techniques you can do to accomplish minor weathering still using your drybrushing skills. The vents on my tank for example are simply a drybrush of chaos black to create diesel gunk. I would recommend when drybrushing black wipe almost all the paint off until you can barely see pigment coming off the brush, its much better to apply to little than too much. The chipping I did was a technique that was popular at the time (since then though its seems that painters do chipping differently now) it just involes painting a black area, then going over it with boltgun metal, making sure to leave the outline of the black. Quite simple. When drybrushing you can do different things to get different effects, scorched brown and beastial brown will give you a nice mud effect, bleached bone drybrushed extremely lightly on the tank can give the appearnce of dust. Search around for other weathering tips online. Best of luck with your tanks and drybrushing!
|
|
This message was edited 2 times. Last update was at 2010/12/15 20:41:57
4250 points of Blood Angels goodness, sweet and silky W12-L6-D4
1000 points of Teil-Shan (my own scheme) Eldar Craftworld in progress
800 points of unassembled Urban themed Imperial Guard
650 points of my do-it-yourself Tempest Guard
675 points of Commoraghs finest!
The Dude - "Jackie Treehorn treats objects like women, man."
Lord Helmet - "I bet she gives great helmet."
|
|
|
|
|
2010/12/15 20:46:55
Subject: Drybrushing Tanks
|
|
[ARTICLE MOD]
Huge Hierodule
|
Here's my basic mud/weathering technique
http://kan.org/michael/mkp/weathering_mud.php
The build up on the blade was done with weathering powders, mixed with some alcohol. I do my chipping pretty much the same way as described above. I use Charandon Granite then apply gunmetal silver over it, leaving a slight outline.
|
|
|
|
|
|
2010/12/15 21:37:39
Subject: Re:Drybrushing Tanks
|
|

[MOD]
Anti-piracy Officer
Somewhere in south-central England.
|
My most weathered tank.
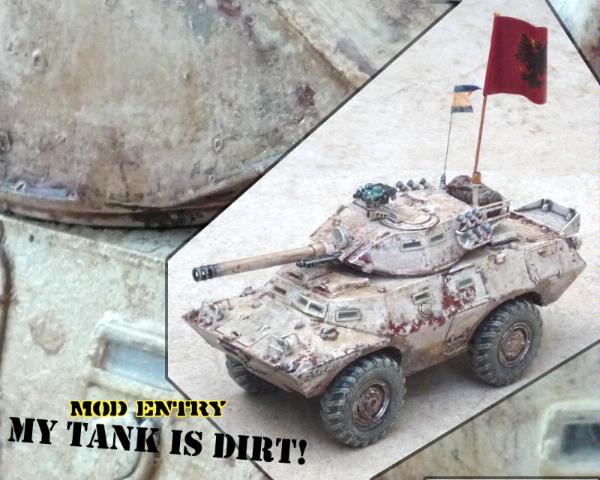
I used just about every technique in the world -- sprays, salt chipping, drybrushing, sponging, washes, and acrylic media mud. It wasn't hard to do but it took a long time just ebcause of the number of different applications.
|
|
|
|
|
|
2010/12/15 21:41:14
Subject: Drybrushing Tanks
|
|

Decrepit Dakkanaut
|
Well, since we are talking about painting tanks, I'll throw in a question of my own. (if you want me to make a new topic on this let me know, don't want to hijack or anything)
What's the best method to paint ork vehicles? Since they don't have as many smooth surfaces.
|
|
|
|
|
0101/12/16 00:07:34
Subject: Drybrushing Tanks
|
|
Storm Trooper with Maglight
Back in the UK and hating it
|
the GW tank brush is pretty good for this, it's big and flat. I used it last night to get an obliterator (I know it's not a vehicle but it's bigger than a normal guy) drybrush with 2 levels of colour in a very short space of time, and it looks pretty good IMO.
|
|
|
|
|
|
2010/12/16 00:10:05
Subject: Drybrushing Tanks
|
|
Chalice-Wielding Sanguinary High Priest
Arlington TX, but want to be back in Seattle WA
|
Ifurita wrote:Here's my basic mud/weathering technique
http://kan.org/michael/mkp/weathering_mud.php
The build up on the blade was done with weathering powders, mixed with some alcohol. I do my chipping pretty much the same way as described above. I use Charandon Granite then apply gunmetal silver over it, leaving a slight outline.
Dude that is a fantastic tutorial! I was conflicted because I am going to be painting 5 tanks for my Chapter over the winter break (college) and I am doing all my models NMM. So I had no idea what I wanted to do with the tracks....but not anymore! Great stuff!
|
4250 points of Blood Angels goodness, sweet and silky W12-L6-D4
1000 points of Teil-Shan (my own scheme) Eldar Craftworld in progress
800 points of unassembled Urban themed Imperial Guard
650 points of my do-it-yourself Tempest Guard
675 points of Commoraghs finest!
The Dude - "Jackie Treehorn treats objects like women, man."
Lord Helmet - "I bet she gives great helmet."
|
|
|
|
|
2010/12/16 12:04:12
Subject: Re:Drybrushing Tanks
|
|
Death-Dealing Ultramarine Devastator
|
Wow that was a very helpful tutorial thanks for posting
|
|
|
|
|
|
|