The subject line sums it up pretty nicely. Played a regular opponent of mine who always gives my Tau a tough fight with his IG. He recently, however, had purchased some DH troops from a friend who was selling them on the cheap, and was toying around with a DH list with inducted guard. He had been very pleased with their performance against other players in the area, and was looking forward to giving them a run against my Tau.
Needless to say, I was pleased to see the basilisk stay in its case. I had yet to see a DH list heavy on guard or AT weapons, so I hoped my Hammerheads would have free run of the field. We'll see.
Lists were something like this:
Tau
Shas'el TL Plasma, Fusion, HW Multi
Shas'el TL Plasma, Fusion, HW Multi
Bodyguard with same
4 Stealth Suits
4 Stealth Suits
2 Deathrain Suits
6 Firewarriors
14 Kroot
14 Kroot
14 Kroot
3 Hammerheads with Railgun, Burst Cannons, Decoy, Multi and Disruption
Demon Hunters (Approximate...not an expert on justicars and such)
Cheap inquisitor with BP and CCW
Leader in terminator armor with 4 buddies
7 GKs with leader and teleport homer
5 GKs
2x IG Platoons
HQ with lascannon
2 squads with ML and GL
6 Storm Troopers with plasma gunner
2 Sentinels with autocannon
1 Leman Russ with 3 HBs
(For the following diagrams, use your imagination a bit please. Not quite to scale, and turning units is a bit of a pain, so be prepared for units to jump around a bit and such.)
Battlefield:
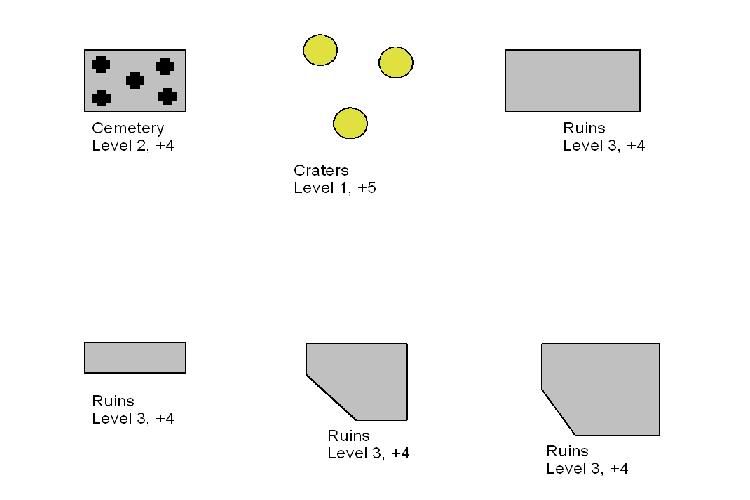
Pretty standard. For some reason, the tables always seem to get setup around here with terrain around the edges and a big empty spot in the middle.
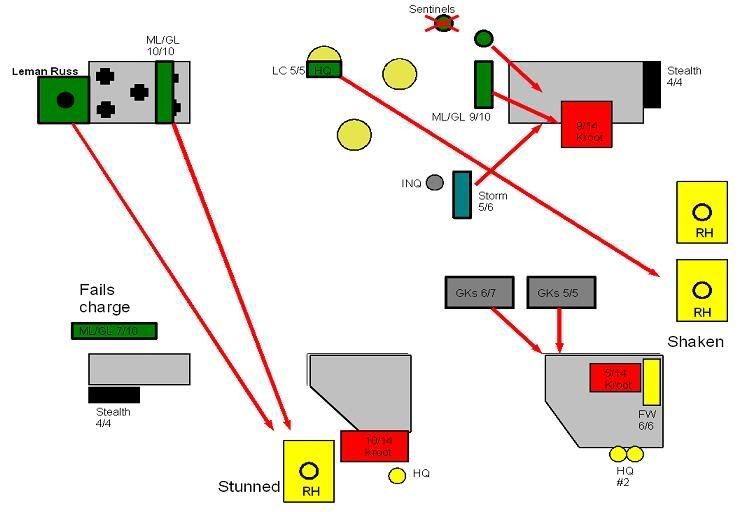
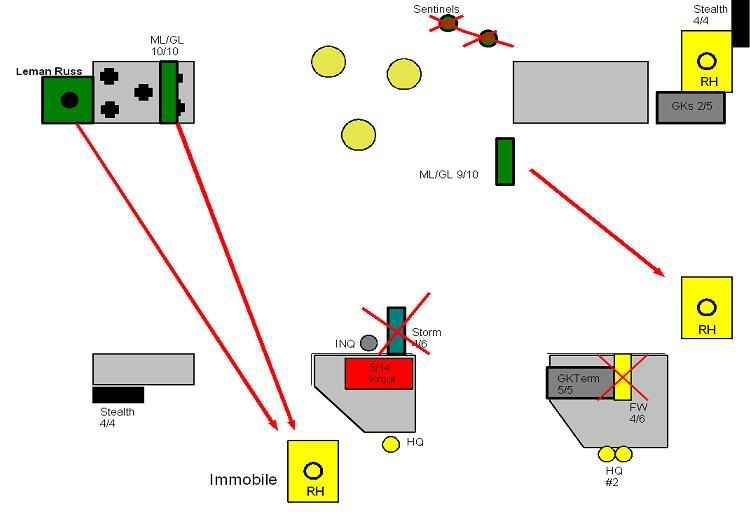
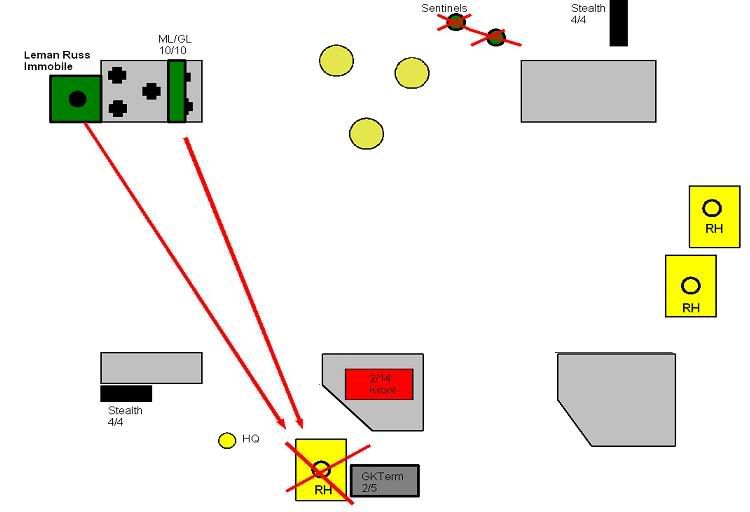
Setup:
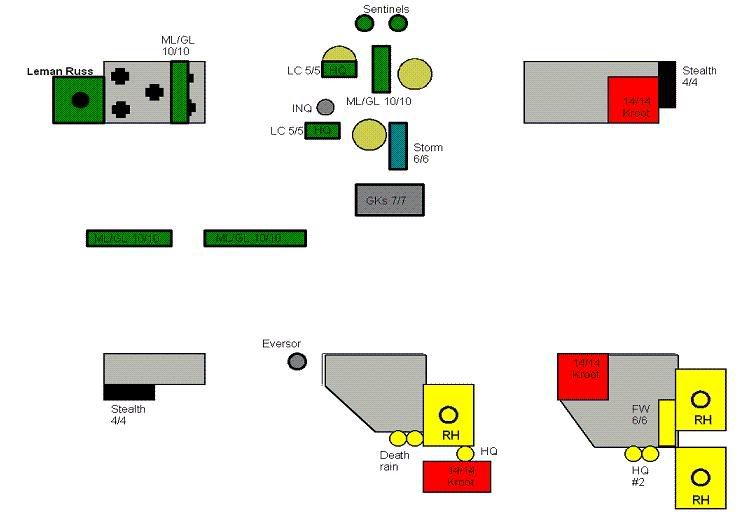
The first of my mistakes. I even saw the eversor assassin, but didn't really plan deployment around him. Should have kept my troops hidden within my tanks....oh well.
He wins the roll, and decides to go first.
DH Turn1:
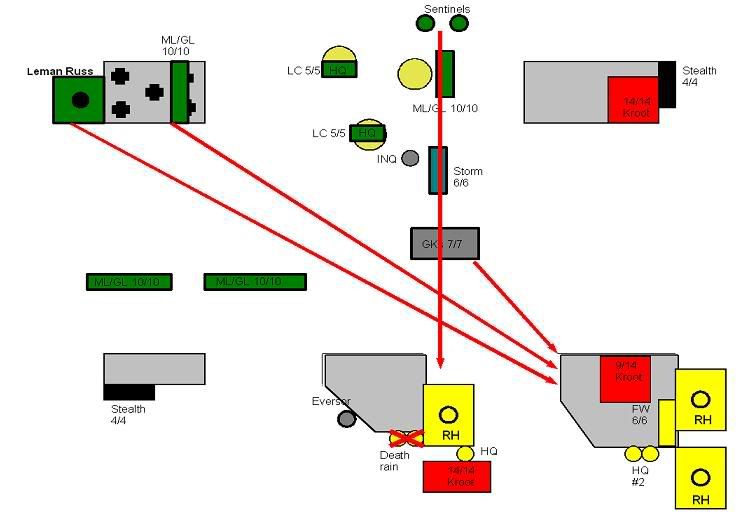
Pretty much what I figured. The eversor got to infiltrate first, so he deployed 13" away from my death rains, and they didn't take the charge well. My kroot took a pounding, but overall losses weren't too bad. They broke, of course, but the terrain slowed them down. Sentinels took their shots and failed to hurt the hammerhead.
Tau Turn 1:
Not a bad round of shooting. Took out a pair of squads, a killed a few troops here and there. Kroot couldn't shoot the eversor as he had ducked behind the building after slaughtering the suits, so we had to assault him. He killed a pair in fighting and two more when he melted, but in the end the kroot got him.
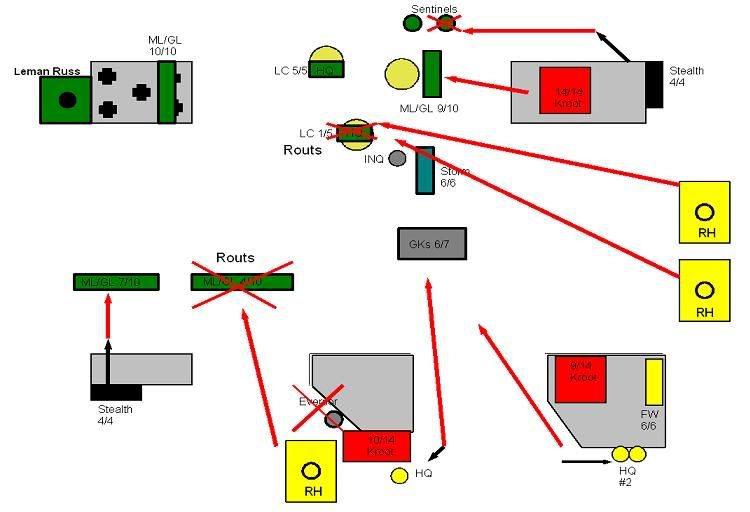
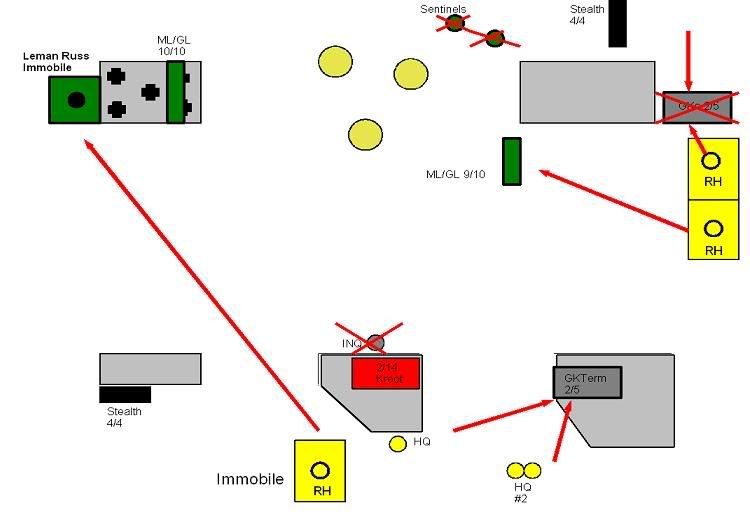
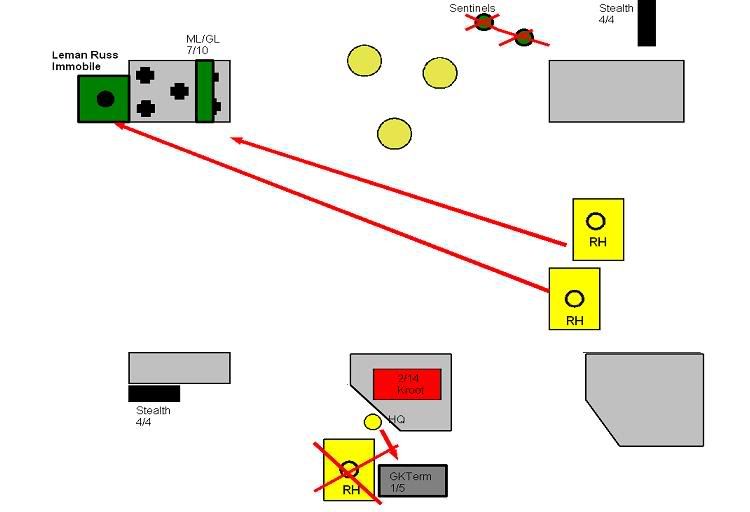
DH Turn 2:
The smaller GK squad teleports in, and two kroot squads end up taking a bit of a beating. Hammerheads take some hits, too, but nothing serious so far. Both kroot squads break.
Tau Turn 2:
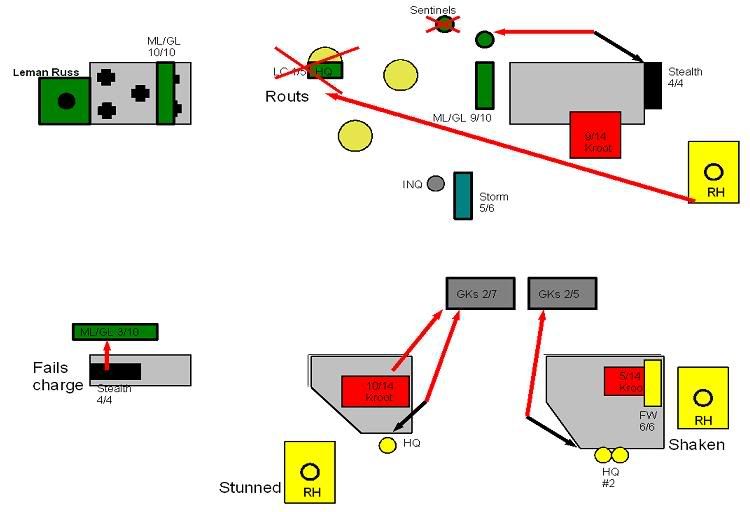
Now the GK squads are close enough for my HQs to jump out and rapid fire, and they get hurt. The only active hammerhead continues the primary mission of removing AT weapons from the field by nuking an IG HQ with lascannon. My stealth suits on the left flank shoot some more IG, but roll snake-eyes for the charge, so they're stuck in the building. Other squad fails to hurt the remaining sentinel.
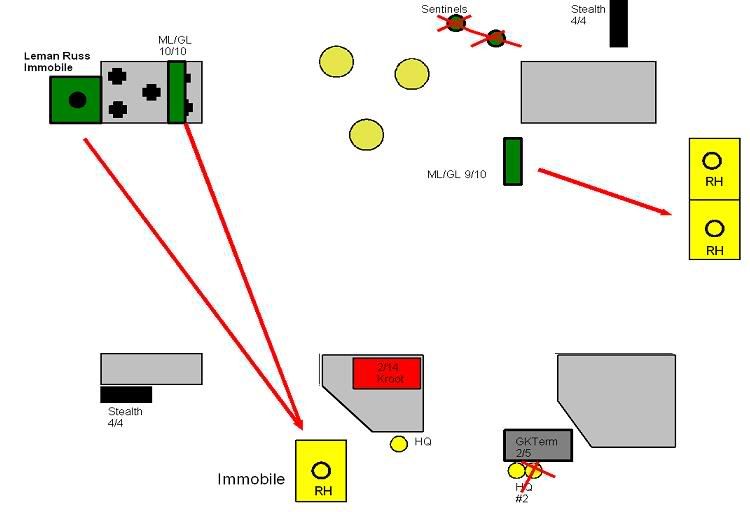
DH Turn 3:
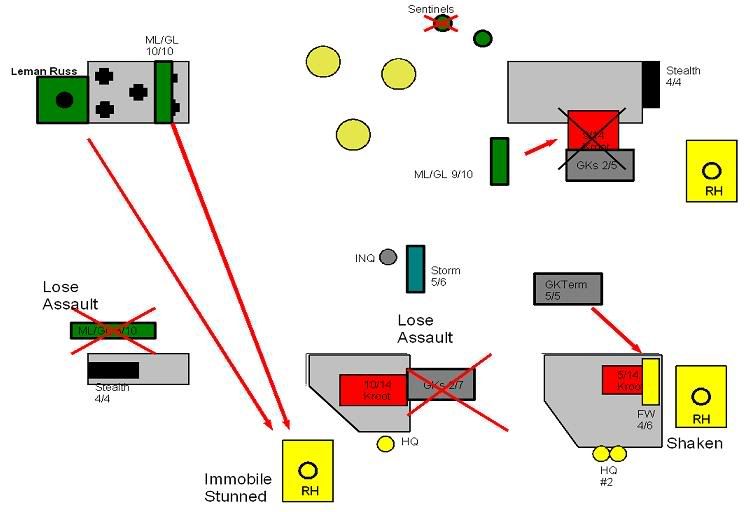
Now the 5 GK terminators drop in. Missile launcher in the ruins penetrates my hammerhead and immobilizes it. Could have been worse, I suppose. The kroot on the right flank take another hail of shots, and are finished off by the charging GKs. The kroot on the left, however, avoid incoming fire and kill the assaulting GKs from cover before they get a chance to strike back.
Tau Turn 3:
Another error on my part. I moved my right-most hammerhead up along the edge, hoping to shoot the squad in the ruins. Of course, the two destroyed sentinels were blocking LOS....not sure what I was thinking. The stealth team runs to the corner to avoid the GKs coming around the corner. Few shots at the terminators do nothing...wait for the inevitable and hope my HQs can hurt 'em.
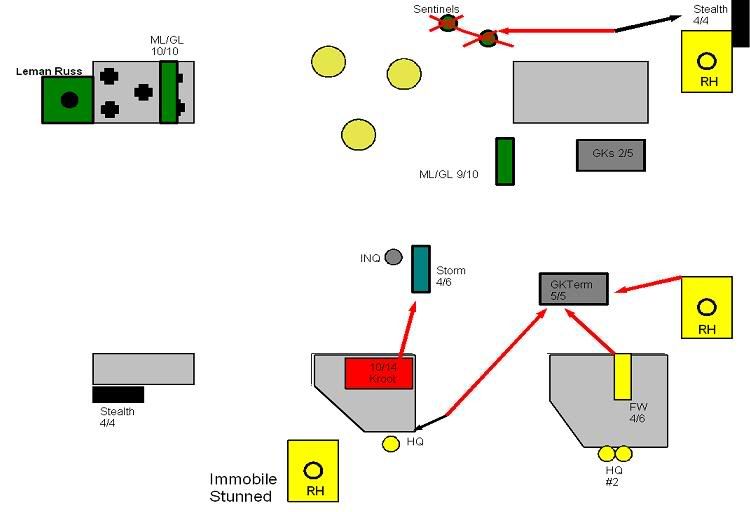
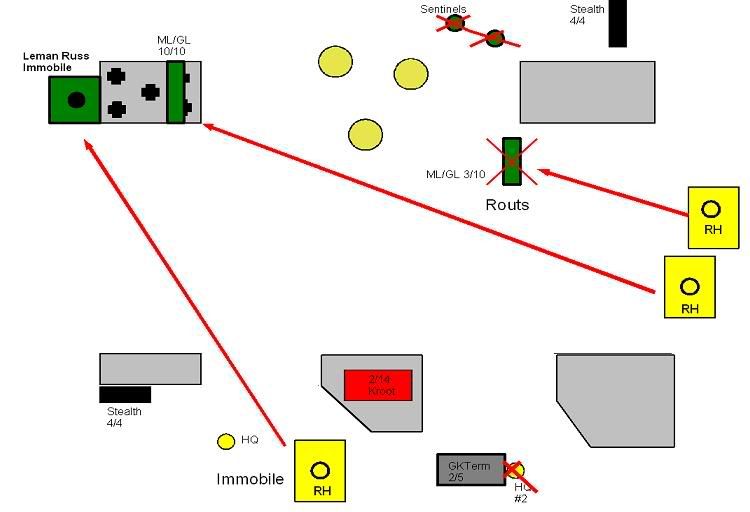
DH Turn 4:
And, the inevitable happens, with the termies charging the poor FWs and cutting them down. GKs round the corner, but fail to see the stealths. The inquisitor and stormtroopers charge, and in the nasty fight that follows, all the storm troopers and 4 kroot die.
Tau Turn 4:
The Hammerhead that been pounded the last few turns gets some measure of revenge with a glancing (cover) immobilization against the Leman Russ. The two HQ teams do some damage to the terminators, killing 3 off. Good, but not enough. The Hammerhead finishes off the remaining GKs after the stealths fail to kill either.
DH Turn 5:
It's getting desperate for the DH. Lots of ineffective shooting, but the assault pans out, killing the bodyguard. The shas'el doesn't break, and the terminators close in.
Tau Turn 5:
The free shes'el runs behind the downed hammerhead while watching his buddy get horribly butchered. The IG squad in the open gets easily cut down.
DH Turn 6:
Once again, shooting fails to finish off the crippled Hammerhead. The angry termies, however, are more than happy to charge its rear armor and blast it.
Tau Turn 6:
The shas'el regains his courage and jumps out to blast the final terminator, leaving the leader (whatever he's called) left. The hammerheads fail to do much.
I didn't get the final point total from him, but I'm sure I killed over 1250 points of stuff. Adding in the two corners, and I had a pretty solid win. Think I lost about 750 points. Game went pretty much according to plan: use tanks to kill AT units quickly, then roam the field shooting whatever threats remained. The HQs worked out well, helping finish of the power/terminator armored foes much more quickly than otherwise would have been possible. The kroot managed to stick around and soak up several rounds of fire, and in some cases did some pretty decent damage in return.


