Switch Theme:

Using PowerPoint to create a guide for freehand text  [RSS] Share on facebook Share on Twitter Submit to Reddit
»
Author Message
Advert


Forum adverts like this one are shown to any user who is not logged in. Join us by filling out a tiny 3 field form and you will get your own, free, dakka user account which gives a good range of benefits to you:
  • No adverts like this in the forums anymore.
  • Times and dates in your local timezone.
  • Full tracking of what you have read so you can skip to your first unread post, easily see what has changed since you last logged in, and easily see what is new at a glance.
  • Email notifications for threads you want to watch closely.
  • Being a part of the oldest wargaming community on the net.
If you are already a member then feel free to login now.


Made in us
[ARTICLE MOD]
Huge Hierodule


North Bay, CA

For me, freehanding text is one of the harder things to do. Getting text size, spacing, and alignment is always a paint. For my latest model, a Chaos Land Raider, I created a simple template/guide in PowerPoint, that I then used to help guide my painting of letters. Here's how you do it:

Step 1.
Measure the space where you want the lettering. I was putting this on a Land Raider side door, which was about .75 inches

Step 2.
Open PowerPoint, create a text box, and write out the text you want. Play around with fonts to get the style you want. Once you're done, right click on the text box and select 'Format Text Box'


Step 3.
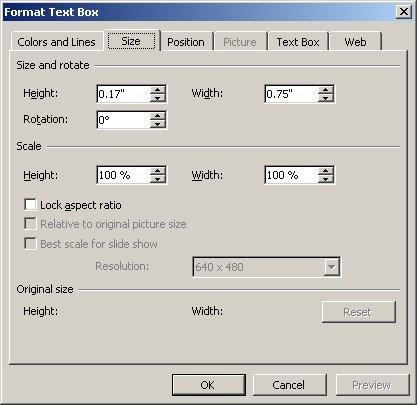
First, go to the tab called 'Text Box' and set the margins. You'll have to play around with these settings a bit. I went with a 0 margin, you might want to go .01". This will determine how much room around your lettering you have to play with.


Step 4.
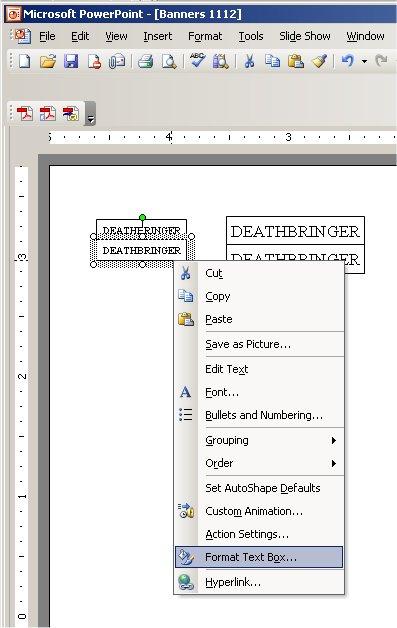
Next, go to the tab called 'Size' and set the width to your measurements. If your text wraps inside the box, you'll have to play around with font sizes so that everything fits on one line. Once you're done, clone your text box and stack them like I have in the first picture.


Step 5.
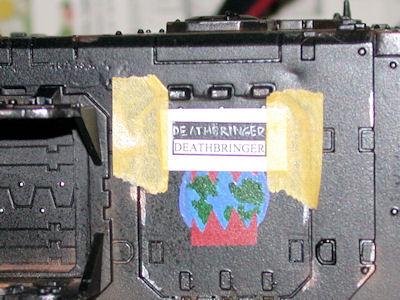
Print your sheet, cut out one of the text boxes (either the upper or lower box), then cut around both of them. Use some low tack tape to attach this to the area you want to paint your lettering, and as you can see, you'll have a window for painting and the lettering above or below to help guide your spacing and size. You can cut out the upper or lower text box, depending on the spacing on your model.


The really nice thing about this is that if you want to paint lettering on other vehicles, your template will help ensure everything is the same size.

This message was edited 1 time. Last update was at 2011/02/12 19:01:03


Made in gb
Yellin' Yoof


england

awsome

spartans don't die, they are just missing in action  
   
Made in us
Erratic Knight Errant


This is really clever. My only blade is a clumsy boxcutter left over from Target that could never do this. What kind of knife do you use?

   
Made in us
[ARTICLE MOD]
Huge Hierodule


North Bay, CA

Standard X-acto knife. Really don't need anything fancy, just so that it has a sharp tip. I imagine a basic X-acto knife is a little easier to handle than a box cutter.

   
Made in us
Dakka Veteran


Nifty idea, but why would you use powerpoint instead of anything else?


Made in us
[ARTICLE MOD]
Huge Hierodule


North Bay, CA

Because it's easy to set up and arrange simple text boxes the way I like. Really, use anything that works for you.


Forum Index » Painting & Modeling Tutorials
Go to: