Hey folks,
I have made a tutorial a while ago on how I magnetised my grey knights, using 2mm diameter neodymium magnets (aka rare earth magnets). It can also serve as a general tutorial on how to magnetise anything really. You may also find it handy to magnetise certain kits like the space marine commander. Basically, any troops with thick enough arms to house a 2mm magnet should be good. Smaller magnet might be a bit too weak to actually keep the parts in place in an efficient manner...
1. Finding the right size magnets.
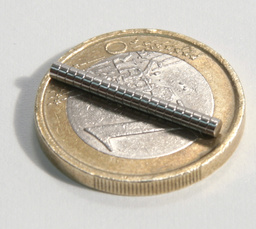
First of all, I started looking for suitable magnets. They'd have to be strong, so they'd have to be neodymium magnets (aka rare earth magnets).
I tried various sizes, but 2
mm ones seemed like the best option allround. They allowed for enough weight carry capacity (up to 130gr according to the manufacturer), while being small enough to fit into the smallest bits (such as the hands).Even with the 2mm diameter however, it would still be a VERY close call on some bits, so you couldn't afford to be off centre. More on this later.
I got them at this retailer:
http://www.supermagnete.be/eng/index.php
Their prices were reasonable and the transport options weren't too bad. I'm sure there are other suitable retailers however, for those not living in the European Union.
The magnets themselves are 2
mm in diameter and have a depth of 1
mm. So to match this, a quick trip to local hardware store got me a 2
mm drillbit.
 2. Requirements: what will you need.
It's always a good idea to think ahead and have a little list of what you are going to need. So here's a list of what you'll need if you plan to do ANY magnetisation project:
- A pinvice with suitable drills (I have 0,5mm, 2mm,3
mm and 4mm bits for this project).
- A toothpick.
- Superglue and some superglue accelerator.
- A sharp hobby knife.
- Greenstuff/plastic putty
- A crapload of magnets.
The pinvice is a pretty obvious one. You'll need to be drilling a ton of holes into your miniatures. The toothpick might be less obvious though. You'll be working with magnets and then tend to... you know... stick to metal tools. Having a toothpick at hand means that you'll have a “tool” that will not be affected by the magnets and that'll come in handy at some point, trust me on this...
Superglue is pretty obvious as well, superglue accelerator will be extremely handy to get the job done faster. Remember to work in a well ventilated area with this stuff, or you'll be high as a kite in no time!! The rest are just generic things that are always handy when working on miniatures. Now lets get on with it!
Part 3: Drilling holes in the body.
A good first start point, is a single body. This means that the legs will be glued on the base and that the torso (when the two halves are glued together) will be glued to the legs as well. You could magnetise these as well, but I see no point to this.
The heads can be glued on, but can also be magnetised. For the powerarmoured knights, I glued the heads on for 4 out of 5 bodies. The fifth one would get an interchangeble head (helmet option for a regular trooper, or a bare head to be a justicar).
Let that glue cure (plastic glue take a while to set, and you'll be manhandeling these models when you have at them with your pinning vice).
If you are going to magnetise your army, here's what I suggest:
BE CAREFULL WHEN YOU DRILL HOLES. THEY HAVE
TO BE CENTERED!
One thing that can potientially go wrong, is to get the holes for your magnets off center. The magnets will stick to eachother, but the pose you'll end up with, is going to be all screwed up.
To increase your chances of drilling the hole right in the centre, you are going to have to work with pilot holes. These pilots holes will make sure that even the larger drills will stay centered.
Start by taking off all the moldlines and getting a nice flat surface for your shoulder sockets. Then, with your sharp craft knife, try and find the centre spot of the sockets, and make a tiny indentation in the centre.
Even when using the smallest drillbit you have, you will have a hard time staying on centre, and you can be A LOT more accurate for this with your craft knife. After this indentation has been made, get the smallest drill out that you have, and drill into the body. Use this indentation as a guilde for the drill. The body will need 3 (of 4, depending on wether or not you want interchangable heads) holes drilled into it. One in each shoulder, and one right above the “bulge” where the backpack is going to end up.
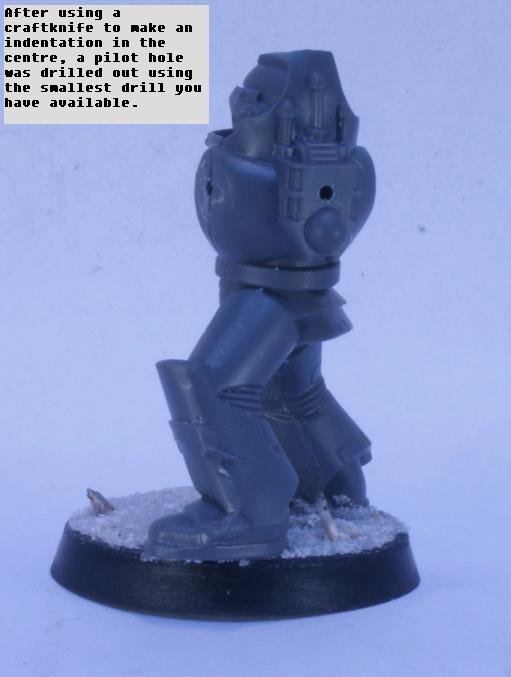
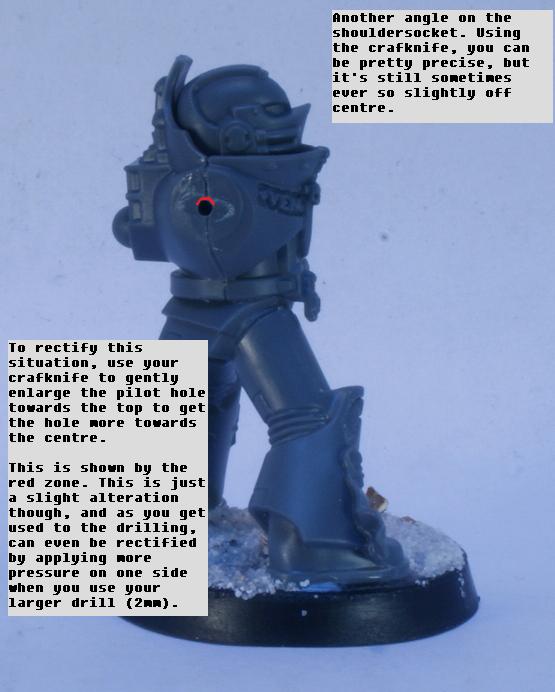
After you made these pilot holes, it's safe to have at them with the 2
mm drill. If you notice these aren't exactly on center, you can still do SOME correcting with your craft knife by making the whole slightly bigger towards the center.
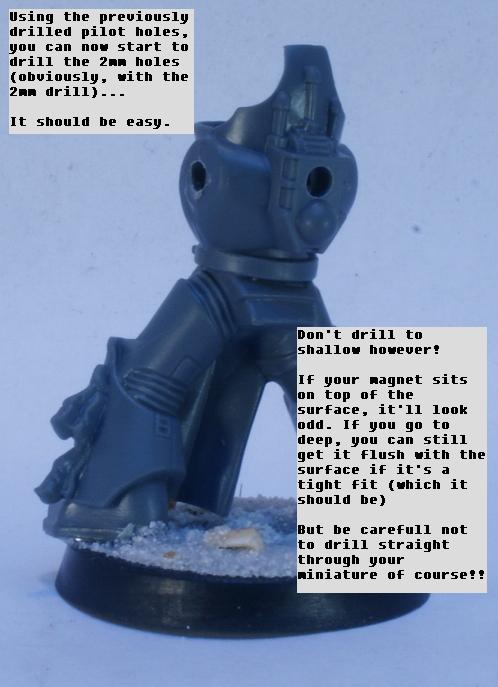
Then drill the hole with the 2
mm drill. Don't make this hole to shallow, or your magnets will sit “over” the surface and the pose will just end up looking weird. Don't drill to deep though, you'll run the risk of drill straight through the miniature, because these drill will go through plastic like a hot knife through butter! This is what it should start looking like.
Now on to the next step: Adding the magnets.
4. Adding the magnets to the body.
PAY GOOD ATTENTION
TO WHAT YOU ARE DOING!!
Obviously, magnets have a given polarity. So it's not a matter of jamming some magnets into tiny holes that you drilled out. If you make a mistake with your polarity somewhere, you're basically boned... because the holes you drill should be so precise, that the magnet is a really snug fit. That snug fit however, means the magnet isn't going to come out any time soon after the superglue has set.
So what I suggest, is to do one FULL TEST model before you move on to any others. That one testmodel will determine the polarity of the magnets of all miniatures to follow. This is done so all the miniatures are full interchangable.
Step 1: Getting the body done.
Luckily, for the FIRST BODY you do, you won't have to be worried about any polarities, but you will have to start worrying about that once you start attaching the arms. Once you attached those arms, you can trace back the polarities that will be needed in ALL OTHER bodies from that point on.
You first start by adding 3 or 4 (again, depending on interchangable heads) magnets to the body. It's rather easy for a straight surface luckily. Just take a single magnet and let it attach to a steel stave with a flat end and a noticably larger diameter then the magnet. This can be the “none sharp end” of your 4mm drill, or (as I have used) the back end of a sculpting tool.
Just add some superglue into the hole, press the magnet in firmly, so it sits flush with the surface. Once it's in and the superglue has taken a bit, slide the holding stave down the surface and your magnet should stay in nicely and flush. Do this for all 3 or 4 holes in the body.
Step 2: adding the magnets to the parts that will attach to the body.
Explaining how to take polarity into account is pretty tricky using pictures, so I used my leet paint skills to make this simple diagram to show you how it's done.
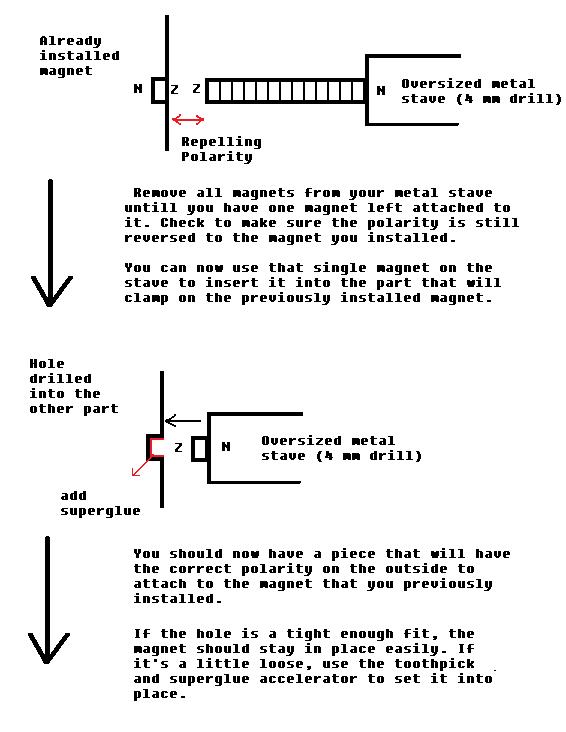
Like I said: check, check and double check before you jam your magnet into the opposite part. If it's not right, you are boned. Use that same method of adding the magnets to all parts and bits that you want to magnetise. I cannot do an example for every single magnet I used in these grey knights, but I have taken a picture of a magnetised grey knight that was “disassembled” to show you were all the magets went in this badboy.
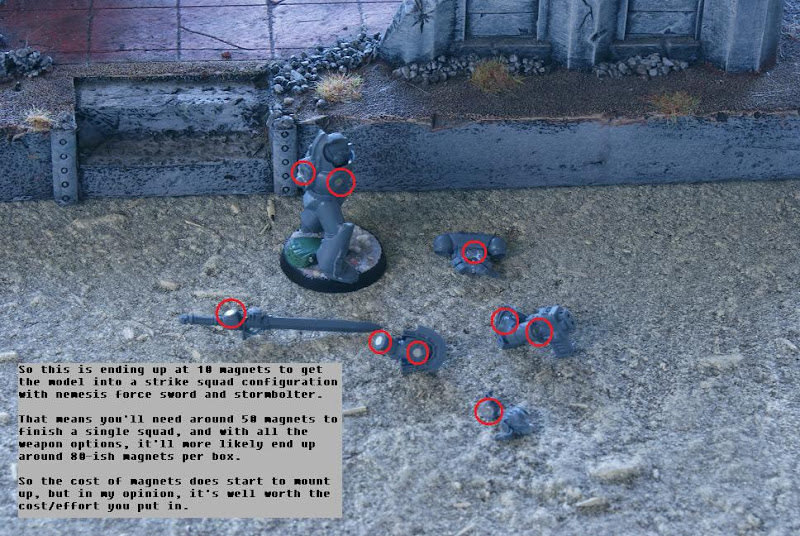
Now remember: this is only for a SINGLE weapon configuration. Adding additional weapons however should be easier and take less effort. If you want to add falchions for example, that'll only take you 2 extra magnets, because the arms already have them! Same deal with the personal teleporters. Swapping backbacks should only be a 1 magnet affair, so is the demonhammer or a halberd (if you convert them slightly to be carried by a single hand, rather then two → more on this later!).
Step 3: Making the rest of your models.
Once your FIRST FULL Grey knight is done, you can start doing the others. Using the method to get the polarity right, you can start working your way back to adding the magnets to the rest of you bodies. Just use the magnets in the arms of your first grey knight to get the polarity right for all the bodies of the other guys to follow.
TIP: Make a mark on the bottom of the base or something, to remember wich guy was the “template” sort of speak, for the polarity of all your later miniatures.
A little planning ahead, will get you pretty far. As an example of this, I will show you two pictures of a single body from a grey knight with two different weapon configurations. ALL these weapon configurations are interchangable to different bodies, because the polarities all match.
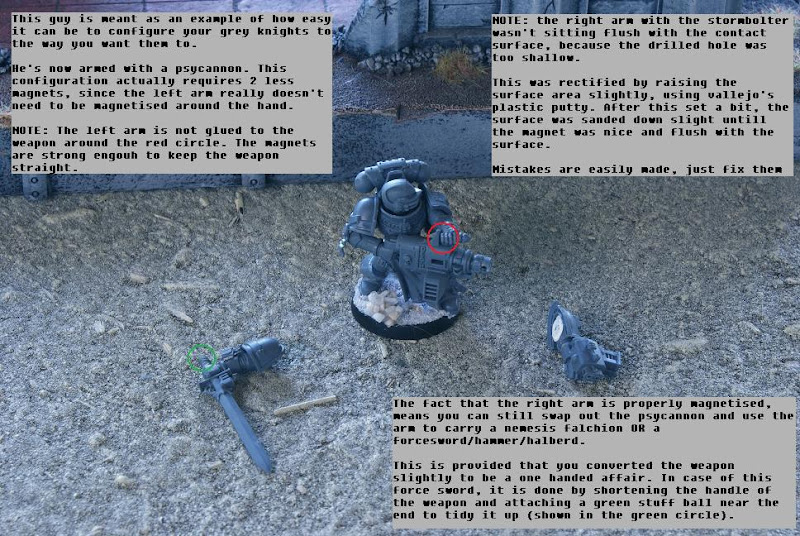
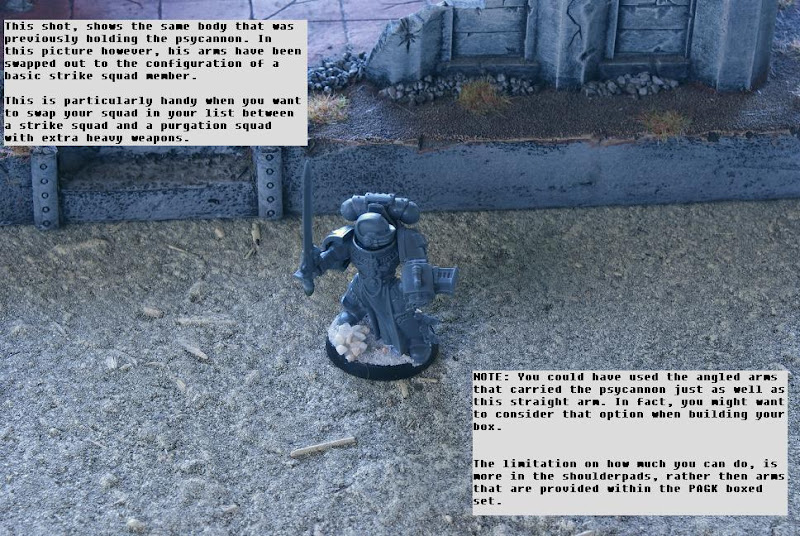
Doing this on a whole army scale takes some planning. Especially when you consider that the bottleneck for your options will be the shoulderpads.
Hopefully, this thing can be usefull to somebody on these boards too.


