
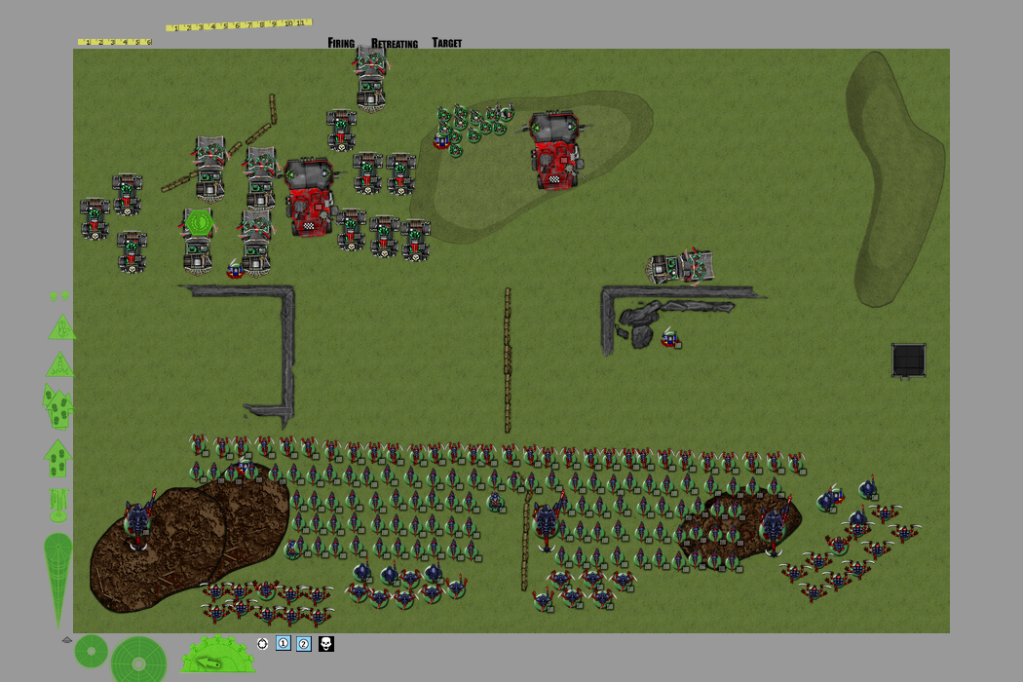
Here's the map! only turn 1 vassal worked. sorry guys, hopefully its descriptive enough that you can still follow it. next time I think I'll cut down on it a little!
Tyranid vs. Orks
Pitched battle and seize ground with 5 objectives.
Orks win roll off and choose north deployment and deploy mostly on the west side of the board with only a unit of buggies and the loaded battlewagon to the east. My other battlewagon which normally deployed with burnas and mek was empty. Instead the burnas and mek started outside of what was the shoota boys truck and the shoota boys deployed on top of the objective in the orks deployment zone.
The Tyranids deployed in strict formation. Along the front of the deployment zone were 2 daisy chains of hormagaunts and termagants. There were two wings of deployment, each containing a squad of 30 termagants (no extra wargear), a squad of hive guard, and a squad of tyranid warriors with a venom cannon led by a tyranid prime with a devourer. Behind all this was a squad of genestealers and a broodlord, and a carnifex with a heavy venom cannon. Connecting the two squads were two venomthropes (meant to give a cover save to all the units) and a carnifex with a strangle thorn cannon.
Tyranids attempt to seize initiative and fail
Turn 1(Orks)
Movement
Everything moves west in an attempt to outflank the tyranids and overload one side before his slower moving infantry can react. My eastern battlewagon and one transport however head up the middle of the board to capture the main objective (worth 2 points) in the middle of the battlefield.
Shooting
Nothing in range
Turn 1 (Tyranids)
Movement
Tyranid forces move up and slightly to the west to counter ork flanking movement, but stay in formation. hive guard on far eastern flank out of synapse range on turn 1(Oops!) and move almost directly west into cover and get back into synapse range for the next turn.
Shooting
All tyranid shooting aimed at truck with big mek and burna boys inside (3 impaler cannons, 2 heavy venom cannons, a venom cannon, and a stranglethorn cannon!) after some very fortunate kustom force field cover saves (about 7 in a row), they only immobilize it and the truck is now stuck sitting on an objective.
Turn 2(Orks) (Orks 3, Tyrannids 2)
The burnas hop out of immobilized vehicle and enter the battlewagon they left earlier! The battlewagon advanced through ruins and does nothing. A truck full of slugga boys advanced 12 got out and prepared to assault the front 2 lines of hormogaunts and termagant daisy chains. The rest of the western orks advance to the cover of ruins and stay there.
Shooting
Ork rokkit buggies and all combined shooting take out a venomthrope in the middle of his deployment. Leaving much more of his army without cover. I’m afraid of shooting my small arms at his termagants and leaving my orks without a unit to assault.
Assault
The 12 boy squad assaults the two squads and due to some good rolls and dozens of fearless wounds the squad comes out unharmed after butchering all of the hormagaunts and 15 termagants.
Turn 2 (Tyranids)
Movement
Nothing moves except some stuff in the east moving towards my truck hiding behind ruins in the middle (while holding the objective!)
Shooting
Now we had an argument here about whether or not units could see through or shoot through assault if anyone has a more educated guess than us that would be great. We ended up treating it as an additional 4+ cover save. So a cover save before you can shoot. So given this, the carnifex managing to explode my battlewagons front armor is even more impressive because he had to roll a 4+ and then a 5+ to hit and then a 6 to pen and then me fail my cover save and THEN to rolls a 6 on the damage chart! Beating all the odds and unhorsing my burnas and mek a second time. They hop and lose a few guys to emergency disembarking and some more tyranid shooting. My big meks forcefield protecting my vehicles from a great amount of shooting along with a difficult to shoot through melee in front of his shooting stuff greatly helped
Assault
Western 30 termagant and zonethrope charge into the melee with my trukk squad and the zonethrope gets squished along with a dozen or so more termagants and a squad of termagants is finally finished and the assault goes on!
Turn 3 (orks)(Orks 4, Tyranids 1, 1 contested)
Movement
Another truck boy squad moves up and unloads in preparation for assaulting the vulnerable carnifex and whatever was left of the ongoing melee. The now unhorsed burna boys charge forward but founder on difficult terrain so instead just kind of hide out of sight. The rest of my trucks move up the western side and get a little closer to the tyranid deployment but stay well hidden. In the middle of the field my battlewagon charges forward a valiant 13 inches but still can’t do anything except get shot. My far western buggies move up to get in range of the carnifex. Buggies in the middle get within range of the tyrannid warrior
HQ unit. One of my trucks attempts to tankshock the carnifex out of cover but explodes instead.
Shooting
The carnifex makes all his cover saves and gets ready to be charged. The other two rokkit buggie squads in the middle and shoot at the tyranid warrior squad instant killing 3 warriors!
Assault
My dropped off unit charges into the carnifex and pulp him thanks to the
PK nob. They consolidate into cover in preparation for the genestealers right on the other side of the terrain. My other assaulting squad right next to it continues to be stuck beating up gaunts but the end is in sight! As there are only 20 left!
Turn 3 (Tyranids)
Movement
genestealers move up to cover but choose not to assault the ork squad in cover that just killed the carnifex. The tyrannid warriors move within assault range of the continuing trukk boy-gaunt melee. The eastern flank moves up 8 inches thanks to running.
Shooting
Hive guard shooting destroys and shakes 2 buggies. Ineffective shooting at my battlewagon from the eastern flank of his army.
Assault
Tyrannid warriors assault the trukk boy gaunt melee and crush the last of my orks but not before the orks reduce the gaunts to a measly 4 gaunts. All the units get crappy consolidations and pretty much stay where they are.
Turn 4 (Orks)(Orks 4, Tyranid 1, 1 contested)
Movement
An empty truck moved into flamethrower range of the genestealers hiding on the other side of the cover. My flamethrowers get a good move through cover and hop inside to take advantage of flaming out of open-topped vehicles. My truck squad still stuck in cover rolls crappy moves through cover and is stuck there. My buggies move to shoot at hive guards and do an unimpressive one wound. My battlewagon tank shocks the gaunt squad and carnifex in front of it, doing 1 wound to the carnifex and nothing to the gaunt squad. my truck sitting on a western objective leaves and charges across the map help out on the eastern side of the fight(Dope! Forgot it was an objective game!)
Shooting
My tankshocking battlewagon flames the entire eastern gaunt squad out of existence. We had another argument here that I would enjoy a third opinion. I had always thought I could place the template wherever I damn well please but I ended up having to target the carnifex and “happen” to inflict 30 wounds on the gaunt squad.
On the western side of the board my rokkit buggies finished off his tyrannid warriors but left his tyrannid prime alive with one wound.
My burna boys who moved into the truck flamed the western genestealer squad out of existence.
Assault
My trukk boy squad mired in the western forest charged out and finished off the tyrannid prime ending the hive minds knowledge(last synapse creature) of that side of the battlefield hopefully leaving me a free hand with the hive guard and gaunts still left over there.
Turn 4 Tyranid
Fairly uneventful turn as he is finally running out of units, but he manages to knock out the truck holding my western big mek and burnas, again. The rest of his army prepares for last turn objective grabbing. The western flank advances and there is more ineffective fire at the front armor of my battlewagon.
Turn 5 Orks (Orks 3, Tyranid 0)
In a continued flawed strategy I abandon the main objective (Dope!) and assault the hive guard who I only discover after assaulting are not a unit to be trifled with lightly. My eastern battlewagon full of burnas moves over a few inches and flames a squad of genestealers out of existence with about 10 wounds to spare. My rokkit buggies all line up to get shots on the middle carnifex that my battlewagon has already wounded and finish that off.
Turn 5 Tyranids (Orks 2, tyranids 0)
My opponent manages to pass his leadership 5 test for his gaunt and the move onto a western objective, but my immobilized truck from earlier is waiting for them! So that’s contested now. His guard however fail their leadership 10 test with double 6’s. But their instinct is to move to cover so they move onto the objective anyway. Putting me up by 1 now. Then he uses his
HQ led troop choice to assault my boys locked in combat with the hive guard and manages to stay in range of an objective while doing it and now our objectives are tied.
He rolls and dice aaaaaand, the game ends!
With a objective tie between the tyranids and orks though if we were too look at victory points, I lost a little over 500 points and he lost nearly 2000 but its his third game with tyranids and he still managed a tie. It was a great game and we had a blast though I admit we were proxying his entire army with knex pieces so I’m saving you all from pictures.
Best moment: unit of burnas with mek having not 1, not 2, but 3 vehicles immobilized or exploded beneath them, yet still finishing with a few guys of the squad surviving.
MVP: probably that first trukk boy squad taking out nearly 90 gaunts and a zonethrope entirely without aid.
LVP: battlewagon, hands down, I kept my boys out of it to get them their safely and when they lost their ride they jumped back in and immediately were blown away again, I think it killed a gaunt with its big shoota, yippee.
For myself. I played an almost flawless game
imho, until of course I started abbanding objectives at the end of the game. It just isn't in my blood to leave a fight to stand on an objective, need to keep the eye on the prize! I could have played less aggressive on the eastern front where I was severaly outnumbered and simply camped on the objective with my trukk and battlewagon and just flammed whoever got near it.
please comment on game decisions and anything the tyranids could have done better.
anything on our rule disputes would be appreciated as well!


