| Author |
Message |
 |
|
|
|
|
Advert
|
Forum adverts like this one are shown to any user who is not logged in. Join us by filling out a tiny 3 field form and you will get your own, free, dakka user account which gives a good range of benefits to you:
- No adverts like this in the forums anymore.
- Times and dates in your local timezone.
- Full tracking of what you have read so you can skip to your first unread post, easily see what has changed since you last logged in, and easily see what is new at a glance.
- Email notifications for threads you want to watch closely.
- Being a part of the oldest wargaming community on the net.
If you are already a member then feel free to login now. |
|
 |
2011/09/20 08:02:51
Subject: 2500kgm3's Gothic scenery and other deviations -Some Flames of War-
|
|

Regular Dakkanaut
|
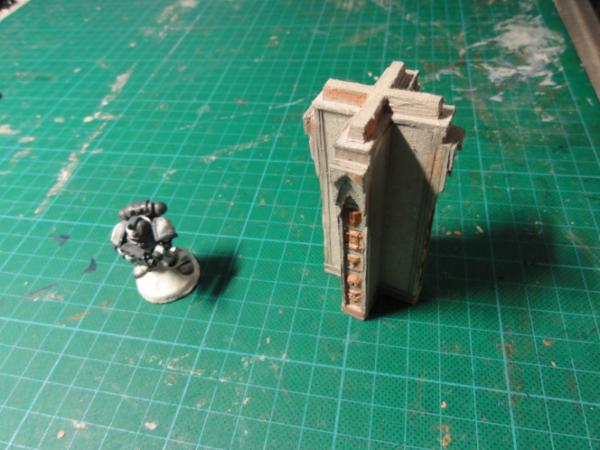
As some of you might know, I have been working on a cardboard temple.
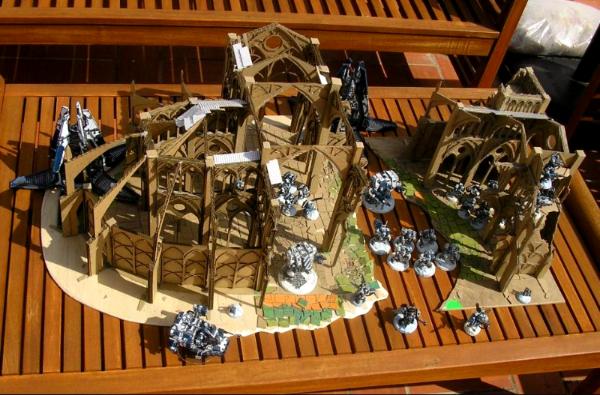
The problems I faced with the temple were the lack of detail (although it was very detailed for your standard scenery, and texturing it with sand helped a lot) and the need of a laser cutter and lots of gluing time to duplicate the pieces in order to make such a large building.
So, with the lesson learnt, I want to build a better piece of scenery. The final goal is to build a more detailed, resin based, modular cathedral, of over 1 metres long and about 60 centimeters high.
I want to create one piece of each type with cardboard, then detail them with putty, texture them with sand, and duplicate them. Since the final temple I am going for would involve the use of over 35 different pieces and I am unexperienced with resin, I will start with a much simpler proyect, involving a smaller ammount of pieces, which will still be useful for the cathedral.
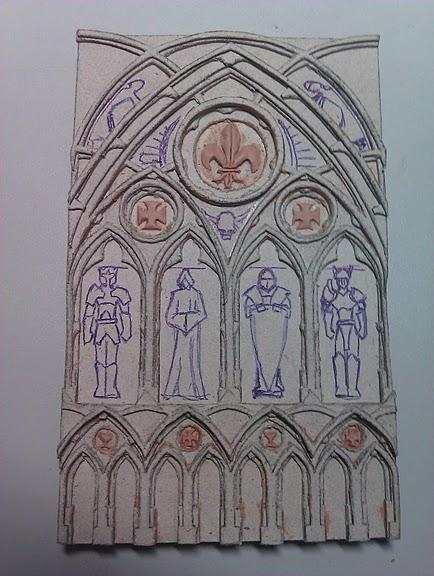
Here is a concept design I drawed. The result will have less skulls xD, and less sculpting quality, since I am a better artist than sculptor:
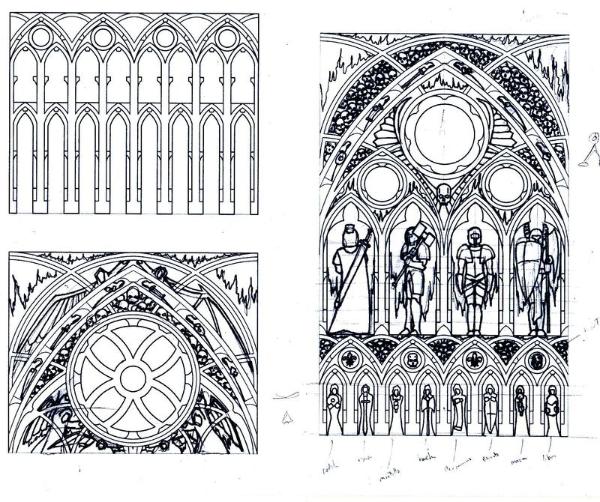
My primary goal will be to build a tower of nearly 1.5 times the size of an imperial bastion. It should be able to contain 25 warhammer fantasy miniatures in a 5x5 formation in each of it's storeys, which I hope is more than enough room for a full warhammer 40k squad. Then, I will be able to give casting with resin a try. If I can make it work, I will be able to duplicate the pieces and continue with the proyect to expand into a bigger building with an increased range of walls, pillars and arches.
Maybe I will divert my attention with some side-proyects in the same style, in order to build other kinds of resin based scenery from time to time.
I will be posting pics of my progress with each piece, if everything goes as expected. Wish me luck!
|
|
This message was edited 7 times. Last update was at 2018/06/21 05:54:27
|
|
|
|
2011/09/20 19:01:14
Subject: Gothic scenery - Sentry tower
|
|
Regular Dakkanaut
|
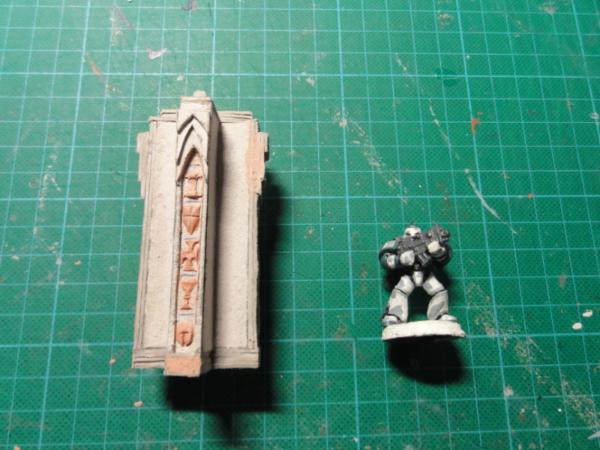
This is a wall section, just the cardboard base, no detailing done yet. It's all cut by hand.
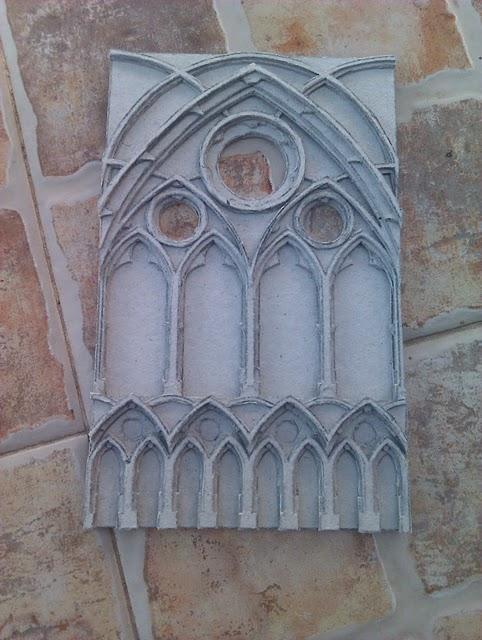
The wall will be the same way on both sides, so there will be two different looking options within the same resin piece.
|
|
|
|
2011/09/21 20:30:24
Subject: Re:Gothic scenery - Sentry tower
|
|
Regular Dakkanaut
|
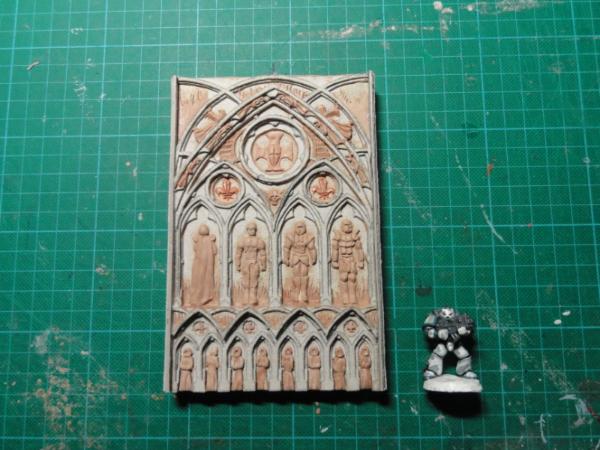
Sculpting work has started. I also filled the circular windows, since this will be an opaque wall.
|
|
|
|
2011/09/22 11:57:03
Subject: Re:Gothic scenery - Sentry tower
|
|
Regular Dakkanaut
|
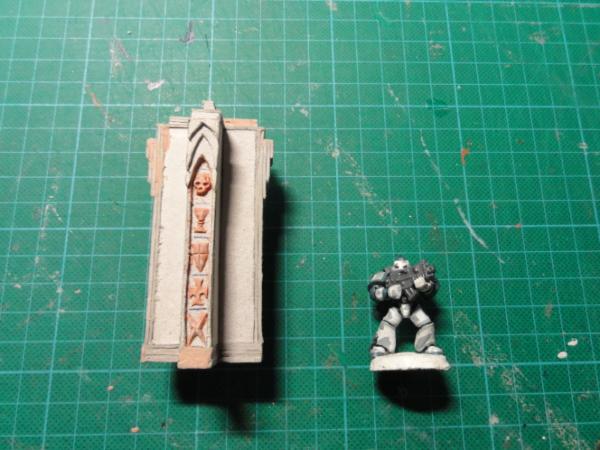
Thanks a lot for the positive feedback!
This is the initial design for the standalone tower. The blue colour marks the piece I have been showing you.
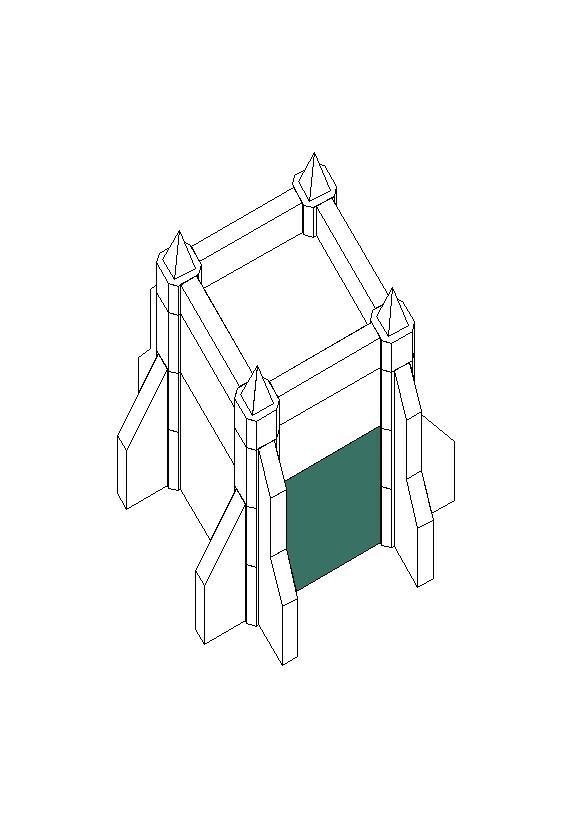
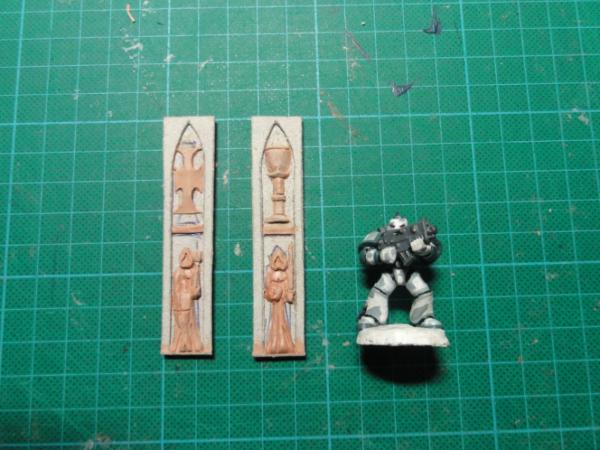
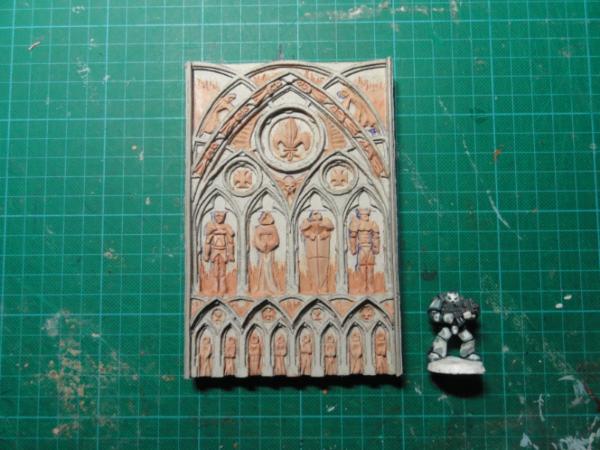
And here I present you one side of the wall which I have already finished. I am worried about the sand+pva glue I want to use to texture the wall will eat too much detail, beyond obscuring most imperfections on the sculpt. I hope it won't be a problem, or all this work will be ruined, just as if I was not able to cast the pieces in resin for some reason. After all, I have never given resin casting a try, so it's a whole new world for me.
|
|
This message was edited 1 time. Last update was at 2011/09/22 12:26:43
|
|
|
|
2011/09/22 21:24:06
Subject: Re:Gothic scenery - Sentry tower
|
|
Regular Dakkanaut
|
I also intended to use the "watered down pva glue+sand" layer to make the cardboard resistant to liquids. Maybe that is not necessary. Can anyone with some experience with casting with resing give me advice on the matter? If that protective layer was not necessary, textured spray paint would be an option if I can find it in Spain.
I'd like to get a small degree of texture into the material, in order to make the pieces easy to paint, with just a basecoat and two layers of drybrushing, each one less wet and with a lighter colour than the previous one. Just like the Games-Workshop Imperial Bastion walls have a fine texture on them. This will also absorb some of the small putty "stains" and irregularities that are unavoidable in such a sculpt with my limited skills.
I am not really worried about the cardboard warping, since most of goes from 2 mm thick to 17 mm thick, which I am quite confident won't warp easily. The surface texture is what worries me the most. Maybe a coat of pva glue, without sand, would also absorb many irregularities. But then, does the wall have enough detail to be just drybrushed without a texture and look good? In my mind, it's bastion style versus citadel ruins style, which if I'm right, are not textured. And I am quite sure the wall detail is not crisp enough to leave it untextured and still look good.
¿Anyone can lend me a hand regarding that?
|
|
This message was edited 2 times. Last update was at 2011/09/22 21:31:17
|
|
|
|
2011/09/26 09:19:45
Subject: Re:Gothic scenery - Sentry tower
|
|
Regular Dakkanaut
|
I might give the pieces a coat of watered-down pva glue in order to make them waterproof. Then, I will look for textured spray paint, although I have no Idea of where to find something like that in Valencia (Spain).
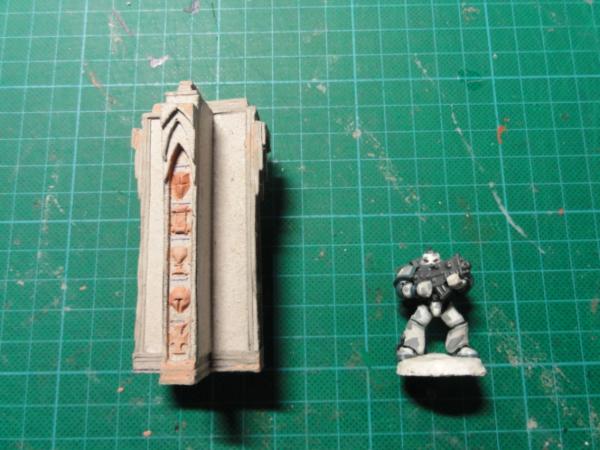
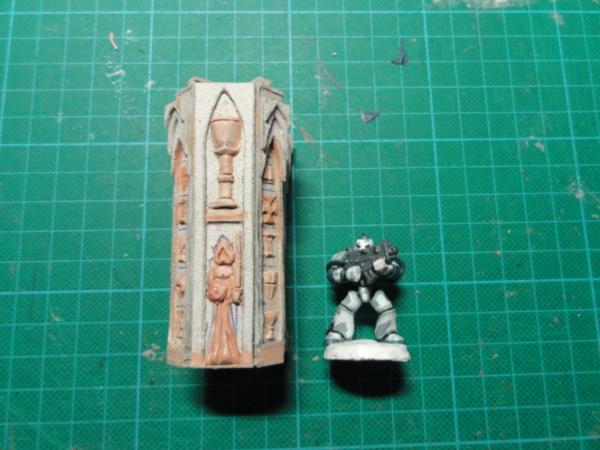
I have completed the other side of the previous wall segment:
And although the next piece was not necessary in the initial design of the cathedral, I thought the tower needed gates, so I built this variation on that previous wall segment.
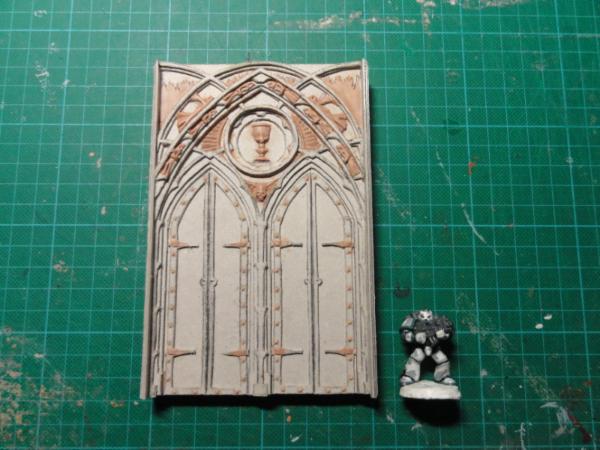
The doors themselves should not get textured, of course.
|
|
|
|
2011/09/26 12:06:03
Subject: Gothic scenery - Sentry tower
|
|
Regular Dakkanaut
|
Maybe I could cast the pieces first with the waterproof layer only, and then give a try at texturing them? If you were to get these pieces, would you want them just as they are, with no sand-like texture? or would you preffer them textured?
To be honest, I am quite confident about the masters not warping. Both sides of the wall sections are glued back to back, and each one is composed of several layers of 1mm thick cardboard, glued using PVA glue. The thinnest part of the master is always of no less than 2mm thick, with most of it being 4-6mm thick, and some arches being up to 20mm thick.
The fact that I already used plenty of pva glue to glue each cardboard layer and was able to prevent warping to a degree, and having such a thick piece in general makes me less worried about warping, and more worried about being able to give it the right texture. Not too thick so it obscures most of the detail, but not too light so it leaves any mistakes in sculpting and rough edges clearly visible.
|
|
|
|
2011/09/27 22:34:30
Subject: Re:Gothic scenery - Sentry tower
|
|
Regular Dakkanaut
|
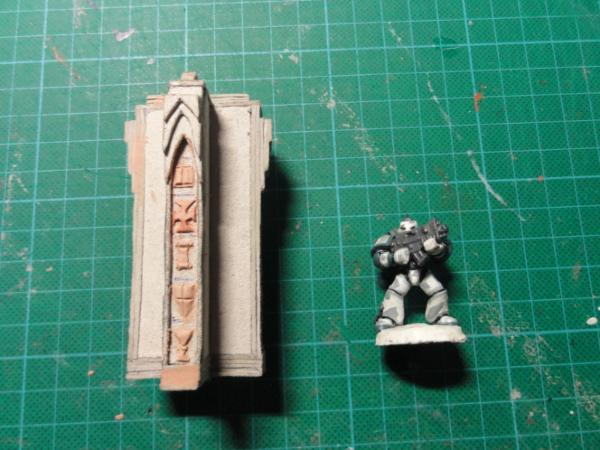
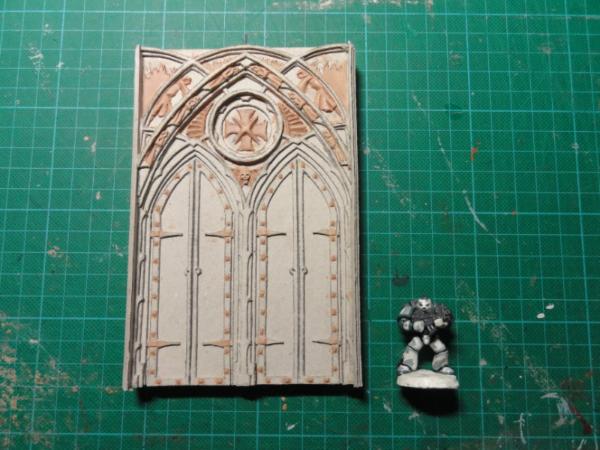
Here you have the other side of the gate piece:
And here is the floor, upper and lower view
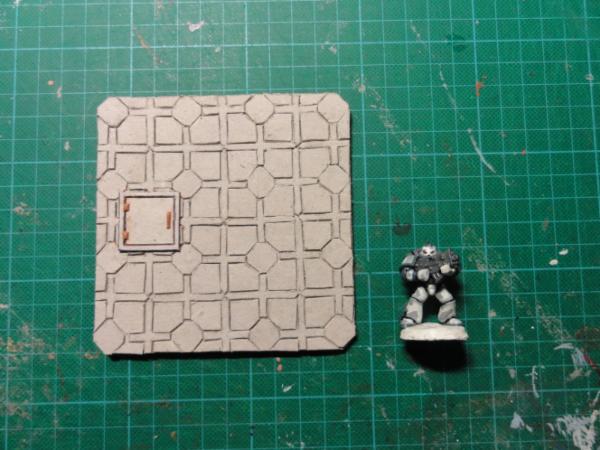
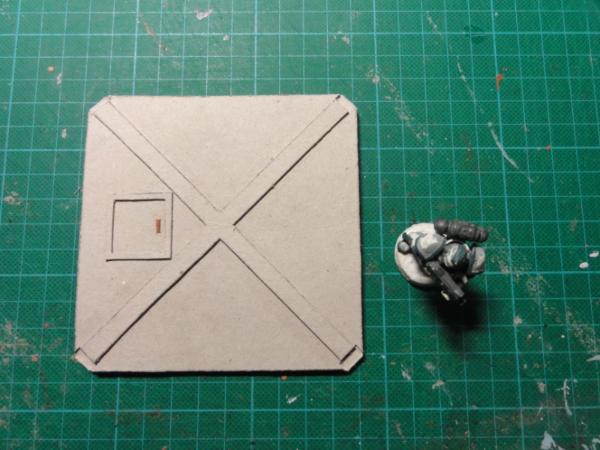
Finally, I have given the piece a very very watered-down layer of PVA glue. No bending whatsoever, YAY! And the pieces are now much harder.
I am worried about the ammount of resin involved on cloning the pieces, however.
|
|
|
|
2011/09/28 16:39:35
Subject: Gothic scenery - Sentry tower
|
|
Regular Dakkanaut
|
To be honest, the way I create these is really easy. I just cut cardboard in layers, which I then glue on top of another, and then I sculpt over the cardboard. It's just time consuming, but it works.
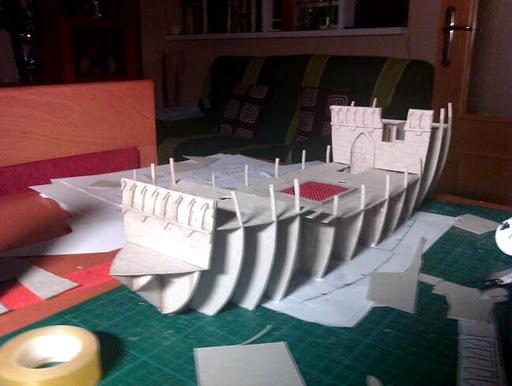
Here I present you the upper floor walls
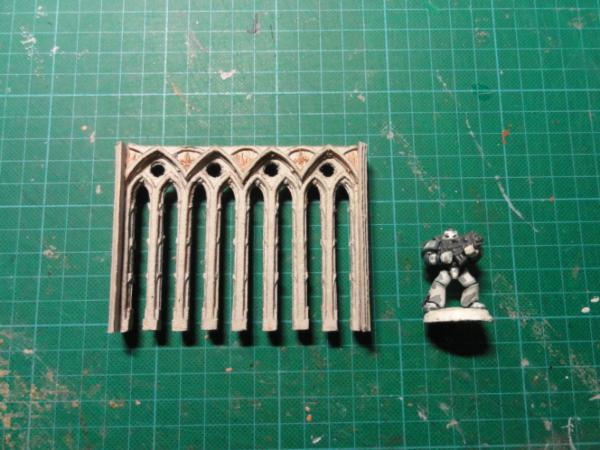
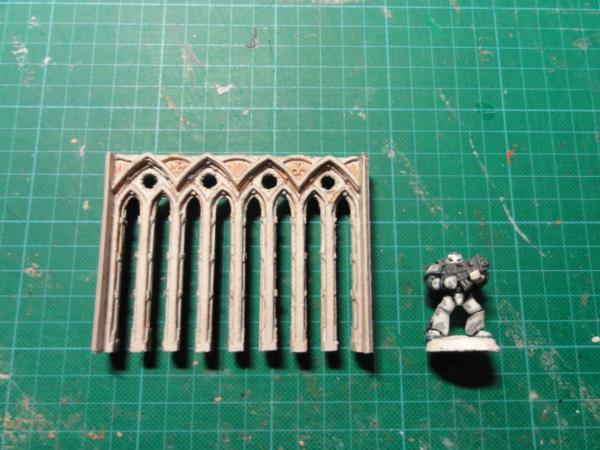
These go directly on top of the high walls you saw in the previous page.
I have been researching regarding resin casting.
After building a 3d model of the tower to calculate it's volume. If my numbers are not wrong, the quantity of material needed is reasonable, so I could duplicate it without being a huge money sink.
The problem is the initial investment: The moulding material.
We would be speaking of about 123€ for about 5 kg of material, which I guess is what I would need to build a mould of each piece.
It is not a price I can pay right now, as I am unemployed :-(
|
|
This message was edited 1 time. Last update was at 2011/09/28 16:40:25
|
|
|
|
2011/09/29 12:50:21
Subject: Gothic scenery - Sentry tower
|
|
Regular Dakkanaut
|
dsteingass wrote:I would cast each piece seperately, not make a huge mold. And yes, the good resin (OOMOO) should be based on volume, so if you use dry rice to measure the volume of each piece, then that exact amount of resin should be needed. Molds can be made from LEGO and DIY silicone in a caulking tube to save money.
That was my plan. Individual moulds and lego pieces. Each piece with its own mold, 1.5 centimeters bigger than the piece itself in all but one side (to pour the resin on the mould) After calculating the external volume of each mould and substracting the volume of the piece, then multiplying the totals by the density of silicon, I got my figures: nearly 5.8 kg of silicon is needed. I can get special moulding silicon at 23€ per Kg. As you can see, it adds up very quickly. I might save a bit by using DIY silicon... but I would be saving only 4€ per Kg at most, at the expense of a silicon of inferior quality and a lower mould lifespan.
Viktor von Domm wrote:how about later to use plaster instead? this could then be added with pva and you have a sturdy reproduction material...oh and those arches are lovley!
as i see it south eurpoe is currently not a nice place to be living in... seems economy is doing down the drain wherever one looks...greece, italy and spain... maybe even france... seems like a europaen collaps is bound to happen...
What is this method you are talking about? can you give me any link to tutorials or exemples? I am interested in any alternative to silicon. I am quite worried about the pieces needing the flexibility of the silicon to be propperly extracted from the mould, however. Specially the columns, as I have designed them.
Digits wrote:This is incredible!
Thanks a lot! I will continue building one piece of each, even if cloning the pieces is not an option yet, hoping for someone to come to me with a posible solution.
|
|
|
|
2011/09/30 15:24:41
Subject: Gothic scenery - Sentry tower
|
|
Regular Dakkanaut
|
Here I bring you the butressess for the tower:
The short one:
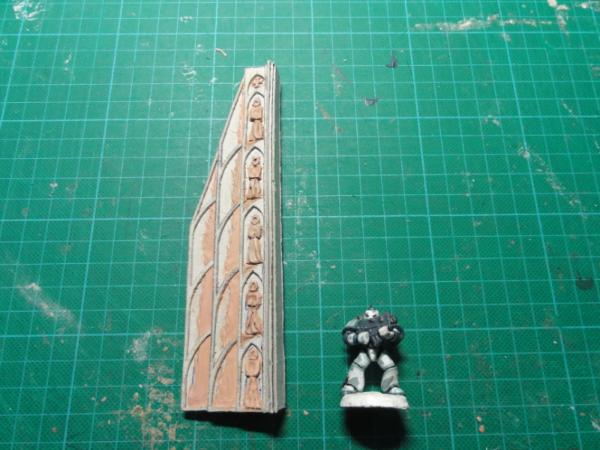
And the long one:
Maybe I could start a Kickstarter for this project... I am not totally sure about how that works, however.
How about 35€ + postage for an unassembled resin tower of 22cm wide and 29 cm tall (about a GW bastion and a half) whose 3 floors can be accessed during gameplay simply by sliding the walls in order to move miniatures on them, and can hold up to 25 WFB miniatures (or a full squad in WH40k) on each floor?
|
|
This message was edited 1 time. Last update was at 2011/09/30 15:27:23
|
|
|
|
2011/10/05 07:56:01
Subject: Gothic scenery - Sentry tower
|
|
Regular Dakkanaut
|
|
|
This message was edited 1 time. Last update was at 2011/10/05 07:58:14
|
|
|
|
2011/10/11 07:59:23
Subject: 2500kgm3's Gothic scenery - Sentry tower and other deviations
|
|
Regular Dakkanaut
|
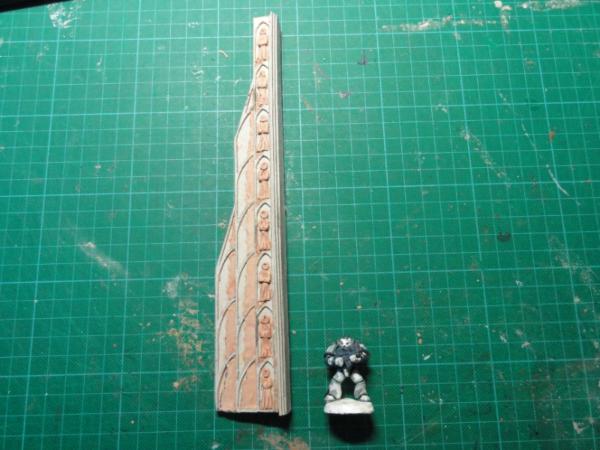
Since I have not found a way to afford silicone yet, and my spare time will be drastically reduced by university, I have diverted my attention to some small sideproyects, such as this one, a test of a wodden texture on cardboard:
|
|
|
|
2011/10/12 13:36:52
Subject: 2500kgm3's Gothic scenery - Sentry tower and other deviations
|
|
Regular Dakkanaut
|
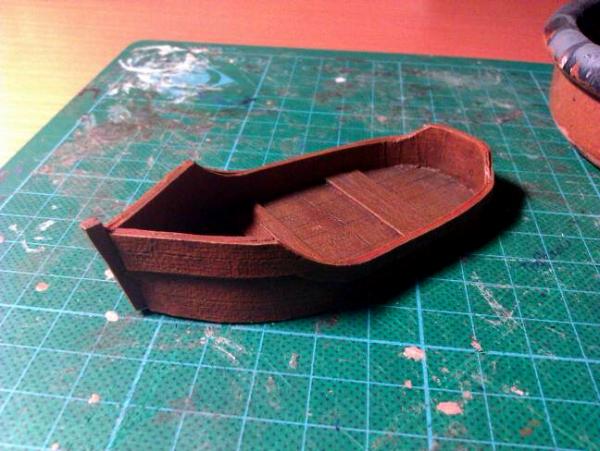
I was not aiming for a great paintjob in this case. Basecoated black, some brown on top of that and just a drybrush of a lighter brown. I wanted to see how that texture ended looking after a fast paintjob.
And, while we are in this mood, why not...
|
|
This message was edited 1 time. Last update was at 2011/10/12 13:39:00
|
|
|
|
2011/10/13 07:54:04
Subject: 2500kgm3's Gothic scenery - Sentry tower and other deviations
|
|
Regular Dakkanaut
|
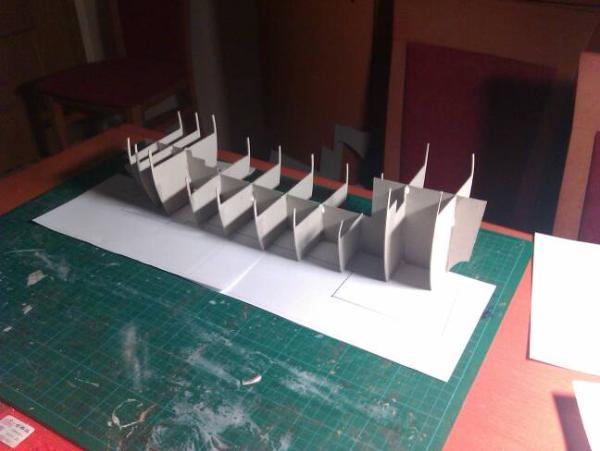
Viktor von Domm wrote:will this one middlesection provide enough structural stability? will you coat it for further sturdiness? how long will this finally be?
vik
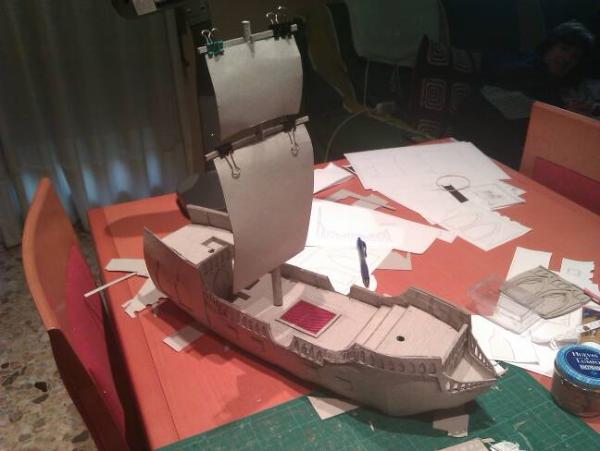
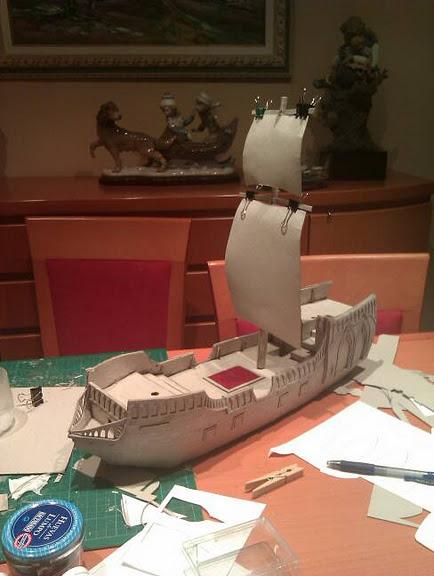
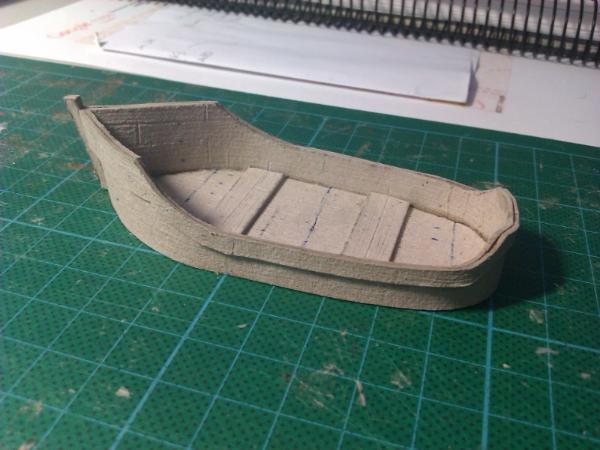
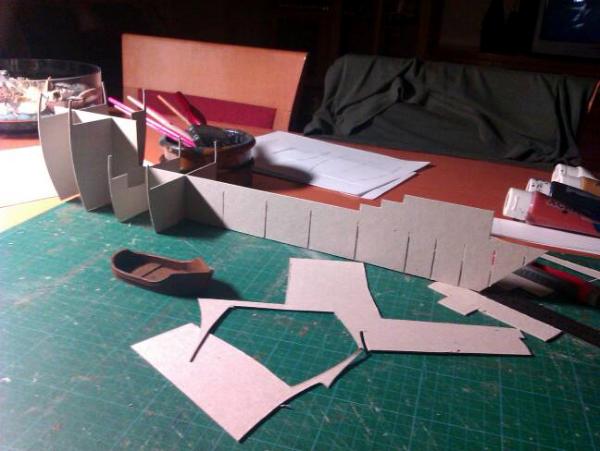
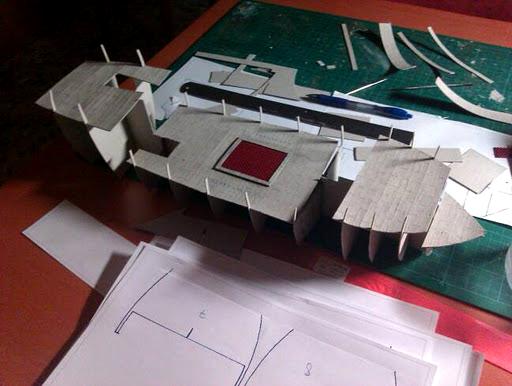
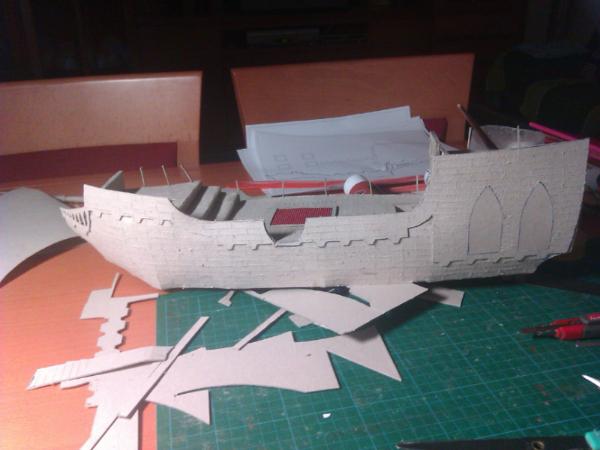
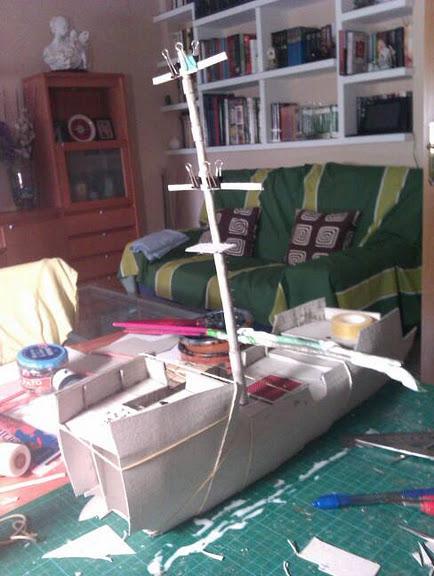
No, it surelly won't provide enough structural stability. However, the deck of the ship will fix the position of both the main axis piece and the ribs. The total length will be of nearly 50cm.
My main question right now is, do I put masts on the ship? only the lower part of the masts, as if these had been broken? I feel the masts will probably be problematic for both storage and piece manipulation, specially if I put sails on them. I doubt that would be a good idea. What do you think?
|
|
|
|
2011/10/13 10:25:54
Subject: 2500kgm3's Gothic scenery - Sentry tower and other deviations
|
|
Regular Dakkanaut
|
Regarding masts, I have not an easy solution for the material yet, since cardboard would not be suitable for its rounded section, and it must support being textured. I was thinking about some thick plastic markers I have lying around here, which would be good, but are not long enough for a full mast. Almost nothing is long enough and I am not sure I could get hold of something suitable.
The model was supposed to be a fit for my hypotetic Mordheim modular table, so it would fit in a river tile, making it easy to fill the gap between both sides of the river by jumping. And it would suit the style of the bands of pirates my friends are painting, as if they had sailed up to that point and run aground. Therefore, I considered building it as a ruin. But if I get hold of a suitable pole to work as a mast and a good way to storage the ship, I could reconsider my decision
|
|
|
|
2011/10/13 17:55:42
Subject: 2500kgm3's Gothic scenery - Sentry tower and other deviations
|
|
Regular Dakkanaut
|
While the hexagon idea could work, I don't feel such a small ship (yes, its quite big for scenery standards, but with the scale of the game its hull would does not measure more than 22 meters -72 feet-) deserves such a great treatment.
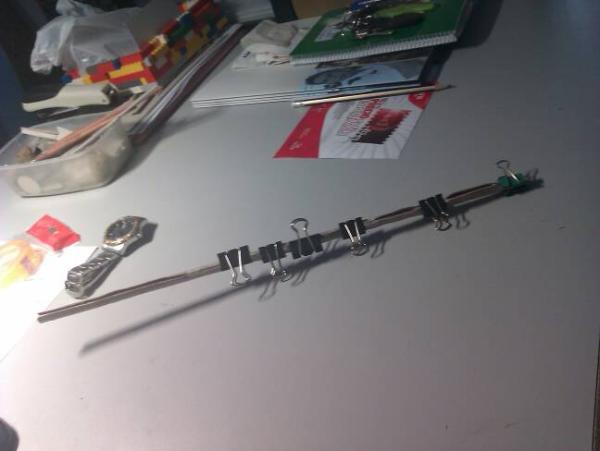
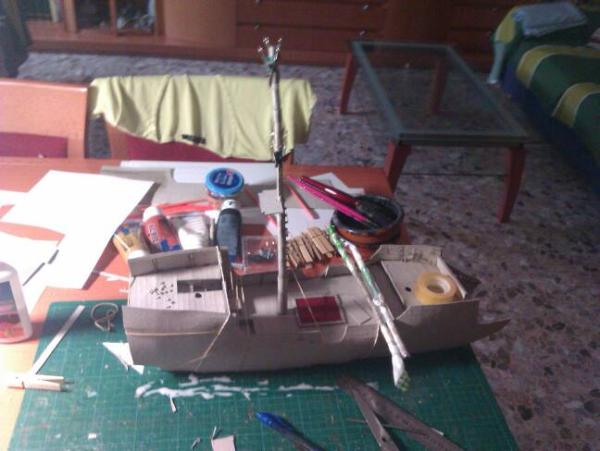
My idea right now is to roll the cardboard I am working with around these sticks and gluing them, increasing the thickness of the stick and getting a great surface to work with.
Obviously, this way of working also allows for bands wrapped around the pole.
The main problem: the joint of the cardboard, and how to treat it. I am thinking about putting a carboard line from top to bottom of the pole over that joint, and consider it a metal reinforcement or something. Maybe even a ladder? don't think the pole will end up being thick enough for that...
And I have not figured out how to get the masts in and out of the ship, yet.
So I went out and got some very cheap thin wodden sticks (coloured, used for decoration in jars and the like). These are not perfectly straight, but I hope to be able to straighten them a bit more.
EDIT: As this is a really small ship, with the sails I am aiming for a Xebec look: a small ship used by corsairs and pirates in the mediterranean sea, and used in more recent times by the French, British and Spanish, with two main lanteen sails and a small rear third lanteen sail. http://en.wikipedia.org/wiki/Xebec
However, the hull profile will be the classic galley profile with forecastle and aftercastle. Not sure if this is will turn to be a mesh... but I also feel the classical square galley sails would look ridiculous on such a small ship.
EDIT2: I have come across a portughese caravel with lanten sails and aftercastle (only two masts, however). And it seems early caravels measured from 20m to 30m. So maybe the ship I am building can be considered a caravel?
|
|
This message was edited 2 times. Last update was at 2011/10/13 18:44:35
|
|
|
|
2011/10/13 21:54:17
Subject: 2500kgm3's Gothic scenery - Sentry tower and other deviations
|
|
Regular Dakkanaut
|
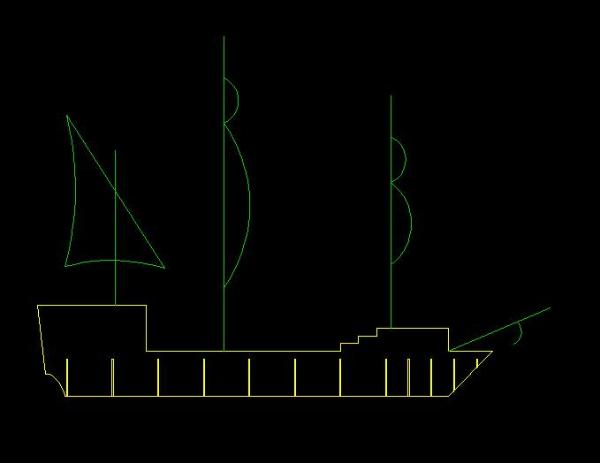
This is an elevation view of the ship as I have planned it. the front of the ship is more similar to a galley than a caravel, but I hope it will end looking fine
|
|
|
|
2011/10/14 18:30:10
Subject: 2500kgm3's Gothic scenery - Sentry tower and other deviations
|
|
Regular Dakkanaut
|
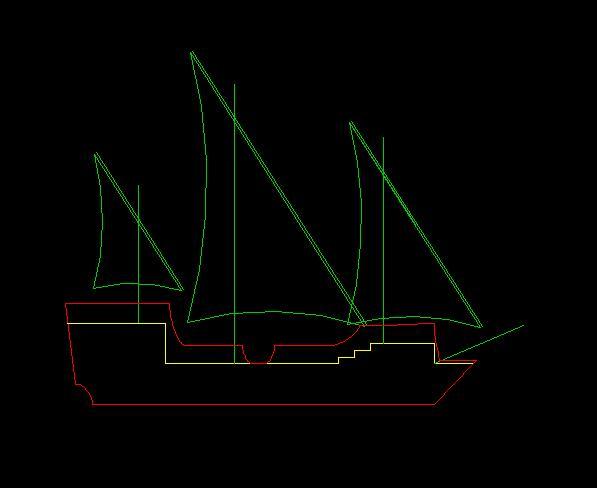
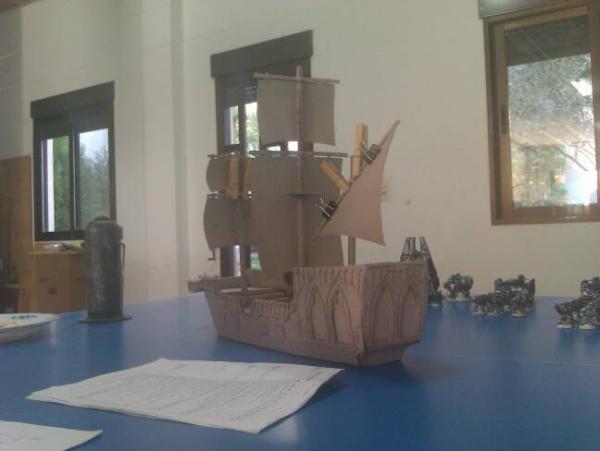
A friend of mine which is on the know of victorian era vessels has told me this sail configuration is not suitable for a caravel, and that small galleons existed. He told me a galleon sail configuration would fit the model better.
So what do you think of this other sail configuration?
And yes, I have already thought of a way to insert the masts to the ship deck. Not exactly the way Zefig pictured it, but it should work in the same way.
|
|
|
|
2011/10/15 09:44:11
Subject: 2500kgm3's Gothic scenery - Sentry tower and other deviations
|
|
Regular Dakkanaut
|
To be honest, I like the first sail configuration more. However, hystorical accuracy is important, and I really respect the person who told me about the mistakes on sail configuration. I am not really sure of what to do.
Meanwhile, I started with the masts (which will be a pain to work on, as rolling the cardboard in such a small cilinder is not easy, specially if you have to hold the whole mast during hours for glue to dry) and on the main deck.
|
|
|
|
2011/10/16 09:28:56
Subject: 2500kgm3's Gothic scenery - Sentry tower and other deviations
|
|
Regular Dakkanaut
|
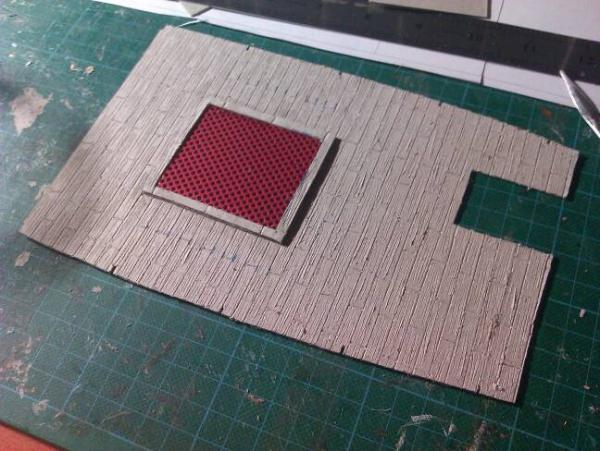
dsteingass wrote:That is great! is that granny grating?
It's the protection carcase of a mobile phone that broke some time ago. Recycling is the most essential skill of scenery building!
Viktor von Domm wrote:wow... that texture is sooo sweet looking...is this juts mere carving with a knife? or what is that secret ingredient here?
These are just carvings. A wider metal instrument for the gaps between planks and a sharper, thinner one for the wood texture.
Bugstomper wrote:great work, really love it!
as for the masts: you don't have to make full length masts if you make them modular
on old sailships they were stacked as well (because trees usually come in limited length...)
http://de.wikipedia.org/w/index.php?title=Datei:Mast-rigging.svg&filetimestamp=20071108231925
of course, that would work better with the second configuration...
so you can decide for each game how many mast sections you want to use
you could even make broken versions
Thats an interesting idea for sure... but since I have not decided on the wail configuration, I try to keep it versatile for now, as yesterday I was advised to add two more sails. I will show you how I am building the masts. I rolled cardboard around some wodden tubes. I plan to roll more cardboard on some sections to vary the thickness of the masts. I fear I will have to do the rolling during at least two different sesions (half and half?), because I am not able to keep the whole length of the mast fixed. I think as I get to wider diameters it will turn out to be much easier.
The legos you can see in the pic are what would become the moulds for the sentry tower which has been put on the side because of money. If only I could be sure to sell 10 copies, I go on being sure I would not lose too much money with that enterprise.
|
|
This message was edited 1 time. Last update was at 2011/10/16 09:31:08
|
|
|
|
2011/10/18 06:33:27
Subject: 2500kgm3's Gothic scenery - Sentry tower and other deviations
|
|
Regular Dakkanaut
|
I made some more progress. Next is stairs. And I have now started fixing cardboard with adhesive bands. I am not sure if it will work.
|
|
|
|
2011/10/19 07:25:49
Subject: 2500kgm3's Gothic scenery - Sentry tower and other deviations
|
|
Regular Dakkanaut
|
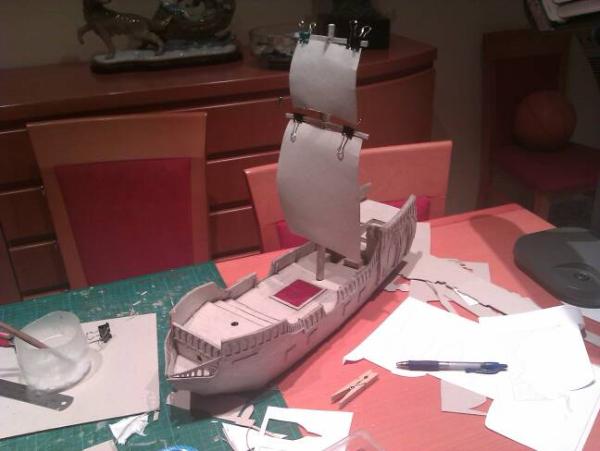
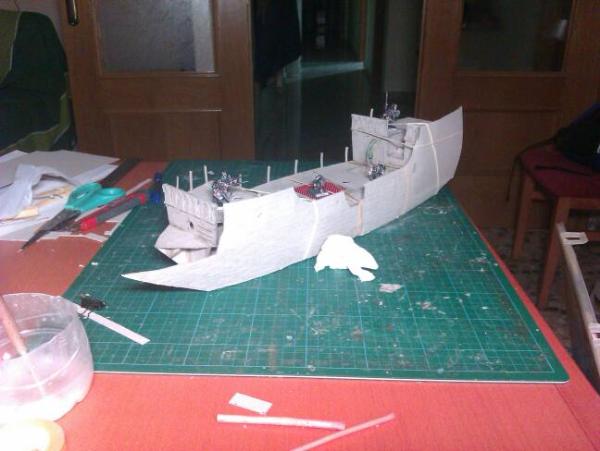
We have stairs now! and I think after the third mast section, I have perfected the mast-building process so it will at least not look horrible

Next is the side of the ship, which is one of the most difficult parts of the building process, since it is a BIG piece of cardboard that must bend in two different directions. I'll do my best.
|
|
This message was edited 2 times. Last update was at 2011/10/19 07:26:46
|
|
|
|
2011/10/25 07:41:42
Subject: 2500kgm3's Gothic scenery - Sentry tower and other deviations
|
|
Regular Dakkanaut
|
I'm back!
As you might have already noticed, Life has not been kind to me this week. As I have been working 20 hours a day sitting in front of my computer. Finally, I have had some good sleep and I was able to work on the ship again.
So yes, I will be showing you more progress.
Some of you might already have seen this pic, with my mordheim rats showing the scale of the ship.
As I was going on, I noticed I had to build one side to completition and coat it with watered pva glue before working on the other side of the ship, as the rubber bands would break the cardboard otherwise. Therefore, I proceded with aplying the detail layers to the side.
layer 1
layer 2
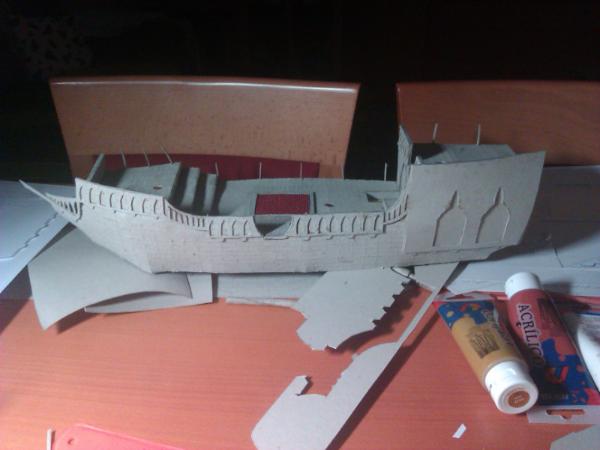
layer 3
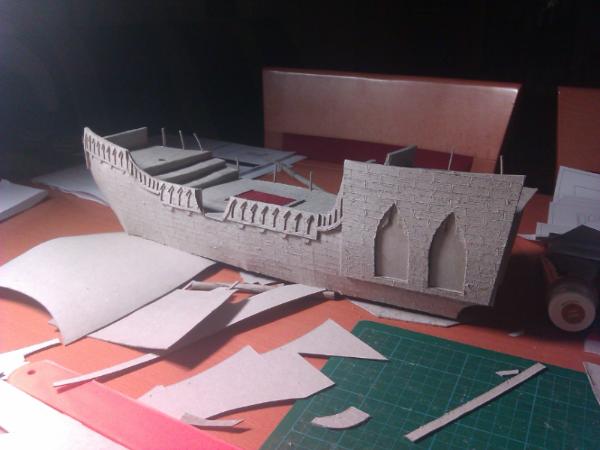
layer 4... and so on, until getting this final result:
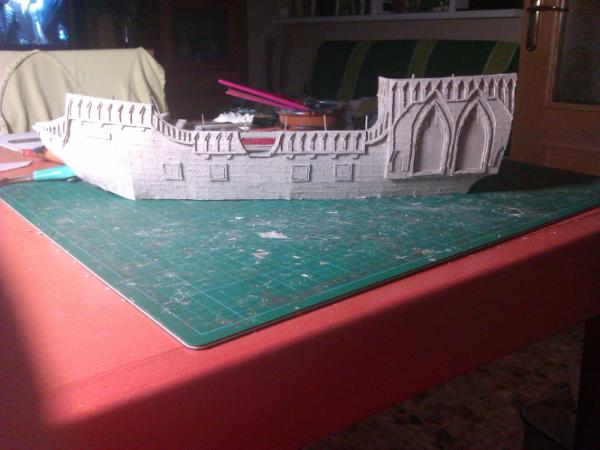
Next will be gluing the other side of the ship and getting the rear wall of the aftercastle ready. Then detailing the new side of the ship, finishing the front of it, and finally building masts and sails. - - - And then paintiing. So yes, there is still a lot of progress to report on
|
|
This message was edited 1 time. Last update was at 2011/10/25 07:42:33
|
|
|
|
2011/10/26 17:14:48
Subject: Re:2500kgm3's Gothic scenery - Sentry tower and other deviations
|
|
Regular Dakkanaut
|
I have continued work on the ship... but I found due to asymetry during assembly, the other side piece was not long enough to cover the whole side, so I need to scrap it and build it again. Certainly a minor setback
I was wondering, what do you think should be the name of the ship? I was thinking about my favourite TV series, and "John Sheridan" or "Serenity" came to my mind. Any suggestions?
|
|
|
|
2011/10/27 14:08:10
Subject: 2500kgm3's Gothic scenery - Sentry tower and other deviations
|
|
Regular Dakkanaut
|
Viktor von Domm wrote:too bad to hear about yopur problems...i cross fringers for you to get a good ripping of the false start...and then start over again with more luck...
by the way i have planned a similar project...for my kids...they are soon on a three week holiday with my wife and they are atm totally in the pirate scheme...so in those long and lonley days i want to build them a pirate ship from scratch...the scale will be fitting for their playmobil figures...
would yoiu be able to share your suportive sections...those walls you built the hull with with me to make a substructure for the ship for my kids? this would give me a good headstart in that project...the built will be from wood and cardboard...and later on should withstand the strenght of a five and three year old couple of sons^^
thanks in advance, vik
I do have my own playmobil pirate ship (the official plastic one) laying around somewhere. I remember it was one of the most sought after toys among kids during my childhood.
I see you received my PM. If your kids ever let go of that pirate mood and get into echlesiastic mood, I do have pdf plans for the cardboard building you can see in the first post of that thread xD
Viktor von Domm wrote:
oh i forgott....as for names... i can´t help you with those shows...but i tink you should name it fitting to the faction this ship is supposed to belong...so if it is an imperial vessel it should be a name that sound like shipnames of british, spainish or french origin...
I have been suggested other names like "phantom", "surprise", "Iron maiden", "Acheron", "the feared" (or "El Temido", after Espronceda's poem) "Queen Anne's Revenge" or "Ship Happens"
I do not want to name it after other naval ships, however, but I would like it to be a cool sounding name. Quite short too. Any other suggestions or opinions?
Briancj wrote:"...You can't take my cardboard from me..."
Maybe the "Malcolm Reynolds" would be a bit (a tiny bit) more subtle xD
I have always wanted to build a full-female human Mordheim warband, but my devotion to only use plastic miniatures (no resin, nor metal) has prevented me to do so. I am waiting for some mainstream company to create cool fantasy plastic female adventurer miniatures. When I manage to build the warband, Inara Serra will be the name of one of these girls. That's for sure. Maybe I should name the mage after Lyta Alexander too... Until some company makes decent heroic scale plastic female adventurers, it's only a dream.
I have started correcting the mistakes on the other side of the ship, and it is currently drying. I also worked a bit on the masts. here you can see more progress:
And no, while I know I should be screaming "Arrr" while building the ship, A horrible song is stuck in my head while building the ship. A song that I find hilariously fitting xD
http://youtu.be/R7yfISlGLNU <---- I told you it is a horrible song, you have already been warned xD
I am listening to http://youtu.be/qGyPuey-1Jw in order to compensate xD
|
|
This message was edited 4 times. Last update was at 2011/10/27 14:16:26
|
|
|
|
2011/10/28 20:05:31
Subject: 2500kgm3's Gothic scenery - Sentry tower and other deviations
|
|
Regular Dakkanaut
|
|
|
|
|
2011/10/29 10:36:28
Subject: 2500kgm3's Gothic scenery - Sentry tower and other deviations
|
|
Regular Dakkanaut
|
To be honest, if you had not been there boosting my ego, I doubt I would have been able to reach this stage, so you do have played a very important part on this proyect.
Now that I am aproaching the end of this project, as the main hull is nearly finished, I am asking my gaming group what would be good to do next. My initial intention was to create a Mordheim modular board I have already designed, where this boat would serve as a "bridge" of sorts to cross the central river.
However, now I am considering building different boats for every warband (this boat for a pirate user, small Chinese boarding rowing boats for my skaven, a Xebec for another pirate friend, maybe a dwarven steam battleship for someone I know, and a long and sleek vampire counts ship -maybe a ghostship?-) And then, put some islands together to create neutral landmasses, with maybe one featuring a tower of sorts. That way we could arrange all the ships and islands as static scenery for Mordheim games, or even play with moving ships...
I think it will depend mostly on my group reactions, but what do you think about that?
|
|
|
|
2011/10/30 13:07:31
Subject: 2500kgm3's Gothic scenery - Sentry tower and other deviations
|
|
Regular Dakkanaut
|
dsteingass wrote:Oh, that would be a great idea, having the ship in the Port of Mordheim when the comet hit!
neil101 wrote: athe port idea sounds brilliant.
In order to clarify... there is no port. There was a port in one of my early designs (I built a virtual board where there was a 60*60 port section with a broken pirateship) but it changed, in order to accomodate all the possible missions of the mordheim rulebook, as well as a much more fulfilling multilevel paths.
There are two options. Either...
A) build a typical mordheim modular board with lots of buildings, a road and a river across it where the ship would be stuck, as if the ship had sailed up to that point and gone aground.
or...
B) build three to four small islands and five to six ships, which could be connected in several ways from game to game, or could be even controlled by the players. That would not be a port, but more like a rocky area not too deep into the sea, with several islands having one building on them. Now that I think about it, it would be like the scenery in Dreadfleet, but in a much smaller scale.
|
|
This message was edited 2 times. Last update was at 2011/10/30 17:18:48
|
|
|
|
2011/11/01 20:49:54
Subject: 2500kgm3's Gothic scenery - Sentry tower and other deviations
|
|
Regular Dakkanaut
|
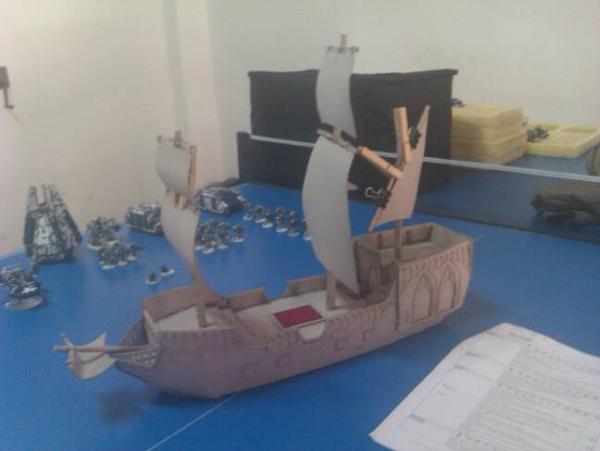
More pics, with masts drying and my 40k army as background:

|
|
|
|
|
|