| Author |
Message |
 |
|
|
|
|
Advert
|
Forum adverts like this one are shown to any user who is not logged in. Join us by filling out a tiny 3 field form and you will get your own, free, dakka user account which gives a good range of benefits to you:
- No adverts like this in the forums anymore.
- Times and dates in your local timezone.
- Full tracking of what you have read so you can skip to your first unread post, easily see what has changed since you last logged in, and easily see what is new at a glance.
- Email notifications for threads you want to watch closely.
- Being a part of the oldest wargaming community on the net.
If you are already a member then feel free to login now. |
|
 |
2017/10/12 04:59:31
Subject: Re:The Necromunda Project: Questoris Knight Styrix
|
|

Decrepit Dakkanaut
|
|
|
This message was edited 1 time. Last update was at 2017/10/12 05:02:26
|
|
|
|
2017/10/12 05:28:43
Subject: The Necromunda Project: Re:The Necromunda Project: Questoris Knight Styrix
|
|
Decrepit Dakkanaut
|
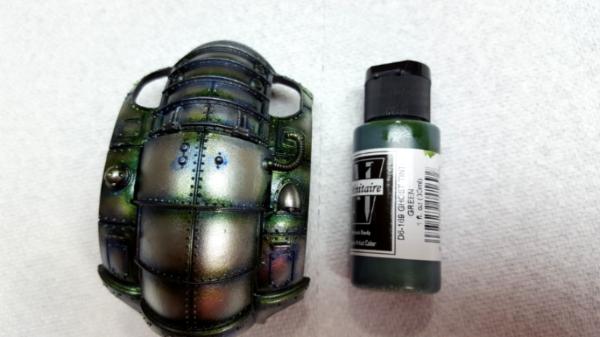
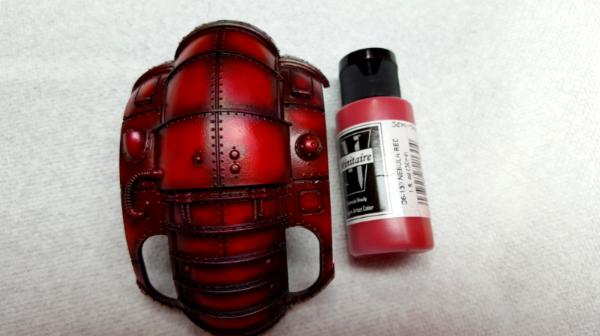
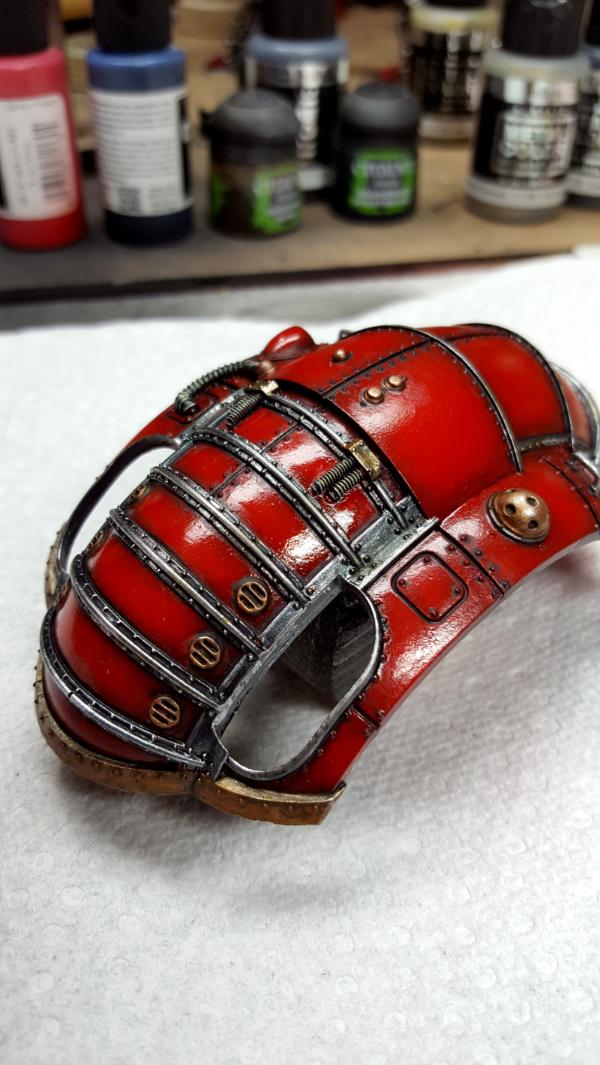
@vik I'm working with transparent red, it'll never cover the other colors below it, just tint them. The green shows up as the darkest shadows
@cam, thanks man
|
|
|
|
2017/10/12 12:19:14
Subject: Re:The Necromunda Project: Re:The Necromunda Project: Questoris Knight Styrix
|
|
Decrepit Dakkanaut
|
Thanks Klaus! It's really not that time consuming actually getting the pre-shading done, it'll be time consuming with all the red layers.
|
|
|
|
2017/10/13 02:29:11
Subject: Re:The Necromunda Project: Re:The Necromunda Project: Questoris Knight Styrix
|
|
Decrepit Dakkanaut
|
@theo- no, but that sounds interesting, I actually bought the Forge World Horus Heresy Masterclass book, and wanted to try it out. I find it best to try new, unproven techniques with whatever paints on hand on a $165 model 
|
|
|
|
2017/10/15 02:36:18
Subject: Re:The Necromunda Project: Re:The Necromunda Project: Questoris Knight Styrix
|
|
Decrepit Dakkanaut
|
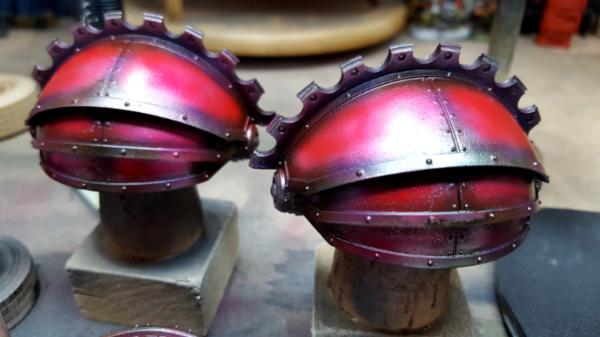
Thanks Whale and Doc!
Some progress
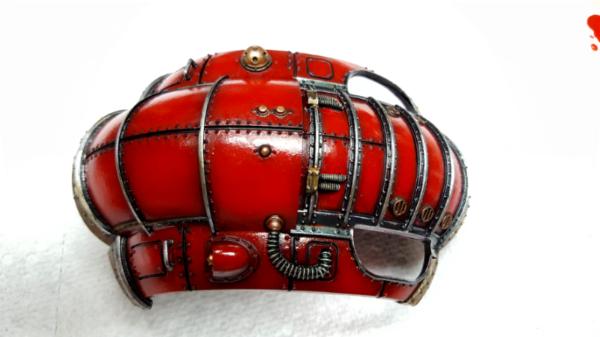
I'm liking it
|
|
|
|
2017/10/15 13:02:45
Subject: Re:The Necromunda Project: Re:The Necromunda Project: Questoris Knight Styrix
|
|
Decrepit Dakkanaut
|
Actually, no, I dont think I am going to battle damage this one up. At least not too much. It'll just be a cold-blooded infantry elimination machine and transport vehicle recycler.
|
|
This message was edited 1 time. Last update was at 2017/10/15 13:03:06
|
|
|
|
2017/10/18 22:24:23
Subject: Re:The Necromunda Project: Re:The Necromunda Project: Questoris Knight Styrix
|
|
Decrepit Dakkanaut
|
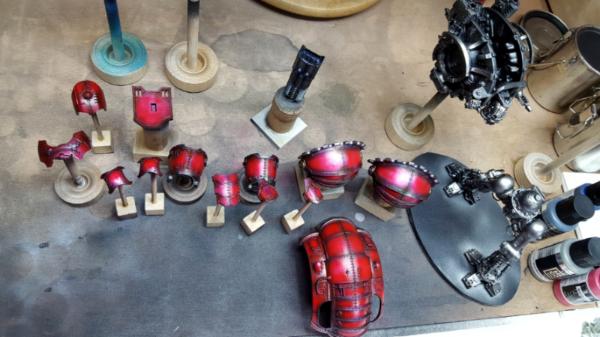
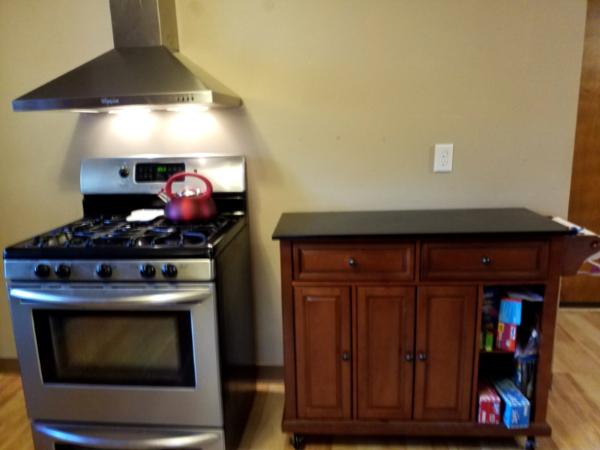
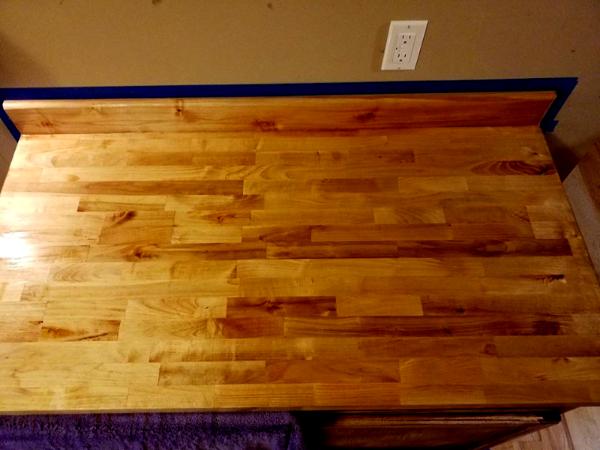
O/T, but this is the 1:1 project I've been working on today
Before
After
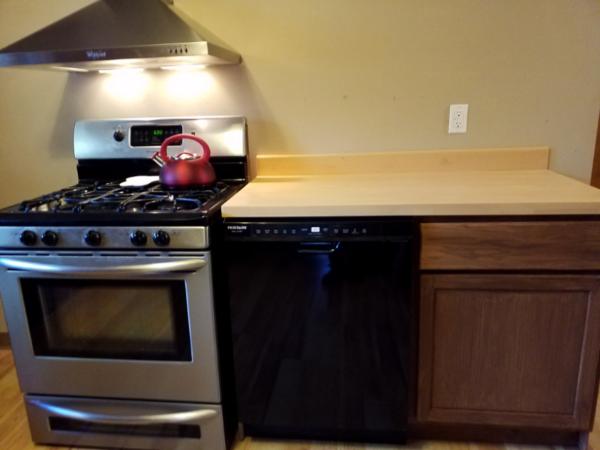
nothing fancy, but my Wife's Birthday Present is installed, the new dishwasher. The Birch Butcher Block countertop needs the finishing done, that will take many coats and many sandings, and then many coats of Spar Urethane, then I want to add a tile (or maybe stainless steel?) backsplash, and finally hang the magnet strips I got for my kitchen knives, then there are pot lights for overhead. There is no reason my Food Prep area is not as well-equipped as my model prep area 
|
|
This message was edited 1 time. Last update was at 2017/10/18 22:36:45
|
|
|
|
2017/10/19 12:35:46
Subject: Re:The Necromunda Project: Re:The Necromunda Project: Questoris Knight Styrix
|
|
Decrepit Dakkanaut
|
Birch was used, because that is all that was available locally. This section of the kitchen will be the beta for the rest of the kitchen remodel eventually, so you can ignore the wall color, like the rest of the house, it all had a sloppy coat of what I call "Flip it tan" on everything before we bought it. Cherry or Walnut would have been an expensive special order. All the old cabinets are a dark walnut stain. I know white kitchen cabinets are now the trend, but I don't care, I don't want to spend the rest of my life cleaning cabinets. The people who own those magazine kitchens never ever cook, and therefore never make a mess. i do. A lot.
|
|
This message was edited 1 time. Last update was at 2017/10/19 12:38:51
|
|
|
|
2017/10/21 22:45:49
Subject: The Necromunda Project: Re:The Necromunda Project: Questoris Knight Styrix
|
|
Decrepit Dakkanaut
|
I've seen the glass tiles, and yeah I heard you can paint behind them for crazy effects. I dunno. Let me get through this project first. I bought a Random Orbital Sander (the excuse I needed to buy myself a birthday tool) and took off the water-based stain, it looked horrible the next day, like BAD. and I used some scrap block from these hobby benches to try out different finishes. I'm going all the way on this one, totally committed
in Hindsight Vik, I wish I'd bought a different wood with more varied wood tones, but I have work to do to make these boards stand out. This will teach me how to finish a softer hardwood properly.
|
|
|
|
2017/10/23 15:43:36
Subject: The Necromunda Project: Re:The Necromunda Project: Questoris Knight Styrix
|
|
Decrepit Dakkanaut
|
Thanks guys!
Isn't it good? Norwegian Wood.
|
|
|
|
2017/11/15 23:36:04
Subject: The Necromunda Project: Re:The Necromunda Project: Questoris Knight Styrix
|
|
Decrepit Dakkanaut
|
No Way @ender! That is insane!! did any of the photos even work from the Photobucket days? I appreciate the love man! I haven't been doing much lately, but I pre-ordered all the New Necromunda stuff, that should get me active again. The endless stream of Space Marine crap was only pushing me away from it all. I want to paint some 54mm Vietnam models and take them to a game and call them Primaris Catachans, just to show how the irony of it all.
|
|
This message was edited 1 time. Last update was at 2017/11/15 23:38:38
|
|
|
|
2017/11/16 21:39:45
Subject: The Necromunda Project: Questoris Knight Styrix
|
|
Decrepit Dakkanaut
|
I'm pretty excited for Munda myself. I like that the boxed game is designed as the intro, 2-player learning system, then the Gang War book is used for all the classic height rules and such. If it plays anything like the old, it'll be worth it to learn the rules fairly well before getting too multi-level. I see it as a progressive system, and that's good. I think GW is on the right track. I dont get into AOS, but I think I se that system over there too with the large variety of OOB games lately.
|
|
|
|
2017/11/16 23:33:05
Subject: Re:The Necromunda Project: Questoris Knight Styrix
|
|
Decrepit Dakkanaut
|
That sounds amazing Vik! Some fun shall be had! Your boys should be getting about old enough to learn the rules eh?
I have a minty get started Skitaari box too
|
|
This message was edited 1 time. Last update was at 2017/11/17 00:37:21
|
|
|
|
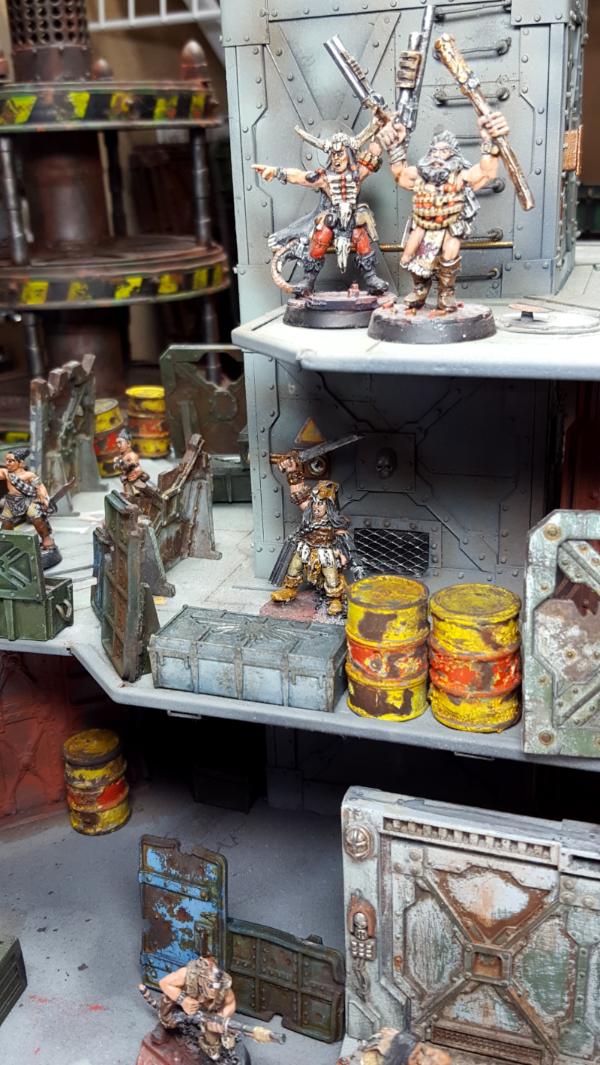
2017/12/11 15:03:43
Subject: The Necromunda Project: Coming Soon: Actual Necromunda in this thread!
|
|
Decrepit Dakkanaut
|
Well, OK, these Eschers are not easy to paint But I'm working on them. Too embarrassed to show WIP at this awkward stage.
|
|
This message was edited 1 time. Last update was at 2017/12/11 15:09:10
|
|
|
|
2017/12/11 21:30:54
Subject: The Necromunda Project: Coming Soon: Actual Necromunda in this thread!
|
|
Decrepit Dakkanaut
|
You'll have more gangs over the next year. You need gangs painted, to learn the boardgame, so you can learn the real game with falling and such At least that's my thinking.
|
|
|
|
2017/12/12 01:11:24
Subject: The Necromunda Project: Coming Soon: Actual Necromunda in this thread!
|
|
Decrepit Dakkanaut
|
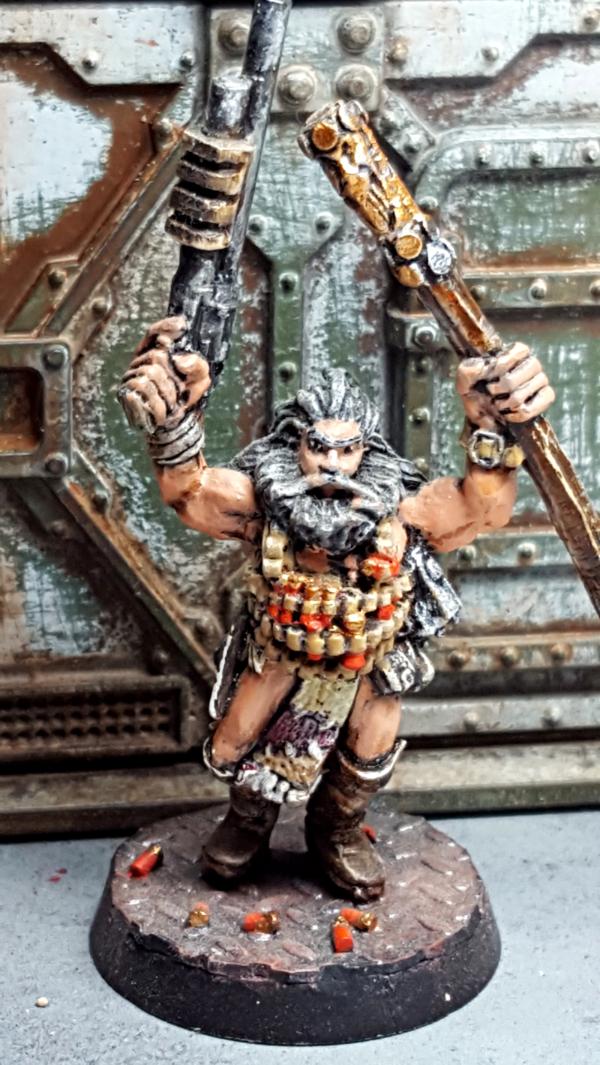
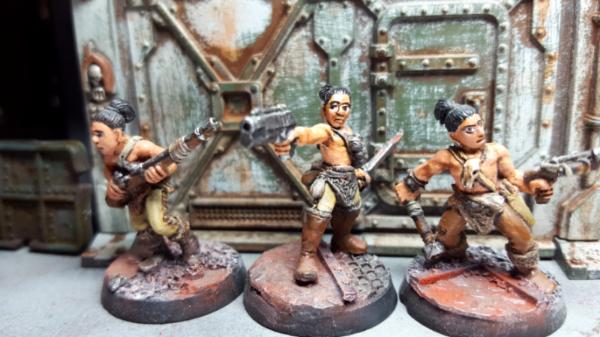
These ladies definitely have a bit of Slaneesh corruption going on, so many spikes on the clothing! I've actually drawn blood
|
|
|
|
2017/12/12 04:18:31
Subject: The Necromunda Project: Coming Soon: Actual Necromunda in this thread!
|
|
Decrepit Dakkanaut
|
I dunno, I think I forgot how to figure paint. Cant I get by by just painting rust on terrain?
|
|
|
|
2017/12/24 02:34:32
Subject: Re:The Necromunda Project: Coming Soon: Actual Necromunda in this thread!
|
|
Decrepit Dakkanaut
|
Merry Christmas!

Sheeter was Full
|
|
|
|
2017/12/25 16:15:18
Subject: The Necromunda Project: Coming Soon: Actual Necromunda in this thread!
|
|
Decrepit Dakkanaut
|
Cheers Vik!
Santa Brought me the Lego Old Fishing Store, and beardcare products. I'm young and old all at the same time
|
|
This message was edited 1 time. Last update was at 2017/12/25 16:16:33
|
|
|
|
2018/01/14 13:06:17
Subject: Re:The Necromunda Project: Coming Soon: Actual Necromunda in this thread!
|
|
Decrepit Dakkanaut
|
Thank Skalk! Its great to see you man! Thanks for the kind words! I appreciate it.
I haven't touched a brush in a couple of weeks now. It seems like I've been living at work. I have a couple of days off now, and no video games or other easy distraction is interesting me, so hopefully I'll get something done. TBH, the Eschers are a bit intimidating to paint. All the little straps and spikes make it seem like you'll be going back and cleaning up perpetually., never ending.
As for the terrain, I've already got some ideas to turn extra bulkheads into larger structures. This Month's White Dwarf released a spires scenario that I feel Necromunda was made for, terrain is set up with lots of towers and walkways, with a central, highest tower in the middle. High Ground wins. But I still need to play a few games with the flat box set to learn the rules. It's like homework you have to do before getting to the fun 3d game.
|
|
|
|
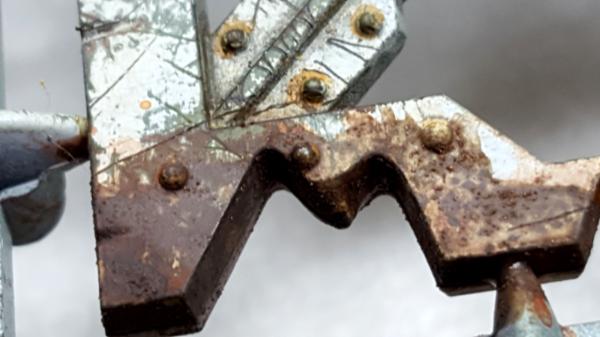
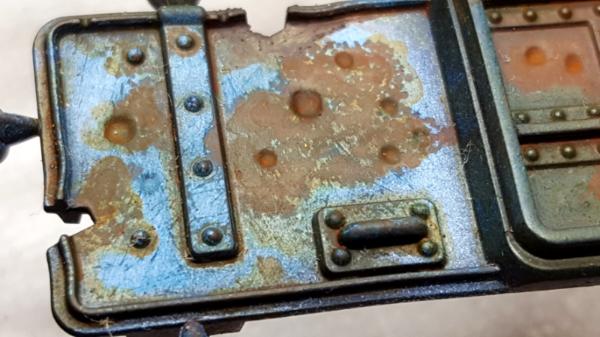
2018/01/31 15:14:32
Subject: Re:The Necromunda Project: Coming Soon: Actual Necromunda in this thread!
|
|
Decrepit Dakkanaut
|
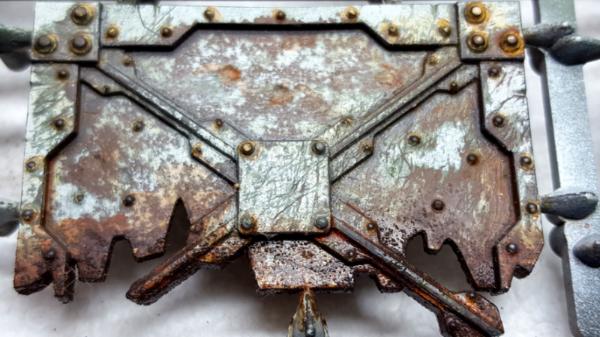
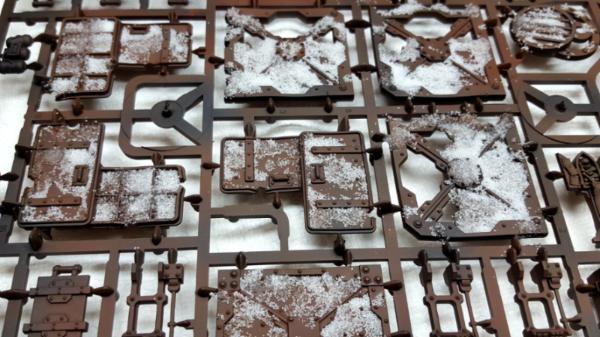
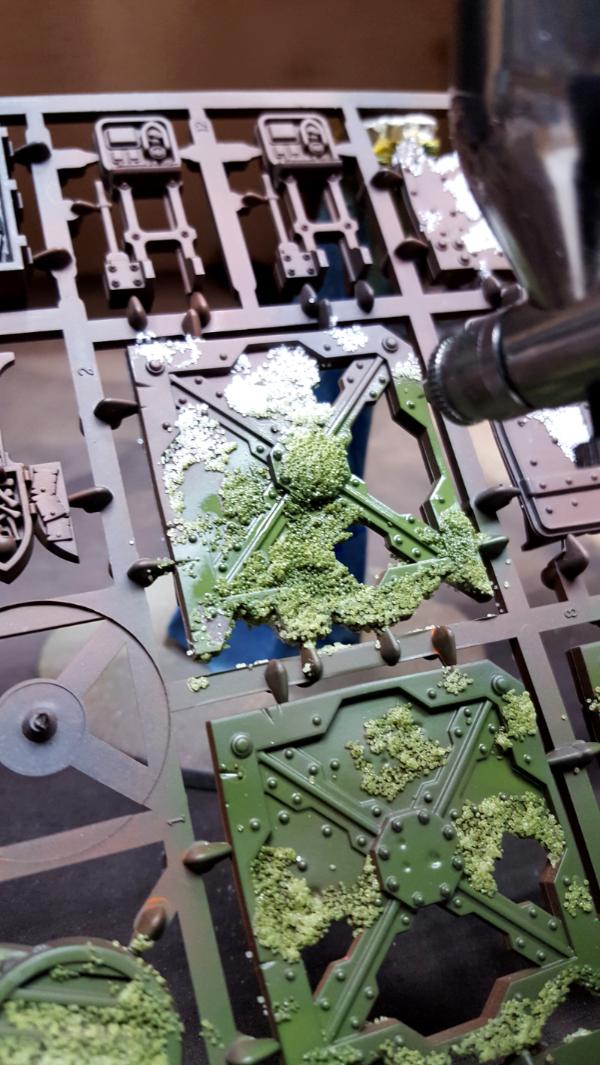
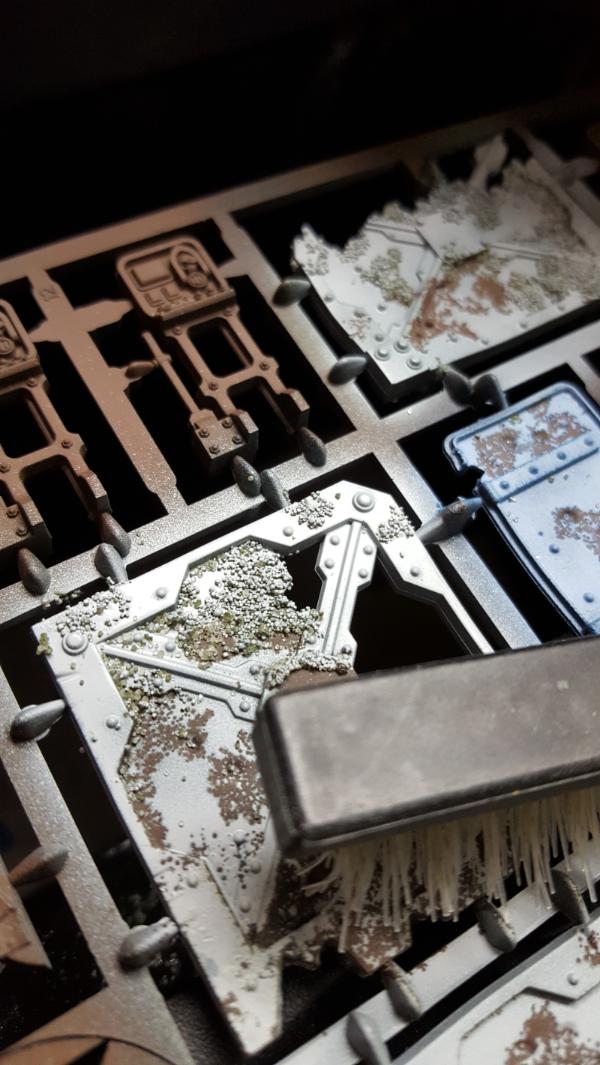
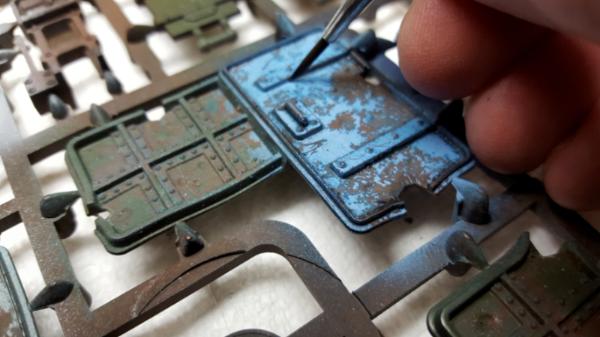
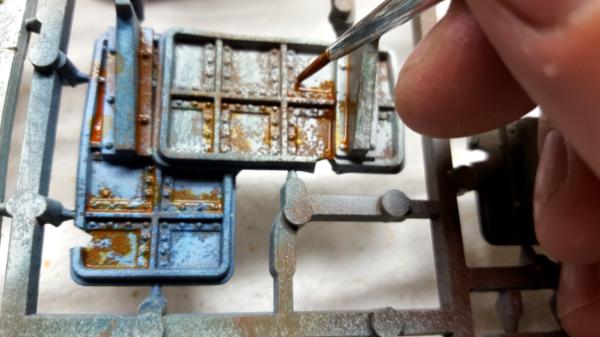
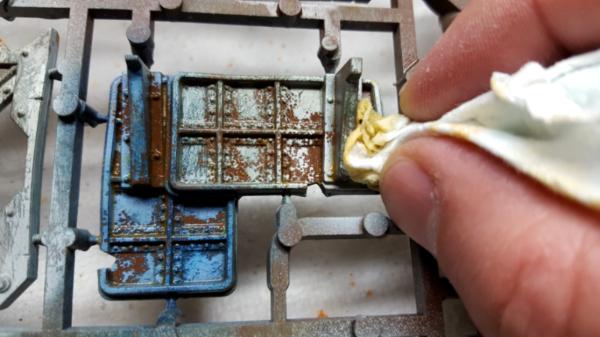
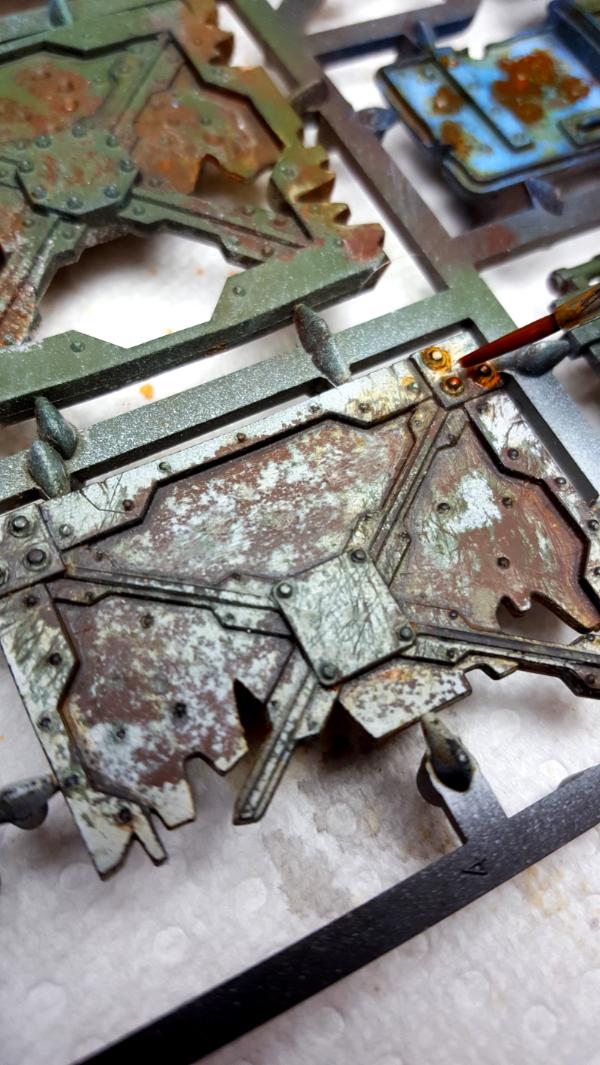
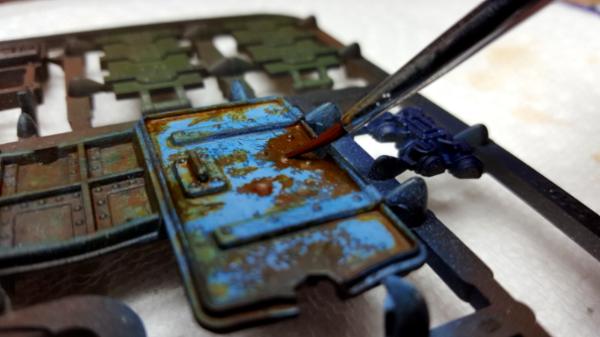
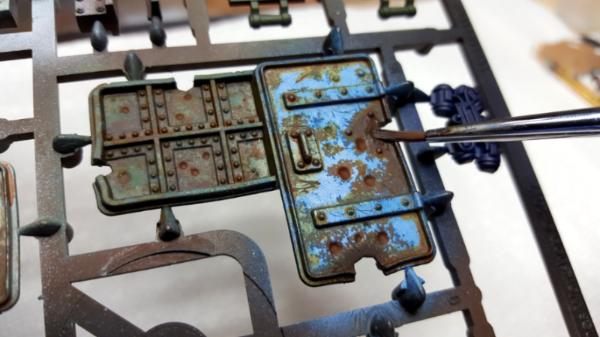
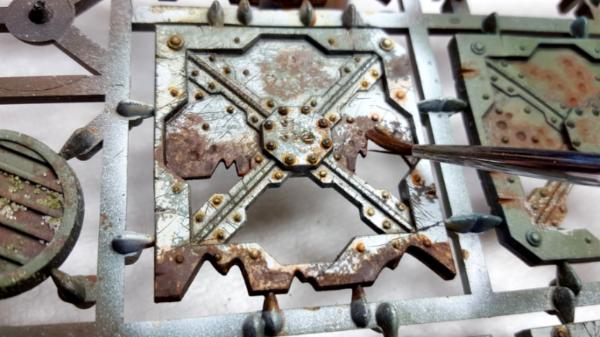
Let's see if I can still make some lovely filth...

Salt over Badger Stynlrez Red Brown Primer

Experimental Sprues

Dry hatch
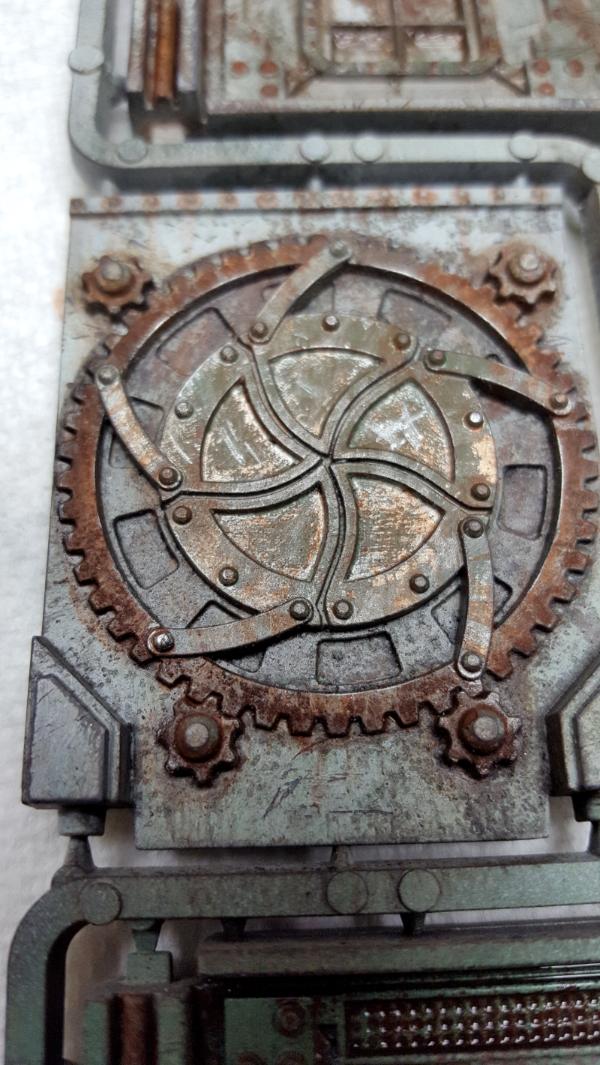
This was my favorite to paint

More Dry Rust

Weather exposing old Government Green
Dry Government Green
I think I may be a bit...rusty 
|
|
|
|
2018/01/31 15:30:25
Subject: Re:The Necromunda Project: Coming Soon: Actual Necromunda in this thread!
|
|
Decrepit Dakkanaut
|
Thanks Vik! My soul needs it methinks.
I'm going to see if I can repeat the scratched paint layer effect again and if so, I'll do a tutorial. I use a nylon brush to scrape away the not quite dry top coat of paint.
|
|
|
|
2018/02/03 13:41:16
Subject: The Necromunda Project: Rusty, painted industrial metal Tutorial
|
|
Decrepit Dakkanaut
|
Viktor von Domm wrote:Seems to me you didn't loose any know how at all...
Working on spruce tho is too daring for my taste...but your effects look very cool!
Also, nice to see you back working with stuff that really matters
Thanks again Vik! I can get to work, no problem. I'm finding it hard to actually finish anything.
CommissarKhaine wrote:That's looking amazing! Would love a tut on the scraped paint 
Thanks, I hope to work on something soon.
RandyMcStab wrote:Yes me too, not heard of that before. Fantastic results.
Thanks, It was an accidental discovery.
lone dirty dog wrote:Been a while but saw this and had to say some real stunning work Dave, I would say you have gotten better if anything that’s some nice realistic looking weathering.
The rust actually looks textured don’t know how you did it but you did and did it well, also hats off on the scratched technique that is impressive if you do a tutorial on that I am going to have to see it.
Now I have to go and get a set of those damn bulkheads sprues  cheers Dave 
Thanks LDD! Good to see you man! - The secret to that is just Typhus Corrosion, its the color of steel rust with a little bit of fine pumice mixed in for texture.
Camkierhi wrote:Amazing work, still a master sir, truly magnificent mucky work.
I have also messed about with acetone on a cotton bud, be careful but gives a great worn effect.
Thanks! No chemicals here, just manipulation of acrylic layers. I spray water while still wet to diffuse the paint and give that faded look. If you're lucky, it'll create a nice pattern.
Skalk Bloodaxe wrote:That's excellent work.
Thanks Skalk! Appreciate it!
Dr H wrote:Good work, Dave. Very much does the job. 
Thanks Doc!
Maybe today I'll get to this. I got the salt and everything ready last night, but didnt get started yet.
|
|
This message was edited 1 time. Last update was at 2018/02/04 21:42:27
|
|
|
|
2018/02/04 14:44:51
Subject: Re:The Necromunda Project:Filthy, Filthy Bulkheads
|
|
Decrepit Dakkanaut
|
Hey LDD,
Pumice is a common mineral used in art supplies and home products for texture. Its a soft, porous volcanic rock. It is used in ladies' beauty products like face scrubs (and some Men's, I have a beard scrub with pumice) for what they call "exfoliation". That is a fancy marketing term for "sanding- the grit just scrubs the dead layer of skin off of your face, aka, it sands your face, makes it feel fresh.
Even in fine art supplies, you can get pumice infused paint for medium grit, and even Marble Dust (probably a by-product of countertop making and such in modern industry) Like these texture pastes
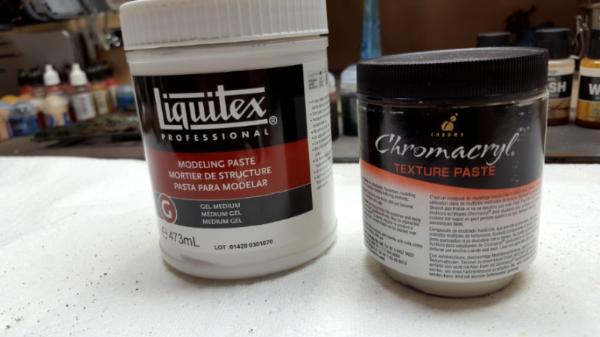
The Liquitex paste is made with Marble Dust, this will make you scale desert sand or snow it is so fine (and its the same thing you get in a little pot of hobby-industry snow or sand effect) its that fine
The Chromacryl is made with pumice dust, so it has a more course texture than marble dust.
These both have a polymer medium, so it dries in clumps, rather than a nice smooth acrylic paint medium.
If you had some powder somehow ground from a stone (it would have to be done with a harder tool than the stone) you could absolutely mix it with paint.
It would be easier with some pre-made dust, but I havent tried this.
GW's Typhus Corrosion is an acrylic paint medium, somewhat metallic, with a very little bit of pumice dust already mixed in, so when it dries, you see a slight bit of texture in it, like real rust.
All of their Texture paint is just paint mixed with a polymer medium, and for about $2 more than a tiny 12mL self-drying pot of GW , I can buy this giant, 473 mL lifetime supply of paste, and mix my own paint into it.
|
|
This message was edited 2 times. Last update was at 2018/02/04 14:47:40
|
|
|
|
2018/02/04 21:54:08
Subject: Re:The Necromunda Project: Rusty, painted industrial Metal Tutorial
|
|
Decrepit Dakkanaut
|
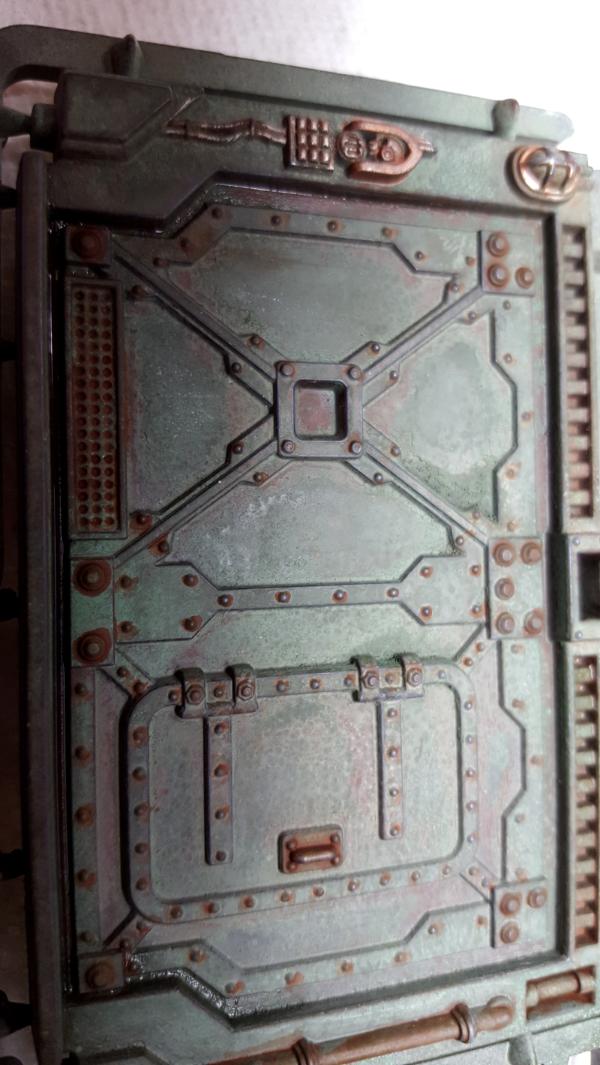
A Tutorial
For Rusty, Grungy, Industrial Metal.
by: Dave Steingass
I live in the Midwest, United States. A part of the country known as the "Rust Belt" As a result, there is a lot of old industrial stuff exposed to the elements. When people stop maintaining this equipment, I've always been fascinated by the way it looks. In My Underhive, it looks a lot like "Abandoned Industrial Town, Anywhere, USA", a shining testament to the industrial age, some say.
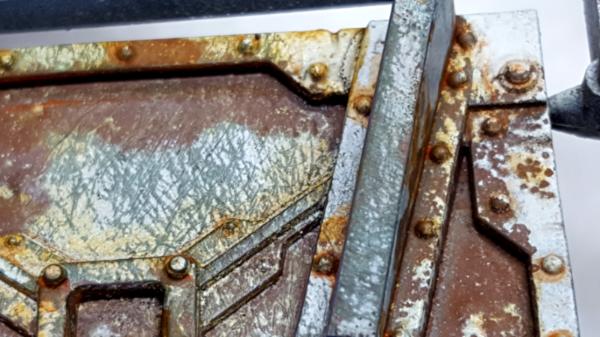
Old Industrial metal is often rusted, and rust often leaves parts of the paint as it slowly takes over. Its always random, or it tells you where moisture has been accumulating.
1: Prime the plastic your base rust color. I used Badger Stynylrez Red Brown Primer. Let this dry completely.
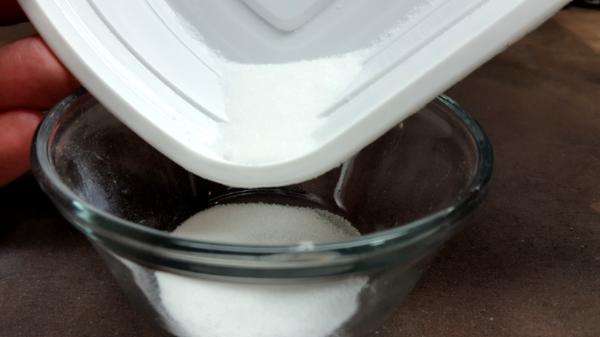
2. Gather a brush, some standard table salt, water, and something to catch salt, this will make a mess.
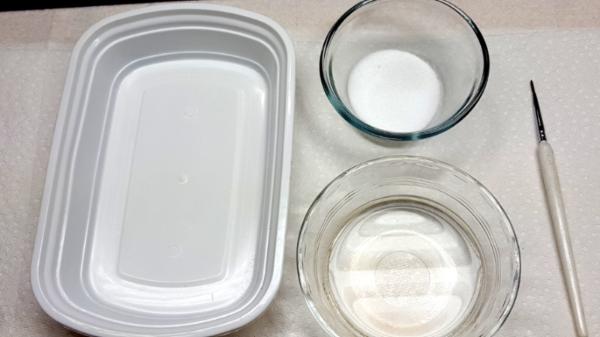
3. Using water, Paint where you'd like rust to be. In the real world, rust is random, or tells you where moisture has settled.
4. For this tutorial, I am using parts on a sprue for ease of painting. This will work on a full model too, just do one section at a time. As much as you are comfortable doing at once. Don't hurry.
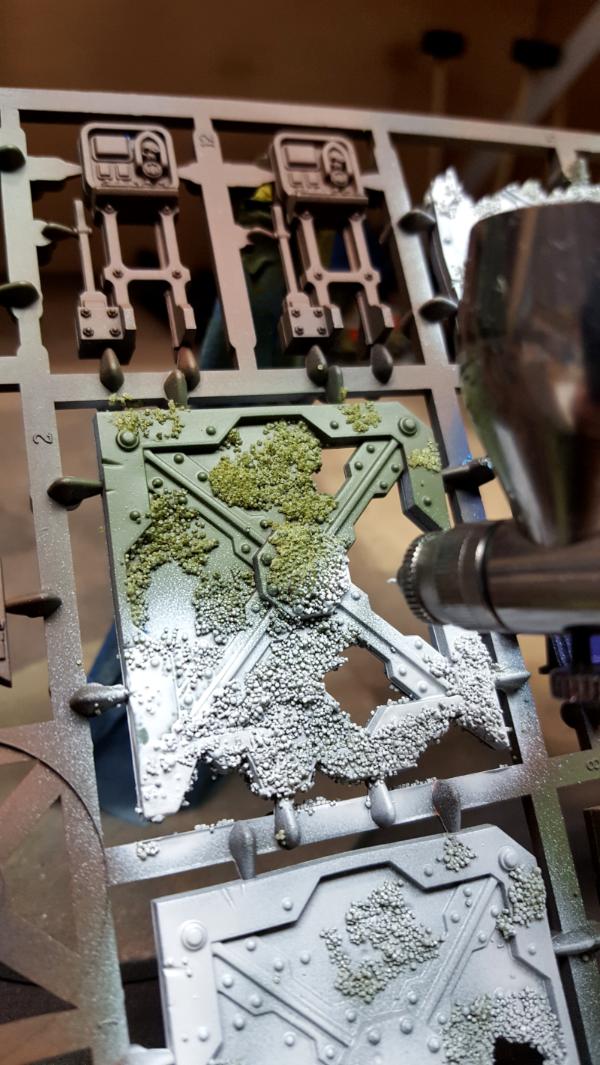
Sprinkle salt on the water.

5. After most of the water is absorbed (give it a few minutes) shake off the excess in your pan. You can reclaim wet salt all day and reuse it, but NEVER reclaim salt that has been painted. Finish the part/section/sprue side.
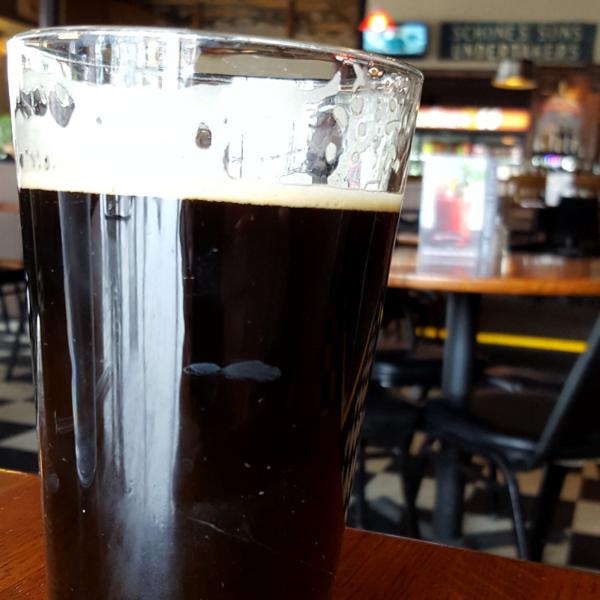
6. Go have a pint. Don't touch it until its dry. 
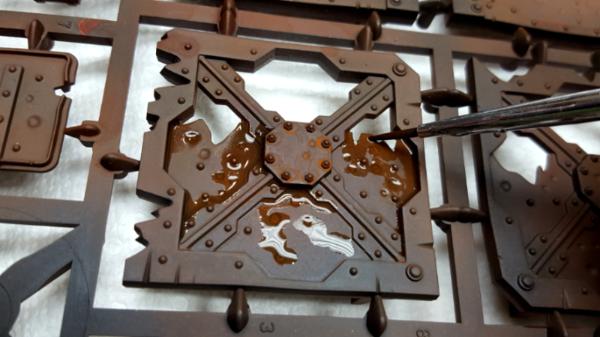
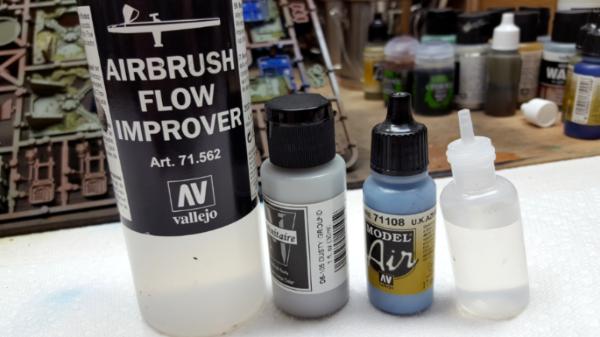
7. Gather your airbrush, and some base layers. I am using government green (russian green) and Blue for my basecoats. I always use a drop or two of Vallejo Flow Improver, paint, and a drop or two of water, then i stir it all up in the brush cup with an old brush. Works for me every time YMMV
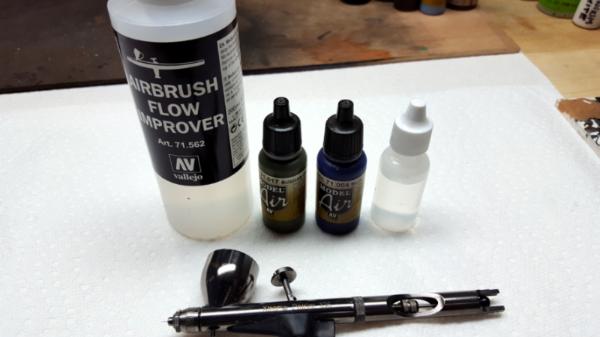
8. Paint the base color over the rust primer, salt and all
9. For the top coats, I am using Badger Minitaire Dusty Ground, and Vallejo Air UK Azure. I dont know if the colors are as important here as is that the colors MUST be of different VALUE in brightness as the bottom layer. You need CONTRAST between bottom coat and top coat. Light/Dark.
Paint them over the top.
[u] DO NOT HAVE A PINT - not now anyways, you MUST begin the next step before the topcoat dries!!![u]
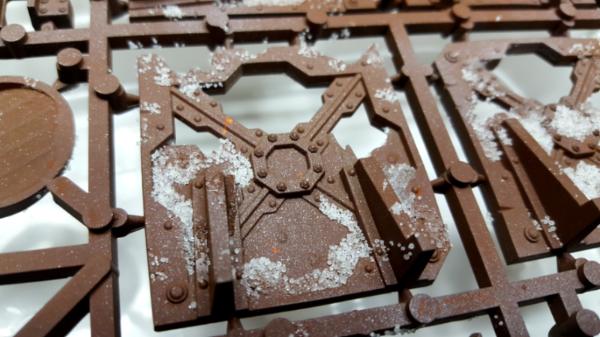
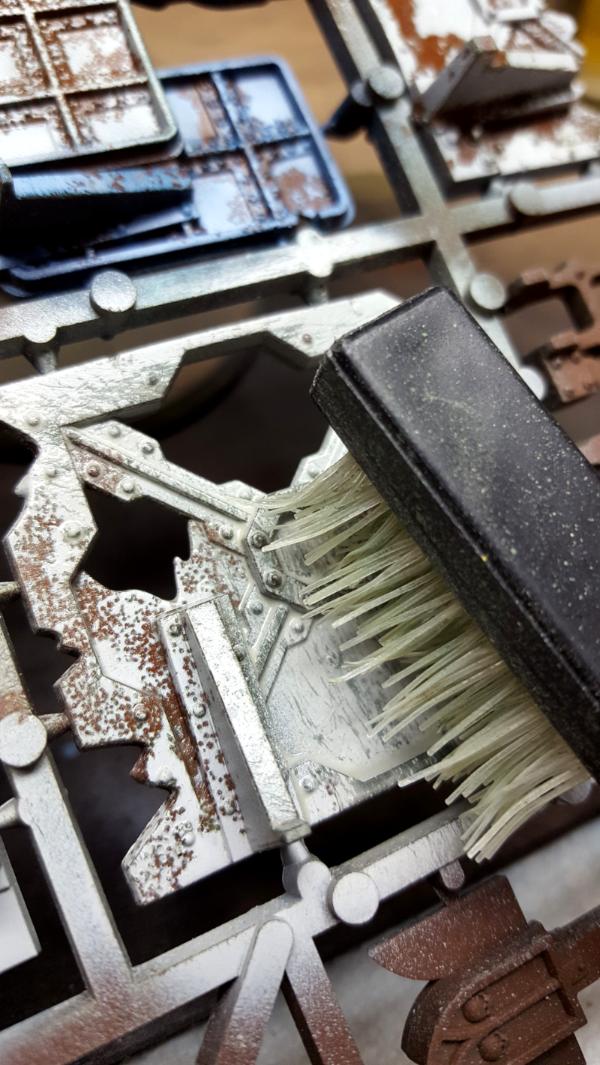
10.This is a nylon cleaning brush. Its just a brush, with nylon bristles, nothing fancy. Any brush that IS NOT harder than the GW Plastic should work. I would not recommend a brass or metal brush, it would be harder than the plastic. An old toothbrush, a scrubbing brush, I'd imagine a variety of bristle sizes would make this look even better.
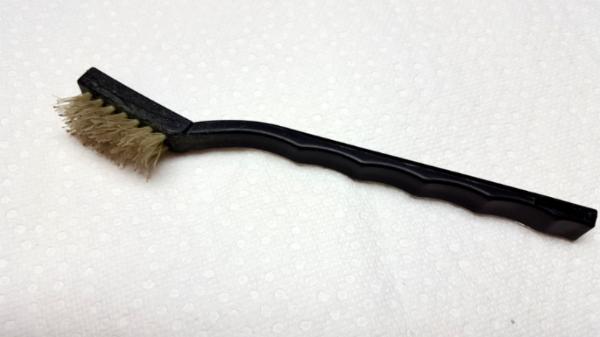
WITHOUT WETTING THE PAINT -Scrub the salt off of the plastic Over a trash basket, this is the messy part. DO NOT RECLAIM THIS SALT
11. Now, we want to spray our part with WATER, just plain old water. I just use my airbrush. While the part is wet, take your scrub brush and go crazy! Making sure to scrub in all directions, especially on the edges! Scratches, gouges, chips, just let it all happen!
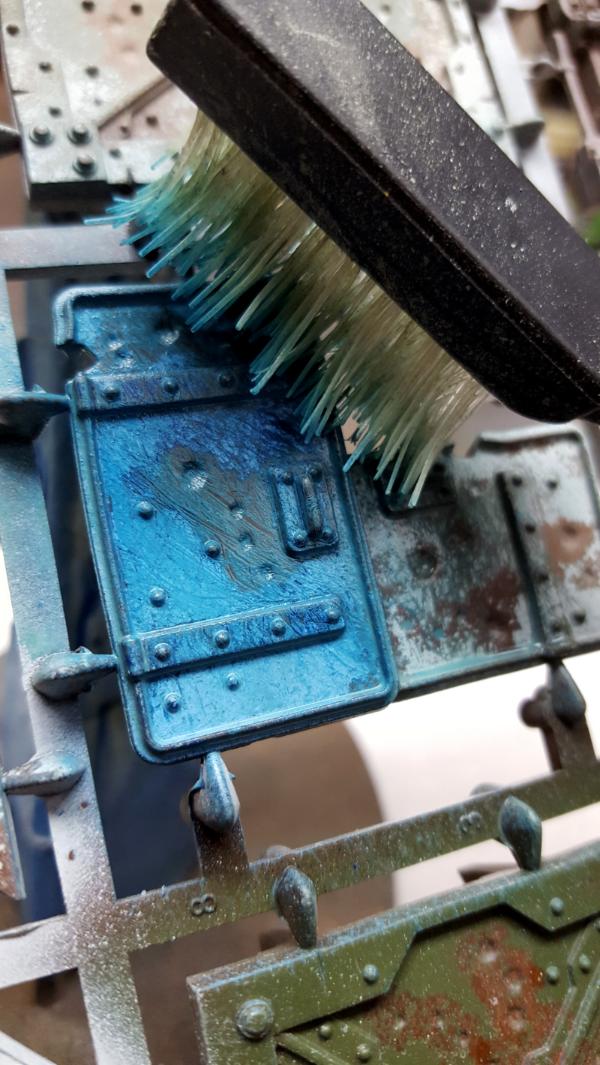
12. This is just a cheap set of wire/nylon brushes, You can use any metal thing you want.
Make scratches, gouges, go nuts! Dont be afraid to spray it again and again, you'll start to see the water dissipate the paint and make cool patterns layered over the scratches.

13. NOW we get to go have another PINT!
Let this dry.
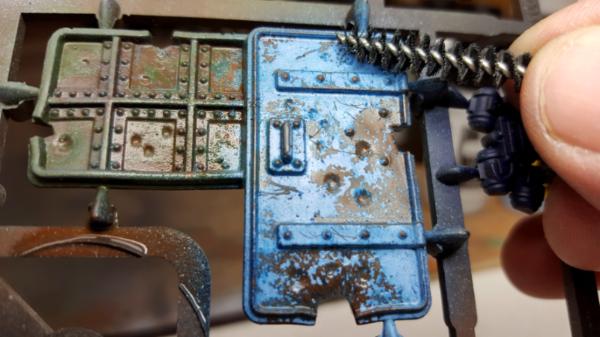
14. For washes, This is what I'm using.

Everyone knows that nuln oil is magic, well Vallejo Oiled Earth wash IS Nuln Oil, and a lot more economical!
Vallejo Light Rust, Rust, and Dark Rust washes, and GW Typhus Corrosion (I decant them into dropper bottles- it is NOT sold this way)
15. Start with the Nuln Oil wherever there is any plate-on-plate action, go easy, just a shadow. If you water down the nuln oil, let it seep into your scratches and cracks for shadow too.
16. I do rust washes LIGHT to DARK
Starting with Light Rust
Dont be afraid to RUB the light rust into your scratches and cracks. It's oK to remove paint with this technique.
17. Medium Rust wash is used for all of the rivets and bolts! 
18. Dark Rust is used on any deep dents like bullet holes, or wherever metal has been torn or sheared. Also in the center of large splotches.
19. After Three washes, you're ready for ANOTHER PINT
This allows the washes to dry.
20. Finally, we go in with the Typhus Corrosion in the very center of large splotches and ESPECIALLY on the EDGES of the plates that have been torn or sheared off (the metal would rust there more rapidly with no paint to protect it)
If you followed the included drinking steps, you should be feeling pretty good about your accomplishment right about now. 
There is no wrong way to do this, and I'd LOVE to see how yours turns out!
Happy Underhiving!
|
|
This message was edited 4 times. Last update was at 2018/02/04 22:22:04
|
|
|
|
2018/02/04 23:45:36
Subject: Re:The Necromunda Project: Rusty Industrial Metal Tutorial
|
|
Decrepit Dakkanaut
|
Thanks guys! Much appreciated!
@Vik - 3 mates, pint.
You know, I never really weathered the tower....
|
|
This message was edited 1 time. Last update was at 2018/02/04 23:49:50
|
|
|
|
2018/02/05 04:54:55
Subject: Re:The Necromunda Project: Rusty, Industrial Painted Metal Tutorial
|
|
Decrepit Dakkanaut
|
|
|
This message was edited 2 times. Last update was at 2018/02/05 04:57:35
|
|
|
|
2018/02/05 13:50:01
Subject: The Necromunda Project: Rusty, Industrial Painted Metal Tutorial
|
|
Decrepit Dakkanaut
|
Thanks LDD, yeah the green doesn't look as good, but I didnt want to lighten the topcoat green enough to contrast. it works next to the blue, but not so much by itself. its all about contrast rather than color.
When I made my tut into a Dakka Article, I found this article about the different Vallejo Pumice products
https://www.dakkadakka.com/wiki/en/Vallejo%20Pumice%20Comparison
|
|
This message was edited 1 time. Last update was at 2018/02/05 13:52:16
|
|
|
|
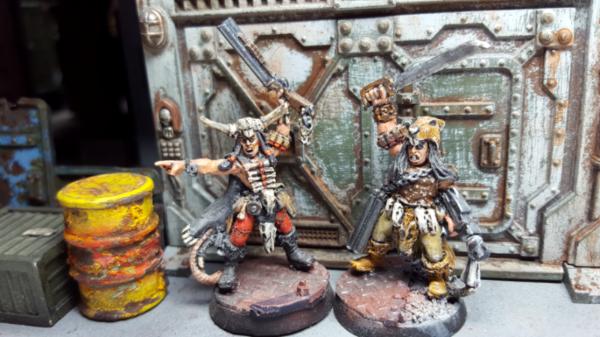
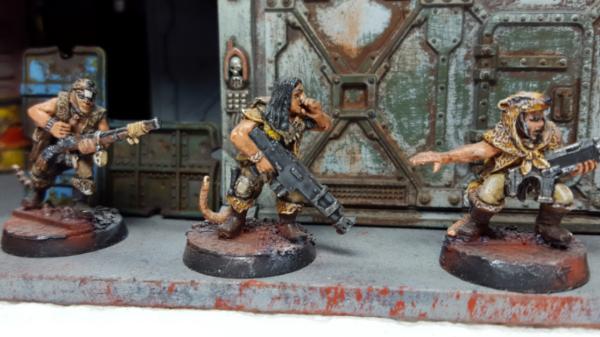
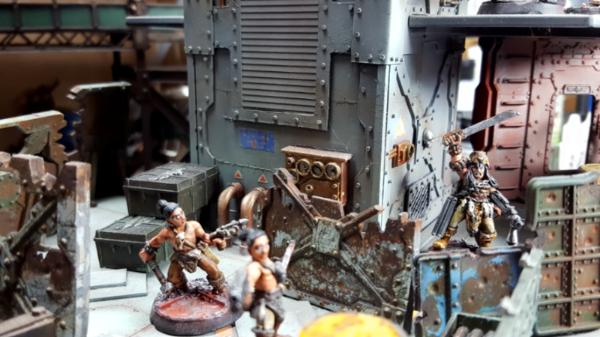
2018/02/09 13:48:32
Subject: Re:The Necromunda Project: Rusty, Industrial Painted Metal Tutorial
|
|
Decrepit Dakkanaut
|
News From the Town Spire:
Forge World throws in the Necromunda Ring with some Hired Guns!
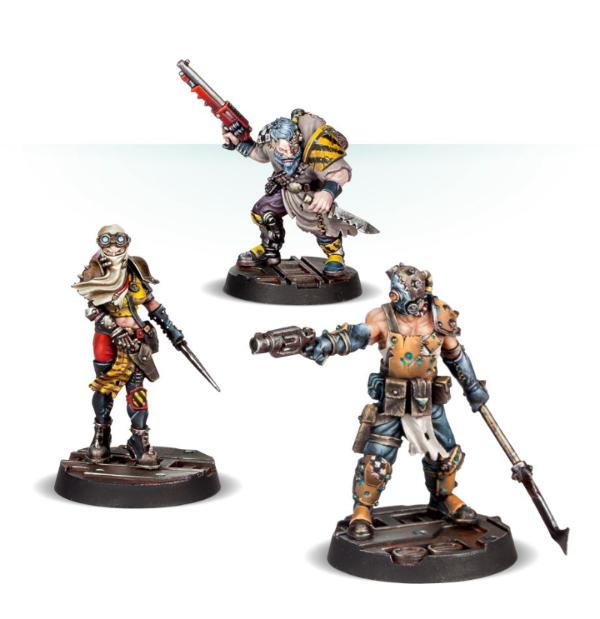

and I like my rust better
oooh, i also see a Gor, Half-horn, Sanctioned bounty-hunter
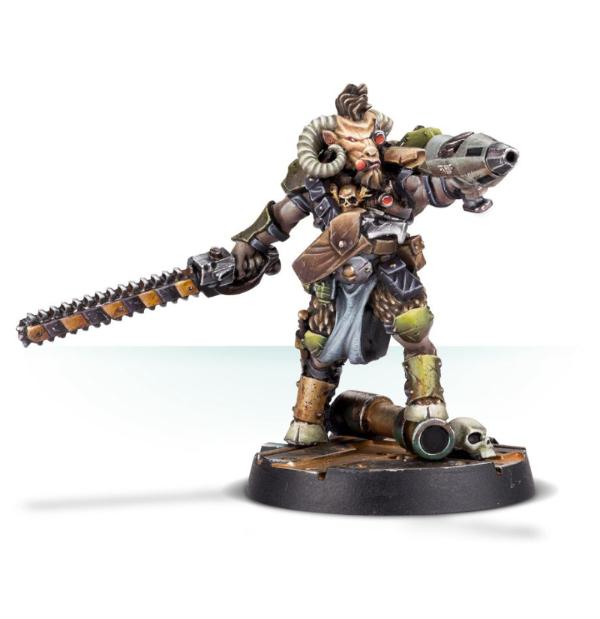
I know the Imperium is racist, and xenophobic, but It's good to see a beastman in 40k Imperial lore.
The fluff even says Hive Primus has a spire where abhumans and xenos are permitted for trade purposes.
|
|
This message was edited 2 times. Last update was at 2018/02/09 13:55:48
|
|
|
|
2018/02/09 15:52:09
Subject: Re:The Necromunda Project: Rusty, Industrial Painted Metal Tutorial
|
|
Decrepit Dakkanaut
|
Actually no, they are only £20 for the 3, and £18 for Gor half-horn- not too bad. I actually dont mind their prices. Compared to a lot of regular plastic model kits, its not bad at all. I just dont like the space marines everywhere thing. There are billions of GUARD, from millions of worlds, Marines are supposed to be rare. The Imperium exists because the GUARD hold the line.
|
|
This message was edited 1 time. Last update was at 2018/02/09 15:53:33
|
|
|
|
|
|