| Author |
Message |
 |
|
|
|
|
Advert
|
Forum adverts like this one are shown to any user who is not logged in. Join us by filling out a tiny 3 field form and you will get your own, free, dakka user account which gives a good range of benefits to you:
- No adverts like this in the forums anymore.
- Times and dates in your local timezone.
- Full tracking of what you have read so you can skip to your first unread post, easily see what has changed since you last logged in, and easily see what is new at a glance.
- Email notifications for threads you want to watch closely.
- Being a part of the oldest wargaming community on the net.
If you are already a member then feel free to login now. |
|
 |
2011/10/21 06:05:11
Subject: Painting Digi Marines... And rifle scopes...
|
|

Thunderhawk Pilot Dropping From Orbit
|
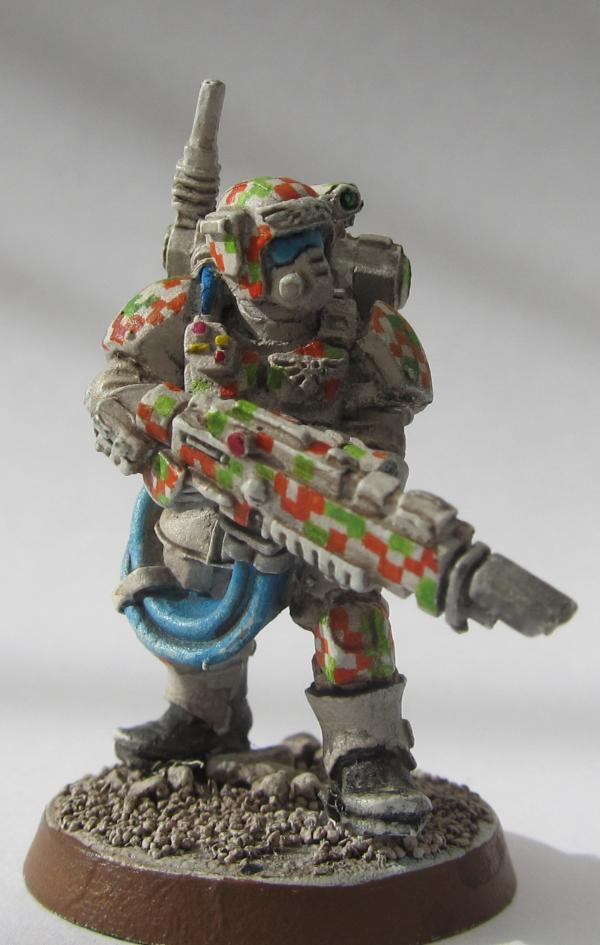
So I recently have been converting and buying stuff from forgeworld like crazy... and I want my army to look great.
Since I did some time in the Marines I would like my Marines to have a jungle digi pattern. I would like it to be in the smallest pixiles as possible to represent the USMC pattern. Like this...

So I have thought up a way how to do this...
Black spray paint as a base...
Then wash my model in a type of brown wash that is available at GW's website.... let dry... then dry brush a brown color onto my model...
Next is the tricky part...
I thought about how am I going to get the digi pattern as best and little as possible... I concluded the best way is taking electrical tape and carving a pixil pattern that is small enough for the models, then tape the cut away piece onto my Marine, and paint over it so I would get an almost perfect pattern...
Downsides... Takes a lot of time cutting multiple patterns in small pieces of tape... And is it the best way?
[u](I am open for other suggestions) [b]
Does anyone else know of a great way of doing the small digi pattern on the Space Marine models? ? ?
the paints I will be using for the models are-
Chaos black spray- base coat
Gryphonne Sepia- brownish b4 dry-brushing wash
Bestial Brown- for the brown part of the digi
Catachan green- green part of digi
Chaos black- for black part
(sound good? ? ? ) Any suggestions on the colors I will be using? ? ?
I am very open for ideas other then my own how to do it and if anyone has better colors I should use...
ALSO
I bought forgeworld bolters with the rifle scopes on every one of my models... I want to paint them perfect also... What colors should I use for the lenses? And how would I paint them... If you could please name and list the colors in order please!!! Thanks!
|
|
|
|
 |
|
2011/10/21 06:52:36
Subject: Painting Digi Marines... And rifle scopes...
|
|

Wight Lord with the Sword of Kings
|
For the digital part, Id day you should do it like Ork check and dag patterns: first paint a grid on it, then fill it with paint 
|
|
|
|
|
|
2011/10/21 07:16:19
Subject: Painting Digi Marines... And rifle scopes...
|
|

Rifleman Grey Knight Venerable Dreadnought
Realm of Hobby
|
please let me know which technique proves successful...
I plan on doing something similar on my drop pods
|
 MikZor wrote:
We can't help that american D&D is pretty much daily life for us (Aussies) 
Walking to shops, "i'll take a short cut through this bush", random encounter! Lizard with no legs.....
I kid Since i avoid bushlands that is 
But we're not that bad... are we? 
|
|
|
|
|
2011/10/21 08:14:25
Subject: Painting Digi Marines... And rifle scopes...
|
|
Boosting Space Marine Biker
|
For the scope, just paint it up like the gems on the eldar articles page. Only use thin layers of paints dark to lightest. It also might help to look at a real scope lense from the angle your light source will be coming from on your model. Any color you want, but blues seem to be great for it. Or you can try a black basecoat followed by a fenris grey coat leaving a bit of the top black. Make sure you use thinned paint so it blends well. Next a thinned coat of 70:30 fenris grey and space wolves grey leaving a bit of the fenris showing (again blend it nicely). Lastly a final thinned coat of 50:50 fenris grey and space wolves grey then a dot of white in the top corner you left black. If you would like to add a final white highlight along the bottom rim that is an option, but it must be thin to look like a reflection. Then when your model is matte coated hit the lenses only with a bit of gloss coat. Hope this helps, I prefer these colors to the very bright alternatives. Looks more like glass when done properly.
Now for the pattern, it is going to be hard because like you mentioned it must be very small. Don't worry about specific shapes being done on every model the same. Masking is going to be too much work and the end result won't be great most likely. Skip the Brown wash on the black base coat, it won't make a difference. After you prime it in black fully coat it with Khemri Brown and the wash it with Devlan mud. Don't slather it and let it pool in the recesses, were just darkening up the Brown base. Once that is dry take a sharp fine detail brush and your pot of badab black wash and carefully outline all the pattern shapes on the uniform. It will be very light but dark enough to see. When that is done go back with your other camo colors and fill in your outlined blocks of digi. The grid technique won't be useful here because it is a random pattern and grids are more useful for perfect patterns like diamonds and checkerboard IMO. The best advice I can give you is take your time and get the wash outline perfect, freehand is the way to go with this pattern. This technique will produce a great quality digi cam as long as you stagger your colors properly and make the pattern blocks tiny and sharp. Good luck hope this helped.
Chaos black - primer
Khemri Brown - basecoat
Devlan mud - wash
Catachan green - camo color
Chaos black - camo color
Commando khaki - camo color
|
|
This message was edited 1 time. Last update was at 2011/10/21 08:19:39
|
|
|
|
|
2011/10/21 11:59:38
Subject: Painting Digi Marines... And rifle scopes...
|
|
Thunderhawk Pilot Dropping From Orbit
|
AvatarForm wrote:please let me know which technique proves successful...
I plan on doing something similar on my drop pods
Now for the pattern, it is going to be hard because like you mentioned it must be very small. Don't worry about specific shapes being done on every model the same. Masking is going to be too much work and the end result won't be great most likely. Skip the Brown wash on the black base coat, it won't make a difference. After you prime it in black fully coat it with Khemri Brown and the wash it with Devlan mud. Don't slather it and let it pool in the recesses, were just darkening up the Brown base. Once that is dry take a sharp fine detail brush and your pot of badab black wash and carefully outline all the pattern shapes on the uniform. It will be very light but dark enough to see. When that is done go back with your other camo colors and fill in your outlined blocks of digi. The grid technique won't be useful here because it is a random pattern and grids are more useful for perfect patterns like diamonds and checkerboard IMO. The best advice I can give you is take your time and get the wash outline perfect, freehand is the way to go with this pattern. This technique will produce a great quality digi cam as long as you stagger your colors properly and make the pattern blocks tiny and sharp. Good luck hope this helped.
Chaos black - primer
Khemri Brown - basecoat
Devlan mud - wash
Catachan green - camo color
Chaos black - camo color
Commando khaki - camo color
This wouldn't turn out good for the pixil size I want but Ill try it... Ill get back to you boyz... ahaha get wat i did there ork player....
And ill try this and my technique, makes sense... Ill do a basecoat with khemri brown and then instead of just painting everything ill do one where I dry brush kemri brown. Its going to be a while b4 I start to paint (circa 2 weeks) but ill post pics on my adventures.
thx for the help fellas
|
|
This message was edited 3 times. Last update was at 2011/10/21 12:08:36
|
|
|
|
|
2011/10/21 17:59:01
Subject: Painting Digi Marines... And rifle scopes...
|
|
Boosting Space Marine Biker
|
It will, because I've pulled off small detailed patterns with the technique. Masking that small is too much work and it usually doesn't turn out great. Best way is like I said, a lot of time and tedious outlining with a new small brush
|
|
|
|
|
|
2011/10/22 02:45:42
Subject: Painting Digi Marines... And rifle scopes...
|
|
Longtime Dakkanaut
|
I tried masking digital camo before on a few Drop Pods, and let me tell you what kind of hell it turned out to be, with results that weren't worth the time invested.
If you can free hand it, good. The scale you're working with limits the use of stenciling (aka tape with holes in it). Have you worked on a normal camo scheme yet? They look very good if done correctly, so I might advise starting there, and working your way up.
If you're absolutely pinned to the idea of digi, then:
http://tacticalcamo.com/MARPAT/digi.php
Use that link, play with your colors, scale it down, to get an idea.
I can't find the link, but here's a rough rundown of what I do for some things I do in camo wtih stencils:
Materials:
-painters tape (2in. wide preferably, I like "Frog Tape")
-wax paper (baking paper)
-Xacto knife (razor blade)
-plain printer paper
-printer that's not finicky
-ruler (straight edge)
-cutting board
1. take your tape, and coat the wax paper. Make sure to overlap so that you have 1 solid sheet of tape.
2. using your printer paper as a guide, cut out the wax-paper/masking tape to the size of the printer paper (straight edge to help guide, cutting board to prevent lethal damage to body, table, counter-tops, etc).
3. load your newly cut sheet of paper into your printer, and print (on the TAPE side) your design (aka digi camo)
4. cut out stencils.
5. apply newly cut stencils to medium (aka your minis, paintball guns, side of your car, etc.)
6. paint.
Now remember when doing any camo, overlapping color layers are the key to breaking up your shape (thus making it work, and look good).
Sorry, didn't mean to post so much, but I hope I helped somebody out there with something
|
Why is it that only those who have never fought in a battle are so eager to be in one? |
|
|
|
|
2011/10/22 14:08:40
Subject: Re:Painting Digi Marines... And rifle scopes...
|
|

Waaagh! Warbiker
|
When painting digital on 28mm scale, you can't really do them do them to scale, as it would simply look like dots. Its better if you do the pixels larger.
I start off with a solid base coat and then use two different colours to make geometric patterns. It does take a while, but it does pay off.
I realize the colours might not be to everyones taste, but its the technique I'm wanting to get across. I've also done the same technique in modern military colours and it really works well, but I haven't got a working camera at the mo, so I can't share :L
Good luck, It'll be an impressive army if you get it to work.
|
|
|
|
|
2011/10/22 23:39:32
Subject: Painting Digi Marines... And rifle scopes...
|
|

Basecoated Black
|
I think easy,st way to do this tech would be to base up the mini make your stencil out of frisk it lay it over mini air brush 1st layer then move frisk it slightly do the 2rd layer then move frisk it again do 3rd layer once you have done this just paint mini as per usual
|
|
|
|
|
2012/01/03 07:48:26
Subject: Painting Digi Marines... And rifle scopes...
|
|
Thunderhawk Pilot Dropping From Orbit
|
So I finally am ready to do paint my models in the Crye camo instead of digi...
Do you guys think I should use a wash? That is now the question...
|
|
|
|
|
|
2012/01/03 08:18:55
Subject: Painting Digi Marines... And rifle scopes...
|
|
Sneaky Kommando
Austin, Texas USA
|
Basecoat, wash, pattern, wash again. Repeat as needed.
Course, I thought Space Gumbies didn't use cammo cause it somehow lessened their honor.
|
Eating and sleeping are the only activities that should be allowed to interrupt a man's enjoyment of his cigar. S. Clemons
|
|
|
|
|
2012/01/03 09:50:17
Subject: Painting Digi Marines... And rifle scopes...
|
|
Thunderhawk Pilot Dropping From Orbit
|
Yeh I know but I like the design haha...
So what color do I wash with? I have some wood finish ... would that work?
|
|
|
|
|
|
2012/01/03 12:25:59
Subject: Painting Digi Marines... And rifle scopes...
|
|
Sneaky Kommando
Austin, Texas USA
|
I couldn't give you the official GW colors, as I am a craft paint using xeno heretic scum.
Having said that I'd go with a khaki base, burnt umber wash, dark khaki, light od green, and burnt sienna for the pattern, and then a light wash of burnt umber to tie it all together.
|
Eating and sleeping are the only activities that should be allowed to interrupt a man's enjoyment of his cigar. S. Clemons
|
|
|
|
|
2012/01/03 13:35:33
Subject: Re:Painting Digi Marines... And rifle scopes...
|
|
Lady of the Lake
|
Depends on the colour you want for the lens really. I usually have green lenses in my army though.
Firstly ensure this is one of the last details you do, you will however have highlighting the scope case as a minor form of cleanup though.
Start with a clean black basecoat on the lens itself it is important as it builds depth.
Next I base dark angels green over that, covering the entire lens. One thin coat is enough as you are just looking to tint the black.
I then get snot green and apply it as a crescent on the lower half of the lens. This will roughly take a quarter of the lens and is on the shaded direction of your lighting.
A smaller crescent of goblin green is then placed within the middle of the existing, being roughly half the size.
An even smaller crescent of scorpion green is then put into that, though a dot will suffice.
Lastly a very small dot of white into the center of the scorpion green and on the opposite edge from it, adding the illusion of light passing through.
Some would say to use gloss varnish at this point, but I feel it wouldn't really add and would detract somewhat from it as you just made a static shine and the gloss would be dynamic.

I've done blue once and all I did was replace the greens with regal blue, enchanted blue, ultramarines blue and ice blue.
Unfortunately the picture isn't as clear.

I originally used this for gems so I suppose you could apply it to that for the more ornate marines, though if you're using camo they'd likely be dull so as to not take away from the effect.
Good luck with the camo, it is an impressive scheme to pull off. 
|
|
|
|
|
|
|
|

