Since I joined up with Dakkadakka, I've crusaded for cheaper, affordable alternative models for my
GW armies, most specifically my son's Necron army. He received it as a Christmas present some two years ago now, fully assembled and painted and ready to play a 3rd edition army in a 5th edition game. Some of the best units in the dex (specifically Immortals) were only made in metals and priced well out of the range of affordablilty on my very modest gaming budget. After careful inspection, I determined that it was possible to convert a warrior into an Immortal so long as I was willing to sacrifice two warriors for one Immortal. I documented my progress and, coincidentally, Dakka ran a tutorial contest to which I submitted my efforts. Lots of folk have found it to be very informative and helped make running 10x Immortals a possibility.
Now
GW's come along and made these great plastic Immortal/Deathmark kits, more or less halving the cost of the models. This is great - don't get me wrong! I love the new models, but having to choose between the three options is really kind of crappy. There's been a lot of noise about using the spare bits with warriors to get full use out of the kit to make 5 gauss Immortals, 5 tesla Immortals, and 5 Deathmarks and I promised some folks in the rumors thread that I'd give it a go.
After assembling the Immortal legs, heads, and bodies with Tesla carbines, I had the Gauss Blasters left over for use with my
Immortal on the Cheap conversion. That only leaves the Deathmarks... here's my initial effort:
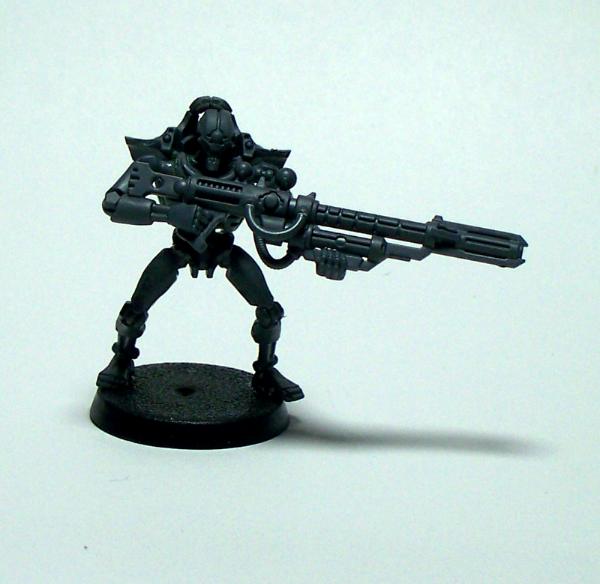
Sorry for the poor lighting, but I took it at night and only have the one lamp,
lol. Also, this isn't a tute, obviously, but that will be forthcoming once I nail down the full process. Here's the important details:
1. The warrior chestplate is a little smaller than the Deathmark backplate, requiring a plasticard spacer on the bottom half as well as some greenstuff gap filling.
2. The warrior chestplate has a semi-cylindrical bit on the inside that needs to be trimmed off so that it fits flat on the backplate.
3. Since the arm sockets won't match up exactly, a little greenstuff in them will bulk them up to hold the Synaptic Disintegrator arms. You'll want to press the ball sockets of the arms into the shoulders to get the proper shape, but don't leave them there since the
GS won't hold them up. Wait for it to cure and then glue the arms in place.
4. The neck of the warrior is angled differently than the Immortal's and requires a bit of sprue or thick wire to keep the head from having a "looking at the sky" angle. I used the round bits on the sprue section, carefully trimmed with clippers and evened out with a hobby knife. Still didn't get the head centered properly, but that was simply impatience.
5. If you used the spine bit on the back for the Immortals like I did, you'll need to find some thick bass guitar wire (probably an "A" string) to replace it. A bit of bending to shape it and a bit of glue and you're golden.
6. The warrior legs don't look too bad with the torso, but the thighs could use some bulking/extra plate. Follow the link above to learn how I did that for the Immortals. I didn't do it for this guy, but in hindsight, I probably should have.
There you go! Let me know what you think!


