| Author |
Message |
 |
|
|
|
|
Advert
|
Forum adverts like this one are shown to any user who is not logged in. Join us by filling out a tiny 3 field form and you will get your own, free, dakka user account which gives a good range of benefits to you:
- No adverts like this in the forums anymore.
- Times and dates in your local timezone.
- Full tracking of what you have read so you can skip to your first unread post, easily see what has changed since you last logged in, and easily see what is new at a glance.
- Email notifications for threads you want to watch closely.
- Being a part of the oldest wargaming community on the net.
If you are already a member then feel free to login now. |
|
 |
2011/11/29 22:13:46
Subject: My First Imperial Fists Dreadnought!
|
|

Space Marine Scout with Sniper Rifle
|
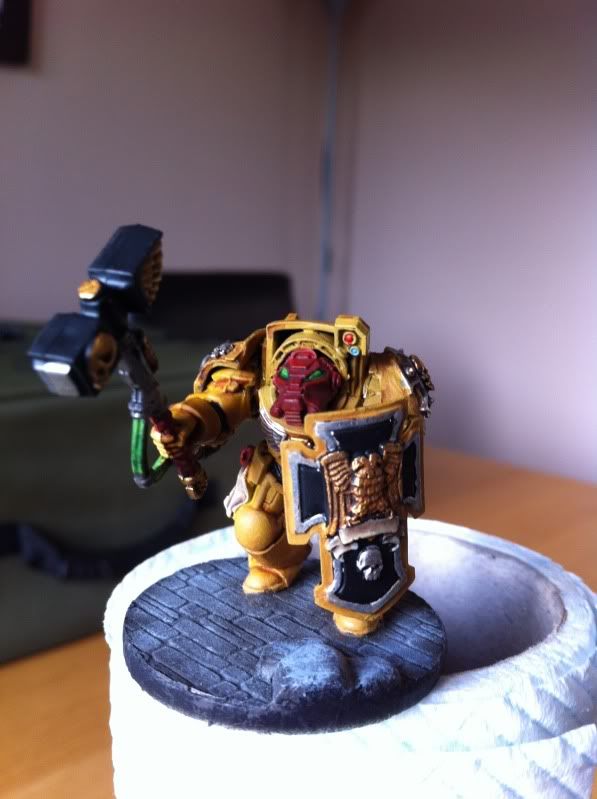
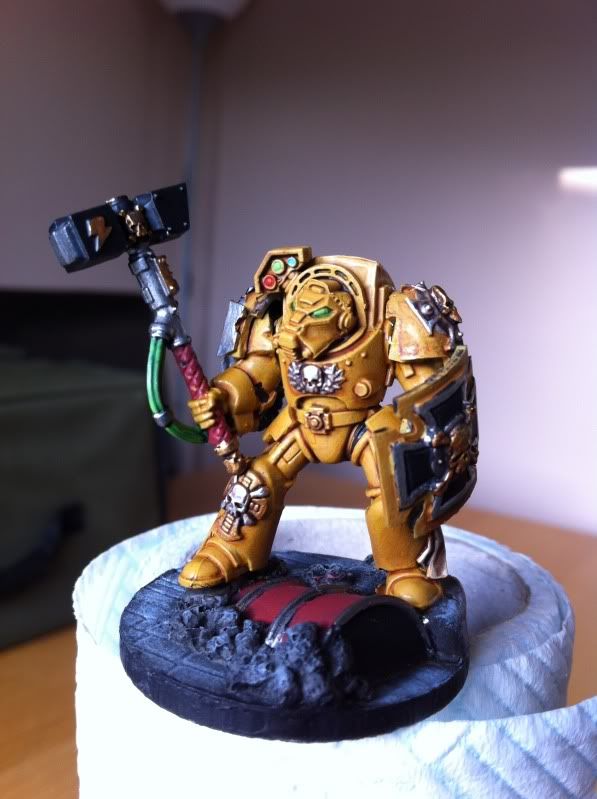
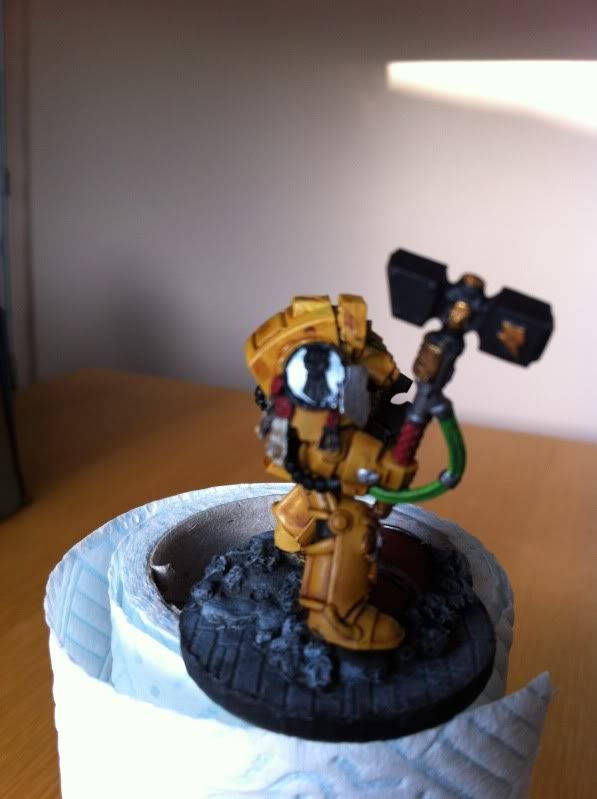
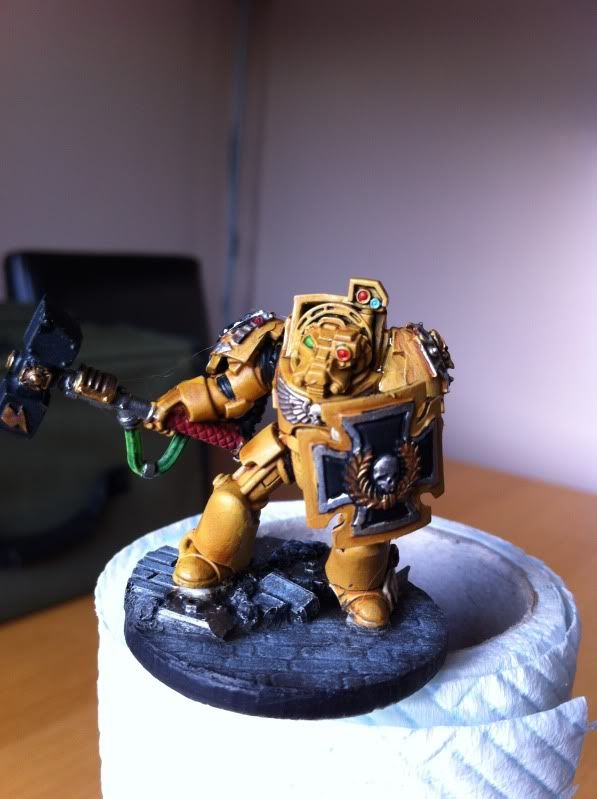
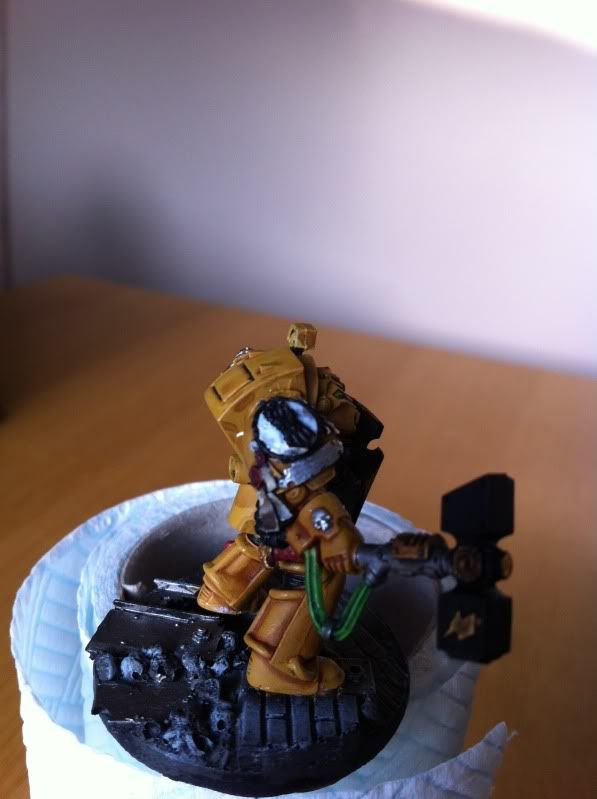
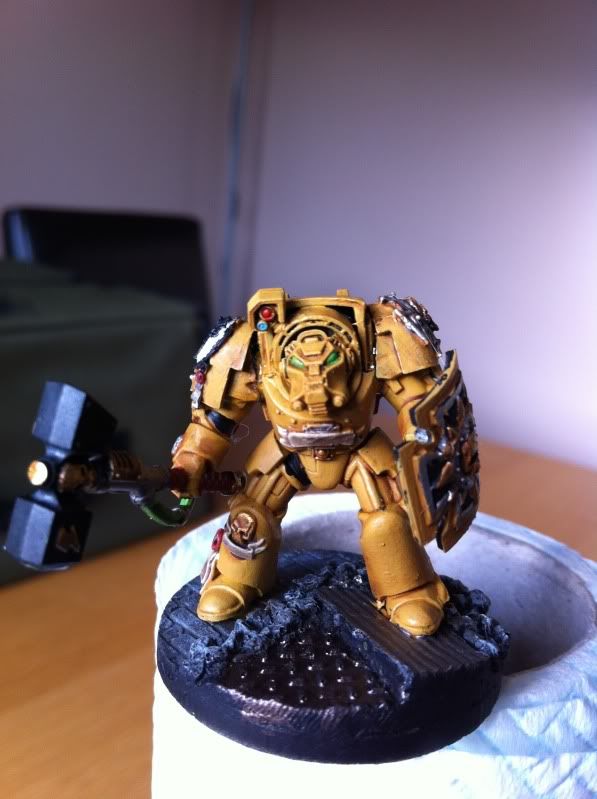
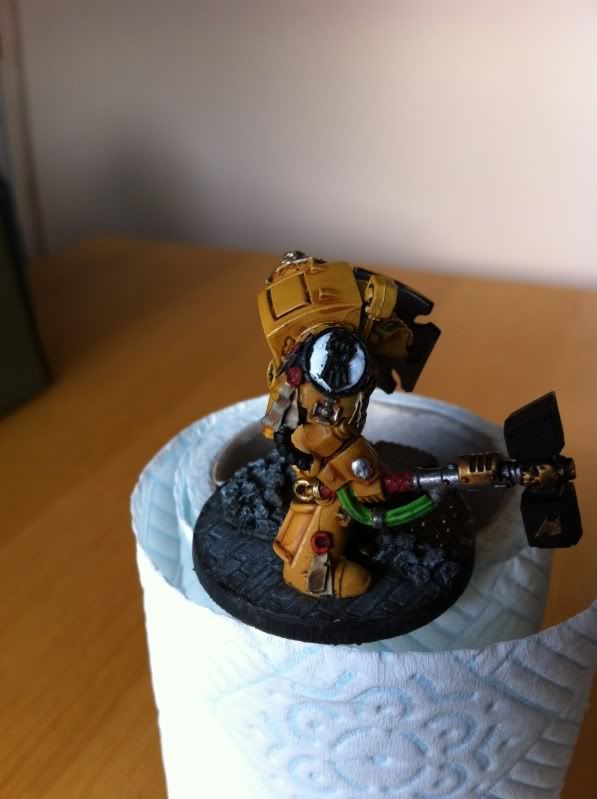
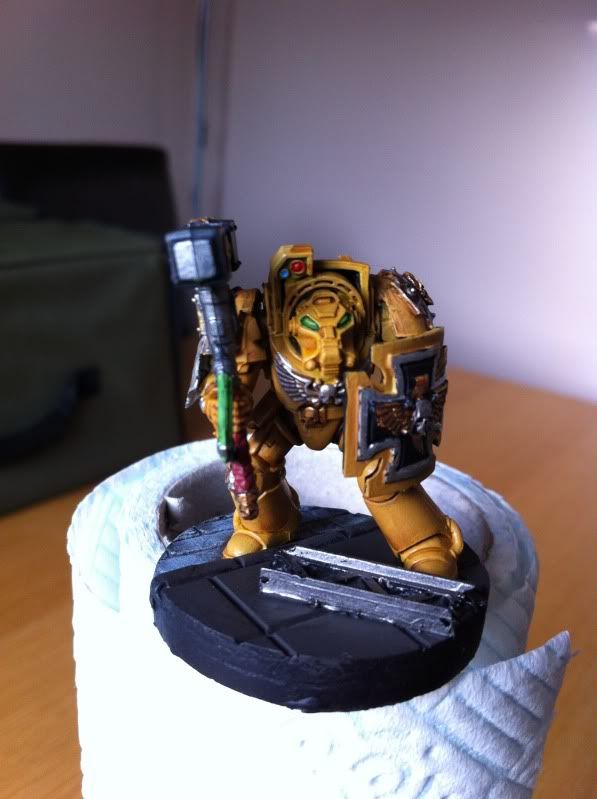
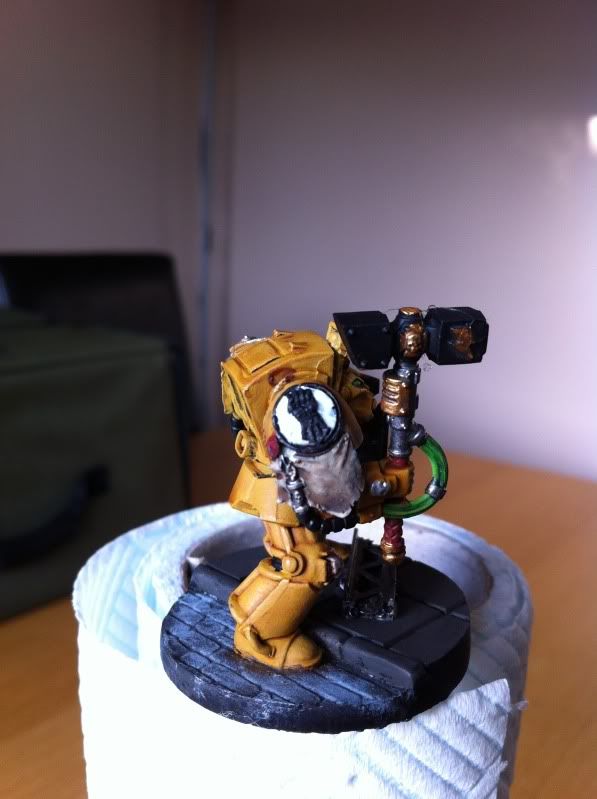
So i haven't played, or collected for many years and recently bought a tonne of new stuff to make and paint for a 1750-2000 point Imperial Fists (Codex SM) army.
I have now started painting and have finally finished my first dreadnought.
I know many people like crisp bright yellow, but im not a fan, i prefer a much darker yellow, like some pictures i have seen in books and on the internet.
Please let me know what you think, as i have another 50 something models to paint. Cheers.
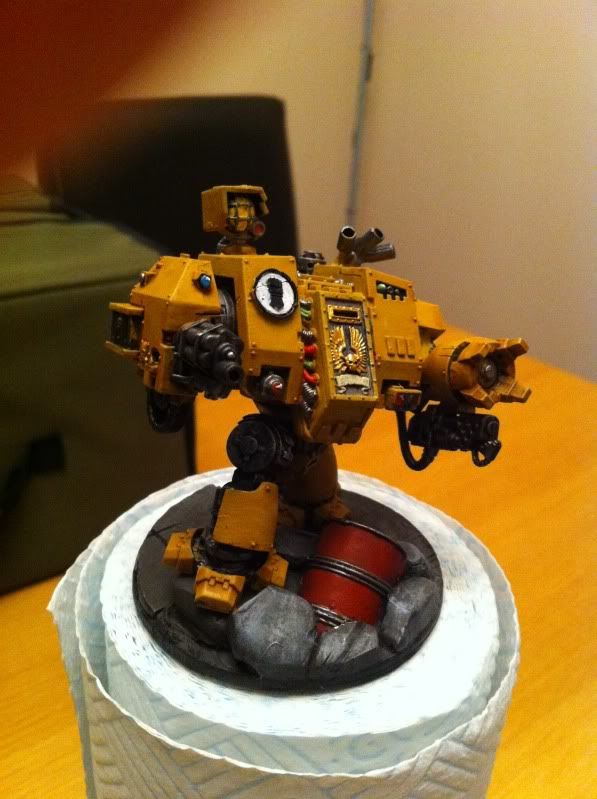
P.S sorry about the photo, it was taken on my iphone.
|
|
This message was edited 1 time. Last update was at 2011/11/29 22:15:35
|
|
|
 |
|
2011/11/29 22:21:50
Subject: My First Imperial Fists Dreadnought!
|
|
Dangerous Outrider
|
Nicely done.
Which yellows have you used?
Looks like you have a nice even layer all over the large surface areas.
Only criticism would be lack of contrasting/spot colours. Maybe using blues/purples/greens on the lamp for example might help details stand out.
But impressive all the same 
|
Armies | Space Marines (Void Knights - Own Chapter), Space Wolves & Dark Angels | Imperial Guard Cadian and Kasrikin | Grey Knight/Sisters/Inquisitors | Empire - Hochland | Britanan (Relics) | Mordor & Gondor |
Hello, although I'm a static Zero.
I'm fighting all your wars.
Warning: These miniatures contain lead and should not be chewed or swallowed.
These Miniatures may well be miscast... |
|
|
|
|
2011/11/29 22:29:45
Subject: Re:My First Imperial Fists Dreadnought!
|
|
Space Marine Scout with Sniper Rifle
|
Thanks,
I used GW Foundation: Iyanden Darksun. - It took about 2 layers of this just as i base coated with black spray.
I then used watered down Golden Yellow.
Then a wash of gryphonne sepia.
Thanks again.
|
|
|
|
|
|
2011/11/30 00:46:44
Subject: My First Imperial Fists Dreadnought!
|
|
Stalwart Space Marine
|
Very nice i like it dude looks very good like how you have done the yellow on your fist bit darker then mine 
|
 2500pts 2500pts
 Ogre 6000pts Ogre 6000pts
 2000pts - WIP 2000pts - WIP
|
|
|
|
|
2011/11/30 00:56:05
Subject: My First Imperial Fists Dreadnought!
|
|

Manhunter
|
That yellow is nice
|
Lokas wrote:...Enemy of my enemy is kind of a dick, so let's kill him too.
"Without judgement there is no obstacle to action." ~ Kommander Oleg Strakhov
|
|
|
|
|
2011/11/30 06:06:31
Subject: Re:My First Imperial Fists Dreadnought!
|
|

Warning From Magnus? Not Listening!
|
Wish i could do yellow that well!
|
Notice: If you notice this notice you will notice that this notice is not worth noticing
|
|
|
|
|
2011/11/30 12:27:49
Subject: My First Imperial Fists Dreadnought!
|
|
Speedy Swiftclaw Biker
|
That Yellow is great, Nice and smooth. Very good Job!
|
My Armies:
Space Wolves 
Ogre Kingdoms  |
|
|
|
|
2011/11/30 12:29:45
Subject: Re:My First Imperial Fists Dreadnought!
|
|
Longtime Dakkanaut
|
The yellow is very nice but thought of any highlights for it?
|
|
|
|
|
|
2011/11/30 13:17:27
Subject: My First Imperial Fists Dreadnought!
|
|
Boom! Leman Russ Commander
|
alphaomega wrote:Nicely done.
Which yellows have you used?
Looks like you have a nice even layer all over the large surface areas.
Only criticism would be lack of contrasting/spot colours. Maybe using blues/purples/greens on the lamp for example might help details stand out.
But impressive all the same
What is the green and red wiring, if not spot colouring my friend.
Don't even get me started on the red barrel.
Anyway, you suck because you have not build up yellow from black. You have used foundation paints [I think] So I am assuming you suck.
I'm kidding! Anyway, I want to see these models painted in the brightest yellow you can find.
|
|
|
|
|
|
2011/11/30 13:42:28
Subject: My First Imperial Fists Dreadnought!
|
|
Space Marine Scout with Sniper Rifle
|
Thanks for all the comments! I have thought about doing highlights but really want to wait til I've painted some more things first. I did spray black first and then foundation, so maybe cheating a bit there, but it got the yellow I wanted.
|
|
|
|
|
|
2011/12/01 10:32:47
Subject: Re:My First Imperial Fists Army!
|
|
Space Marine Scout with Sniper Rifle
|
|
|
|
|
|
|
2011/12/01 13:54:56
Subject: My First Imperial Fists Dreadnought!
|
|

Infiltrating Broodlord
|
I don't think that the use of Foundation Paints could be considered "cheeting" honestly. They're so damn good that would be a "intellectual masturbation" do not use them just because looks easy...
In a painting contest I will understand but for gaming purposes..
Anyway, your Yellow tone looks good to me but it's damn flat you know?
This thing is even more evident on the Terminators where all the details, the deep parts and all the crevices (like the pistons and tubing on the legs) will really deserve a shading. Well, patiently, directed darker washes would help you so much. Consider Devlan Mud.
After, you'll more easily see where and when add a highlight - border highlight for the Dread - with Golden Yellow in the beginning and a progressive mix of Golden Yellow and white to continue. This will slowly and gently emphasize the 3d structure of the models.
The very last step, at least for my taste absolutely necessary, will be add some battle damage. There are many many ways to do it, even very fast and effective methods like the "sponge hitting", something that really change the global look of your models givin' them a "real" look.
By the way Space Marines are supposed to be in fight zones most of time and their armors should show that...
Hope this help.
|
Every molecule will be useful
 6000+ pts NIDS 6000+ pts NIDS
 ( ( ) 2000 pts growing to 4000... ) 2000 pts growing to 4000... |
|
|
|
|
2011/12/01 14:24:53
Subject: My First Imperial Fists Dreadnought!
|
|
Space Marine Scout with Sniper Rifle
|
Thanks for the feedback. I agree with you on the shading, I'm not that confident at shading yet, so practising on other spare models first, but it will be done. It's the same with the battle damage really, I need a bit of practice but it will be done aswell, as I'm a real fan of the darker yellow with some damage. Cheers.
|
|
|
|
|
|
2011/12/01 14:28:33
Subject: Re:My First Imperial Fists Dreadnought!
|
|
Longtime Dakkanaut
|
Battle damage can be really hard to make it look good and 'fitting', if your not confident with highlighting and other such skills, put BD straight to the bottom of your list.
Liking the termies though, a very good start
|
|
|
|
|
|
2011/12/01 14:43:35
Subject: Re:My First Imperial Fists Dreadnought!
|
|
Fresh-Faced New User
|
Its a really great start. IMO you have the hard part done, which is getting yellow to look smooth and even. I would second the recommendation to use a wash, especially on the terminator, which has more crevices to pick it up. I'm with you on not highlighting until you've painted more. Your stuff already looks pretty good so I wouldn't risk compromising that with poorly done highlights if you're not confident you can do them well. At the same time, you'll have to do them at some point to get good at them and sometimes messing up and repainting a section multiple times is what it takes.
If you do battle damage I have a suggestion. Get matte varnish from a local art store. I use liquitex paint on varnish which seems pretty widely available. Varnish your model before you do battle damage. That way, if you sponge or paint on some damage that you don't like, you can remove it with rubbing alcohol easily without damaging the paint under the varnish. Just rub very gently to remove the battle damage.
Cheers,
Scyth3
|
|
|
|
|
2011/12/01 15:09:45
Subject: My First Imperial Fists Dreadnought!
|
|
Boosting Black Templar Biker
|
The yellow looks great. The Foundation colors are meant to go onto Black undercoating so techincally its not really cheating, your just using it as intented.
It looks like your already using a wash on the terminators am I correct in assuming its Gryphonne Sepia? It tones yellow very nicely. If you wanted to tackle highligting I would just add a dab of bleached bone to the foundation yellow to use as your highlight color. Try just highlingting the upper parts of edges like the tops of the knees and shoulderpads. You also dont have to go crazy and highlight every edge on the model, afew well placed highlights on high points works wonders.
One more thing about varnishing before doing battle damage as suggested by Scyth3, I would recommend you use either a Satin or even a Gloss varnish, not Matte. Matte varnish wont protect as well as Gloss. This is a military modeller's technique I use frequently, but its meant more for applying weathering effect washes than for battle damage chipping effects. My technique is to seal with an acrylic satin/gloss varnish, then apply oil paint washes to achieve weathering effects (usually a dab of black or raw umber thinned in white spirits). The reason you use a oil/white spirits is it wont penetrate the acrylic layer and will act as more of a color filter to achieve a great effect. It also runs into the crevices using capillary action like no other washes can.
Battle damage can be applied using a chunk of packing sponge( like from a blister pack) just dab it in a dark color like black or scorched brown for the yellow and apply it very carefully to where you want it, mostly on the outer edges where there would be natural chipping. You can then hit those dark spots with some chainmail to achieve nice chips.
Another great weathering/ battle damage tool I use is theTamiya Weather Master kits. They come in what looks like a makeup compact and have applicators similar as well. They are great as you can rub in the soot, rust or even mud effects onto the model with great control.
After all that is done then you should reseal with a matte varnish to regain your flat finish.
There are a number of great videos on Youtube from users like scale model medic that demonstrate these great military model techniques that can be applied just as easily to 40k stuff. Check them out you wont be disappointed.
Oh and last thing, please please clean up the mold lines on your next models, I doubt you can do it on the termies without ruining the smooth paint job but just going forward =)
|
|
|
|
|
|
2011/12/01 15:16:41
Subject: My First Imperial Fists Dreadnought!
|
|
Drone without a Controller
|
they look awesome! Would look GREAT having your army at this standard
|
About 1000 points of 
And 400 points of 
Defeating a sandwich, only makes it tastier |
|
|
|
|
|
|

 Oh my...... I feel a need to do unmentionabel things with you now Scottie