Switch Theme:

Painting advice wanted - what technique(s) should come next  [RSS] Share on facebook Share on Twitter Submit to Reddit
»
Author Message
Advert


Forum adverts like this one are shown to any user who is not logged in. Join us by filling out a tiny 3 field form and you will get your own, free, dakka user account which gives a good range of benefits to you:
  • No adverts like this in the forums anymore.
  • Times and dates in your local timezone.
  • Full tracking of what you have read so you can skip to your first unread post, easily see what has changed since you last logged in, and easily see what is new at a glance.
  • Email notifications for threads you want to watch closely.
  • Being a part of the oldest wargaming community on the net.
If you are already a member then feel free to login now.


Made in gb
Fresh-Faced New User


Angus, Scotland

Hi, getting back into painting minis and want to get past a very basic paintjob.

This guy is my most recent test mini.


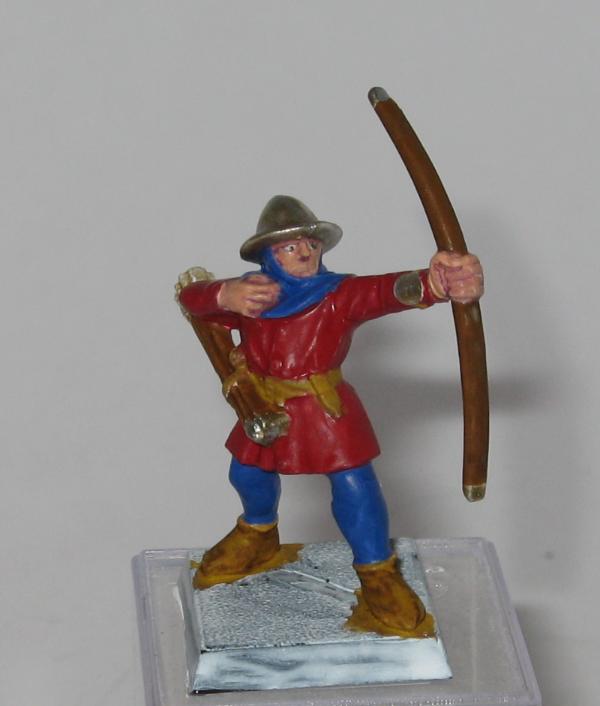
I used to count something like this as finished (other than basing), but I want to take the painting aspect of the hobby further.
What techniques should I be aiming to try next on this figure?
If there are other things that you would consider mistakes shout them out too.
Any criticism is welcome if it includes some advice about what may have gone wrong and how to put it right.

I am also unsure if I am having problems with my home-build wet palette.
Many of the Vallejo colours seem to separate when left on there for more than quarter of an hour

Plastic tub, sponge mat, baking/cookie paper, Vallejo paint, tap water. Is this normal, or do I need to try different materials/commercial wet palette?

Thanks in advance

   
Made in gb
Longtime Dakkanaut


Nottingham, UK

Deeper shading, some nice tight highlights.

A model like that in a unit of 50 at 3 foot is going to look good enough. Eyes are a bit starey right now, but that comes with a bit of practice.


Made in de
Dipping With Wood Stain


Hattersheim, Germany

Highlighting and Washing would be the next logical step.

Wash the whole miniature either with Badab Black or Devlin Mud and when that's dry, clean the colors back up with your base colors. Make sure to leave the recesses untouched for shading.

For highlighting, take a shade which is lighter than your basecolor and apply it to the raised surfaces.

Cheers,


IK-Painter

Check out my Warmachine and Malifaux painting blog at http://ik-painter.blogspot.com/

As always, enjoy and have fun! 
   
Made in gb
Longtime Dakkanaut


UK

IK-Painter wrote:Highlighting and Washing would be the next logical step.

Wash the whole miniature either with Badab Black or Devlin Mud and when that's dry, clean the colors back up with your base colors. Make sure to leave the recesses untouched for shading.

For highlighting, take a shade which is lighter than your basecolor and apply it to the raised surfaces.

Cheers,


IK-Painter


+1

You obviously have a steady hand as the mini is very neat, you should be able to create some great looking minis once you get washes and highlights down
   
Made in us
Willing Inquisitorial Excruciator


Utah

What the others have said, highlighting and washing.

Your metal helmet in particular has a very 'painted' look. Metals are fairly easy to do and can look fantastic with just a bit of work.

Start with boltgun, then wash with black. Re-highlight with boltgun, then load up a drybrush with mithril silver, get 95% of it off on a paper towel, and start rubbing it over the edges and top of the metal. You will get a great, realistic metal effect.

My Armies: 1347 1500 1500
My Necron Nihilakh Dynasty blog: http://www.dakkadakka.com/dakkaforum/posts/list/416131.page 
   
Made in us
Guard Heavy Weapon Crewman


Peoples Republic Of Kalifornia

I myself very rarely paint eyes. First it's hard to get the mini from looking like Marty Feldman and second, when you factor in the viewing distance in scale you would only see the whites of the eyes, if that. I just give the face a good base coat, wash and then work the highlights with dry brushing.

As for the helmet, next time try basing it with flat black and then building up the metalics with progressively dry brushed shades of steel / silver getting lighter with each color. You may want to do a blue/black wash to kill the shine but that might be an added step.

Naval Aviation Ordnance,
Specialists in Urban Renewal,Landscaping and Population Control

Every time a deployed AO does his job, a Terrorist dies.  
   
Made in au
Lady of the Lake


The eyes can still have detail yet look in scale perhaps even be less noticeable at a distance as well. Either using an off white or rather than painting black dots on white, you paint white dots on black and just clean up the black.

The shoes are the best part you have there, simple highlight and they'd be really nice. Like the others have said it looks like you have the brush control and all you really need is shading and highlighting. As while clear with somewhat sharp edges it's just a tad flat.


Forum Index » Painting & Modeling
Go to: