| Author |
Message |
 |
|
|
|
|
Advert
|
Forum adverts like this one are shown to any user who is not logged in. Join us by filling out a tiny 3 field form and you will get your own, free, dakka user account which gives a good range of benefits to you:
- No adverts like this in the forums anymore.
- Times and dates in your local timezone.
- Full tracking of what you have read so you can skip to your first unread post, easily see what has changed since you last logged in, and easily see what is new at a glance.
- Email notifications for threads you want to watch closely.
- Being a part of the oldest wargaming community on the net.
If you are already a member then feel free to login now. |
|
 |
2012/02/07 22:28:16
Subject: Thinning and Layers
|
|

Water-Caste Negotiator
|
OK, I'm thick in the head, and need some help with this one.
Everyone says thin your paints, milky consistancy, paint is always to thick, yadda yadda waaagggghhh! I get this, you want to minimize the amount of paint on the surface to retain detail, and because at 6mm = 1 foot (15mm = 1m) even a .5mm layer is significant.
I get that by adding mixed color layers over increasingly smaller areas you'll achieve an illusion of light that makes mini's look the same as full scale items would.
What I don't get is why managing 1 coat coverage in base coat (the layer after primer) is bad, or how it's benifitial to make a paint really thin, then do several layers of the same color over and over again until you build back up?
Isn't 30 layers at 1/30th the thickness the exact same amount of paint/pigment as having never thinned at all?
|
|
This message was edited 1 time. Last update was at 2012/02/07 22:29:30
DS:70+S-G+M--B-I++Pw40k11#+D++A+/areWD-R+T(D)DM+
elchristoff wrote:Shoot the choppy things, chop the shooty things :-)
GENERATION 8: The first time you see this, copy and paste it into your sig and add 1 to the number after generation. Consider it a social experiment. |
|
|
 |
|
2012/02/07 22:38:13
Subject: Thinning and Layers
|
|

Longtime Dakkanaut
|
No, it's as much to do with flow as it is to opacity; if your paint is thick it doesn't settle out and you get a lumpy, grainy finish.
|
|
|
|
|
|
2012/02/07 22:50:48
Subject: Thinning and Layers
|
|
Longtime Dakkanaut
|
Theres no laws about paint thinning, if your happy with a 1 or 2 coat base coat then thats all that matters.
|
|
|
|
|
2012/02/07 23:10:38
Subject: Thinning and Layers
|
|
Regular Dakkanaut
|
I think the whole point of thinning paint is that the layering of multiple levels of the same color adds depth to the individual colors themselves.
By thinning paint, you can get alot more paint exactly where you want it than if you have 100% opacity/thickness per each coat.
If you aren't big on shading or highlighting, then thinning your paint is less nessisary.
I personally hate the clumping unthinning paint gives. I even bought an airbrush to get a more even coat of paint. It also allows me (a horrible painter) to shade and contrast my models alot better. All in all, it just "sits" better on the model when you are using multiple colors over the same surface area.
|
"Nothing is so exhilarating in life as to be shot at with no result."
- Winston Churchill
|
|
|
|
|
2012/02/07 23:28:18
Subject: Thinning and Layers
|
|
Water-Caste Negotiator
|
Painnen wrote:I think the whole point of thinning paint is that the layering of multiple levels of the same color adds depth to the individual colors themselves.
By thinning paint, you can get alot more paint exactly where you want it than if you have 100% opacity/thickness per each coat.
If you aren't big on shading or highlighting, then thinning your paint is less nessisary.
I personally hate the clumping unthinning paint gives. I even bought an airbrush to get a more even coat of paint. It also allows me (a horrible painter) to shade and contrast my models alot better. All in all, it just "sits" better on the model when you are using multiple colors over the same surface area.
I get this, and I understand why a thin layer of say, 25%Blood Red, 75% Scarb Red, followed by 50%/50%, 75%/25% and a then a highlight edging of Blood Red will add to the effect.
I don't see how making an extra thin Blood Red, then coating the entire area in it 10-20 times would produce better (or even different) results than just doing 1-2 layers that haven't been watered down to 1/10th the original thickness.
|
DS:70+S-G+M--B-I++Pw40k11#+D++A+/areWD-R+T(D)DM+
elchristoff wrote:Shoot the choppy things, chop the shooty things :-)
GENERATION 8: The first time you see this, copy and paste it into your sig and add 1 to the number after generation. Consider it a social experiment. |
|
|
|
|
2012/02/08 00:07:19
Subject: Re:Thinning and Layers
|
|
Regular Dakkanaut
|
Bounty wrote:I don't see how making an extra thin Blood Red, then coating the entire area in it 10-20 times would produce better (or even different) results than just doing 1-2 layers that haven't been watered down to 1/10th the original thickness.
You're assuming you can lay down an even coat of un-thinned paint with a brush... How's that working out for you?
If you thin your paints you can get a more even coverage. You're putting down less pigment with each stoke which allows you to gradually build the pigment up evenly across your entire painting surface. Un-thinned paint will have more pigment in some areas than others. Think of the paint as it's pigment. Un-thinned you'll have 20 pigments stacked on top of each other in some areas and only 10 in others (brushes push paint out to the edge of the stroke). This might create the same opacity but it will create bumps and look gritty / uneven. Laying down a thinned paint will lay down less pigment but more evenly. So while you build up those 10 layers you might have a slight variance in coverage (some areas have 10 pigments, others 8) but much less than the unthinned paint. This creates a much smoother / more consistent finish with the least amount of paint necessary. Oh, and make sure you let each layer dry completely before applying the next. If you're doing it right, you can see the paint dry after you paint it on.
If you need more insight then put it to the test... Nothing like trial by fire! Try priming your mini in black then painting it red or yellow with two coats of un-thinned paint using your brush. How's that mini end up looking? Can you get a consistent coat? Do you see brush strokes? Do you still see details? How's the vibrancy of the color? There's no rule that you have to thin your paints but you'll hit a plateau you won't pass if you don't start.
Painting is a patience game, there's a reason it's a virtue and everybody isn't painting golden demon models...
|
|
|
|
|
2012/02/08 00:11:01
Subject: Re:Thinning and Layers
|
|
Longtime Dakkanaut
|
Nowoo wrote:Bounty wrote:I don't see how making an extra thin Blood Red, then coating the entire area in it 10-20 times would produce better (or even different) results than just doing 1-2 layers that haven't been watered down to 1/10th the original thickness.
You're assuming you can lay down an even coat of un-thinned paint with a brush... How's that working out for you?
If you thin your paints you can get a more even coverage. You're putting down less pigment with each stoke which allows you to gradually build the pigment up evenly across your entire painting surface. Un-thinned paint will have more pigment in some areas than others. Think of the paint as it's pigment. Un-thinned you'll have 20 pigments stacked on top of each other in some areas and only 10 in others (brushes push paint out to the edge of the stroke). This might create the same opacity but it will create bumps and look gritty / uneven. Laying down a thinned paint will lay down less pigment but more evenly. So while you build up those 10 layers you might have a slight variance in coverage (some areas have 10 pigments, others 8) but much less than the unthinned paint. This creates a much smoother / more consistent finish with the least amount of paint necessary. Oh, and make sure you let each layer dry completely before applying the next. If you're doing it right, you can see the paint dry after you paint it on.
If you need more insight then put it to the test... Nothing like trial by fire! Try priming your mini in black then painting it red or yellow with two coats of un-thinned paint using your brush. How's that mini end up looking? Can you get a consistent coat? Do you see brush strokes? Do you still see details? How's the vibrancy of the color? There's no rule that you have to thin your paints but you'll hit a plateau you won't pass if you don't start.
Painting is a patience game, there's a reason it's a virtue and everybody isn't painting golden demon models...
This is a most excellent post.
|
|
|
|
|
2012/02/08 01:26:48
Subject: Re:Thinning and Layers
|
|
Water-Caste Negotiator
|
Nowoo wrote:Bounty wrote:I don't see how making an extra thin Blood Red, then coating the entire area in it 10-20 times would produce better (or even different) results than just doing 1-2 layers that haven't been watered down to 1/10th the original thickness.
You're assuming you can lay down an even coat of un-thinned paint with a brush... How's that working out for you?
If you thin your paints you can get a more even coverage. You're putting down less pigment with each stoke which allows you to gradually build the pigment up evenly across your entire painting surface. Un-thinned paint will have more pigment in some areas than others. Think of the paint as it's pigment. Un-thinned you'll have 20 pigments stacked on top of each other in some areas and only 10 in others (brushes push paint out to the edge of the stroke). This might create the same opacity but it will create bumps and look gritty / uneven. Laying down a thinned paint will lay down less pigment but more evenly. So while you build up those 10 layers you might have a slight variance in coverage (some areas have 10 pigments, others 8) but much less than the unthinned paint. This creates a much smoother / more consistent finish with the least amount of paint necessary. Oh, and make sure you let each layer dry completely before applying the next. If you're doing it right, you can see the paint dry after you paint it on.
If you need more insight then put it to the test... Nothing like trial by fire! Try priming your mini in black then painting it red or yellow with two coats of un-thinned paint using your brush. How's that mini end up looking? Can you get a consistent coat? Do you see brush strokes? Do you still see details? How's the vibrancy of the color? There's no rule that you have to thin your paints but you'll hit a plateau you won't pass if you don't start.
Painting is a patience game, there's a reason it's a virtue and everybody isn't painting golden demon models...
OK, this makes *MORE* sense, but if you're having trouble getting sufficent pigment, like with red, I'd still think you're pushing Diminishing returns by thinning it further.
for Reference
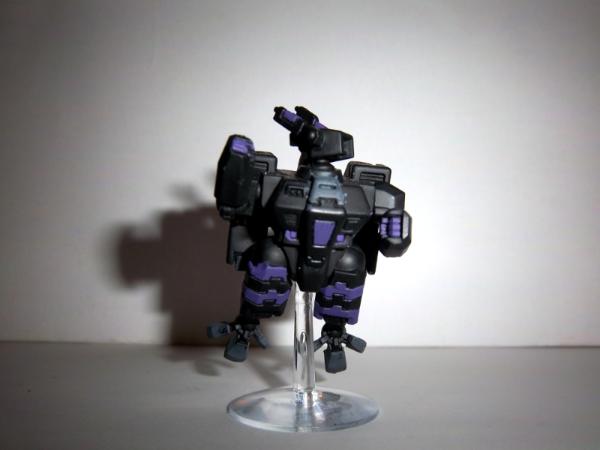
This is the model I was last working on. This is Primed Black and based in a blend of non- GW Grey and Purple. I've been trying to deside if I like the scheme, want more or less color, etc, before I start highlighting. I also need to buy or build a Wash, since that appears to be the suggested next step. I want a very DARK scheme on these (think underground) with a purple that invokes Amathyst crystals.
|
|
|
|
|
2012/02/08 01:55:46
Subject: Re:Thinning and Layers
|
|
Boosting Space Marine Biker
|
Nowoo wrote:Bounty wrote:I don't see how making an extra thin Blood Red, then coating the entire area in it 10-20 times would produce better (or even different) results than just doing 1-2 layers that haven't been watered down to 1/10th the original thickness.
You're assuming you can lay down an even coat of un-thinned paint with a brush... How's that working out for you?
If you thin your paints you can get a more even coverage. You're putting down less pigment with each stoke which allows you to gradually build the pigment up evenly across your entire painting surface. Un-thinned paint will have more pigment in some areas than others. Think of the paint as it's pigment. Un-thinned you'll have 20 pigments stacked on top of each other in some areas and only 10 in others (brushes push paint out to the edge of the stroke). This might create the same opacity but it will create bumps and look gritty / uneven. Laying down a thinned paint will lay down less pigment but more evenly. So while you build up those 10 layers you might have a slight variance in coverage (some areas have 10 pigments, others 8) but much less than the unthinned paint. This creates a much smoother / more consistent finish with the least amount of paint necessary. Oh, and make sure you let each layer dry completely before applying the next. If you're doing it right, you can see the paint dry after you paint it on.
If you need more insight then put it to the test... Nothing like trial by fire! Try priming your mini in black then painting it red or yellow with two coats of un-thinned paint using your brush. How's that mini end up looking? Can you get a consistent coat? Do you see brush strokes? Do you still see details? How's the vibrancy of the color? There's no rule that you have to thin your paints but you'll hit a plateau you won't pass if you don't start.
Painting is a patience game, there's a reason it's a virtue and everybody isn't painting golden demon models...
I have to concur with inquisitorlewis, this is a great explanation for the reason that you should thin your paints. Thanks nowoo, I appreciate your explanation, it helps me out greatly.
|
|
|
|
|
2012/02/08 02:05:46
Subject: Re:Thinning and Layers
|
|
Fresh-Faced New User
|
Bounty wrote:
OK, this makes *MORE* sense, but if you're having trouble getting sufficent pigment, like with red, I'd still think you're pushing Diminishing returns by thinning it further.
for Reference:
This is the model I was last working on. This is Primed Black and based in a blend of non-GW Grey and Purple. I've been trying to deside if I like the scheme, want more or less color, etc, before I start highlighting. I also need to buy or build a Wash, since that appears to be the suggested next step. I want a very DARK scheme on these (think underground) with a purple that invokes Amathyst crystals.
What Nowoo says is pretty much spot on.
Let me expand on what was said: look at that picture you posted. The purple looks nice and bold, however even when I look at that picture the size it is in this thread, I can see slight variations in the coverage of the purple areas. There are small patches of "more blackish" spots. Had you used multiple (4-5) layers of the purple instead of 1-2, these wouldn't be visible anymore.
The manager at my local GW (who is an amazing painter, with 25+ years experience with miniatures) always says "Anything that can be painted in one step, will look better painted in 2. Anything that can be painted in 2 steps, will look better painted in 3. Etc."  Obviously as some point the diminishing returns will kick in, but I find this to be very true. He taught me from the beginning to thin down all my paints, and go for multiple layers, and I have been very happy with the results.
I find that models painted with multiple thin coats just look much more crisp and smooth - if someone glanced at one of my miniatures, they proabbly wouldn't be able to SPECIFICALLY say "OMG, this guy totally thinned his paints!" but they would have a more positive impression of the paint job than if I had not thinned my paints and just done it all in 1-2 layers.
At the end of the day, you have to decide how much time you are wiling to spend on any given aspect of painting your miniatures. The more time you put in, the better the results!
|
|
This message was edited 1 time. Last update was at 2012/02/08 02:07:58
|
|
|
|
|
2012/02/08 06:05:39
Subject: Re:Thinning and Layers
|
|
Water-Caste Negotiator
|
Pattern wrote:Bounty wrote:This is the model I was last working on. This is Primed Black and based in a blend of non-GW Grey and Purple.
What Nowoo says is pretty much spot on.
Let me expand on what was said: look at that picture you posted. The purple looks nice and bold, however even when I look at that picture the size it is in this thread, I can see slight variations in the coverage of the purple areas. There are small patches of "more blackish" spots. Had you used multiple (4-5) layers of the purple instead of 1-2, these wouldn't be visible anymore.
I think cheap paint, inadequate storage, and being used in 2 games without having been sealed have as much to do with the black areas as coverage, but I follow what you're saying. I'm going to get some parchment tomorrow so I can make a DIY wet pallet and start painting again, I may scrub this guy down and redo him. I found on my tank that the paint isn't sticking to the primer very well, I suspect to much handling and poor environment* between the priming and the painting is to blame. May also be the fact I'm using a 99 cent primer from Wal*Mart.
Any tips besides slow down and use more layers?
|
|
|
|
|
2012/02/08 06:48:01
Subject: Re:Thinning and Layers
|
|
Fresh-Faced New User
|
Bounty wrote:Pattern wrote:Bounty wrote:This is the model I was last working on. This is Primed Black and based in a blend of non-GW Grey and Purple.
What Nowoo says is pretty much spot on.
Let me expand on what was said: look at that picture you posted. The purple looks nice and bold, however even when I look at that picture the size it is in this thread, I can see slight variations in the coverage of the purple areas. There are small patches of "more blackish" spots. Had you used multiple (4-5) layers of the purple instead of 1-2, these wouldn't be visible anymore.
I think cheap paint, inadequate storage, and being used in 2 games without having been sealed have as much to do with the black areas as coverage, but I follow what you're saying. I'm going to get some parchment tomorrow so I can make a DIY wet pallet and start painting again, I may scrub this guy down and redo him. I found on my tank that the paint isn't sticking to the primer very well, I suspect to much handling and poor environment* between the priming and the painting is to blame. May also be the fact I'm using a 99 cent primer from Wal*Mart.
Any tips besides slow down and use more layers?
Good call on the wet palette!! I find it invaluable. It sounds like you already have a line on how to make it work - for what it's worth I'll tell you what I do. I'm sure similar has been posted elsewhere, but just to throw my .02 into the ring:
1. Get a square plastic container (the ones that are all stuffed somewhere in the kitchen, that you use to store leftovers)
2. Get a piece of paper towel
3. Get parchment paper (baking paper - it's waxed, both sides are the same)
4. Fold the paper towel twice, so that it's 1/4 the size, and 4 layers thick
5. Put the paper towel into the container and run cold tap water until the paper towel is soaking, but there isn't any extra water in the container
6. Cut a piece of parchment paper a little smaller than the paper towel, and put it on top of the paper towel (the parchment will curl up almost instantly - fear not, just hold it in place for 10 seconds, and it well rest 100% flat)
Now you have a perfectly usable wet palette! The wet palette works awesome in tandem with thinning your paint, because the wet palette keeps your paint at the same thickness as you initially mixed it. Thus you don't have to rush to paint for fear of it drying out, and you'll have a consistent paint source.
As far as primers go - I've only ever used Citadel Chaos Black (I've only been into the hobby a few months now  ), and it's been flawless thus far. It's also 16x more expensive than a $.99 primer, haha. If I were you I'd read a bunch of posts here on Dakka about other brands of primers that people have had success with. I believe there are many different brands that are decent in the $4-5 range, if that works for you ( iirc Rustoleum, Krylon, etc. all have flat black primers).
As you start painting again, feel free to ask more questions, I'll answer what I can
|
|
|
|
|
2012/02/08 08:15:11
Subject: Thinning and Layers
|
|

Dipping With Wood Stain
|
Bounty wrote:Everyone says thin your paints, milky consistancy, paint is always to thick, yadda yadda waaagggghhh!
I think the milk-consistency thing is more about airbrushing, than it is about brush painting. Thinning is necessary, but in most cases not to this level - unless you're shooting for a Golden Demon standard, that is.
Cheers,
IK-Painter
|
|
|
|
|
|
|
|
