Switch Theme:

How to paint winter guardsmen  [RSS] Share on facebook Share on Twitter Submit to Reddit
»
Author Message
Advert


Forum adverts like this one are shown to any user who is not logged in. Join us by filling out a tiny 3 field form and you will get your own, free, dakka user account which gives a good range of benefits to you:
  • No adverts like this in the forums anymore.
  • Times and dates in your local timezone.
  • Full tracking of what you have read so you can skip to your first unread post, easily see what has changed since you last logged in, and easily see what is new at a glance.
  • Email notifications for threads you want to watch closely.
  • Being a part of the oldest wargaming community on the net.
If you are already a member then feel free to login now.


Made in au
Fresh-Faced New User


I did this tutorial on my blog a while ago so I thought I would repost it here for you guys. This is actually my old scheme now and combines ideas of urban and winter camoflauge (without the tricky painting bits ie. the camoflauge pattern). Anyway hope you like it feel free to comment, post any critism or visit my blog which can be found at http://w-hpaintingstudio.blogspot.com.au/
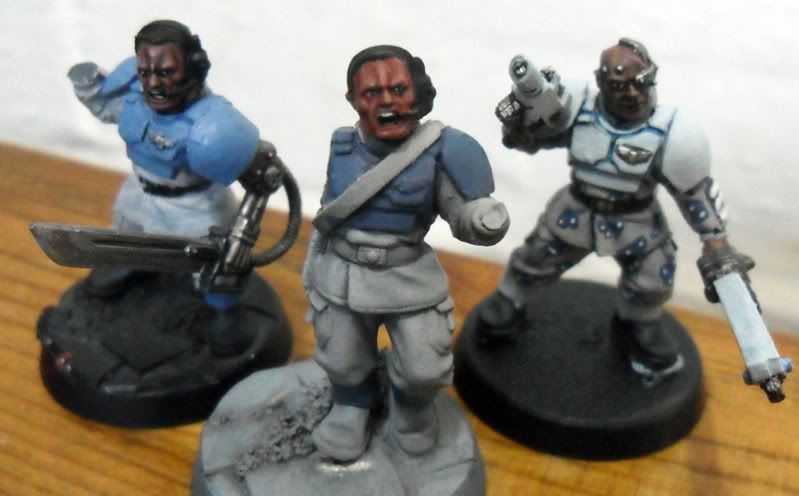
1.Cloth

Base coat with Denheb Stone
Wash wiht Devlan Mud
Layer Denheb Stone
Edge high light with a mix 2:1 Mix of Denheb Stone and Skull White


2. Armour

Base coat with Fenris Grey
Line the recesses with a 2:1 mix of Chaos Black and Fenris Grey, watered down
Edge highlight with a 1:1 mix of Fenris Grey and Skull White


3. Skin

Base coat with Tallarn Flesh
Wahs heavily with Ogryn Flesh
Glaze with Liche Purple
Highlight with Dwarf Flesh
Highlight with a 1:1 mix of Dwarf Flesh and Elf Flesh
Sparingly highlight with Elf Flesh
[Thumb - IMGP4101.jpg]

[Thumb - IMGP4103.jpg]

[Thumb - IMGP4104.jpg]

This message was edited 2 times. Last update was at 2012/06/11 07:51:35


I'm currently open to commissions so Pm me or visit my website, www.w-hpaintingstudio.blogspot.com 
   
Made in pf
Been Around the Block


Maybe orther effect will be nice ^^

But goood tuto thanks you

This message was edited 1 time. Last update was at 2012/06/11 08:31:17


Made in au
Fresh-Faced New User


Thanks for the compliment but what did you mean orther effect?

I'm currently open to commissions so Pm me or visit my website, www.w-hpaintingstudio.blogspot.com 
   
Made in pf
Been Around the Block


Doing the armor more old, i don't real see in the picture maybe my eye xD, and the grenade look real strange :O.

but all the work is perfect a 360° shotting picture is welcome
   
Made in au
Fresh-Faced New User


Sorry I understand you now, I didn't put the steps for weathering in the instructions as I like to think of it as a quite an individual procedure but here is what I did:
1. Using a scrap of kitchen scourer (blister pack sponge can be switched for this) I sponged on a 50:50 mic of chaos black and scorched brown onto areas that I thought would suffer the most wear and tear
2. Then I repeated this step by sparingly sponge on chainmail. This step was enhanced by using a fine detail brush, where I effectivley highlighted some deges with a very thin line of chainmail.
3. Under the chips and scratches I painted a thin line using the lightest blue mix to portray a feeling of depth.

Further I dulled some of the scratched areas with thinned badab black or devlan mud and then rehighlighted them selectivley. The point of this is to try and get the effect that the damage occured at different times with some being more aged than others. And the grenade, I don't know whats up with that I think I will go back and redo that at a later date, I'll try and put some more pictures up soon too.

I'm currently open to commissions so Pm me or visit my website, www.w-hpaintingstudio.blogspot.com 
   
Made in gb
Guard Heavy Weapon Crewman


uk

Look similar to my own guard Cadian 249th Ice Raptors
Spoiler:


Keep up the good work, more meat for the grinder.

EJ

This message was edited 1 time. Last update was at 2012/06/20 22:40:41


Forum Index » Painting & Modeling Tutorials
Go to: