| Author |
Message |
 |
|
|
|
|
Advert
|
Forum adverts like this one are shown to any user who is not logged in. Join us by filling out a tiny 3 field form and you will get your own, free, dakka user account which gives a good range of benefits to you:
- No adverts like this in the forums anymore.
- Times and dates in your local timezone.
- Full tracking of what you have read so you can skip to your first unread post, easily see what has changed since you last logged in, and easily see what is new at a glance.
- Email notifications for threads you want to watch closely.
- Being a part of the oldest wargaming community on the net.
If you are already a member then feel free to login now. |
|
 |
2012/07/02 02:02:11
Subject: How to paint Checkerboards
|
|

Decrepit Dakkanaut
|
First, buy a Micron .05 illustration pen off the web, preferably black. Should cost around $6. I have several in multiple colors, use them for a ton of things.
Second, buy or mix an off-white. Just slightly off-white... can be grey or some super light brown... but it's important that it look white when compared with other colors *except* white.
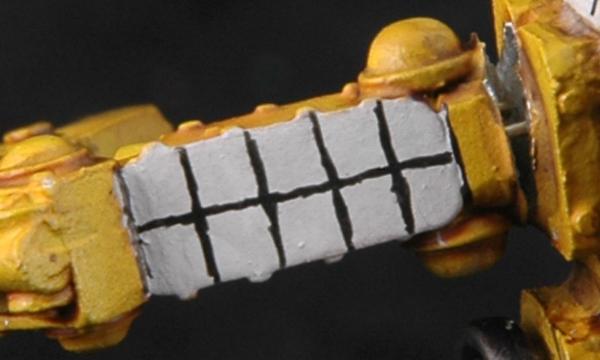
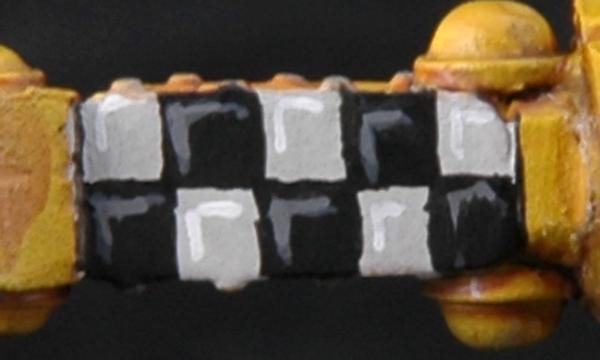
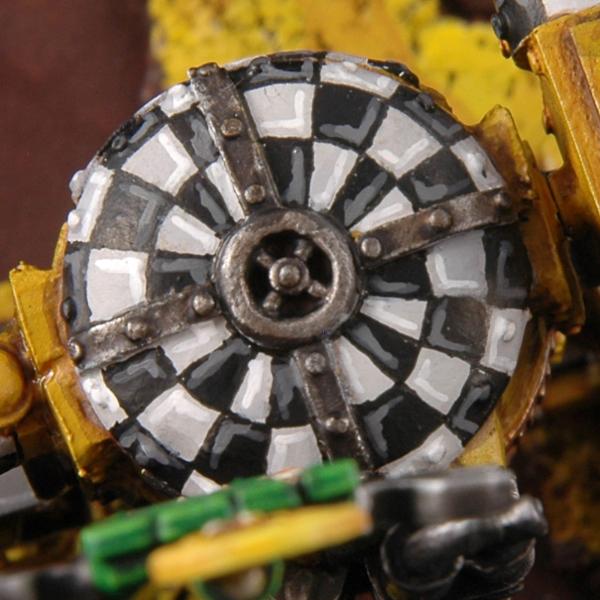
Step #1: Paint the area you want to put into checkers with your off white. Use multiple coats of thin paint so you have a nice, smooth surface.
Step #2: Use the pen to make your checkerboard guide lines. You can measure and use a bit of masking tape to make sure you get a straight line. I only do this for the largest surfaces. Mostly I free-hand it. I also am not worried about making all the squares on the figure the same size... so I usually measure, or eye-ball the specific area I'm interested in and let that be my guide for determining square size. Things in a single pane should be neat and tidy... but exact is not necessary. It's ok to touch up some wayward lines with your off-white paint and re-draw the lines if you need to.
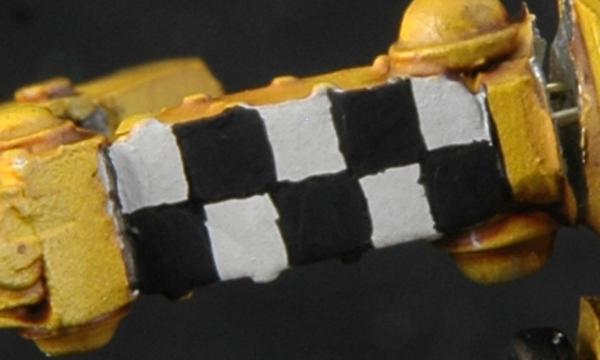
Step #3: Paint in the black squares. I usually look for the crappiest square & paint it black (and fix it while I'm painting it). You want to use paint that's thinned enough to flow smoothly and not glob up, but thick enough to cover in one coat. You can clean up the white boxes if you want, for grots... I didn't bother. For something Imperial it might be worth your while.
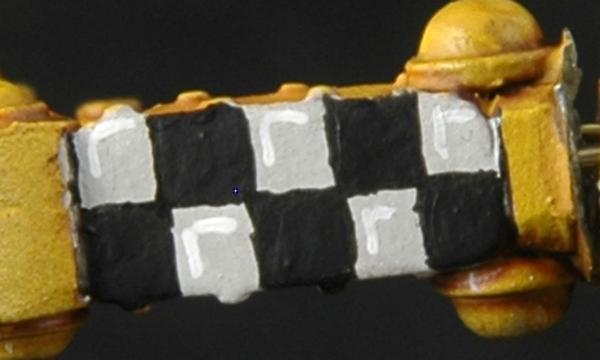
Step #4: Decide where the light is coming from and take *real* white and paint in your highlight lines with a fine brush. This will give the look of the grid being embossed as a simple painted on design would of course... not have any highlights of this type. I excuse this by thinking that the kan boss is trying to be as much of a big shot as he can... so since he doesn't have the wherewithal to actually have 3-d checkers on his kan, he has some artistic underling "fake it" using the clever application of paint. Important! Do not paint your lines at the very edges of the box, nor should they extend to the opposite corners (think of how the keys on a keyboard look, only the top edges of the upper (raised) square catch the light).
Step #5: Do the same thing with a dark grey on the black squares. A good, fine brush and thinned paint helps a lot here, but you still want it thick enough to cover in 1 coat. To be honest I was having major brush issues while painting this, so my lines are a lot sloppier than I intended them to be.
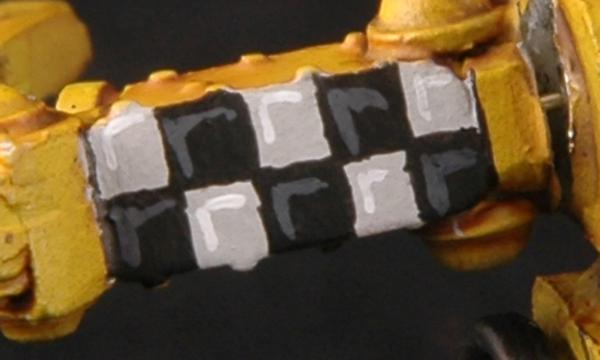
Step #6: Add a second, lighter grey over a smaller area on top of the first. This isn't a great example... I should have picked a lighter grey the second time for more contrast.
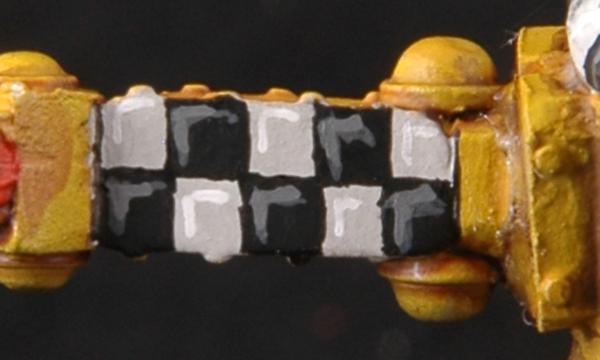
Step #7: Go back in with dilute versions of your base colors (off-white and black) and clean up the lines. Generally, the thinner the lines, the better. Come to think of it you could use your black pen to help tighten up the black highlights... hmmmm... I may have to revisit this kan again.
Author's Note: I have gone in and worked on cleaning up some of the lines in the black squares with the micron pen and I can report that it works fantastically well. I'll probably be doing my black square cleanup almost exclusively with a pen from now on.
Viola!
Step #8: If you're super anal... you can put a slightly darker off-white corner opposite your pure white corner for the shadow (I did that on my grot tank). I didn't do it here as I thought it would just make the grids too busy and visually muddled.
That's all there is to it. Easy-peasy.
Here's a second set of pics showing how to do a round area... the only difference is setting up the grid and the fact that eventually you lose the side-to-side highlight because the cells are too narrow.
Steps #1 & 2:
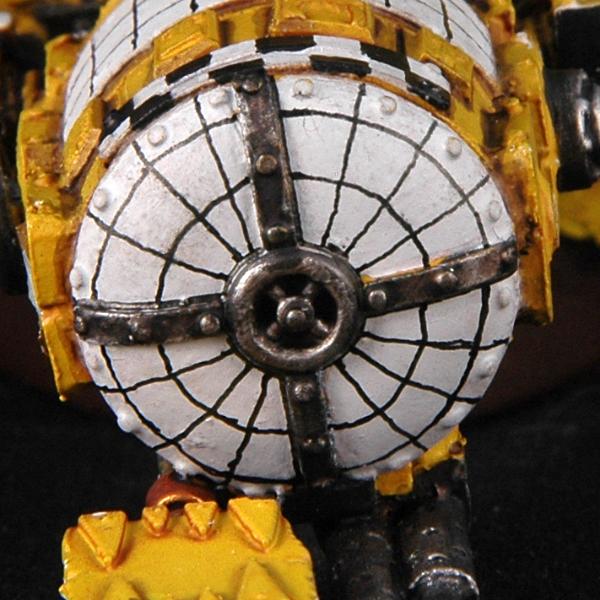
Step #3 & 4:
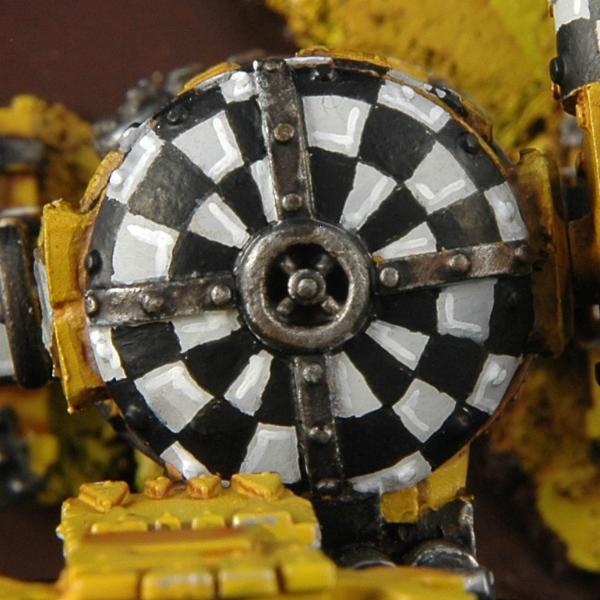
Step #5 & 6:
Step #7:
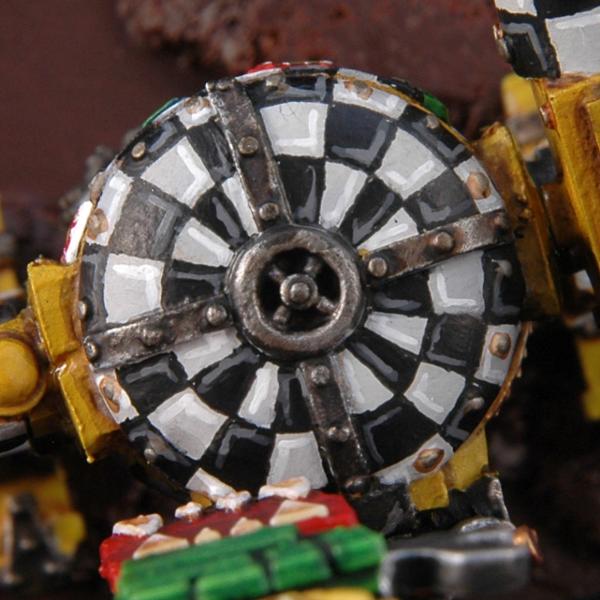
And... the end result! You'll note that even though I didn't really do a neat job with my squares or highlights... the end result is pretty impressive and the sloppiness doesn't show.
Hope that was helpful!
|
|
This message was edited 5 times. Last update was at 2012/07/03 02:16:56
|
|
|
 |
|
2012/07/02 07:01:29
Subject: How to paint Checkerboards
|
|
Gargantuan Gargant
|
Nice tutorial. It's easy to follow with great photos.
|
|
|
|
|
|
2012/07/02 13:06:03
Subject: How to paint Checkerboards
|
|
Decrepit Dakkanaut
|
Thanks adam, glad you liked it!
|
|
|
|
|
|
2012/07/02 13:49:42
Subject: How to paint Checkerboards
|
|

Fresh-Faced New User
|
exactly what I was wanting cheers Gits
|
|
|
|
|
2012/07/02 17:12:42
Subject: How to paint Checkerboards
|
|
Painting Within the Lines
|
Looks perfect for my orks, a good apadption on what the norm is, good work 
|
|
|
|
|
2012/07/02 17:58:25
Subject: How to paint Checkerboards
|
|
Decrepit Dakkanaut
|
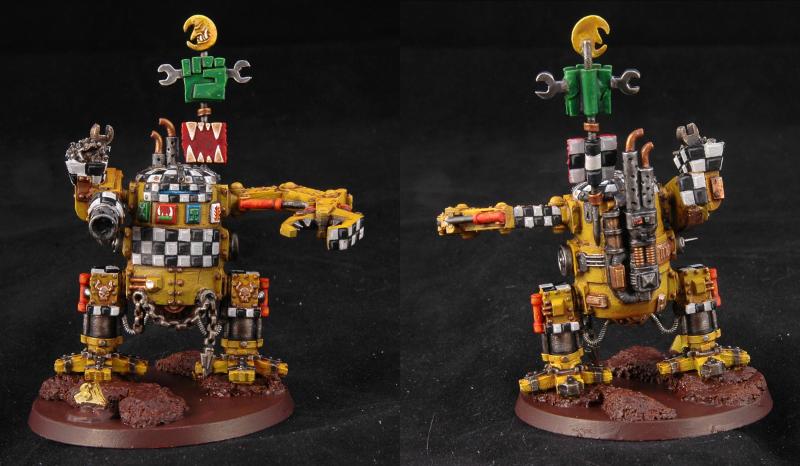
Thank you both, glad to be of service.  I went a little nuts with the checkerboards on this kan. Up to this point, I had these nice Forge World decal checker strips that I was using... but everyone gave me crap for not painting them myself. So, I thought I'd better come up with a system so I could *finally* shut everyone up!
|
|
This message was edited 1 time. Last update was at 2012/07/02 17:58:59
|
|
|
|
|
2012/07/02 18:21:45
Subject: How to paint Checkerboards
|
|
Painting Within the Lines
|
Seems to have worked a treat
|
|
|
|
|
2012/07/02 19:08:02
Subject: How to paint Checkerboards
|
|
Battlefortress Driver with Krusha Wheel
|
Brilliant. Best check tutorial I have ever seen.
|
|
|
|
|
2012/07/03 01:20:56
Subject: How to paint Checkerboards
|
|
Annoyed Blood Angel Devastator
Boston
|
Great stuff will use it when I paint a lamenters unit!
|

 We are winged salvation, but we are a terrible, final salvation, and our wings embrace the horizon with fire. We are the Blood Angels. To confront us is to die, and death is my remit, my reality, my unbounded domain. I have known death, and defeated it, claimed it as my own. To my cost, to my strength, death is my one gift to bestow, and I am nothing if not generous. We are winged salvation, but we are a terrible, final salvation, and our wings embrace the horizon with fire. We are the Blood Angels. To confront us is to die, and death is my remit, my reality, my unbounded domain. I have known death, and defeated it, claimed it as my own. To my cost, to my strength, death is my one gift to bestow, and I am nothing if not generous. |
|
|
|
|
2012/07/03 02:15:35
Subject: How to paint Checkerboards
|
|
Decrepit Dakkanaut
|
Great! Feel free to post of pic of your results here. To "prove the theory" so-to-speak. I have gone in and worked on cleaning up some of the lines in the black squares with the micron pen and I can report that it works fantastically well. I'll probably be doing my black square cleanup almost exclusively with a pen from now on.
|
|
|
|
|
|
2012/07/03 03:17:57
Subject: How to paint Checkerboards
|
|
Rogue Inquisitor with Xenos Bodyguards
|
That pen is a big maker for checkers! I am so used to hand painting the things when I do make them with small/fine brush, tedious work, but that pen would cut the time in half for me!
|
"Your mumblings are awakening the sleeping Dragon, be wary when meddling the affairs of Dragons, for thou art tasty and go good with either ketchup or chocolate. "
Dragons fear nothing, if it acts up, we breath magic fire that turns them into marshmallow peeps. We leaguers only cry rivets!


|
|
|
|
|
2012/07/03 11:14:29
Subject: How to paint Checkerboards
|
|
Kinebrach-Knobbling Xeno Interrogator
|
Wasn't too keen on the markings on the rocket, but then when I scrolled down and saw them on the Kan I was blown away.
Looks superb, now if I can find a wayward Ork to test this out on
|
DA:90S+G++M---B-I+Pw40k09#+D+++++A++/eWD358R++T(M)DM+ |
|
|
|
|
2012/07/03 11:30:27
Subject: How to paint Checkerboards
|
|
Decrepit Dakkanaut
|
My first attempt at this was just a double strip of rather large checkers across a section of a grot tank. Was easy and good practice. What you see above is only my second attempt... so... it just can't be that difficult! (and isn't)
|
|
This message was edited 1 time. Last update was at 2012/07/03 11:30:47
|
|
|
|
|
2012/07/04 15:52:53
Subject: How to paint Checkerboards
|
|
Regular Dakkanaut
|
Awesome, WIl be giving this a shot
|
For 400 dollars I got Jerry Garcia in a pouch, man!  |
|
|
|
|
2012/07/04 18:00:45
Subject: How to paint Checkerboards
|
|
Happy We Found Our Primarch
|
nice tutorial matey will definatly be having a pop at this
|
|
|
|
|
|
2012/07/04 18:37:25
Subject: How to paint Checkerboards
|
|
Decrepit Dakkanaut
|
Thanks guys! Feel free to post the results here. Be useful I think for folks to see what others can do using this technique.
|
|
|
|
|
|
2012/07/05 20:26:24
Subject: How to paint Checkerboards
|
|
Scarred Ultramarine Tyrannic War Veteran
|
Great tut gits!
|
|
|
|
|
|
2012/07/06 13:37:03
Subject: Re:How to paint Checkerboards
|
|
Hoary Long Fang with Lascannon
|
Hey, Gits, great tutorial. I haven't tried it yet, so this might be a bit premature, but I wanted to ask how you might approach painting checkers on a diagonal, such as on the left leg of this Exorcist:

I think the masking tape trick would be helpful here. And I think measuring and marking hashmarks would be a must. About how wide do you make your checks? Hmm, I just realized you'd have to measure the hypoteneuse of the check to make your hashmarks....
Thanks.
|
|
|
|
|
|
2012/07/06 13:55:11
Subject: How to paint Checkerboards
|
|
Decrepit Dakkanaut
|
Nothing really changes. Those are still squares, just oriented at roughly 45 degrees. Make your hash-marks on the surface of the leg plate rather than the edges (because marking the edges won't work). I'd start by drawing a single line (probably using a fine pencil) at the angle you want, then make the rest of your guidelines based on that. Then do the same thing for the perpendicular lines.
Check size depends on the space and the look your going for. My metal beakies (that is not the old plastics) have shin guard length between 8 and 9 mm. In order to get 4 diamonds in that length (as the picture), each square would have to be what... less than 2 mm per side? That's pretty damn small... don't think I could do that.
If you're really good... you might be able to make 1/16" squares, but it might be safer to go with 2mm. With either, you're going to have to use *really thin* guidelines. I think the micron pen would be too thick (and much to dark for the effect your wanting). That being said... if you used the red or brown micron pen, the color of the guidelines would probably fade into the paint job & wouldn't even be noticeable.
|
|
|
|
|
|
2012/07/06 15:51:39
Subject: How to paint Checkerboards
|
|
Angry Blood Angel Assault marine
|
Have you ever seen the way that use tape cut into a grid, then pull each little square off and assembled on a white surface in checkerboard pattern, then paint black over it? A buddy of mine showed me and it turned out great. Cheating, arguably, but results speak volume!
|
|
|
|
|
2012/07/06 16:30:51
Subject: How to paint Checkerboards
|
|
Decrepit Dakkanaut
|
Sounds great J Mac. Labor intensive, but very effective. If you see a tutorial somewhere, please post a link.
|
|
|
|
|
|
2012/07/06 16:31:15
Subject: How to paint Checkerboards
|
|
Hoary Long Fang with Lascannon
|
J Mac wrote:Have you ever seen the way that use tape cut into a grid, then pull each little square off and assembled on a white surface in checkerboard pattern, then paint black over it? A buddy of mine showed me and it turned out great. Cheating, arguably, but results speak volume!
I was just thinking of cutting out a paper leg-armor template, like the one in Scibor's tutorial, and then adding the checks, cutting out alternates (not sure how well it will hold together), and then painting. The tape might work better. Hmm....
|
|
|
|
|
|
2012/07/06 17:27:47
Subject: How to paint Checkerboards
|
|

Grizzled Space Wolves Great Wolf
|
This thread brings back memories. I remember a GW article talking about painting Goffs like this. Might have been a 2nd edition book. Long time ago.
Good stuff though, it's a good technique especially if you can get nice fine lines to make up the grid and your dreadnought looks great.
|
|
|
|
|
2012/07/07 21:04:48
Subject: How to paint Checkerboards
|
|
Roarin' Runtherd
in a little hole in the ground...crying myself to sleep
|
Nice tut, beats the hell out of my technique, which is to paint the area white, then with a piece of paper with a tiny square on it, stencil every square, then use citadel gloss to make it shine.
|
Conduct While Gaming
While rolling a die, do not say, “Anything but a 1!” unless you wish the die to come up as 1. Any other such attempts to anger the “Dice Gods” will result in the existential equivalent of continuously flipping a coin and having it come up heads every time (for reference, see Rosencrantz and Guildenstern are Dead). Your dice will be cursed to roll ones for everything other than morale checks, which will come up sixes.
ORK PLAYERS HAVE A LIMIT OF 1 SCREAMS OF WAAAAAAGH PER HOUR. violators will be forced to play tau.
Players with chimeras and las weapons shall pronounce chimera ki-mere-uh, not chim-ere-uh. Violators will be forced to play nothing but world eaters. Non-40k personnel must purchase and build a chimera. |
|
|
|
|
2012/07/07 23:34:40
Subject: How to paint Checkerboards
|
|
Decrepit Dakkanaut
|
Anything that works for you mate. But I think you're right... this method sounds a bit easier. Less "fiddly" if you get my drift.
|
|
|
|
|
|
|
|


