Hello, this is my the first tutorial I've ever done. I'll be showing you viewers how to make a kustom Ork warbike from an
AoBR Deffkopta and some other little bits.
NOTE: Please ignore the horrible paint job on the kopta, it was never finished.
Things You'll Need:
- An
AOBR Deffkopta. (The propeller is also needed, but the base isn't (unless you want to model it in some pose)).
- Plastic Card or Foam Board.
- Glue: The Super and Hot kinds.
- A small wheel. (Some Lego wheels work very well for this. The one in this tutorial was a little too big.)
- Plastic Cutters/a Hobby Knife
- 2 Plastic Soda Bottle Caps (Or Another Wheel)
- Sandpaper/A File
Step 1: Place the Deffkopta Pilot's head and arms aside. You'll need them later. Take the 2 halves of the kopta chassis and cut them like this:
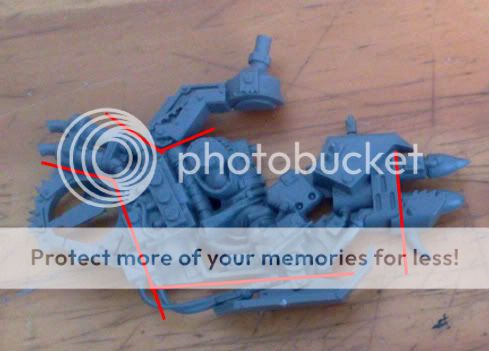
(Image looted from the internet)
You'll want to use a hobby knife/sandpaper/a file to clean up the edges.
The parts should look somewhat like this when you're done with step 1:


Also, use green stuff (or a substitute) to fill in gaps between the pieces caused by the cuts.
Step 2: Glue a small square of Plastic Card/Foam Board to the front of the Deffkopta. You could mount the dakkagun (That's step 3!) on this piece, but I chose to cut the small light-like bit from the top of the deffkopta (right below the propeller) and use it as a headlight. Although I forgot to do it when I took these pictures, you may want to do something similar to the back of the deffkopta and behind the seat.

Step3: You can choose to use gun bits to make the dakkagun and mount them however you would like.
I made a simple dakkagun out of a piece of a thin dowel rod that I had nearby at the time. Each barrel is made from a 3/4 - 1 inch cut of that dowel rod. They were then glued together and had a small rectangle of foamboard put on each side to form a mount for the gun.

Step 4: Cut 2 blades from the Deffkopta propeller. These will mount the front wheel. Glue a propeller blade on each side of the wheel then glue them to the kopta chassis as shown in the picture below.


Step 5: If you chose to use another wheel instead of 2 plastic caps, simply repeat step 4, but on the rear. Glue the 2 plastic caps together so that they form a cylinder. (Unless you chose to use another wheel). Glue this onto the back of the Deffkopta. Then, use foam board/plastic card to cover a bit of the wheel near the connection (You'll see what I mean in the picture) to make the rear will more attached.

Step 6: Add the Pilot's head and arms.
Step 7: Profit! (Or actually, be able to use your saved profits on other things...)

(My Original Conversion)
I hope that helped! Thoughts?


 .
.


 Khador 75p
 Menoth 35p
 Circle 25p
 Legion 25p