| Author |
Message |
 |
|
|
|
|
Advert
|
Forum adverts like this one are shown to any user who is not logged in. Join us by filling out a tiny 3 field form and you will get your own, free, dakka user account which gives a good range of benefits to you:
- No adverts like this in the forums anymore.
- Times and dates in your local timezone.
- Full tracking of what you have read so you can skip to your first unread post, easily see what has changed since you last logged in, and easily see what is new at a glance.
- Email notifications for threads you want to watch closely.
- Being a part of the oldest wargaming community on the net.
If you are already a member then feel free to login now. |
|
 |
2012/09/17 01:20:24
Subject: How to : Little details highlighting
|
|

Martial Arts SAS
|
I drybrush my minis to deal with the highlights. Problem is, at a certain point, I can't do it anymore because the details are too small and drybrushing would overlap on what's already finished.
How do you guys deal with highlighting little details ?
Thanks !
|
|
|
|
 |
|
2012/09/17 01:44:33
Subject: How to : Little details highlighting
|
|

Zhanshi Paramedic
Eugene, OR
|
Go slowly and very carefully. Use a good brush that holds a fine point. Thin your paints properly.
That's basically what I do.
|
|
|
|
|
2012/09/17 01:50:28
Subject: Re:How to : Little details highlighting
|
|
Martial Arts SAS
|
But which technique do you use for highlights ?
Being very new to painting, all I know is edge highlighting and drybrushing.
Drybrushing won't work because it covers too much surface.
Edge highlighting...well...I tried it before and the result was...way too thick
|
|
|
|
|
|
2012/09/17 01:58:13
Subject: How to : Little details highlighting
|
|
Zhanshi Paramedic
Eugene, OR
|
What do you mean 'way too thick?'
Are you not thinning your paints, going slowly, and using a fine point on your brush?
I'm talking about edge highlighting.
|
|
This message was edited 1 time. Last update was at 2012/09/17 02:00:38
|
|
|
|
|
2012/09/17 02:01:49
Subject: Re:How to : Little details highlighting
|
|
Martial Arts SAS
|
Lines are too big...might actually just be a problem with me =P
Looks like it's time I give it an other try =)
Here's the mini I used to try edge highlighting
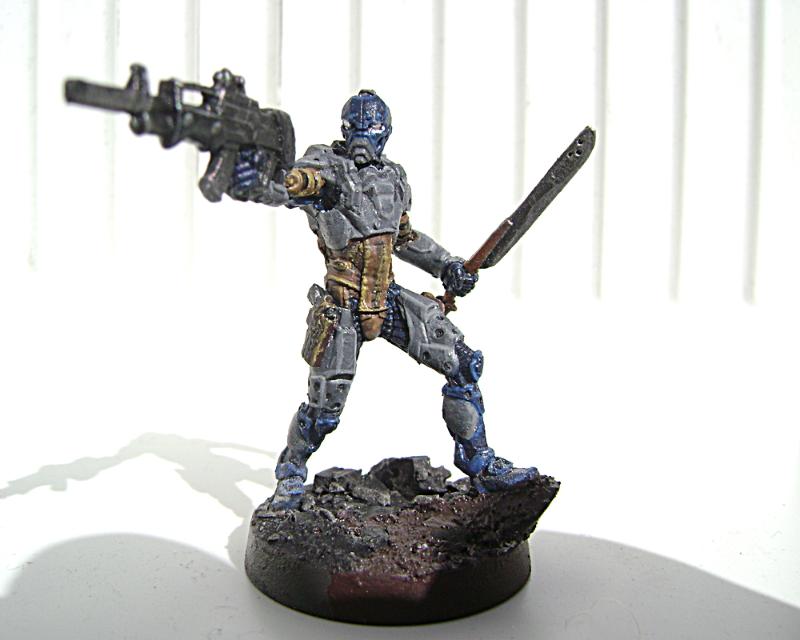 Automatically Appended Next Post: Automatically Appended Next Post: Indeed, seems like it was more a matter of inexperience than using the wrong technique.
Thank you good sir !
|
|
This message was edited 1 time. Last update was at 2012/09/17 02:15:30
|
|
|
|
|
2012/09/17 02:19:45
Subject: Re:How to : Little details highlighting
|
|
Zhanshi Paramedic
Eugene, OR
|
Your paints are too thick.
Next time you paint a mini, try this:
Base coat your mini with two to three light layers of spray (I use black Duplicolor car primer in a can, it's about $5 and comes out smooth). Use white or gray if you want a brighter mini in the end. To do this, I start with my spray can to the left of the mini, about 8-12 inches away, and make a quick 'pass' from left to right over the mini. I then turn the mini and repeat until the mini has 1 layer covering the whole thing. Note that one such layer like this, especially since you're doing light passes, will not cover the entire mini. That's why we do multiple thin layers. This is to preserve the details of the mini. Using thick paints will muddy the details and we don't want that.
After letting the first layer dry a few minutes, I apply one or two more light layers on top of the first until I get good coverage.
Once it's basecoated and dry, I start with a color and paint all of the parts of the miniature that will be that color, i.e. paint all of the green parts first. Make sure your paints are thin, you want them to be slightly thicker than water consistency, sort of like milk. You will get the hang of this with practice. Don't paint out of the pot. Always paint from a palette of some kind.
When you actually begin painting, dip your brush into the paint, but not all the way, just about half way up the brush. You don't want paint getting into the ferrule (the metal part). After dipping your brush into the paint, have a paper towl or sponge or something that will soak up paint handy and wipe excess paint off the brush, usually with this thin a paint, simply touching the brush to the paper towl is usually enough.
Now you should have just the right amount of paint on the brush.
Every time you need to put more paint on the brush, get into the habit of rinsing your brush in water (which you should have in a small container near your paper towl) to get the old paint out before dipping your brush into more paint.
This is basically what I do.
Hope this helps.
EDIT: As far the actual highlighting, your highlights are fine, except that they need to be more contrasting. I used to do the same thing when I first started painting: my highlights weren't bright enough. They look ok up close, but from afar, like when they're on a table 3 feet away from you, you're going to want brighter highlights. Don't be afraid to make them more contrasting! Add more white to your highlight color.
|
|
This message was edited 1 time. Last update was at 2012/09/17 02:21:39
|
|
|
|
|
2012/09/17 02:46:48
Subject: Re:How to : Little details highlighting
|
|

Utilizing Careful Highlighting
|
I think your problem is brush pressure control: it comes with practice. You're correct: drybrushing doesn't work on everything and it is definitely not the solution to every mini, especially the Infinity range. You may want to try washes/inks, they're also an easy way of providing shading to your miniatures. Use a light-colored basecoat, then wash it with a darker color of the same hue (like when doing a grey area, wash it black). When dry, you can repaint the area with the original basecoat if desired while leaving the washed and darkened recesses.
You may also want to look up layering and feathering.
|
|
|
|
|
|
2012/09/17 02:52:04
Subject: Re:How to : Little details highlighting
|
|
Martial Arts SAS
|
Thanks for the tips !
This was the first Infinity mini I've ever painted. Now they are better. I think.
It wasn't the case before but now I pretty much do the same thing as you do Insidius.
And yeah, I know about contrast but it scares me =P I think I prefer subtle highlights to bright highlights that can be seen from 10 feets =P
|
|
|
|
|
|
2012/09/17 03:07:28
Subject: How to : Little details highlighting
|
|
Zhanshi Paramedic
Eugene, OR
|
I used to prefer more subtle highlights as well, but they really do look a lot better on the table. There is a happy medium.
|
|
|
|
|
2012/09/17 03:39:26
Subject: Re:How to : Little details highlighting
|
|
Utilizing Careful Highlighting
|
It's useful to learn how to feather then if you prefer subtle highlights. Also be prepared to spend a lot of time on your minis: my Infinity army is not finished because it takes me at least 3 weeks to finish one model.
|
|
|
|
|
|
2012/09/17 03:49:17
Subject: How to : Little details highlighting
|
|
Zhanshi Paramedic
Eugene, OR
|
Ha, I'm the same way. I take forever on my models.
|
|
|
|
|
2012/09/22 23:30:04
Subject: How to : Little details highlighting
|
|

Zealous Shaolin
|
I find Infinity models look good without highlighting - my opinion is that these are 3 D models and not flat paintings so they highlight themselves .
As some panels / details are small , as you say highlighting is difficult and time consuming - I dont bother .
People with time and the requisite skills improve on already great models with highlighting - I havent got the time .
|
|
|
|
|
|
|