Switch Theme:

Recommendations for printer decal 'paper'  [RSS] Share on facebook Share on Twitter Submit to Reddit
»
Author Message
Advert


Forum adverts like this one are shown to any user who is not logged in. Join us by filling out a tiny 3 field form and you will get your own, free, dakka user account which gives a good range of benefits to you:
  • No adverts like this in the forums anymore.
  • Times and dates in your local timezone.
  • Full tracking of what you have read so you can skip to your first unread post, easily see what has changed since you last logged in, and easily see what is new at a glance.
  • Email notifications for threads you want to watch closely.
  • Being a part of the oldest wargaming community on the net.
If you are already a member then feel free to login now.


Made in us
Fresh-Faced New User


Would like to print out some shoulder pads designs, figured I could use my home printer. size down the image and then print it out on a clear decal like paper. Anyone done this or have any recommendations?
   
Made in gb
Longtime Dakkanaut


Nottingham, UK

Yeah, but my suppliers in the UK.

Remember to get decal paper appropriate for your printer (laser or inkjet). DO NOT USE INKJET PAPER IN A LASER PRINTER - IT CAN MELT ONTO THE ROLLER AND POOCH YOUR PRINTER.

Also remember that you can't print white or opaque light colours; a guide decal that you paint over and then decal over the top of that may be needed.


Made in us
Regular Dakkanaut


I've been through this very thing and posted all my results on my blog.
It's a couple articles covering everything I've lerned about the process.
Here's the link: http://fromthewarp.blogspot.com/search/label/decals

This message was edited 1 time. Last update was at 2012/10/02 21:07:53


When people ask me, "How do you build your army?"
I tell them its "The ten-zero factor, coolness ten, combat effectiveness... zero."

Founder, From the Warp
A blog dedicated to modeling and painting in the 40k universe 
   
Made in us
Willing Inquisitorial Excruciator


Philadelphia

I've used micromark.com, they sell a decal kit with solvents, and instructions. Great stuff.

I've also heard people talk about buying Testor's decal paper where model kits are sold (and sometimes Michael's, etc).

Finally, unless you're using a laser printer, an inkjet will require a fixative for it to work (see micromark's kit).

Finally, finally, google 'bolter and chainsword decal project'. They have files for just about every chapter, and instructions and help in making them.

I've done my entire fleshtearers army with homemade transfers. Any questions, just ask.

Legio Suturvora 2000 points (painted)
30k Word Bearers 2000 points (in progress)
Daemonhunters 1000 points (painted)
Flesh Tearers 2000+ points (painted) - Balt GT '02 52nd; Balt GT '05 16th
Kabal of the Tortured Soul 2000+ points (painted) - Balt GT '08 85th; Mechanicon '09 12th
Greenwing 1000 points (painted) - Adepticon Team Tourny 2013

"There is rational thought here. It's just swimming through a sea of stupid and is often concealed from view by the waves of irrational conclusions." - Railguns 
   
Made in us
Fresh-Faced New User


Everyone, just what I was looking for (and more).

Thank you very much! The help is appreciated.


Made in us
Lone Wolf Sentinel Pilot


San Diego Ca

I've used the testors and it worked pretty good. Its A5 sized; about 5x8.
When you take your image and resize it (I use Paint) make sure you check the "properties." This will give you an actual dimension of the final product. Much easier than trying to guess and waste decal paper.
Save the image as a BMP. It takes more space, but the image is crisper than a JPEG. Then open Word and set your paper to the A5 setting and set your margins. I make the margins as tight as possible to maximize the number of decals I can have per sheet. Use the insert function to place each image, then either 'tab' or hit the space-bar 3-4 times to put a gap between images so you can cut them out later.
Once your done, print a test sheet on plain paper. THIS IS IMPORTANT!!! The test sheet will show you exactly what your going to get. From clarity to size and color. You can cut out the test patterns and dry fit them to make sure everything fits correct.
Only then do you print out the decal. You get one pass with each sheet...so put as many decals on there as you can. Extras are nice because you WILL tear one or mess up putting it on at some point.
Once the decal is printed I let it sit for about an hour or 2. This lets the ink set and dry (on inkjet printers the ink is laid on top of the decal paper and does not imbed into the paper itself...so it is easy to smear). Once dry I hit the entire sheet with a plain matte varnish. Not to thick, but not thin either. Be careful of temperature and humidity. To hot or humid and the varnish can run or dry before it hits the paper causing rough textures and runied sheets. The varnish seals the ink onto the transfer paper. Let it dry/cure over-night to be safe.
The next day trim each decal to the size you need (I find the closer its trimmed the better they come out). Soak the decal for about 15-20 seconds. Use Micro-Sol and Micro-set solutions (available at the same hobby shop) to set the decal in place. Once dry hit the decal with Micro-Sol again. Repeat at least once or twice more. This dissolves a lot of the film/varnish and leaves you with a really clean decal setting. Once your completely done, seal the model with more varnish to protect the paint/decals.
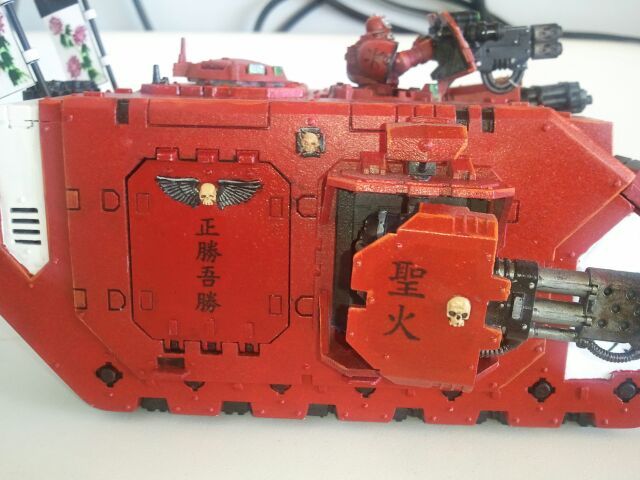
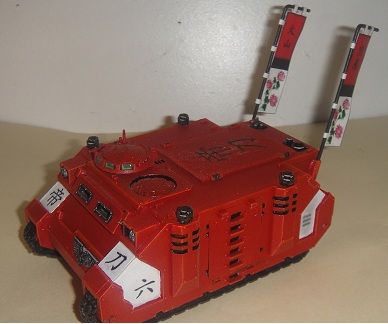
Kanji decals:

This message was edited 1 time. Last update was at 2012/10/03 17:48:27


Life isn't fair. But wouldn't it be worse if Life were fair, and all of the really terrible things that happen to us were because we deserved them?
M. Cole.


Forum Index » Painting & Modeling
Go to: