Forum adverts like this one are shown to any user who is not logged in. Join us by filling out a tiny 3 field form and you will get your own, free, dakka user account which gives a good range of benefits to you:
No adverts like this in the forums anymore.
Times and dates in your local timezone.
Full tracking of what you have read so you can skip to your first unread post, easily see what has changed since you last logged in, and easily see what is new at a glance.
Email notifications for threads you want to watch closely.
Being a part of the oldest wargaming community on the net.
If you are already a member then feel free to login now.
2013/01/25 17:30:58
Subject: Would like help on weathering, rust, battle damage
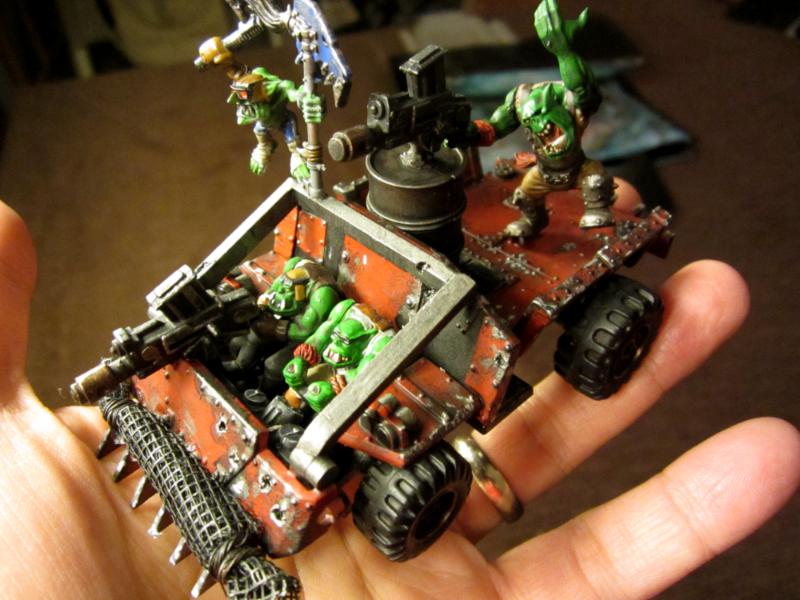
I've just picked up an ork army, and am adding to it, and have taken my first stab at "beating the crap" out of a warbuggy model. A quick search of this forum didn't bring up any newbie/starter advice on weathering and battle damage. I'm a relatively fast-ish modeler (this warbuggy took me maybe 5-7 hours?), with the objective of making a nice army that's tabletop suitable, but was interested in maybe trying to take it to the next level with wear and tear. I'm not quite sure I'm there yet...!
To summarize what I did with this model: after blocking out the colors, I took a torn up corner of some foam from a blister pack and dipped it in black paint. I blotted off the excess paint, and dapped it along edges and parts of the buggy where I thought there would be obious wear, like handles and steps and such. I then took a metallic silver paint and filled in the solid patches of black, almost but not quite completely. I then washed the whole thing with badab black, diluted 1:1 with water. I then hit bits of the metallic silver with mithril silver (very light colored silver), but that was way too much, so I hit that with the diluted wash again. The bullet holes are from a drill bit I normally use for pinning, which I would bend a lot to make a cone entry-hole. I'd rough that up further with a hobby knife, paint it black, then silver, wash, paint it mithril silver, wash again.
Does anyone have any advice? Maybe some good links for tutorials on weathering? I'd prefer text and pictures, but I reckon I could deal with the occassional video if I have to. Where do you go to learn about battle damage and bullet holes and such?
Not the greatest photo, but here's what she looks like now:
I play...
Sigh.
Who am I kidding? I only paint these days...
2013/01/25 18:04:31
Subject: Would like help on weathering, rust, battle damage
I think a quick to learn technique might be weathering powders to add to dirt and rust to your vehicles especially the wheels which look way to clean lol.
Get a pin vice for your drill bit or use a dremel and use a sharp tack or pin to make a starting point in the center of the barrel. thats how i usually do mine.
Edit: also take your time drilling out the barrel. going to quick can make for bad times when it slips or is off center
This message was edited 1 time. Last update was at 2013/01/25 18:20:38
For barrels, use a sharp probe to make a dimple in the center and then start out with a small bit to make a guide hole before you jump to a larger one. For rust, you can use a watered mix of vermin brown and blazing orange and blotch some of this onto selected metal parts. Sponge over with bolt gun metal after it dries.
This message was edited 1 time. Last update was at 2013/01/25 19:11:48
I think a lot of the model is already pretty nicely weathered, but the wheels are very clean. They should at least be dry brushed with grey and dirty brown.
You should look into the techniques of salt, Marmite and hairspray weathering. There are articles about these in the article area of the site.