I have been asked to post up some comments on magnetising the coolers for a Dreamforge Games Leviathan Crusader, so here we are.
Not only is this my first thread in P&M, it's my first attempt at magnetising something, so I hope nothing goes wrong.
To start off, I have mainly used these particular items because I already had them handy. I was not thinking of this project when I got them, but they have turned out very useful in making it work. If I mention a particular retailer, it's only where I happened to get things from, you may have to get them from places nearer to you (Especially if you are not in the
UK). I will try and remember to use generic names where possible, but in a way to give you all the specifics you need.
OK, boring stuff out of the way.
When I got hold of my Crusader, I did think about magnetising the cooling systems as other people had already commented about having gone through the instructions and ended up gluing pieces in for the cooling systems which meant that they no longer were able to swap them out and had to keep to the standard set. With this in mind, I was doubly careful and decided to magnetise mine before I got to that stage. Luckily I had some 2mm diameter by 1mm thick and 3mm diameter by 1.5mm thick Neodymium magnets that I had bought for some
GW stuff that I have not got around to yet, and these were diverted to this project.
So you will need (alongside the kit and coolers), Superglue, the magnets, suitable sized drill bits, a pin vice, and something like a thick magazine to help protect from you drilling into the table. A set-up like this should be fine.
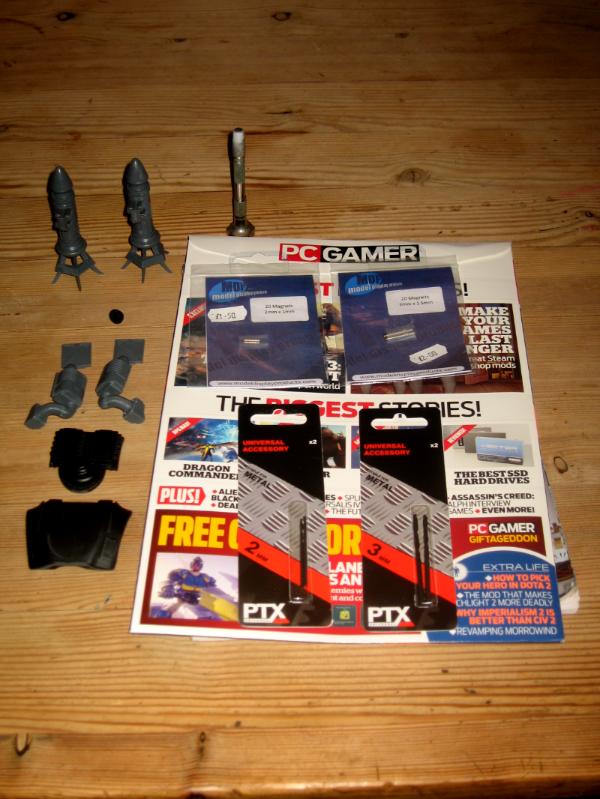
You can see that I have the back plate (G3), the cooler mounting plate (G4), both standard cooling stacks fully built, and the Capacitor Coolers built but without the back plate. this is so I can get at what would be the inside later on. I kept checking the fit of the Capacitor Coolers as I built them so I know they fit properly and I could glue them on if I wanted and get them to fit correctly. The little black piece is one of the two parts G6, and is being the top left of these units.
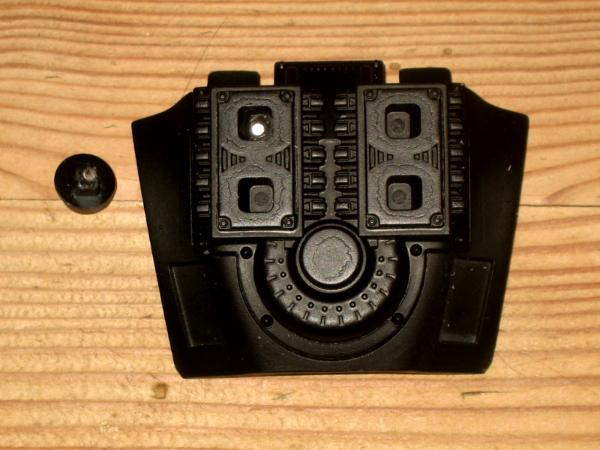
Firstly, I decided to magnetise the standard cooler stacks, and started with the cooler mounting plate (G4). As I had decided to use the smaller of my magnets for these parts, I drilled a 2mm hole in the top left indent in the plate. Take care whilst doing this and try and get the drill to go through as near 90° as possible to the bottom of the indent. There are circular depressions in these indents already and this can be used as a good indication on where to drill as they line up with the holes already in parts G5 and G6. After going through with the drill from the outside of part G4, I then pressed part G6 into place in part G4, and drilled back again from the inside through the hole I had just made. Once I was sure both holes lined up, I glued the first of my 2mm diameter magnets into G4 with a tiny drop of superglue from the back whilst I held the magnet on the end of the drill bit.
After letting this cure for a minute or so - and aware that superglue 'dries' in minutes but can still take a day to reach maximum state of cure and therefore strength - I put the second magnet on a single layer of paper kitchen roll and held it over the first. this allowed the second to properly align itself in the field of the first and ensured I did not get two magnets forcing the pieces apart rather than keeping them together. The hole in the peg of part G6 was then placed over the magnet until the magnet was completely in the hole I had drilled and the kitchen roll ensured that the magnet did not flip over or come out whilst I did this.
Once the second magnet had also been held in place with a drop of superglue and allowed to dry for a couple of minutes, I brought the two together and was rewarded when the two parts stay together even if shaken, yet come apart easily when pulled apart. This will now be repeated for the other part G6 and the two parts G5. The two 2mm magnets are just strong enough to keep the parts in place, provided you do not brush them out whilst handling them, so maybe 3mm would have been a better size even for these, but I would still prefer to have bigger magnets on the stacks and the base of the Capacitor Coolers. These parts should be well enough protected once the stacks are in place, and I plan on reversing the direction of the magnets on the other side so that I can connect them together when not in use and not lose which side they go on to.
I plan on using a pair of the 3mm magnet sets, 4 magnets total, for each of the stacks to keep such heavy items, compared to G5/6, in place For the capacitor coolers, a 2mm magnet to go up in the pin on the back piece of the coolers - which is why I left off the back pieces on the build of them so far - and a set of two 3mm magnets in each of the ends that connect to part G3. In fact, for anyone working through this, it would be better to ensure you drill the hole in the back of the Capacitor Coolers before you glue the magnet into part G4 so you can be sure all the magnets line up properly (although it looks like that should be a relatively easy task, the backplates of the Capacitor Coolers don't move much up/down or left/right in part G4, they do seem to rotate some. There is a sink mark on the inside of mine which should give a good indication on where to drill to position the magnet.)
I'll try and get some more done and posted tomorrow showing the addition of the standard cooler stacks and one of the Capacitor Coolers.


