Forum adverts like this one are shown to any user who is not logged in. Join us by filling out a tiny 3 field form and you will get your own, free, dakka user account which gives a good range of benefits to you:
No adverts like this in the forums anymore.
Times and dates in your local timezone.
Full tracking of what you have read so you can skip to your first unread post, easily see what has changed since you last logged in, and easily see what is new at a glance.
Email notifications for threads you want to watch closely.
Being a part of the oldest wargaming community on the net.
If you are already a member then feel free to login now.
2013/06/05 15:39:42
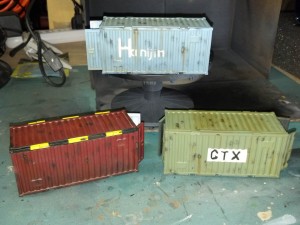
Subject: basic weathering tutorial for Rustforge shipping crates
Looking good! The lettering is a bit rough and uneven, in spots, but ribbed surfaces aren't exactly making things easy on you, when it comes to stencils. The general effect, though, is quite nice.
The Dreadnote wrote:But the Emperor already has a shrine, in the form of your local Games Workshop. You honour him by sacrificing your money to the plastic effigies of his warriors. In time, your devotion will be rewarded with the gift of having even more effigies to worship.
2013/06/05 21:25:56
Subject: Re:basic weathering tutorial for Rustforge shipping crates
Contact paper, cut to the size of a regular sheet of paper, and design your stencils in GIMP (or even Paint). Print them on the paper side in reverse, then get to cutting with your pen knife.
DS:80+SGMB--I+Pw40k12#+D++A+/wWD-R++T(D)DM+
2013 W/L/D Ratio:
Dark Angels (3/12/2)
Malifaux (1/3/0)
JWhex wrote: Some of you guys need to go a through bad girlfriend or two and gain some perspective on things.