| Author |
Message |
 |
|
|
|
|
Advert
|
Forum adverts like this one are shown to any user who is not logged in. Join us by filling out a tiny 3 field form and you will get your own, free, dakka user account which gives a good range of benefits to you:
- No adverts like this in the forums anymore.
- Times and dates in your local timezone.
- Full tracking of what you have read so you can skip to your first unread post, easily see what has changed since you last logged in, and easily see what is new at a glance.
- Email notifications for threads you want to watch closely.
- Being a part of the oldest wargaming community on the net.
If you are already a member then feel free to login now. |
|
 |
2013/09/13 03:36:41
Subject: Help with colors for salys!
|
|

Lead-Footed Trukkboy Driver
Dis filfy git wantz ta know?
|
Need some help for what GW colors to use for my salys. my army is 50tacs, 5sterngurd, vulken,5 assult marines,9droppods and 2 ironclad dreds.
ideas for the green arm on the men and what would work well for the pods and dreads!
Note:i have no access to a sprayer all hand doing! also what primer color would work best? white,black,grey or others i could go for!
also witch paints to water down and how to go about it!
thanks for the help! 
|
10k    
We Green And Not Very Clean!
"Orkses never lose a battle. If we win we win, if we die we die fightin so it don't count if we runs for it we don't die neiher,
Cos we can come back for annuver go,
|
|
|
 |
|
2013/09/13 04:05:18
Subject: Re:Help with colors for salys!
|
|
Hellish Haemonculus
|
Basic paint job is as follows.
Prime black. (I always use Rustoleum primer, but any primer will work.)
Basecoat Loren Forest. (Use overbrushing, which is kind of like drybrushing but with a lot more paint on the brush. This will leave vents and cracks in the armor still black.)
Layer of Warpstone Glow. (Overbrush this as well.)
Apply Abbadon Black to bolters and shoulder pads.
Apply Hashut Copper to bolter clips and barrels, as well as any aquilas (including the one on the chest).
Moot Green in eyes.
Abbadon Black to knee/elbow rubber.
Purity Seals: Wax is Mephiston Red followed by Evil Suns Scarlet. Paper is Rakarth Flesh followed by Ushabti Bone then drybrushing of White Scar. Lines added with Abbadon Black and an ultra fine detail brush.
Go back and touch up anything you screwed up.
Optional: Moot Green for extreme highlighting.
Optional: Agrax Earthshade or Biel-Tan Green wash for depth.
Feel free to look at my gallery to see how this technique works out for you. (Note: While the majority of my models are painted this way, I do my metallics in a slightly more complicated method that I didn't want to relay here because opinions are mixed about whether or not it looks good.) In any event, I hope this provides some kind of help, and good luck with your Salamanders. Unto the anvil of war indeed!
|
|
This message was edited 1 time. Last update was at 2013/09/13 04:09:43
|
|
|
|
|
2013/09/13 17:38:54
Subject: Re:Help with colors for salys!
|
|
Lead-Footed Trukkboy Driver
Dis filfy git wantz ta know?
|
 Jimsolo wrote: Jimsolo wrote:Basic paint job is as follows.
Prime black. (I always use Rustoleum primer, but any primer will work.)
Basecoat Loren Forest. (Use overbrushing, which is kind of like drybrushing but with a lot more paint on the brush. This will leave vents and cracks in the armor still black.)
Layer of Warpstone Glow. (Overbrush this as well.)
Apply Abbadon Black to bolters and shoulder pads.
Apply Hashut Copper to bolter clips and barrels, as well as any aquilas (including the one on the chest).
Moot Green in eyes.
Abbadon Black to knee/elbow rubber.
Purity Seals: Wax is Mephiston Red followed by Evil Suns Scarlet. Paper is Rakarth Flesh followed by Ushabti Bone then drybrushing of White Scar. Lines added with Abbadon Black and an ultra fine detail brush.
Go back and touch up anything you screwed up.
Optional: Moot Green for extreme highlighting.
Optional: Agrax Earthshade or Biel-Tan Green wash for depth.
Feel free to look at my gallery to see how this technique works out for you. (Note: While the majority of my models are painted this way, I do my metallics in a slightly more complicated method that I didn't want to relay here because opinions are mixed about whether or not it looks good.) In any event, I hope this provides some kind of help, and good luck with your Salamanders. Unto the anvil of war indeed!
Thanks for the ideas! How about doing droppods or dreads??
|
10k
We Green And Not Very Clean!
"Orkses never lose a battle. If we win we win, if we die we die fightin so it don't count if we runs for it we don't die neiher,
Cos we can come back for annuver go,
|
|
|
|
|
2013/09/13 18:42:38
Subject: Re:Help with colors for salys!
|
|

Esteemed Veteran Space Marine
|
My method would be as follows:
Prime: Black
Armour:
Basecoat: Caliban Green
Main coat 1, 2 + 3 (Depends on coverage): Warpstone Glow - taking care to leave the Caliban green in the recesses.
1st Highlight: 50:50 Warpstone Glow to Moot Green.
2nd, Extreme Highlight: Moot Green.
Unlike Jimsolo though, I'm not a fan of dry-brushed highlights (No offence Jim, just personal taste  ), so mine are all edge highlights with a fine detail brush. If I am to follow Jim's in depth examples of other features:
Eyes:
Basecoat: Mephiston Red
Maincoat (Only half the lense): 50:50 Evil Sunz Scarlet to Khorne Red
Highlight (Front quarter of lense): Khorne Red
Extreme Highlight: A little dab of Troll Slayer Orange in front lense corner
Detail: Tiny White dot at lense rear.
Purity Seals Wax:
Basecoat: Mournfang Brown
Maincoat: Khorne Red
Highlight: Evil Sunz Scarlet
Parchment:
Basecoat: Mournfang Brown
Maincoat: Ceramite White
2nd Maincoat: Ushabti Bone
Wash: Agrax Earthshade
Highlight: Drybrush of 50:50 Ceramite White to Ushabti Bone
Metal:
Basecoat: Leadbelcher
Wash: Nuln Oil
Highlight: Runefang Steel
Gold:
Nerdfest's epic method of gold, so all credit to him!
http://www.dakkadakka.com/dakkaforum/posts/list/1440/356350.page
As Jim says, best of look with the Salamanders, and should you want examples of how my methods have turned out, take a look in my gallery! Into the Fires of Battle! 
|
|
|
|
|
|
2013/09/13 18:51:33
Subject: Help with colors for salys!
|
|
Secretive Dark Angels Veteran
UK - Warwickshire
|
Purely becuase theyre all a somewhat flat green. I'd reccomned seeking out a spray can. Army painter seems to be a safe bet with the matching warpaints.
Spraying your base colour, particularly on all those pods will be the best way to achieve a nice flat, even coat, quickly.
People might argue over this one but here goes; Sprayed paint films guaranteed to be more paint efficient, smoother, more even coverage, thinner, and just all around better than a brushed one. I'm going as far as to say that anyone disagreeing is plain wrong. Its simple science
An airbursh would be the best method, but a spray cna will do a perfectly fine job of getting a flat even base colour, uniformly applied to the whole army in minutes.
|
'Ain't nothing crazy about me but my brain. Right brain? Riight! No not you right brain! Right left brain? Right!... Okay then lets do this!! |
|
|
|
|
2013/09/13 19:06:09
Subject: Re:Help with colors for salys!
|
|
Esteemed Veteran Space Marine
|
I'd agree with Hairy, but with only one note: It's all well and good spraying on a straight from can green, but that may prove to be A) Expensive B) Unsuitable depending on how much green your Sallies will have and C) If you decide to use primarily Citadel paints, but an Army Painter spray coat, you may find there is no matching warpaint colour - then you're gonna be stuffed. However, on the scientific point of a smoother coat - listen to Hairy, he has the right of it. That said, if you opt to go straight for Warpaints as Hairy suggests, you could very well avoid all match shenanigans!
|
|
|
|
|
|
2013/09/13 19:16:53
Subject: Help with colors for salys!
|
|
Secretive Dark Angels Veteran
UK - Warwickshire
|
Airbrushing doesnt have to be expensive either 
You can get a cheap dual action, gravity feed airbrush on ebay for approx £15
A hose is approx £5
and an airsource could be cans of propellant, a spare car tyre, a compressor, I've even seen a canister with a hand pump on it rigged up by someone here on dakka.
With a spare car tyre, filled up at the local garrage for the 20pence it costs to run the compressor there.
A valve for the tire (lots of airbrush stockist will carry these)
the hose and a cheap airbrush.
you could be set up to spray any colour for under £30-40 depending on how cheap you can get a spare car tire for. (it doesnt need to be brand new.. just hold air.
Frankly that kind of price range is dirty dirty cheap and cant possibly be called expensive when we're talking about painting figures that carry the GW price range.
|
'Ain't nothing crazy about me but my brain. Right brain? Riight! No not you right brain! Right left brain? Right!... Okay then lets do this!! |
|
|
|
|
2013/09/13 19:41:14
Subject: Re:Help with colors for salys!
|
|
Esteemed Veteran Space Marine
|
Actually Hairy, that's a sound piece of advice. I've often thought about buying an airbrush, but have been put off by cost - but a car tyre is a great idea! How would you go about regulating psi though?
|
|
This message was edited 1 time. Last update was at 2013/09/13 19:59:21
|
|
|
|
|
2013/09/13 19:59:09
Subject: Re:Help with colors for salys!
|
|
Secretive Dark Angels Veteran
UK - Warwickshire
|
sorry for slight de-railing of the thread, but if the OP is interested in airbrushes;
Moisture trap/regulator = £12
http://www.ebay.co.uk/itm/AIR-FILTER-REGULATOR-MOISTURE-TRAP-4-COMPRESSOR-NEW-/370330998733?pt=UK_Crafts_DrawingSupplies_EH&hash=item56397297cd[user]
Tyre adapter = £7 (theres one for badger hoses too that has a different thread size)
http://www.ebay.co.uk/itm/AIRBRUSH-TYRE-ADAPTOR-KIT-SAVE-ON-PROPELLANT-/380460037412?pt=UK_Crafts_DrawingSupplies_EH&hash=item58952f7524
Airbrush hose 1/8 female at both ends, 3m long = £5
http://www.ebay.co.uk/itm/Airbrush-Braided-Hose-3-meters-long-1-8-Fitting-/110768615350?pt=UK_Crafts_DrawingSupplies_EH&hash=item19ca52efb6
cheap airbrush, gravity feed, dual action, 0.3mm nozzle, kind of allrounder. = £17
http://www.ebay.co.uk/itm/AIR-BRUSH-PRO-BD-130-AIRBRUSH-FROM-CHRONOS-/370664103587?pt=UK_Crafts_DrawingSupplies_EH&hash=item564d4d5ea3
Plus a tyre, and filling it up every so often.
Now that moisture trap likely has a 1/4inch input and a 1/8inch output... might require another adapter between the tire and the 1/4 inch side. (1/8 female --> 1/4inch female) .. theres hoses and adapter pieces that do this. A decent plumbing supply store might be able to help on the cheap as these are not uncommon pipe sizes or threads. Its a global standard thread size.
Re-filling a tyre will definatly be a better option than buying propellant cans (from any retailer).
I can't comment as to exactly how long the tyre will run for, as I use a compressor. But I can say that a 24L tank, filled to 8bars of pressure, running 20-30psi lasts me approx 60-90 minutes of constant air. Running 15 or even 10 psi would make this much longer.
The trouble with propellant cans is that theyre costing £5.70 at GW, 10 cans later and you just wasted enough money to buy a little tankless compressor, 20cans and you could've had a dual piston 5L tank AS196 with hardcase like mine (which is still running strong 2-3 years later).
A tyre will run every bit as good as cans do, probably for a fair while longer between refils, main issue being its kinda bulky.... lay it flat under the desk out of the way or something
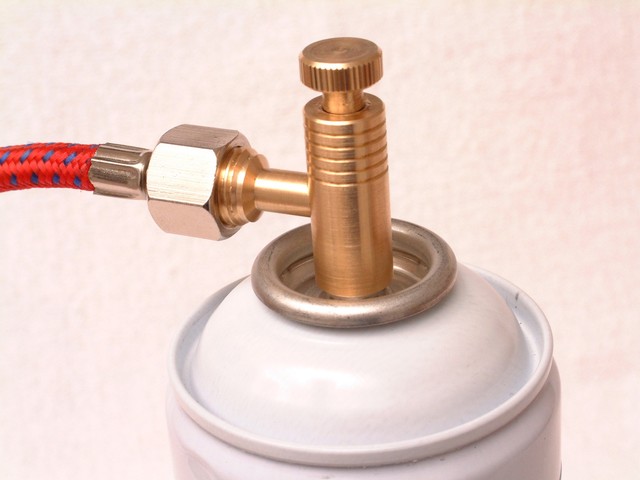
Theres even things like this for refilling them at home, this lil thing runs off a cars cigarette lighter ffs!
http://www.skidrive.co.uk/accessories/product_detail.php?partno=RAC610&gclid=CNW9oZ6UybkCFcaWtAodaEMAcQ
thinking about it, there may even be an attachment available to refil a propellant can... they fill them up somehow, right?
Edit; i read the description of the tyre adapter, and they say it fits these
Which is a propellant can regulator, the tyre adapter is supposed to fit the bottom of this where the can is in that piccy.; so I'm expecting anyone who sells propellant that is worth their teeth to sell these also? .. but honestly its going to be either 1/8 inch or 1/4 inch threads on that tyre adapter... I'd feel okay to put money on that ( afaik only Badger use another size in the spray industry - which does put me off them somewhat - I equate that to Apple using a 'special' usb cable for their phones...i.e a load of crap!)
|
|
This message was edited 4 times. Last update was at 2013/09/13 20:16:37
'Ain't nothing crazy about me but my brain. Right brain? Riight! No not you right brain! Right left brain? Right!... Okay then lets do this!! |
|
|
|
|
|
|