My buddy and I recently played a game of our Dark Eldar against Dark Angels, a rematch of our previous 2000 point game in which the Dark Angels won.
Being silly, we forgot to take pictures until halfway through turn two, so we gave up on that and I've made diagrams instead. apologies for the lack of pictures.
Armies (I may a get some stuff wrong, i don't have the lists)
DE
Urien
4x Grotesques with a liquifier gun
3x Venoms with extra Splinter Cannon, Night shields
each has 5x wytches with haywire grenades
2x Raiders,
each with 10 wracks, 2x liquifier guns
1x raider for Urien and Grots, with
NS,
FF
2x Reapers,
NS,
FF
1x Ravager
NS,
FF
6x Reaver Jetbikes with 2 Blasters
1xRaider w/
NS,
FF
10x Kabalite Warriors with Splinter Cannon
DA
Librarian with Infravisor (Warlord)
Librarian
3x
Tac squad Combat squadded 5 in drop pod (Sarge w/ Combi-melta. 3 bolters, 1x meltagun) and 5 at home (with 1 missile Launcher)
1x full
tac squad at home with flamer
2x
TL Autocannon Dreads
Devastators with 4x lascannon, 5 extra bolter guys
Aegis Defence line with quad gun
Command squad with BoD and Apothecary
2x Deathstorm Drop pod (Whirlwind)
1x ravenwing support squadron of 3 speeders with 2x Heavy Flamer
Drop pods and speeders begin in reserve at board edge left.
Setup
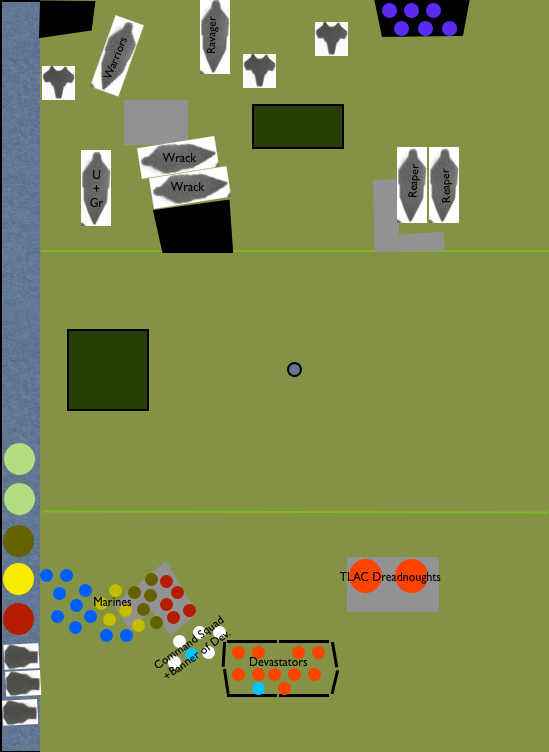
We rolled Hammer and Anvil board setup, and terrain density 3 and 3 in dark eldar DZ, 1 and 1 in the middle (we put a chest-high wall along the right board edge at middle, it never mattered so i left it off the map) and 2 and 1 in the
DA DZ with the Aegis taking up one of the terrain pieces in the '2' zone.
Grey areas on the map are ruins, Black are Impassable and
LoS blocking, and green are a dilapidated bastion at left, and a dilapidated imperial bunker in the
DE zone.
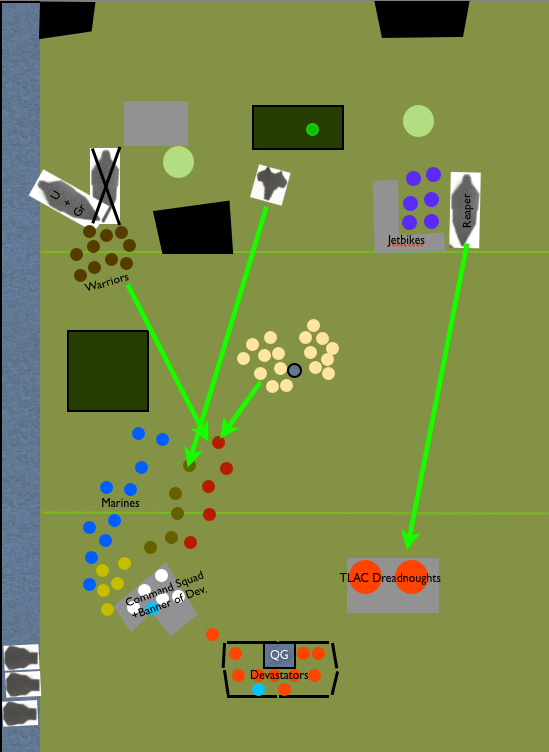
DA won deployment roll and the armies were set up as shown.
 DA
DA Turn 1
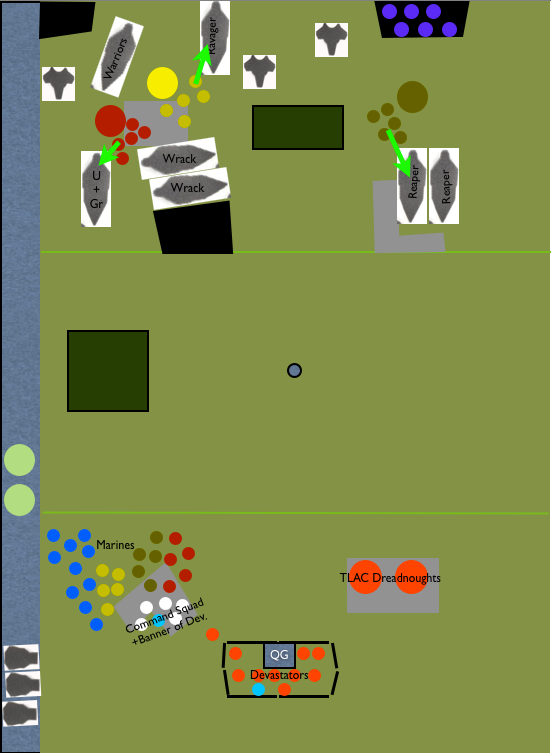
The three drop pods full of melta-rines showed up in the
DE deployment zone and took down the raider carrying the grots, as well as the ravager and one reaper. Other marines just moved up as there was nothing to shoot at, and the relic wasn't going to seize itself.
 DE
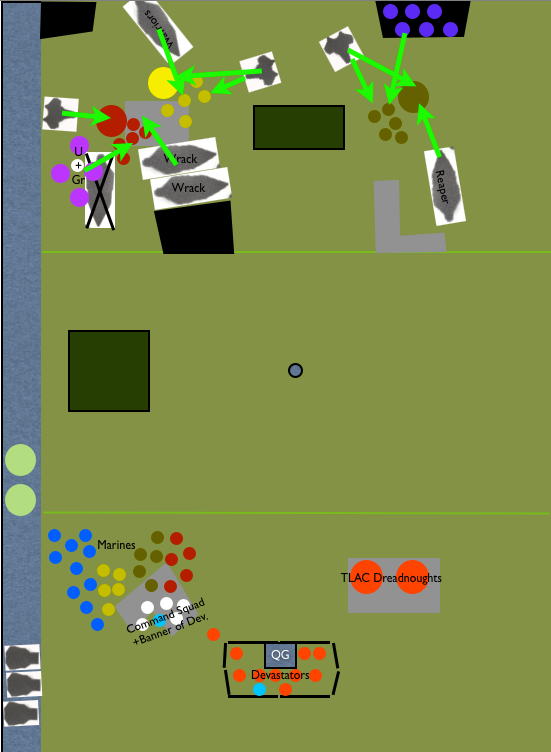
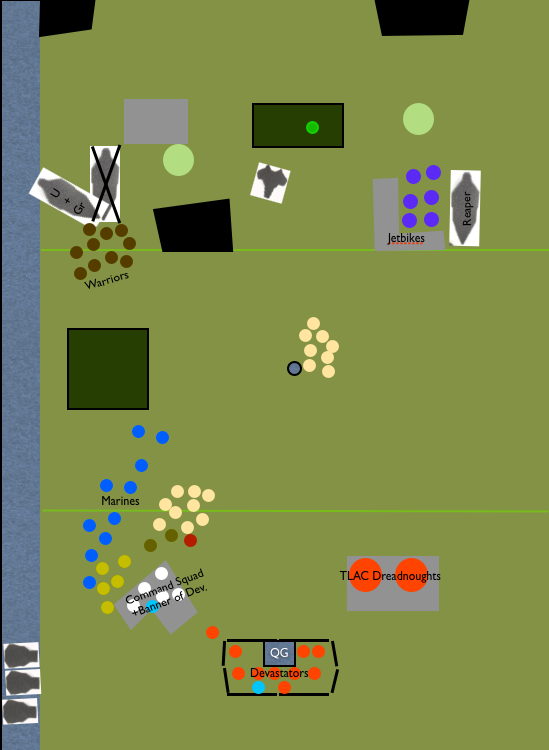
DE Turn 1
The wracks and grots turned their liquifier guns on red and yellow squads, crushing them with help from the center venom, and the jetbikes and venom at right mowed down brown squad. Wytches from the venoms, as well as the Reaper fired haywire into the drop pods, but were unable to destroy them.
 DA
DA Turn 2
Turn two for the Dark Angels is uneventful, no reserves arrive (thanks to
DE Warlord getting -1 to enemy reserve rolls as trait). Marines advance on the relic.
 DE
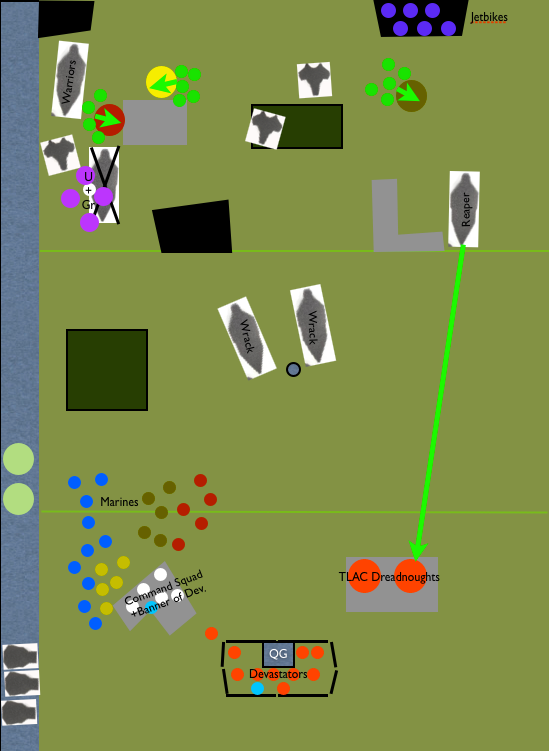
DE Turn 2
Having cleared the marines out of their end, the dark eldar venture forth, turbo-boosting wrack raiders around the relic while wytches disembark and haywire all the drop pods to death. The Reaper at right fires at a dreadnought but misses.
 DA
DA Turn 3
Timing is everything. the two deathstorm drop pods arrive for the Dark Angels, crushing wytches, and destroying a pair of venoms, as well as destroying the dark lance on the Warriors' raider. The rest of the Angels' fire is poured into the wrack raiders and it takes all they have to bring them down, only killing 3 of 20 wracks in the process.
 DE
DE Turn 3
Wracks capture the relic and pass it back a little, while they open up on two combat squads of marines with liquifiers, and then charge, killing the marines and advancing into the thick of the Dark angels with their consolidation, but taking heavy losses. In the backfield, the Reaper fires again at the dreadnought to no effect, and the jetbikes move up behind cover in preparation for their attack. On the left, the kabalites abandon their transport and fire at the marines, supporting the wracks' attack with the one remaining venom while Urien and the grotesques jump in to the raider.
 DA
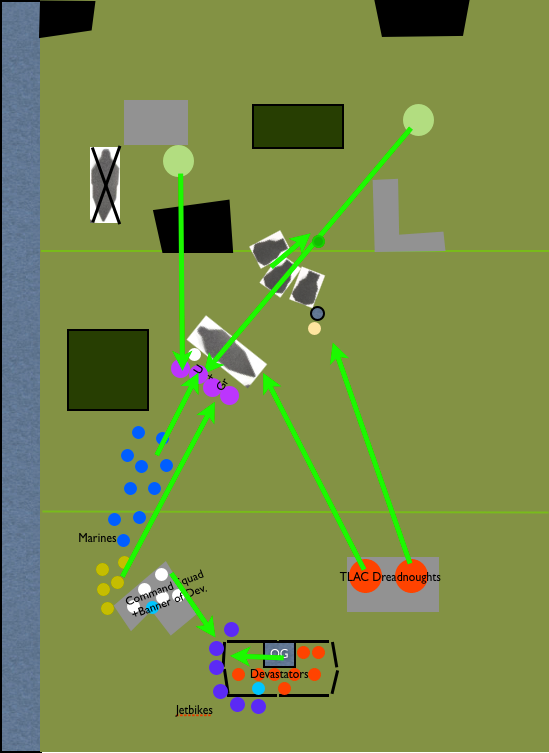
DA Turn 4
The Ravenwing arrives from reserve and cooks the exposed kabalites while the big guns finish off the Dark Eldar attack craft. the infantry pours fire onthe the wracks, killing the squad up close and killing all but the relic bearer at midfield.
 DE
DE Turn 4 &
DA Turn 5
Urien and his transport hop over the skimmers and unload in front of blue squad marines in order to screen the relic bearer, while the one surviving wytch, who had hidden in the imperial bunker comes to try help the wrack carry off their prize. Dark Eldar jetbikes turbo-boost over the devastators, killing two and maiming the Dark Angels' Warlord.
The Dark angels use their speeders to kill the wytch, while a dreadnought takes down the last wrack. Tactical squad marines Manage to bring down the grotesques with help from the deathstorms, while the command squad and devastators pour everything they have into the jetbikes, just managing to destroy them.
 DE
DE Turn 5
With nought but Urien left on the field, the Dark Eldar warlord sprints for the Angels' deployment zone, but falls short.
Game
DA 1 (First Blood)
DE 0

Both Players would like comments on their performance, what they could ameliorate, and what worked well. please post with any comments, and I promise next time we'll remember pictures.


 Dark Angels 1st, 2nd, 5th, 10th Companies,
 ~ 4500 points of Tau
 ~6500 points of Tyranids: Hive Fleet Niadra

 4k
4k
 2k
2k