| Author |
Message |
 |
|
|
|
|
Advert
|
Forum adverts like this one are shown to any user who is not logged in. Join us by filling out a tiny 3 field form and you will get your own, free, dakka user account which gives a good range of benefits to you:
- No adverts like this in the forums anymore.
- Times and dates in your local timezone.
- Full tracking of what you have read so you can skip to your first unread post, easily see what has changed since you last logged in, and easily see what is new at a glance.
- Email notifications for threads you want to watch closely.
- Being a part of the oldest wargaming community on the net.
If you are already a member then feel free to login now. |
|
 |
2013/10/15 03:20:11
Subject: Crimson Fists Sternguard Veterans
|
|

Boosting Black Templar Biker
|
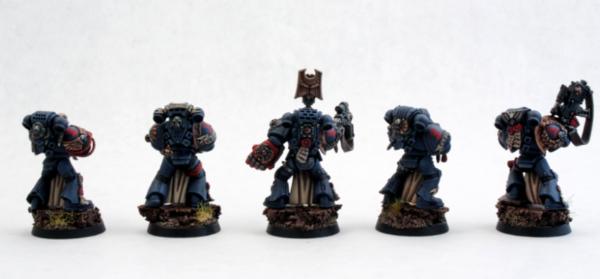
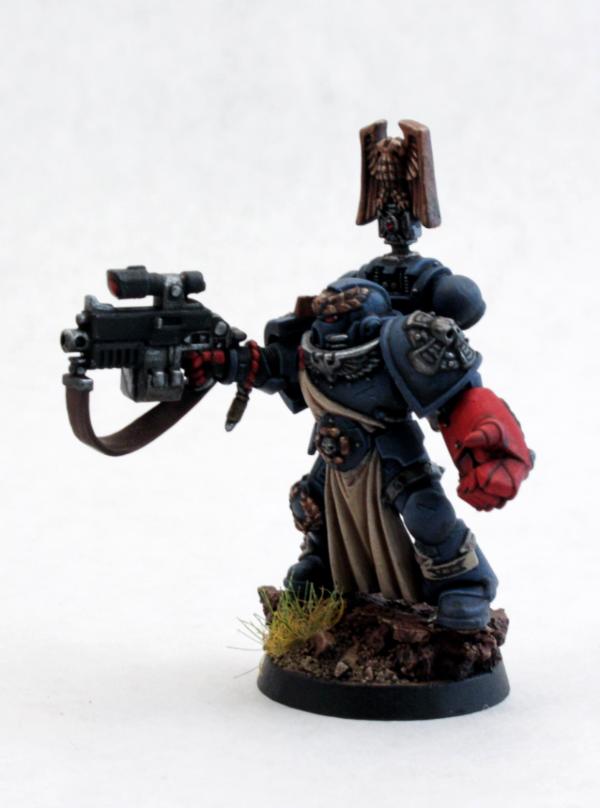
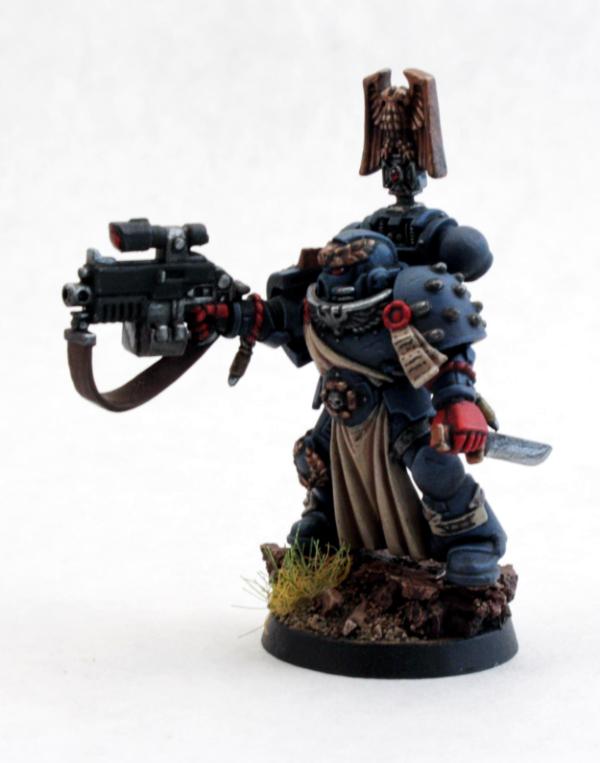
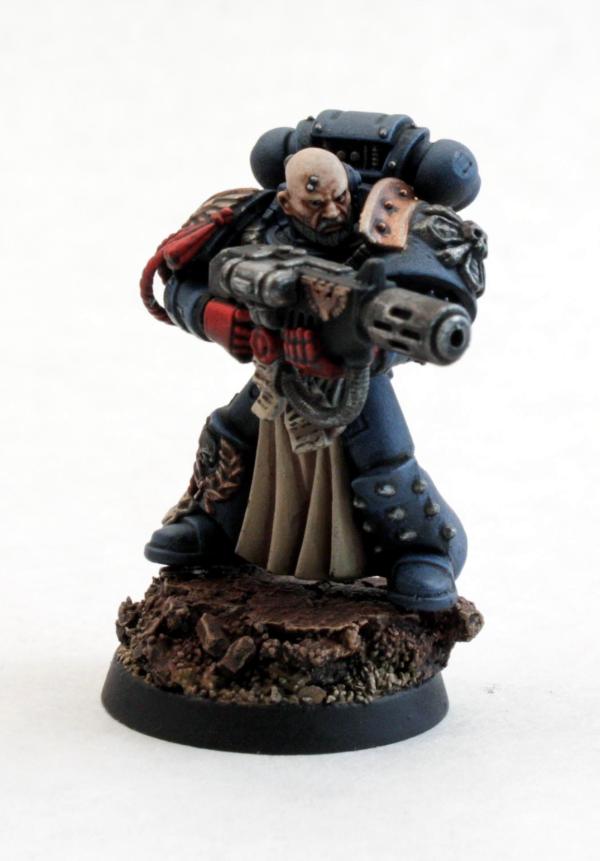
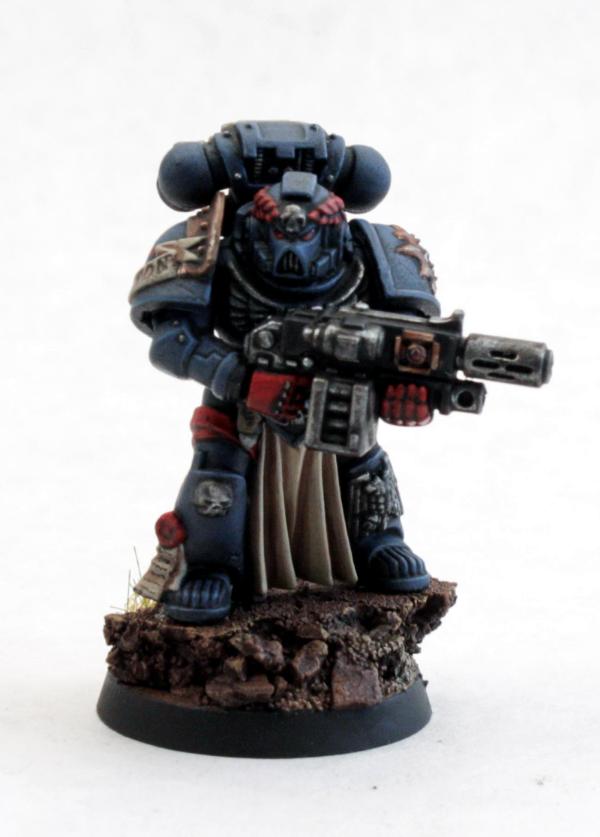
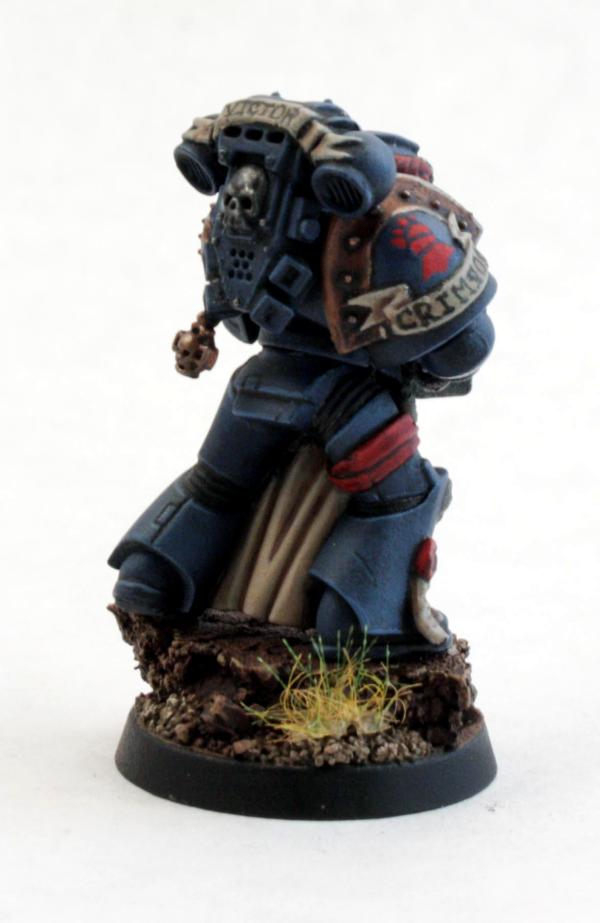
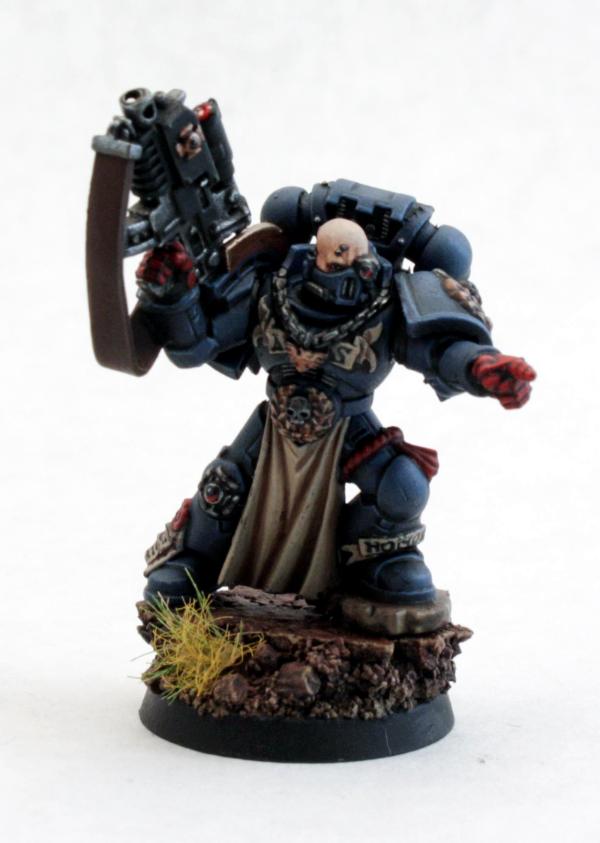
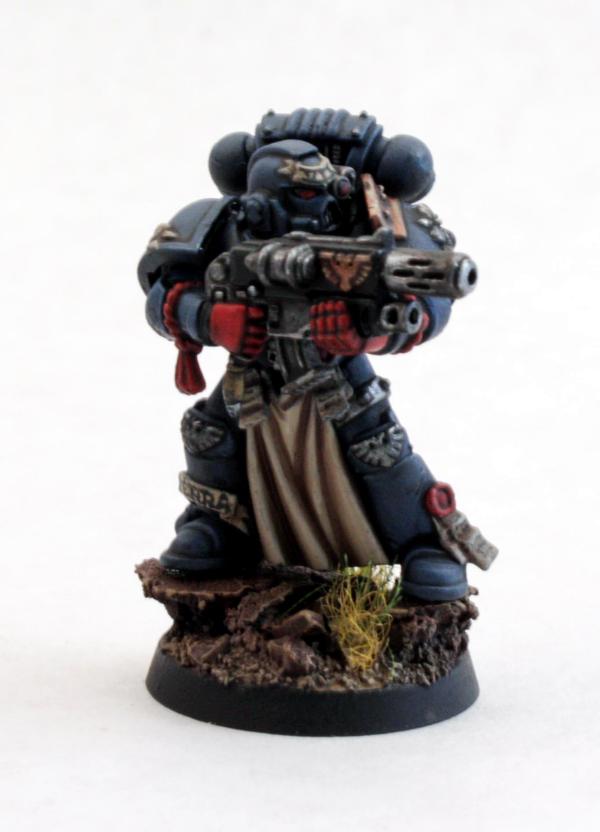
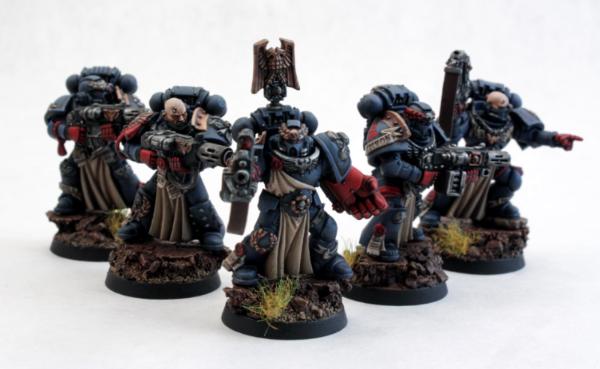
These are images of my completed Crimson Fists Sternguard Veterans. The sergeant's powerfist arm is magnetized so that it can be removed for gaming (since not many people would arm him that way, but what self respecting Crimson Fists sergeant doesn't own a powerfist?). Constructive criticism would be greatly appreciated.
I made some changes to the paint job, so I removed the old images from this post. Scroll down for more pictures! If you're interested in purchasing these, check out my ebay auction: http://www.ebay.com/itm/321238850764
 teran.jpg[/img][/url]
|
|
This message was edited 6 times. Last update was at 2013/10/30 15:58:46
|
|
|
 |
|
2013/10/15 03:25:26
Subject: Crimson Fists Sternguard Veterans
|
|

Elite Tyranid Warrior
Belfast, Northern Ireland
|
Those are very good and certainly much better that most of what ends up on ebay.
For advice I suggest that the wax for the purity seals be a different shape of red from the red of the fists. This will make them more real. Either darken it or lighten it.
Perhaps also a slight bit more edge highlighting on the red fists themselves. I think they will look crisper that way. Making the digits of the fingers more visible implies good work, attention to detail and will really sell them, pardon the pun.
|
|
This message was edited 1 time. Last update was at 2013/10/15 03:26:03
|
|
|
|
|
2013/10/15 06:28:39
Subject: Re:Crimson Fists Sternguard Veterans
|
|
Hellish Haemonculus
|
If I played Crimson Fists I would definitely be interested in these. They look great! That lettering on the shoulder pad is amazing; the only thing that is better is the freehanded symbol above it! Great job!
|
|
|
|
|
|
2013/10/15 17:16:50
Subject: Crimson Fists Sternguard Veterans
|
|
Lord of the Fleet
|
Very nice work! 
|
|
|
|
|
2013/10/15 17:59:25
Subject: Re:Crimson Fists Sternguard Veterans
|
|
Boom! Leman Russ Commander
|
Those are some amazing looking marines right there, Great job!
|
|
|
|
|
|
2013/10/15 21:30:26
Subject: Crimson Fists Sternguard Veterans
|
|

Stalwart Space Marine
|
How did you paint those fist on the shoulder guards? I have been looking for a way to do it my self but with no luck.
|
  : third compagny in the building : third compagny in the building |
|
|
|
|
2013/10/15 23:43:17
Subject: Crimson Fists Sternguard Veterans
|
|
Boosting Black Templar Biker
|
|
|
This message was edited 3 times. Last update was at 2013/10/16 01:19:32
|
|
|
|
|
2013/10/17 19:27:35
Subject: Crimson Fists Sternguard Veterans (Edited: New photos and auction added)
|
|
Stalwart Space Marine
|
Wow, great paintjob on these, the bases really compliment the models.
|
You carry the Emperor's will as your torch, with it destroy the shadows.
 
http://i.imgur.com/a1ZES.gif |
|
|
|
|
2013/10/17 19:52:09
Subject: Crimson Fists Sternguard Veterans (Edited: New photos and auction added)
|
|
Blood-Drenched Death Company Marine
|
They are lovely. The blue and red are nicely muted.
|
|
|
|
|
|
2013/10/18 18:27:38
Subject: Crimson Fists Sternguard Veterans (Edited: New photos and auction added)
|
|
Rotting Sorcerer of Nurgle
|
I really love the texture on the blue armour - did you dry brush it?
|
Check out my gallery here
Also I've started taking photos to use as reference for weathering which can be found here. Please send me your photos so they can be found all in one place!! |
|
|
|
|
2013/10/18 18:48:21
Subject: Crimson Fists Sternguard Veterans (Edited: New photos and auction added)
|
|
Boosting Black Templar Biker
|
 bubber wrote: bubber wrote:I really love the texture on the blue armour - did you dry brush it?
I airbrushed the armor with P3 Exile Blue, then Exile Blue mixed with GW Screaming Skull, and then a final airbrushing of Exile Blue, Screaming Scull and GW Ceramite White. I then gave it an oil wash of Winsor & Newton Ivory Black. The last step was to edge highlight with a mixture of Exile Blue and Ceramite White. I also painted on some scratches with GW Abbadon Black and the edge highlight color.
|
|
|
|
|
2013/10/29 14:19:43
Subject: Re:Crimson Fists Sternguard Veterans (Edited: New photos and auction added)
|
|
Boosting Black Templar Biker
|
I got a request to go through the colors and techniques that I used for these guys, so I thought I'd post it here in case anyone else is interested as well. The recipe for the blue is in my previous post. The ratios were roughly 4 parts Exile Blue to 1 part Screaming Skull for the first highlight, and then another part each of Exile Blue and Ceramite White were added for the second airbrush highlight. The edge highlight was 3 parts Exile Blue to one part Ceramite White. I also used some GW Nuln Oil and did some blacklining with Abbadon Black after the oil wash to clean up areas that didn't come out as smoothly as I wanted. This was my first time using oil washes, so hopefully with a little refinement the touch ups won't be necessary.
The red was done with a basecoat of Mephiston Red, followed by the same oil wash as the blue. I again used Nuln Oil and blacklining to smooth out the transitions in the shading. I then applied a highlight with an old pot of GW Blood Red using two-brush blending. Finally I applied an edge highlight of 3 parts GW Blood Red to 1 part VGC Hot Orange. The gems/eyes were painted using the same mixtures, except that the first step would be to paint the lower 3/4 of the gem with GW Khorne Red and the last highlight was pure Hot Orange. The purity seals were highlighted with mixtures of Mephiston Red and Screaming Skull to make them look a little different. If I were to paint more Crimson Fists, I would probably replace Mephiston Red with Khorne Red in the purity seals to further differentiate them from the rest of the red parts.
The cloth parts were given a basecoat of Karak Stone. Each step here was done using two-brush blending. The first shade was applied using an old pot of GW Graveyard Earth. The final shade was done using a mix of 1 part VGC Charred Brown and 1 part Graveyard Earth. The highlights were done first with 3 parts Karak Stone and 1 part Ceramite White, followed by 1 part Karak Stone and 1 part Ceramite White.
The silver metals were done with a basecoat of Vallejo Air Metallics Gun Metal, followed by the W&N oil wash and a Nuln Oil wash. An edge highlight was applied with Vallejo Air Metallics after the matte varnish was applied to keep the areas looking shiny.
The bronze areas were done with a basecoat of Vallejo Air Metallics Copper, followed by a wash of Army Painter Dark Tone (the kind in the dropper bottle). They then got a blended highlight of Copper again, and a final edge highlight after the matte varnish of Copper mixed with a little bit of Vallejo Air Metallics Silver.
The skin was painted with a basecoat of P3 Ryn flesh, followed by a wash of the old GW Ogryn Flesh. This left it looking a little pink, so I gave it a glaze/wash made of 3 parts P3 Mixing Medium, 1 part P3 Traitor Green and something like 4-5 parts water. I then applied the first highlight using Ryn Flesh, and the final highlight using Screaming Skull. Finally, the tops of their heads were glazed with a couple of layers of watered down GW Mechanicus Standard Grey.
All of the tiny rivets were painted using GW Leadbelcher. The bolter straps were painted with Charred Brown, given an edge highlight of Graveyard Earth, and then washed with Dark Tone. The little bolter shell casings hanging from various parts of the model were painted with VAM Bright Brass, followed by a Dark Tone wash and a highlight of Bright Brass. The ends of the melta barrels were given an extra Nuln Oil wash to darken them up a bit. The bolter casings were painted Abaddon Black and given and edge highlight of 1 part Abaddon Black to 1 part Mechanicus Standard Grey.
I think that's everything!
|
|
This message was edited 1 time. Last update was at 2013/10/29 14:40:27
|
|
|
|
|
2013/10/30 12:14:28
Subject: Re:Crimson Fists Sternguard Veterans (Edited: New photos and auction added)
|
|

Sneaky Sniper Drone
|
Might i ask how you did the bases? They are spendid and i'd like to try that.
The models themselves are absolutely stunning as well, of course <3
|
Mischief. Mayhem. Soap. |
|
|
|
|
2013/10/30 15:54:28
Subject: Re:Crimson Fists Sternguard Veterans
|
|
Boosting Black Templar Biker
|
I don't exactly remember what colors and steps I used for the bases, but I'll try my best to list them.
To build them, I used 1/4" cork to form the rocks that they're standing on and glued those down first. I then used some greenstuff to make some sloping edges up to the rocks in some places to make it look like cork rocks were coming out of the ground rather than just sitting on top. I then applied some GF9 Rocky Basing Grit, followed by some Woodland Scenics ballast (I think it was medium ballast?) and GW modelling sand.
I primed the bases black, and then basecoated them with VGC Charred Brown. I then basecoated the sand parts with GW Tallarn Sand. The rocky parts got a heavy drybrush of GW Doombull Brown, followed by a drybrush of Tallarn Sand. The sand parts got a drybrush of Screaming Skull (this step was probably unnecessary). I then washed the entire base with Dark Tone, but left it a little splotchy on the tops of the rocks for some color variation. I then drybrushed the sand parts once more with Tallarn Sand and Screaming Skull.
At this stage, I brought out some weathering powders. I think the powders I use are from some small company near my hometown, because I haven't seen them anywhere else, but any brand will do. I used a mixture of brown, a dark rusty brown, and a little bit of orange and a little bit of sand colored powders on the rocks. I then applied sand colored powders to the sand, and sort of blended the powders near the transitions between the sand and rocks. After sealing this in with matte varnish, I applied an edge highlight of Tallarn Sand to the rocks, and applied matte varnish one more time. I don't have the label for the grass tufts I use, but I'm pretty sure they're from Woodland Scenics. I found them at my local Hobby Lobby store.
Also, I'm still trying to sell these guys if anyone is interested. I updated the link to the eBay auction again, as they've been relisted.
|
|
This message was edited 1 time. Last update was at 2013/10/30 15:58:26
|
|
|
|
|
2013/10/30 17:17:35
Subject: Re:Crimson Fists Sternguard Veterans
|
|
Sneaky Sniper Drone
|
Awesome, thanks =) Colours were not even necessary, my main interest was the material. So thats cork...i will try that for sure. Also, weathering powder...never worked with that before, i might just give it a try.
Thanks again :>
|
Mischief. Mayhem. Soap. |
|
|
|
|
2013/10/30 19:24:12
Subject: Crimson Fists Sternguard Veterans
|
|
Lit By the Flames of Prospero
|
Awesome, love the muted colours, this is what space marines should look like IMO
|
Muh Black Templars
Blacksails wrote:Maybe you should read your own posts before calling someone else's juvenile.
|
|
|
|
|
|
|