Switch Theme:

need help with rusted paint effect.  [RSS] Share on facebook Share on Twitter Submit to Reddit
»
Author Message
Advert


Forum adverts like this one are shown to any user who is not logged in. Join us by filling out a tiny 3 field form and you will get your own, free, dakka user account which gives a good range of benefits to you:
  • No adverts like this in the forums anymore.
  • Times and dates in your local timezone.
  • Full tracking of what you have read so you can skip to your first unread post, easily see what has changed since you last logged in, and easily see what is new at a glance.
  • Email notifications for threads you want to watch closely.
  • Being a part of the oldest wargaming community on the net.
If you are already a member then feel free to login now.


Made in gb
Regular Dakkanaut


Scotland

Hey - looking for some tips on painting rusted paint. Currently working on a vindicator and I wanted the dozer painted with hazard stripes which had been worn off and gone rusty. Very happy with my rust effect but the stripes look like they are under the rust instead of on top. Seen a few tutorials on weathering featuring hairspray techniques and other technical solutions to this problem but I was wondering if anyone has any ideas for using standard paints and simple techniques?
Any help would be great.
   
Made in us
Colonel


This Is Where the Fish Lives

The "hairspray technique" (with hairspray or commercial chipping fluid) makes the best looking chipped/rust effects because the three dimensional look they give the model. The other common technique is "salt weathering." It can be used with other techniques or on it's own and is pretty simple; all you need is some table salt and water. Here is a good article on how to do it.

That being said, you can certainly use just a few colors of paint and a brush. Here is a video of doing paint chips like that:


The final effect can look great, but as you can see, doing it on a model the size of a tank is very time consuming.

Hope this helps!

 d-usa wrote:
"When the Internet sends its people, they're not sending their best. They're not sending you. They're not sending you. They're sending posters that have lots of problems, and they're bringing those problems with us. They're bringing strawmen. They're bringing spam. They're trolls. And some, I assume, are good people."
 
   
Made in us
Drakhun


Eaton Rapids, MI

The most effective way I have found to do rust on larger models is the hairspray technique but you need an airbrush to do it. For ways to do it with a brush, mini wargaming has a few really good videos about it.

Now with 100% more blog....

CLICK THE LINK to my painting blog... You know you wanna. Do it, Just do it, like right now.
http://fltmedicpaints.blogspot.com


Made in gb
Rotting Sorcerer of Nurgle


Portsmouth UK

Try painting the whole blade rusty then pick out areas with the new crackle paint in the shape of little craters with the centre kept clear.
Then paint the blade in your finished colour scheme?
You could also add some very fine texture in the places you want the rust patches to be before you start.

Check out my gallery here
Also I've started taking photos to use as reference for weathering which can be found here. Please send me your photos so they can be found all in one place!! 
   
Made in gb
Stealthy Grot Snipa


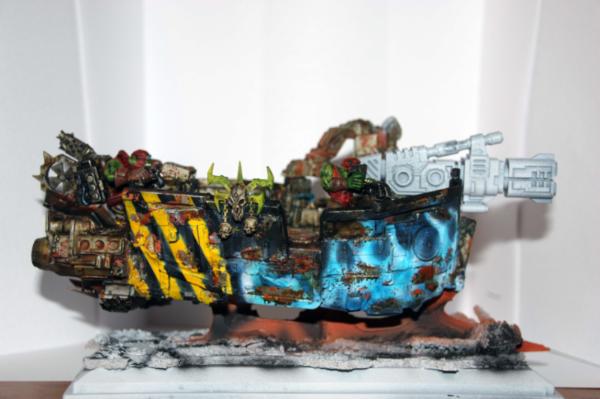
This was done with the hairspray technique, it was first model ever done with this technique and I think the hazard strips turned out great.


Obviously for this you need an airbrush, and considering you are asking for techniques with a brush I can assume you dont have one. My first tip would be get one if you can. In honesty I love airbrushing and with vehicles it really gives you so much scope to play with.

But in terms of using a brush:
Id say, you would want to paint the rust on the dozerblade first, get that looking nice and defined. Then id use masking tape and tape the whole blade with strips of it, including both the black and yellow areas (so you have a fully taped blade). id then pull off a strip at a time and paint on the yellow or black depending on what colour you want starting in the corner. while doing this make sure to leave areas where you want there to be rust, so what you could do is build up the coats with a stippling effect and then block in a little extra solid colour at the end.

Repeat that for each strip of tape (as the tape will help ensure you get clean edges. Other than that im not too sure the best way to get it to look like the rust is beneath.


Favourite Game: When your Warboss on bike wrecks 3 vehicles simply by HoW - especially when his bike is a custom monowheel.


Made in gb
Regular Dakkanaut


Scotland

Thanks a lot for that guys. I'll stick up some photos when I've got it done.
   
 
Forum Index » Painting & Modeling
Go to: