| Author |
Message |
 |
|
|
|
|
Advert
|
Forum adverts like this one are shown to any user who is not logged in. Join us by filling out a tiny 3 field form and you will get your own, free, dakka user account which gives a good range of benefits to you:
- No adverts like this in the forums anymore.
- Times and dates in your local timezone.
- Full tracking of what you have read so you can skip to your first unread post, easily see what has changed since you last logged in, and easily see what is new at a glance.
- Email notifications for threads you want to watch closely.
- Being a part of the oldest wargaming community on the net.
If you are already a member then feel free to login now. |
|
 |
2012/06/15 19:01:56
Subject: Re: Terrain Project- Building a Better Battlefield
|
|

Longtime Dakkanaut
|
@ Bruticus- Ah, good point, and I missed explaining a huge and important step entirely. I based the barrels flat black first, then drybrushed Bolt Gun on them until I had full coverage. At that point is where I started the rust.
I've read about powders many times but never considered them. I'm starting to think about them a lot more now. I remember reading somewhere that you can crush up some sort of charcoal colored pencils that does (almost) the same thing at a fraction of the cost of actual powders. Would have to find that article again, but it bears investigation.
I'm going to try your method (paint dirty, sponge clean) and see which way I like better. I can certainly see the application w/ vehicle damage.
Maybe I'm getting ahead of myself, but I feel like I'm right on the precipice of "the next level" for my modeling skill. If nothing else, I feel a *lot* better about where this project is going now. Massive improvements are on the horizon.
|
|
|
|
2012/06/15 20:52:05
Subject: Re: Terrain Project- Building a Better Battlefield
|
|
Longtime Dakkanaut
|
I'll skip on the 'home brew' powders and try the commercial ones that are made for that purpose then. Money is always an important consideration, but time is more valuable to me. I don't want to spend hours trying to figure out the right mix, or worse yet, settle for "close enough" because I got sick of trying. 
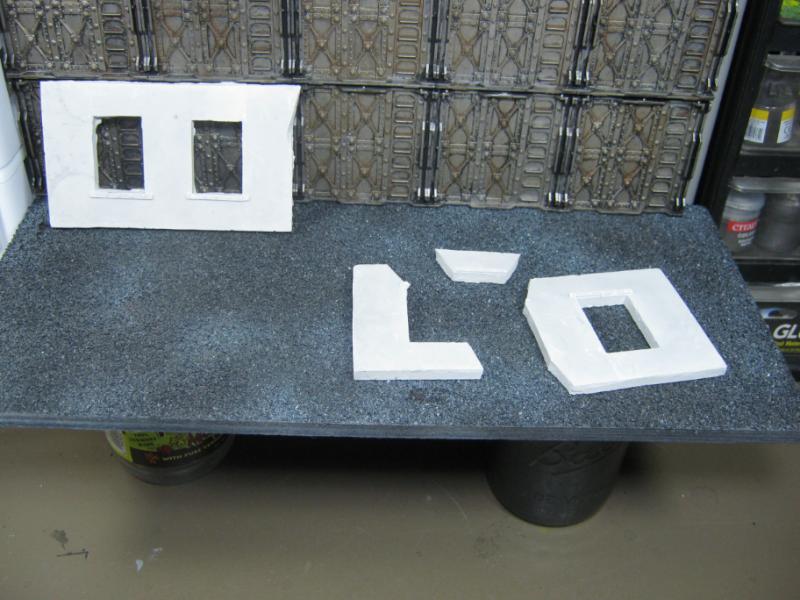
I fully intend on doing some solid riser platform. The modeling possibilities are endless, they can be incorporated w/ my Necromunda terrain easily, and would make excellent objective locations. I have an idea how to do this w/o 'sacrificing' any buklheads or panels. I've already tried a test and it worked out reasonably well. I'll go into more detail once I actually make something w/ it.
Thanks for following along. Your assistance has been invaluable and has really kick-started my motivation. 
|
|
|
|
2012/06/18 16:14:05
Subject: Re: Terrain Project- Building a Better Battlefield
|
|
Longtime Dakkanaut
|
@ Bruticus- Riser platforms are the order of the day very soon. I figured something out this weekend that had eluded me for some time, and the prototype looks decent. I have a few things to finish before getting to this project but I expect to make a few of these at least.
@ Vik- I'll be using this more and more to get better at it. And I've already thought about raiding my wife's makeup bag. And I also had an idea for rust powder this weekend that is 100% free and plentiful. No doubt someone else has already done this somewhere, but I'm not going to look it up, I'm going to simply have a go at it myself and see how it works. I will post the results good or bad once I have somehting to share.
@ GiraffeX- Point well taken. I tried it this weekend and I think the results came out well. Will post pics tonight or tomorrow, was not able to get any pics or update this weekend.
@ Galorn- Can't check the mail until tomorrow afternoon.  I'll post pics as soon as they arrive.
@ Briancj- Can't just yet, but it is an idea I won't discount.
 
Got some work done this weekend but wasn't able to post pics. I'll upload tonight if possible. Basically what I worked on was items I could practice the "rust" effect on, including some older pieces that were considered "finished". I thought about keeping them "as is" to show the evolution of my terrain building, but these pieces I decided to bring up to the same level as the things I am working on and how I'll be doing things going forward.
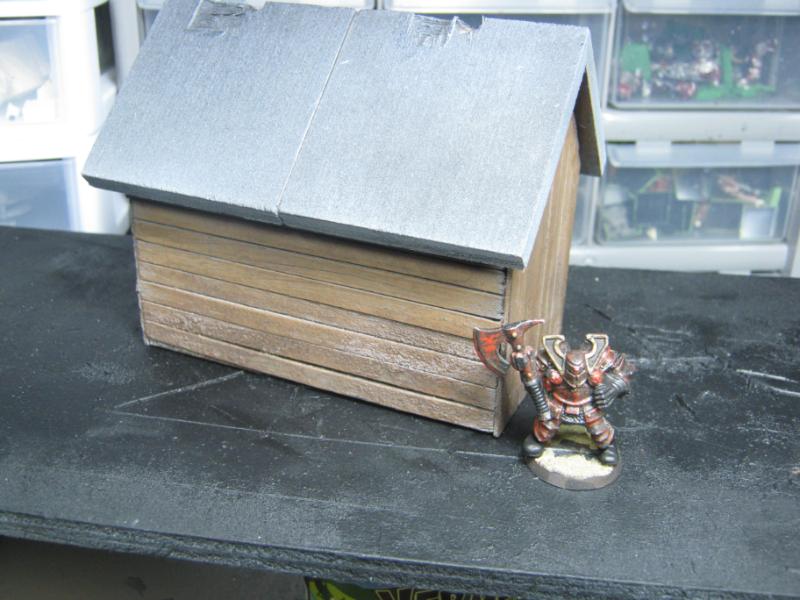
I have ideas on what to do next, but I really need to finish the crates first. There's 3 or 4 of them left. So close to being done. It will be a huge "win" for me once they are finished and I don't want to keep passing them over or they will wind up in a bitz box again and never get used.
Played a game this weekend, 2K each side, Orks vs. Death Guard. It was a bloody scrap and I made a number of stupid mistakes, but overall I am satisfied w/ the results as we fought to a draw and for the very first time ever I was able to take down his Nob squad (including a Painboy and Warboss). If the game had lasted to turn 6 I would have lost, but it didn't and I'll take the draw. Not sure I was ready to be "social" again because I displayed some moments of poor sportsmanship (mostly complaining about how much I dislike wound allocation shenanigans) and how tired I am of 33 flavors of vanilla I have to choose from w/ CSM. Overall it was a good time and I'm looking forward to another game, though in all honestly if that doesn't happen before 6th Ed I won't be upset. May be hijacking my own threrad, and I try to keep this to myself because I know I'm in the vocal minority, but I have strongly disliked 5th Ed since the first time I played it. I announced more than once to my game group that "this is the last 5th Ed I am playing" but I kept getting dragged back in becasue I like the guys and 5th is what was getting played. I'm likely putting too much expectation into 6th, but from what I've read online it's a huge change and it is upsetting the Tourney players. That's the best thing I've read yet. Muuahhaha!
Forgot to mention that I tried somehting completely new to me and I'm looking forward to seeing what I can do with it overall. I bought some flat rust primer spray (the kind you see sprayed over huge bondo patches on cars) and tried it out on a block of wood, it looked amazing. I tried it on one of my CoD ruins that isn't finished yet and I think it came out of, needs detail works and practice w/ the spray can. Overall I think it's going to work out in the right application and is another step toward making better terrain faster.
Will have pics up tonight of all the above. Thanks for reading!
|
|
|
|
2012/06/19 02:49:47
Subject: Re: Terrain Project- Building a Better Battlefield
|
|
Longtime Dakkanaut
|
Nope, will let you know ASAP via PM and a post here.
Update w/ pics tonight. Nothing completed tonight, genuine WIPs.
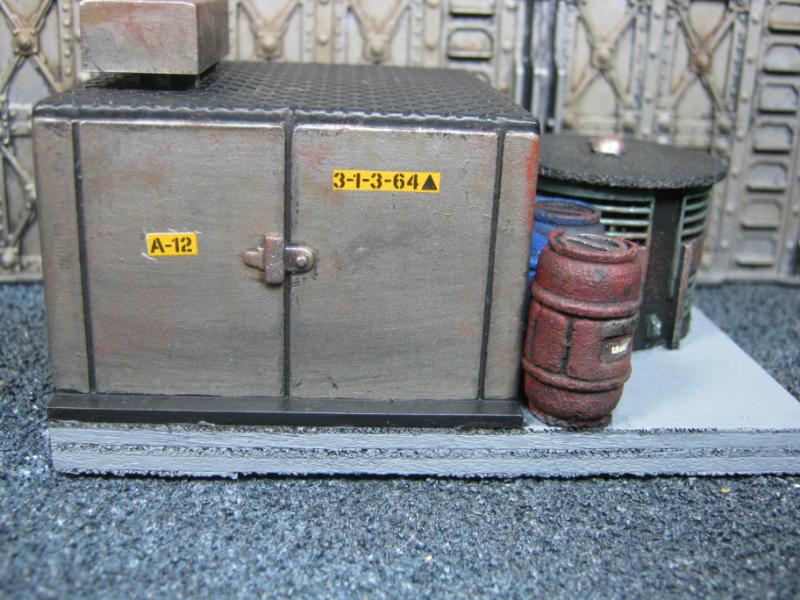
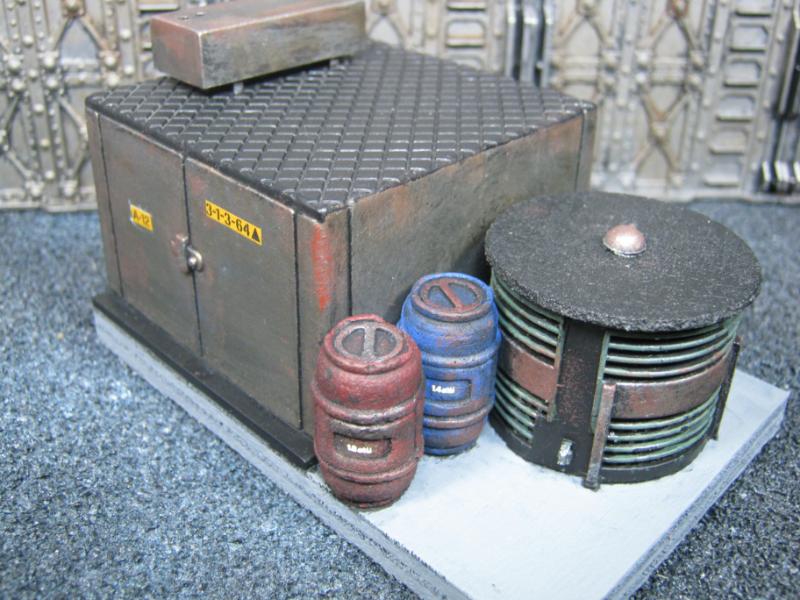
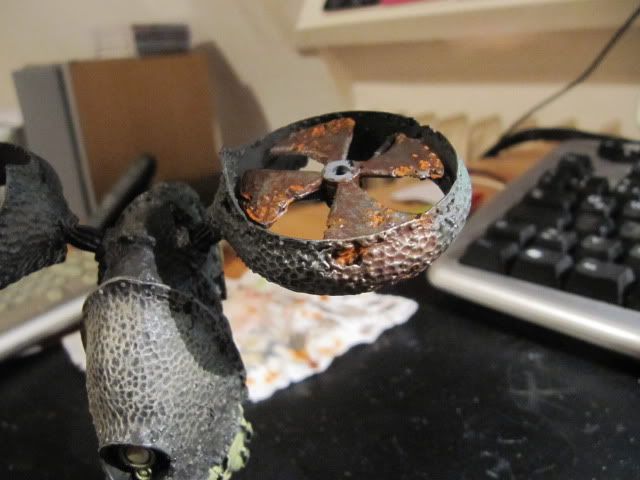
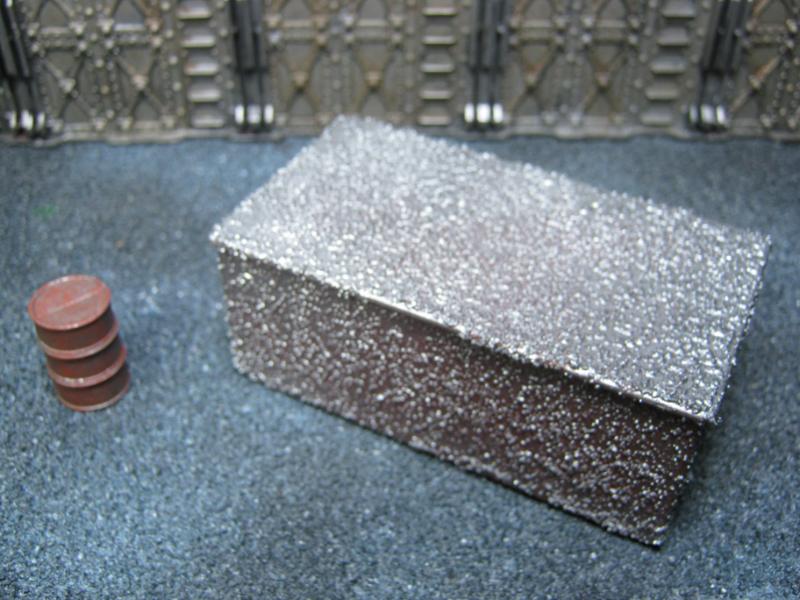
This is a couple bitz I had for my Necromunda terrain way back. I've made what I hope looks like a node or panel box or something like that. The smaller round thing I was envisioning as a generator or an AC unit. The barrels are there because I can't make myself throw them away but man I am really starting to hate those things. I think before this piece is done it will have different barrels. But yeah, I'm pretty psyched on it so far:
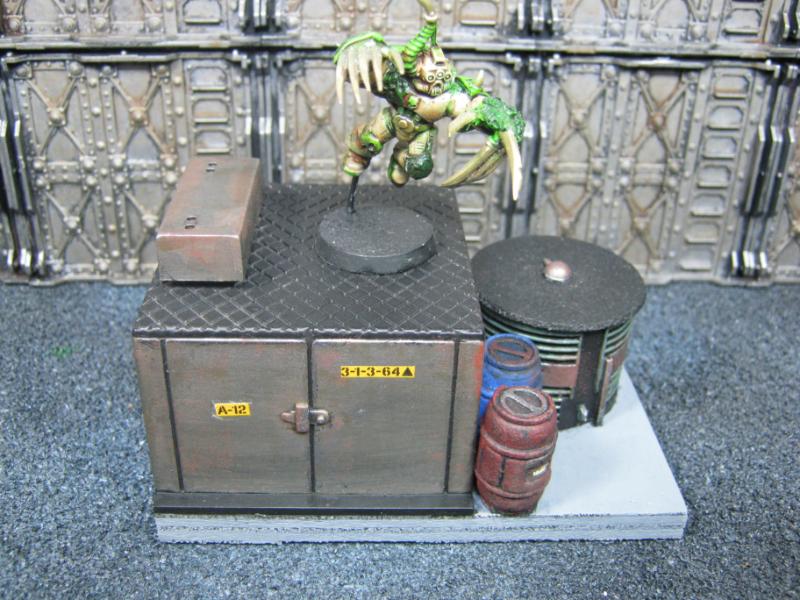
Next pic is of my attempt to use darker / lighter shades of brown for a layered rust look. I also tried it on a barrel I'll be showing further down. C&C on how it turned out?
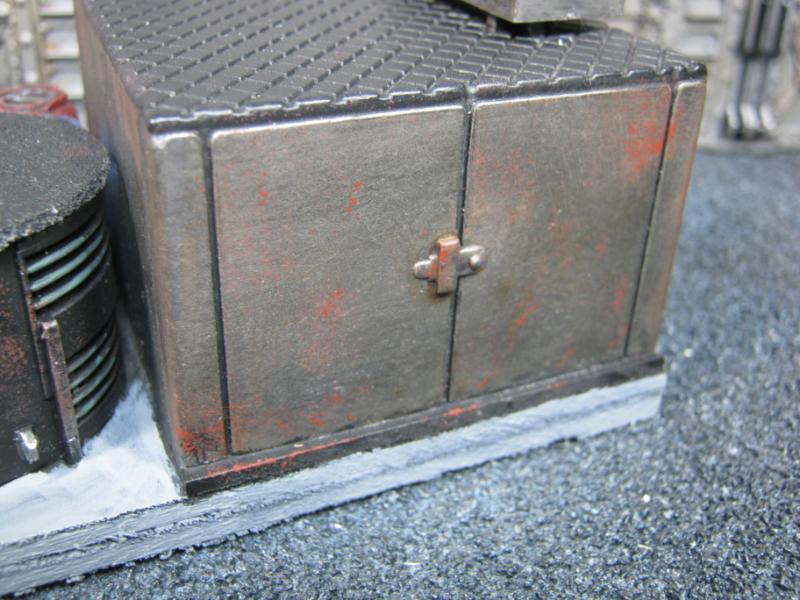
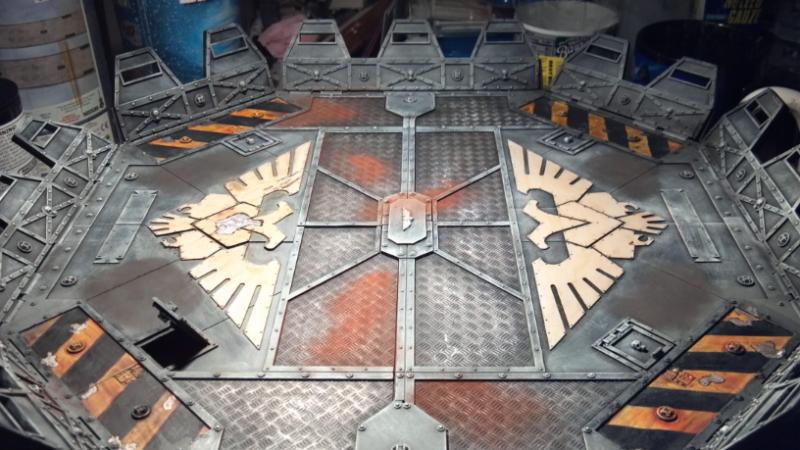
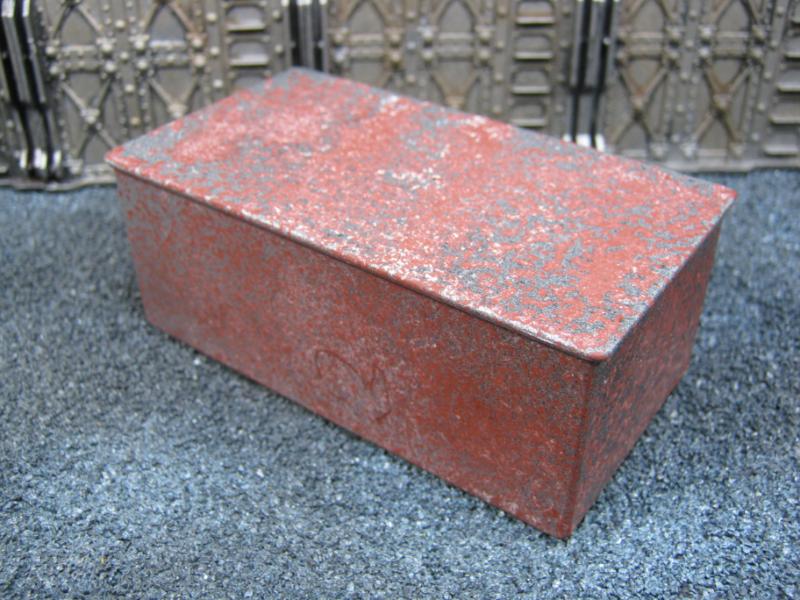
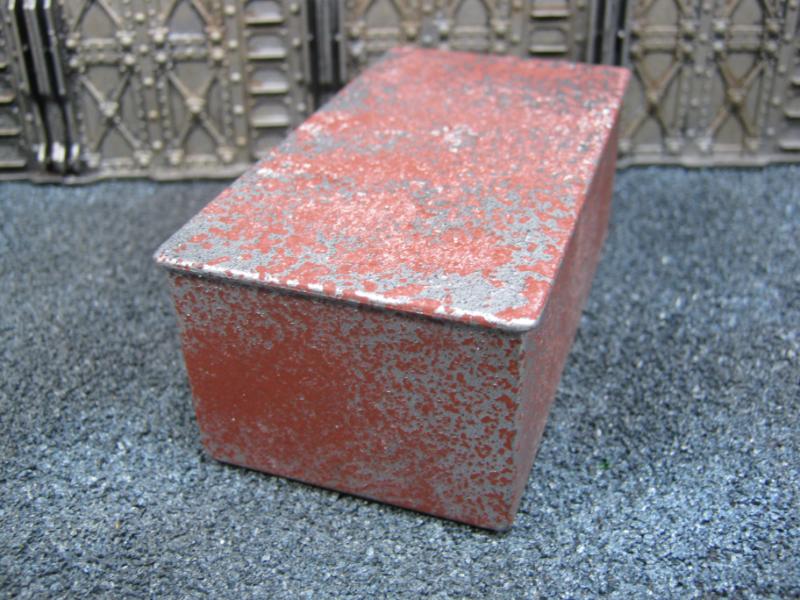
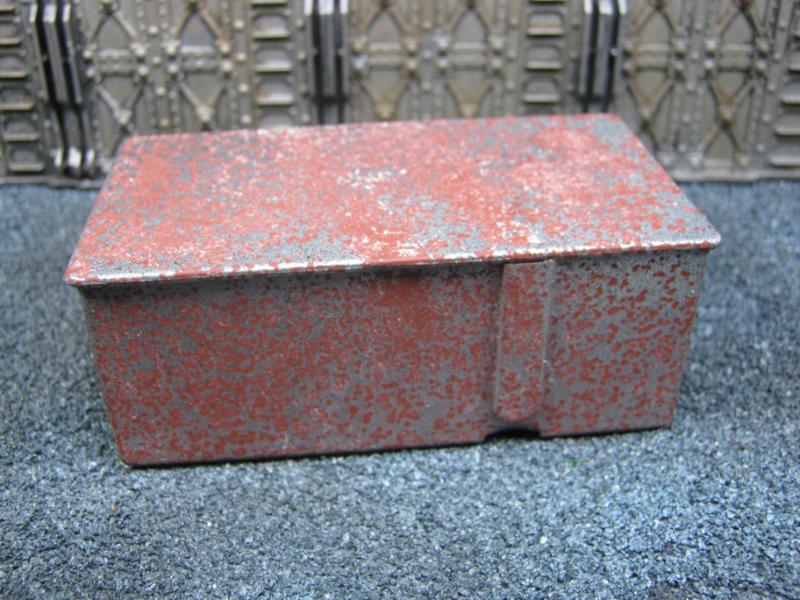
This isn't 100% done but it's something I've been working on between crates and barrels and I'm close enough to being done that I'm looking for some C&C to give it the finish I'm going for. I know I need to do some cleanup on the concrete foundation (trying to make it look concrete) and then shade a bit (thinking about a couple washes and then a light white drybrush over it) and I know I have some detail on the hatches to finish, a little correction here and there (huge photos are way less forgiving than the naked eye) and I'll be ready to put the finishing touches on it that will complete it.
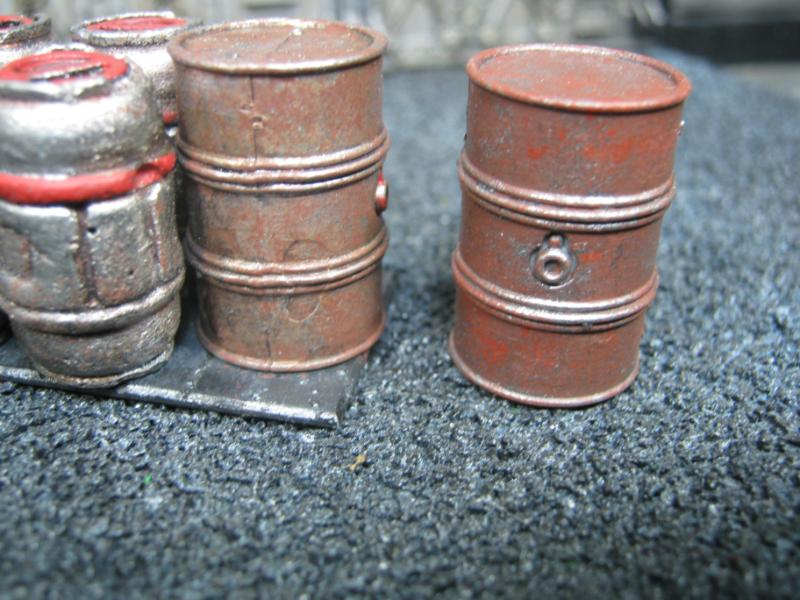
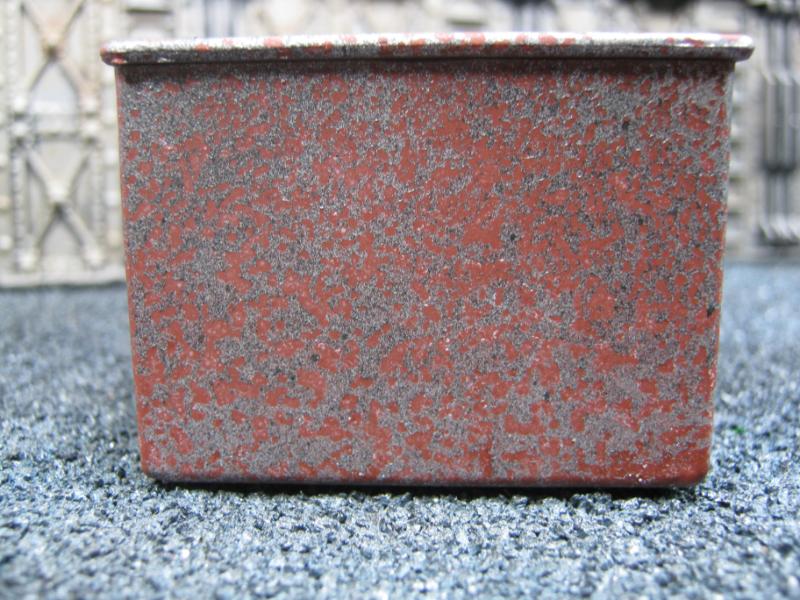
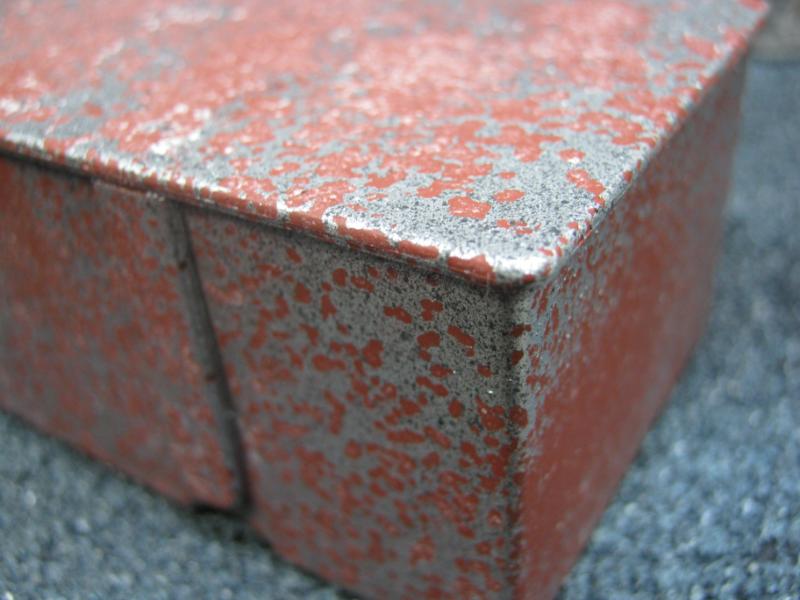
Here's the different barrels I've been working on. Barrel on the left is another example of my attempts at the darker / lighter brown recommendation that GiraffeX shared. I like the distinct contrast of the two colors, and it has not been washed w/ anything. That's Bolt Gun Metal, Pactra Dark Brown, and Reaper Chestnut Brown. The barrel on the right is the 2nd original "test" I did, now with a slight upgrade (I hope). I like the dead dark rust, very dirty. Has been washed a couple times.
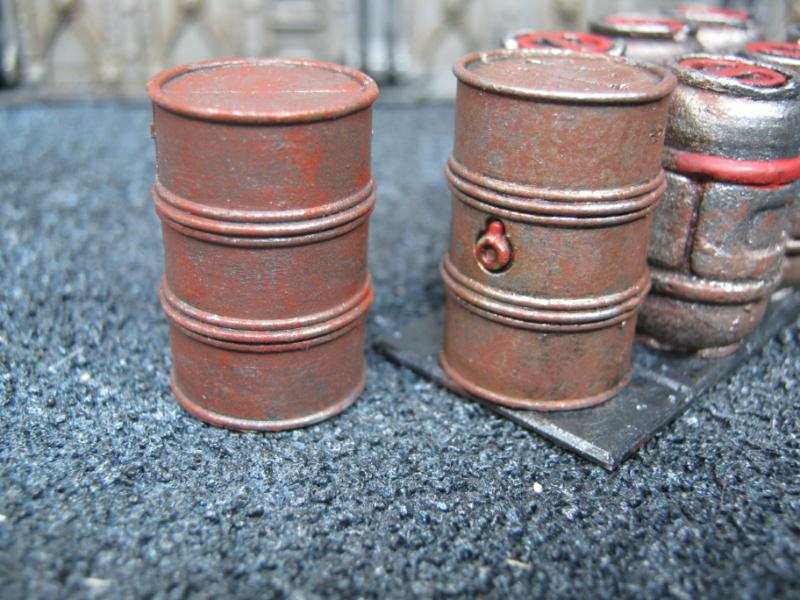
Note that the barrels change places in this photo (R to L)
I know I will do better than this and I'm not going to lose sight of that. But right now I'm not bumming on anything- I'm pretty psyched with where I am at. As far short I am of my expectations, I am far beyond the standard previously accepted. I'm heading in the right direction. Just need practice and all the ideas I can get from you all. 
That's for this one. I have another rust project going right now, is my first test w/ salt. I'm absolutely certain that I have gone horribly wrong with this, but I promise to share the pics anyway. If nothing less it will be a lesson learned. But... I could be completely wrong and it could look amazing. Hard tellin' not knowin'. Will know soon. It's drying right now. I'm logging off for now but I'll be able to post how it went tomorrow. Won't have picks until tomorrow night.
Thanks for reading!
|
|
|
|
2012/06/19 15:33:22
Subject: Re: Terrain Project- Building a Better Battlefield
|
|
Longtime Dakkanaut
|
The salt test came out ok I think. Not what I expected, good or bad. I can see the idea behind the technique and I can see that w/ some practice it is going to be a valuable skill to use on specific projects. I'll post pics tonight w/ a "step by step" of what I did. The results are varied on each side, was mostly intentional but I know some of it was just happenstance. In all things, Chaos still reigns. 
|
|
|
|
2012/06/19 20:07:42
Subject: Re: Terrain Project- Building a Better Battlefield
|
|
Longtime Dakkanaut
|
@ Bruticus- It is an odd process for sure. I'm going to practice it on different objects (empty soup / vegetable cans come to mind) and I feel I'll get better at this over time. Eventually I'll have a table covered with badly corroded soup cans. Ha.
I've been struggling with exactly what to do when it comes to the primary color of any particular object. I agree that Bolt Gun Metal on everything is dull, trying to break old habits. I'm not sure what to do for colors, though. Yellow and red attract my attention, likely because I can think of quite a few real life examples of abandoned machinery / factories I've seen w/ similar coloring.
The "theme" behind the terrain I'm building is (in 40K) to represent an abandoned Imperial outpost / stronghold, and (in Necromunda / underhive) to represent an area that was heavily industrialized a very long time ago, abandoned for decades or even centuries. The Imperial theme has Shadown Gray as my chosen primary coloring choice but I'm afraid to use it too much. I don't know how to shade or weather it properly, and I feel all of my pieces lack the depth I am looking for.
Here are some examples of work I've seen that have inspired me, and what I would like to be closer to for any "end result" for my terrain projects:
(Photo and model by madmartykmf)
(Photo and model by dsteingass)
(Photo and model by CT GAMER)

(Photo and model by Anung Un Rama)
(Photos and model by Ash1)
 
Photo and models by Bruticus)
Those are some lofty goals. One thing I've noticed in most of the above examples is that the modelers are incredibly talented w/ painting miniatures as well as getting great results w/ terrain. It does occur to me that I may be aiming higher than my skills can achieve. Not an excuse, just a point to consider.
That said, I'm still going to give this my best effort. I know the old techniques I've been using are adequate for a game table, I'm not a horrible modeler by any means. But to improve I need to set aside the methods I'm comfortable with and open up to learning new things. In order to learn new things, I need to know where to turn to actually learn.
You haven't missed much by skipping 5th Ed. Opinions vary, but that's mine and I'm adamant about it. And I agree with you about stuffing so much onto a small board. I'd like to play Epic again some time. *sigh*
@ Briancj- I used to have a 12X6 when i lived in VA. People didn't like it when they had to reach across the board so much, but man it was wicked fun to put out 5K worth of troops and tanks. I had a Cult of Speed that ripped that table up.
|
|
|
|
2012/06/20 14:49:16
Subject: Re: Terrain Project- Building a Better Battlefield
|
|
Longtime Dakkanaut
|
@ Briancj- We keep talking about getting together for a game. I really think before summer is out we should work out details. I'm excited about the idea of an outside APOC game, we have a HUGE pavilion tent so we could play rain or shine. Have to get the guys on the same page and make that happen.
@ GiraffeX- . Here, let me do that again- That is a great idea and ESPECIALLY since I shared a bunch of sites w/ dstein for the exact same reason you'd think I would have thought to use them for myself as well. This was the most distinct "duh" moment I've havd in a while. Thanks for the boot. I'll get on that.
@ Bruticus- Ash1 shares the top spot of my "best modelers I've ever seen" list including movie set / historic dioramas modelers. Don't sell yourself short, not at all. The entirety of your work is excellent, and you have been a huge inspiration / help for me. The work I posted from other people were all for something a bit different. Everything I posted is a target goal, a standard I have set to work towards. Even if I never reach those goals, the positive improvement I'll achieve will be significant. I'll give those color schemes / techniques a try.
@dstein- Actually it's the back of a toy truck I picked up at a yard sale. And I just had a thought. If you would like one (or 10, or however many) and it would be a realistic option, I'd be 100% ok w/ and completely willing to take it apart and mail it to someone to be molded / cast. You have more contacts (and influence) than I do, so if you can talk someone into doing this I'll mail it to you w/ that box of other stuff I'm supposed to be mailing you (like 6 months ago or something) and then everyone gets one. Or 10. Whatever. That barrels are decent for what they are but I sincerely do not like them next to this box. In fact last night I removed and replaced them w/ the barrel I used for my rust test. I'm going to try using Shadow Gray as my cohesive color for my terrain. Changes are coming.
Galorn- See my offer to dstein above. If you're interested I'll post it this weekend. I have a few things to send out anyway.
Here are the photos for the salt test I did. I started out with the battery enclosure I took from an aircraft carrier playset. Barrel is for scale:
I based it with flat rust then let dry. I really like this color and the flat finish / texture is really cool.
Next I soaked the model w/ cheap hairspray and randomly salted it to taste. I missed a few photos for some reason, so skipping ahead here it is w/ a top coat of aluminum spray w/ a light and random spray of black and rust under it.
Once everything was mostly dry I knocked off the loose stuff bny tapping on the table, then I brushed off what would come next w/ a dry 2" paint brush. The model was pretty gross at this point so I rinsed it off in the sink under cold water and would up taking abit more off the top than I had wanted but I'm going w/ the experience as "lesson learned". Here are pics of the final result from the salt test. No other work has gone onto this (no washes, highlights, etc).
I think with some practice I'll get better at this, and with some touch-ups I can make this test piece look pretty decent. I think I did the colors in the wrong order, but not sure? C&C again very welcomed.
I would have had those pics up last night like I promised, but I had unexpected company (Feldenglas) came to visit for a while and the three of us (me, Feldenglas, and ktbb22) started talking about playing Necromunda. After a while Feldenglas said he doesn't like Necromunda as much as Mordheim so we discussed that an suddenly my gears were jammed into reverse and I did a complete 180 on everything I've been working on, thinking about, planning out, etc.
So, it looks like at very least we'll be playing some "one off" games of Mordheim!!! If I can keep this going "campaign style" I'll be wicked happy.
That said, you can likely guess where my Terrain project is going, starting right now.
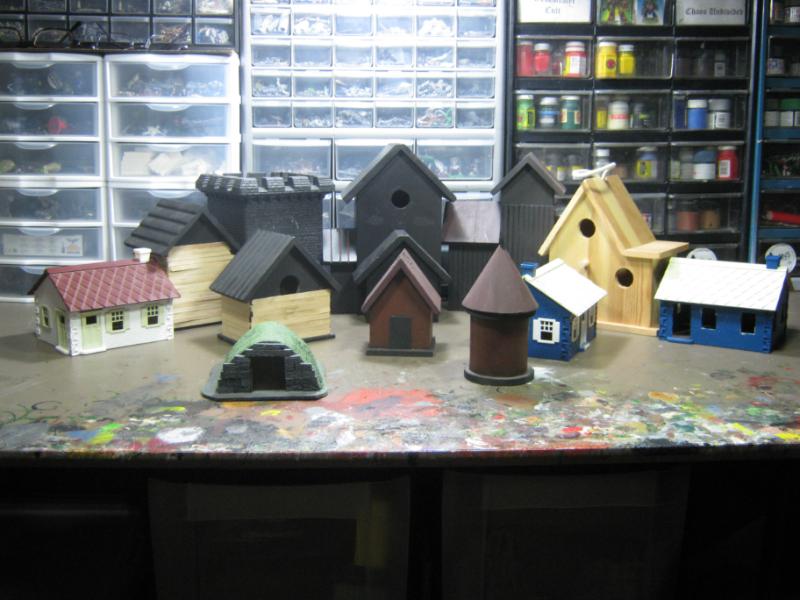
Group shot:
Closeups:

I was ready to throw these away because they had no application in anything I was doing in the foreseeable future, and a few days later they have become the primary focus of all of my terrain building. I have almost no terrain for Mordheim anymore, and really the majority of it that I had was the cardstock that came w/ the original set. I didn't get to the point of a lot of scratch builds.
So yeah! This is exciting. I am going to really enjoy this project. It will be an amazing change of pace regarding building materials and colors used, but I already see numerous instances where I'll be using the new techniques I'm learning. I'm really looking forward to making the walkways, staging, random barricades, etc. Also looking forward to using some scenery flock and static grass to break up the look of things. I might even use my water effects kit.
So many possibilities, and such a solid platform to start from. I am all of a sudden REALLY happy to have kept all the Fantasy projects (so everyone that said "keep them", you were right) but the best part (for me) is that I'm still keeping my word regarding how I am going to work on my projects. The Fantasy buildings are on my "on deck" shelf and the Necromunda projects are in the same drawer the Fantasy stuff came out of. This project will cost me nearly nothing. I have everything I need already.
I will eventually get around to painting up some new Mordheim figures, but for now I'm going to crank away at this and create some really awesome stuff. So stay tuned, a huge shift and a bunch of things you've never seen from me are on the way.
Thanks for reading!
|
|
|
|
2012/06/20 20:00:26
Subject: Re: Terrain Project- Building a Better Battlefield
|
|
Longtime Dakkanaut
|
@ Bruticus- I agree that the paint was applied in the wrong order. I'm going to go w/ this piece because it is still decent and already above the standard I've been accepting up to this point. Next one I do will be silver / light black for shade, heavy salt, rust. I'm going to try this for weathering on wood as well.
Ash does a lot with his layers. What I thought was layered and chipped / worn paint was actually painted on by hand. I attempted it a couple times but it was nowhere close to what I thought it would look like so I passed on it. I may try it again. His recommendation (direct copy / paste) was:
Ash1 wrote:Black primer; Tamiya TS-61 Nato Green or TS-2 Dark green; dry brush with what looks like a pale grey; paintchips - outlined some sort of yellowish colour poss Vallejo Japan Uniform; The dark area of the paint chips either a mix of black and dark brown or Vallejo German cam.black/brown. The muddy bits of the bridge were sprinkled with sand whilst the primer was wet; once all the other stuff was painted a lot of brown earth tones were painted, brush shreddingly dry brushed; followed by a liberal dose of pigments - varnish to taste.
That's quite the recipe. But it's really cool that people who have this talent / experience are willing to so openly share.
I'm going to have to work w/ and experiment w/ the salt / sponge method. Having only a few days experience w/ it I'm still in the absolute novice stage. Wrapping my mind around reverse exposure is going to take a little while.
I'll be posting my Mordheim stuff as a "step-by-step" WIP w/ plenty of opportunity to C&C. I'm already thinking about dimensions and structure. This is going to be a good project to experiment with new construction ideas and apply the new painting techniques I've been learning. And yes, I'll be looking for terrain that can be on the table almost every game and still provide enough diversity as to not make it a static / boring layout.
@ Galorn- Wife said the package arrived today, pics tonight! And just to be sure we're talking about the same bit, let's verify w/ dstein which thing he's talking about. I thought he was talking about the large silver box, but I don't know for sure.
@ dstein- Wow man, thanks for the compliment. Just to be clear, which bit were you asking about?
|
|
|
|
2012/06/20 20:27:53
Subject: Re: Terrain Project- Building a Better Battlefield
|
|
Longtime Dakkanaut
|
Ok. That is a great video for information and process, but there's absolutely no way you'd ever convince me that it isn't a man in drag. It reminded me a lot of a Monty Python skit. I kept waiting for the Spanish Inquisition to appear.
I'll watch it again though. Thank you for sharing that.
|
|
|
|
2012/06/20 22:56:02
Subject: Re: Terrain Project- Building a Better Battlefield
|
|
Longtime Dakkanaut
|
@ RSJake- Thanks for the words of encouragement! I know I've been running you all around today. Bottom line is I'n highly motivated to find new and effective methods to create the best terrain I possibly can, and this is another example of how that process is going for me. I'm making better terrain today than I did a month ago. That terrain is better than the stuff I did 6 months ago. The terrain I make in 3 months from now will be even better. Attention to detail, more "real world" effects, and practicing the techniques my role models use will get me as far as I can go. I'm feeling really good about all of this, and it's been a long time since I've genuinely felt this way.
SUPPLY DROP!!!
So the other day Galorn asked if I'd like him to send me a wall section. I said "Sure, that would be cool!" because who doesn't want a free sample of terrain goodness?
A few days went by and then a few more went by because my wife only goes to the PO once a week (or less)... but today she sent me a msg that I had a huge heavy box. Hmm. Ok.
I got home tonight and indeed there was a huge box w/ my name on it sitting on the kitchen counter. The return address didn't say Galorn, but I figured out all by myself that it was from him. I picked it up and woah... yeah, it was heavy. $13 USPS heavy. I took into my hobby room and opened it up.
This is what he sent:
Unsure if the USPS broke this or if it was a "factory 2nd" casting. Either way it is an easy fix and I'm all over it later tonight.
Looks like the Mordheim project just got bumped back a bit. I recently accused dsteingass of 'project schizophrenia'. I think I'm in good company.
More coming later. I'm off to wash some resin and prime some plaster!
|
|
|
|
2012/06/21 14:54:23
Subject: Re: Terrain Project- Building a Better Battlefield
|
|
Longtime Dakkanaut
|
@ RSJake- Yeah, a "sample". It's like going to the ice cream shop to get a taste of Crunchy Frog and having them give you a gallon. I am wicked psyched.
@ dstein- oh man. Yeah, you really should. It's really awesome stuff. The "gothic arch" piece has so much potential w/ a project I already started... I think my first few games of Mordheim are going to be on a cardstock table.
@ Galorn- Dab of Super Glue and I was back to action. See below for more info!
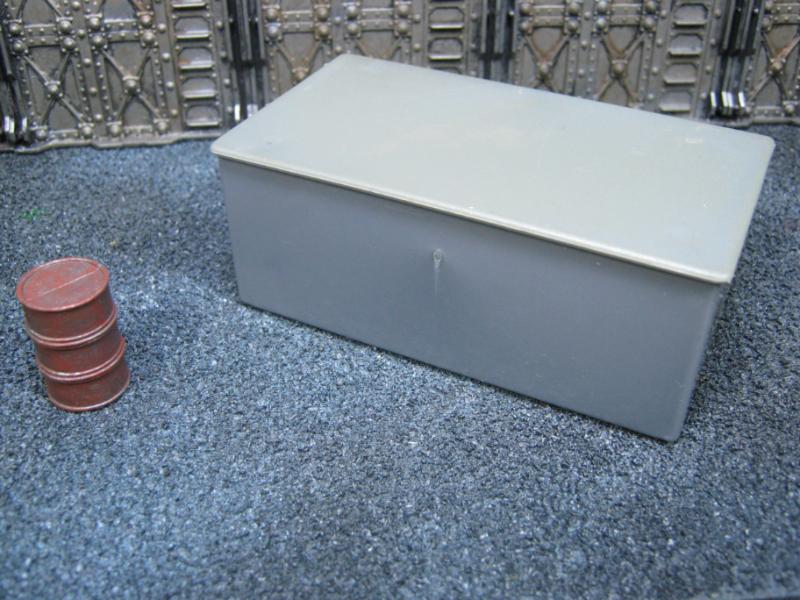
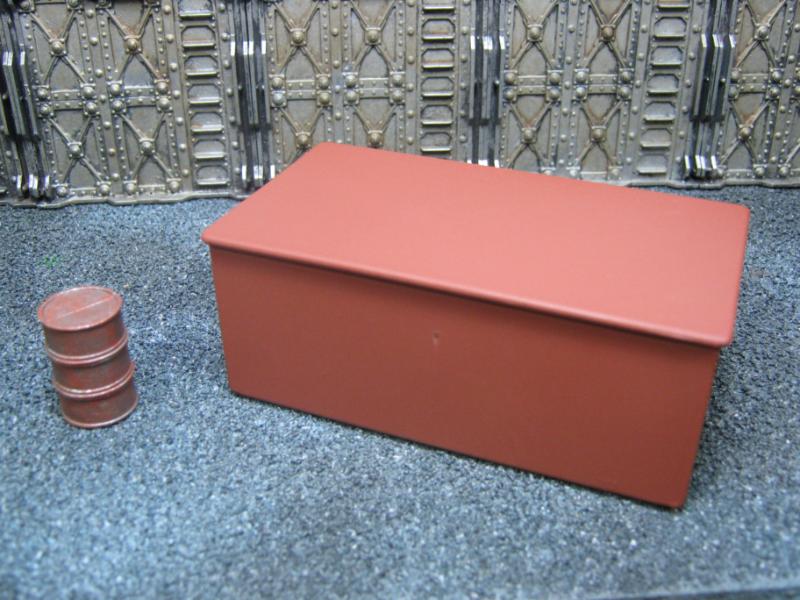
@ Scarper- No worries man. It's Dakka, not life. Glad you are liking the "mystery utility company box". I have no idea what it is or what it is other than some random thing that looks cool on the table. Ha. As far as the salt thing goes, absolutey try it. You already have mad modeling skills, this is something you'll pick up quickly and master within a few pieces.
Last night I spent some time cleaning up and base coating a few pieces. I took pics of everything and I'll upload tonight if I can. Things are getting a bit hectic here again and it's messing w/ my bike and modeling time.
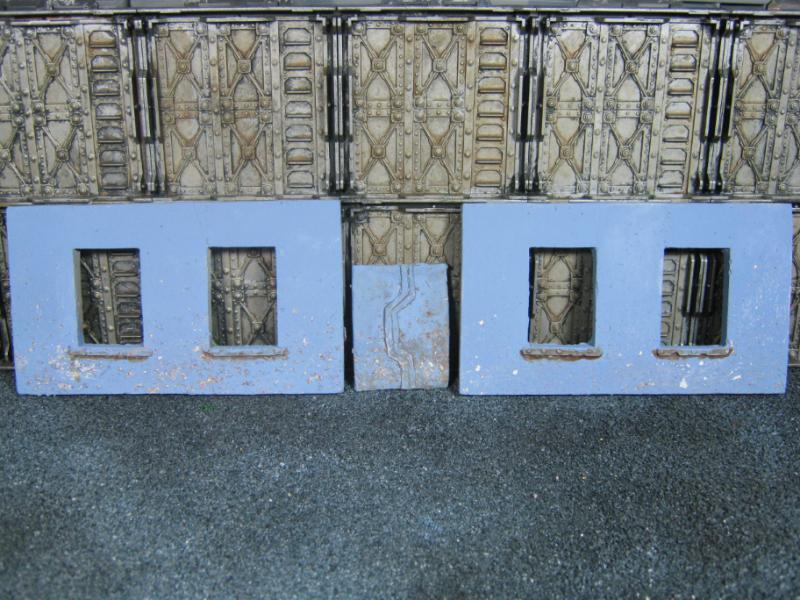
I started working w/ the large wall sections. I realized after starting them that I am missing a "back wall" so I'm likely going to cut one of the broken pieces and make it work to fill things in. I based black, sprayed silver, hairspray / salt, rust, more hairspray / salt, sprayed gray, then light spray white. Will know how it went tonight (if I get the chance).
In other news, I'm picking up the 6th Ed rulebook 07/01. I know 6th will have challenges and issues, but the fact that is isn't 5th Ed already makes it better by default. I've been reading leaks online and am loving what I've seen, such as a vehicle can move up to 6" and still shoot ALL of its weapons. That was driving me mad. Nothing like having 220 points of Land Raider playing the role of static Lascannon battery, or as an "assault vehicle" that does NOTHING to soften up the target before my Plague Marines charge into certain death. Feh.
Buh-bye 5th. Take your well-deserved seat next to Windows Vista, Ubuntu anything, and the default Android email client. 
|
|
|
|
2012/06/22 15:16:41
Subject: Re: Terrain Project- Building a Better Battlefield
|
|
Longtime Dakkanaut
|
@ inmygravenimage- I did. Not sure what that is exactly yet (meaning how it works) but looking forward to seeing it. Looking forward to all of this.
Just text this morning, which is too bad becasue I managed to get a lot of modeling done last night. I did some more work on the Galorn walls, and I also really cranked on my Mordheim buildings. I'm going to 90% finish the buildings and then start work on scaffolding / walkways / bridges. That part I am expecting will be awesome fun because it will go fast and look great. Then I'm going to bring it all together get to playing!
Tonight I'll be taking a bit of a break from building / painting so we can roll up new warband sheets. Getting pretty excited about playing this game again. I haven't played in 13 years.
Automatically Appended Next Post:
Been spending a good part of the afternoon surfing images for ideas / inspiration, and man I found plenty. Really looking forward to this.
One thing that was really cool was I found a map of the city of Mordheim. Very similar layouts but each district has at least one distinctly unique landmark. I'm going to focus on general / generic buildings at first, but if I keep going on this project I'm eventually going to try try building a couple of the more interesting ones like Cemetery of St. Doffer and Middle Bridge (that would be an awesome scrap... bridge battles are brutal and unforgiving).
Another thing I am liking is that the buildings aren't towering spires of of ridiculousness. Vast majority of residential / commercial buildings seem 2-3 stories, 4 at most (and those are rare). Government and specialty buildings are larger, but they are the extreme minority. Most of the city seems to be made up of reasonably sized building. I'm also noticing that the most significant damage is in the vicinity of the Pit and it doesn't seem to spread outward a lot. What that means for me is a lot of regular buildings w/o having to make the CoD- Old World layout to have a decent table. I'll have the random ruins, but they won't be the majority of my available pieces.
Anyway, just sharing what's on my mind. Will make a point of pics tonight.
|
|
This message was edited 2 times. Last update was at 2012/06/22 19:54:54
|
|
|
|
2012/06/23 15:34:48
Subject: Re: Terrain Project- Building a Better Battlefield
|
|
Longtime Dakkanaut
|
@ both of you- 
Here's pics of the Galorn walls from the other night, and a few WIP pics from the Mordheim project last night and this morning.
Salt and light wash on door / under windows
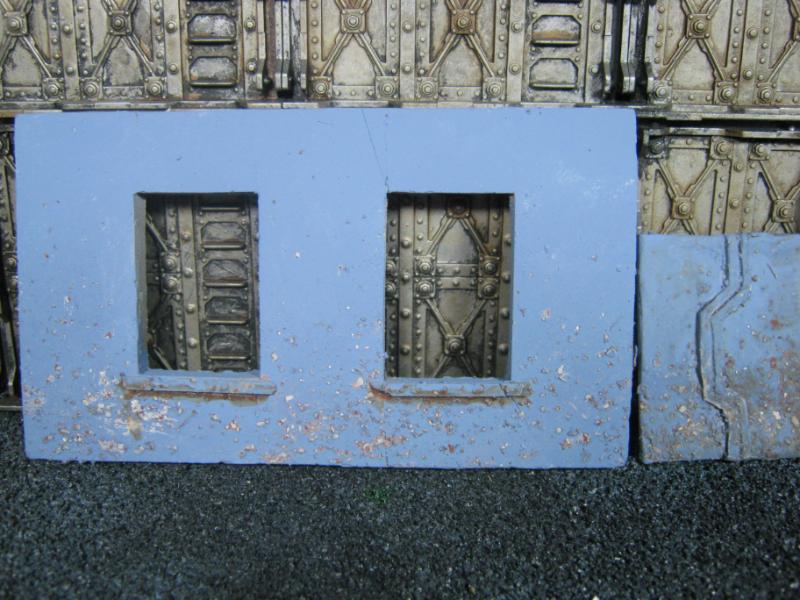
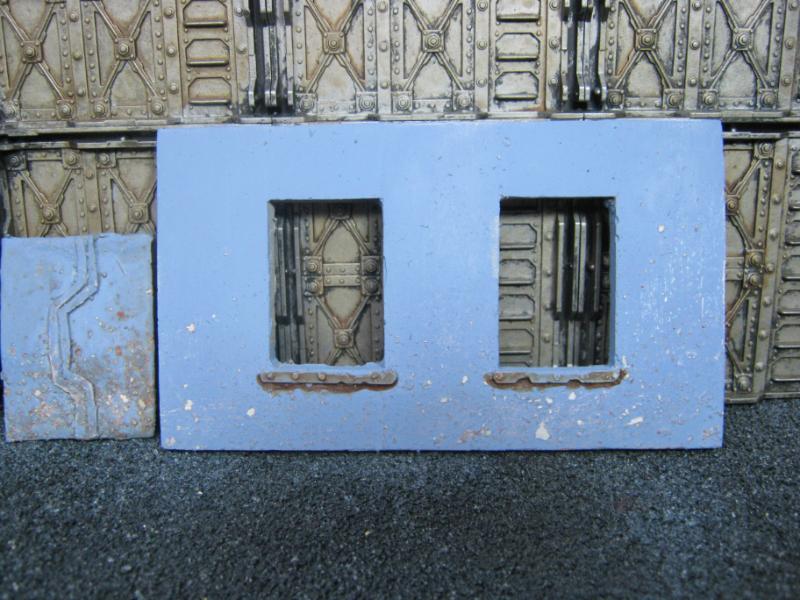
Salt method, nothing else:
I really like how the layered look is coming. The 'bubbles' of paint remind me of corrosion that happens under the paint, hasn't eaten through the paint yet but is definitely corroding underneath. I also really like the different degrees of "reveal" I have achieved. Again, much of this was happenstance, but it was part of what I was trying to do and I paid attention to what I was doing, so now I remember and I can replicate this. Still a bit of a challenge to get the color layering right, but I'm thinking I'll do this a few more times before I nail the technique and can intentionally reproduce the same results over and over.
More work on these walls (as well as most of the remaining pieces from the Galorn collection) is going on hold for now because I'm shifting my entire focus to 
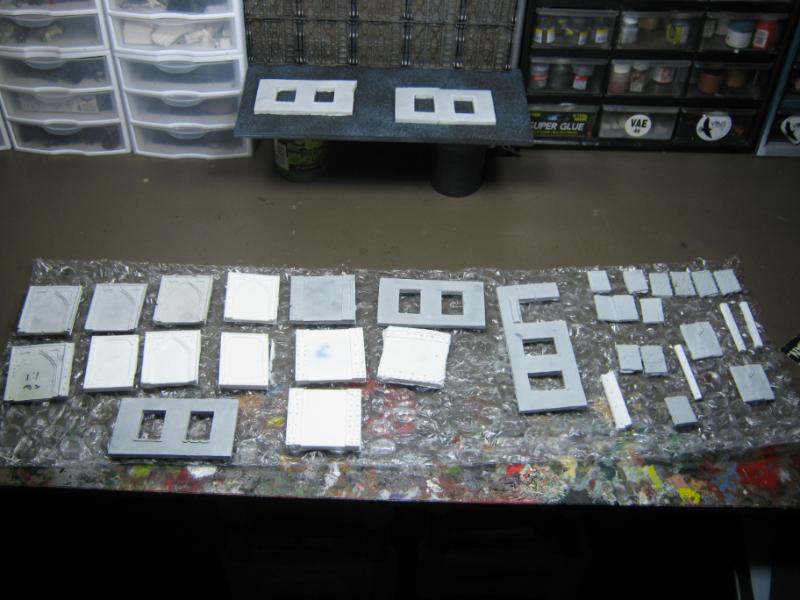
Here's some WIP shots. These are just the 'blanks' that I'll be adding detail to once the standard builds are completed. C&C is always welcomed and encouraged, especially when I'm at the start of something that I can change for the better. I'll explain the process I'm using a bit in case anyone has questions about what I'm doing here.
Note up front- all the rough edges are going to be hidden by something else. This is the rough-in, finish work is going to hide a lot of the shortcuts I'm taking right now.
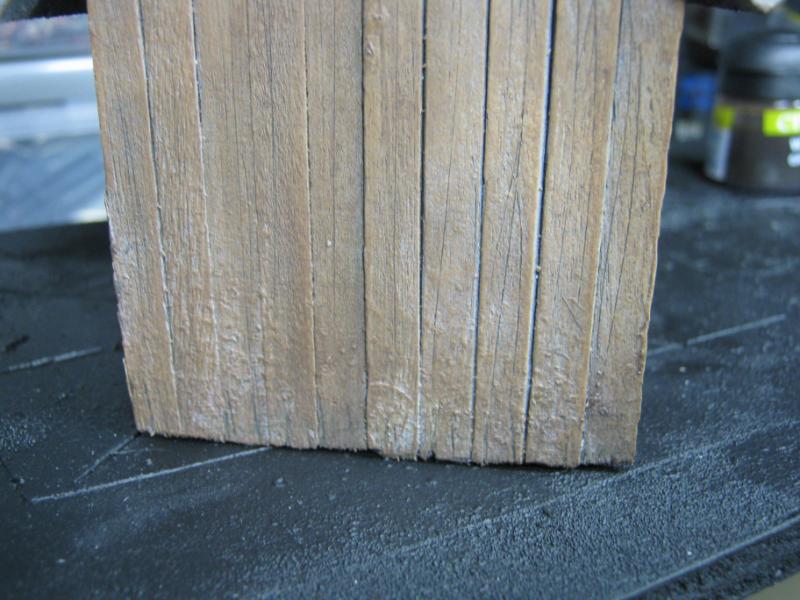
Here I'm adding planking to one of my larger buildings. I know it would have looked more "real" if I had cut the 'boards' to look like they were pieced together like a real building. The idea behind these builds is to slap them together as quickly as possible and then create the illusion of detail later. If what I have in mind doesn't work I will have many examples of what not to do next time.
Another quick and dirty time saver. Glue the sticks on way too long, let dry, score w/ an Xacto blade on inside corner edge, bend over next facing wall, glue, and clamp. Move on to next project while this dries.
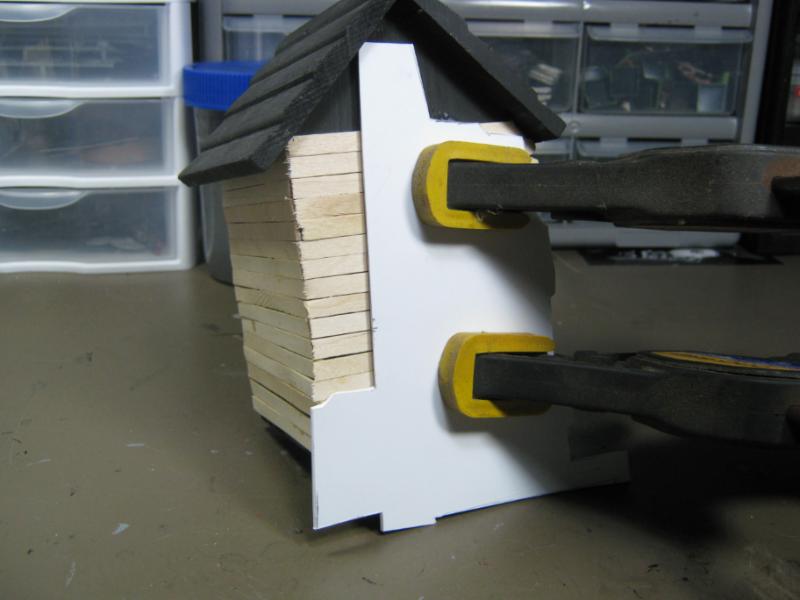
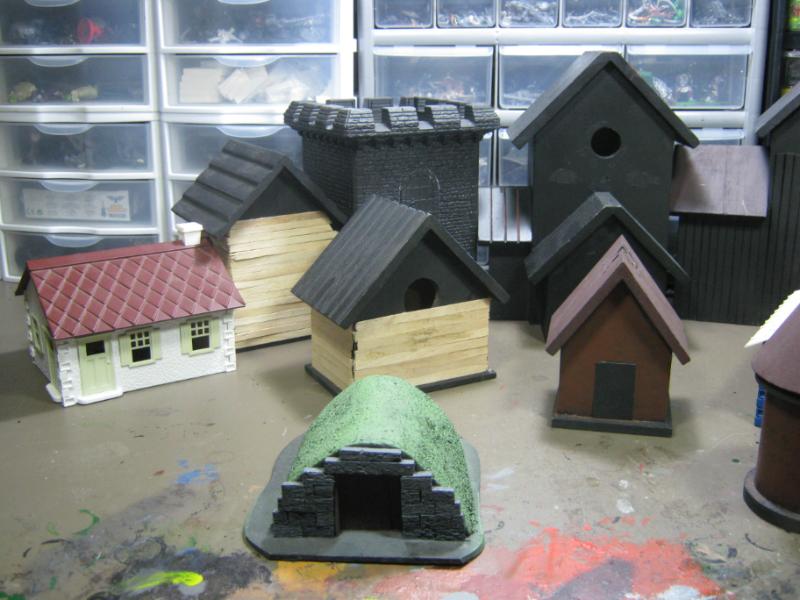
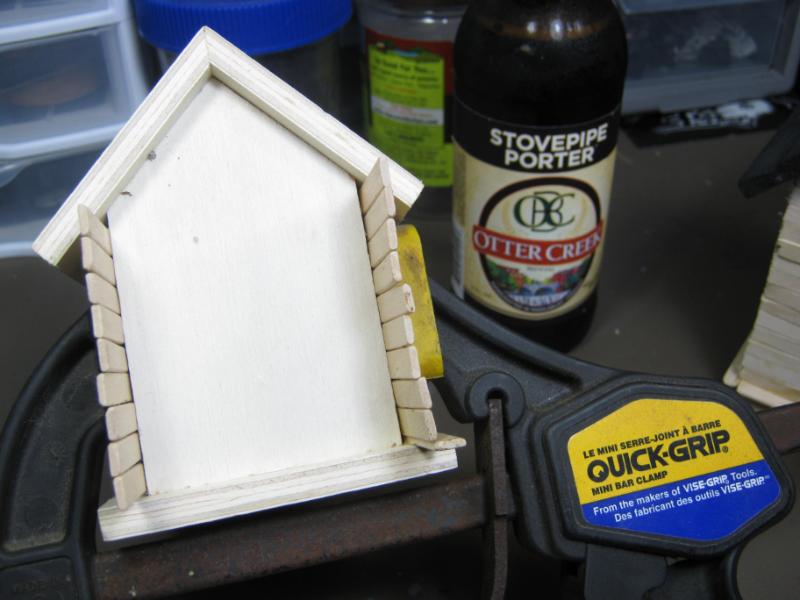
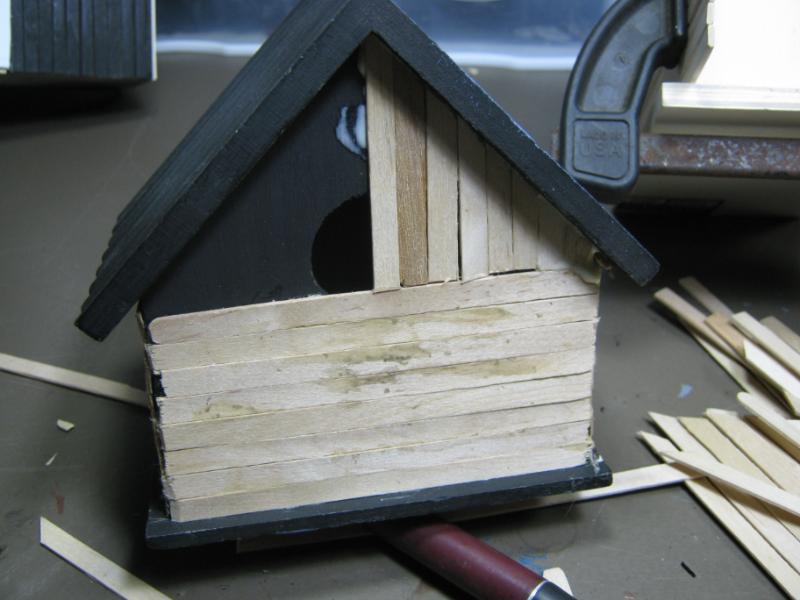
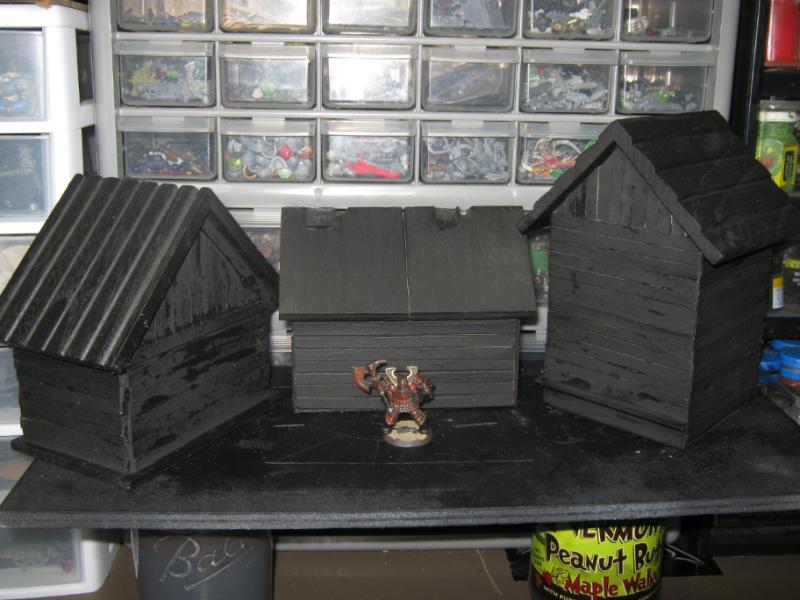
These two small houses I found in my Woods last night so they didn't make it into the original "group shot" but since I've decided to not use the O-Scale plastics they can take that spot. I'm taking the two and building them into one:
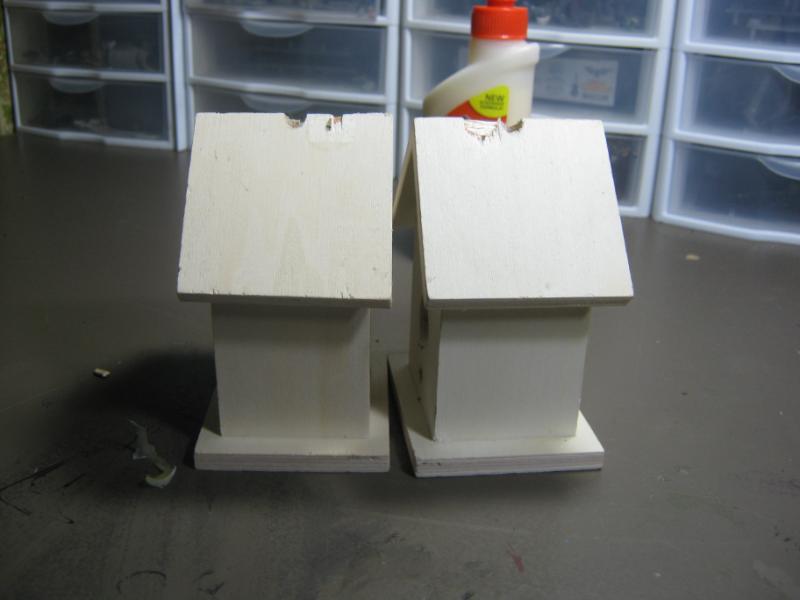
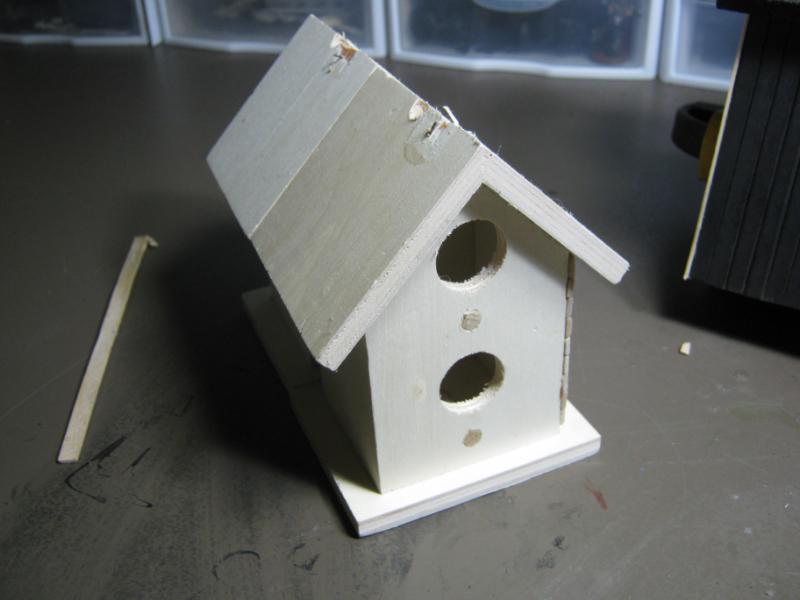
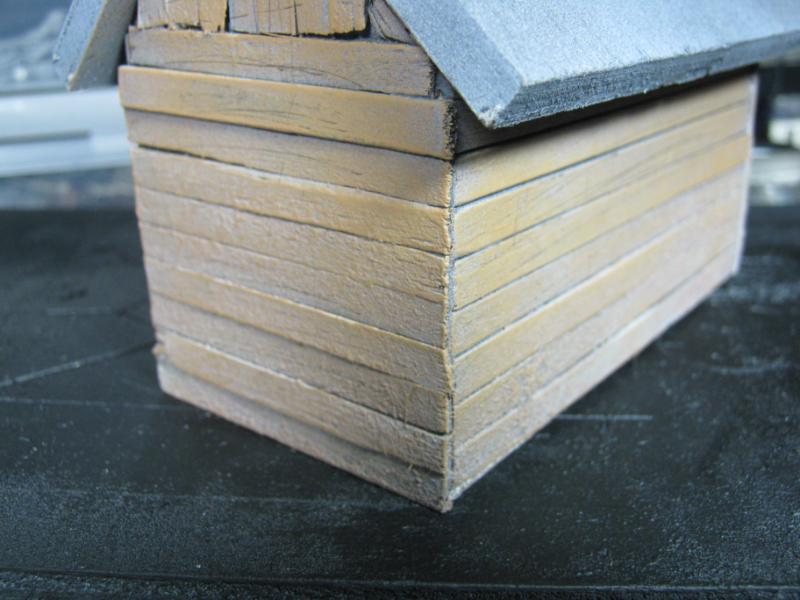
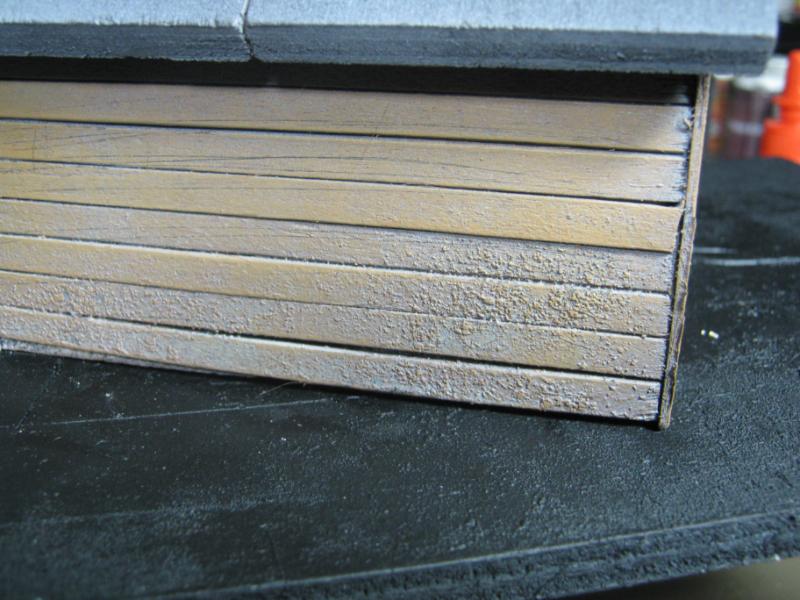
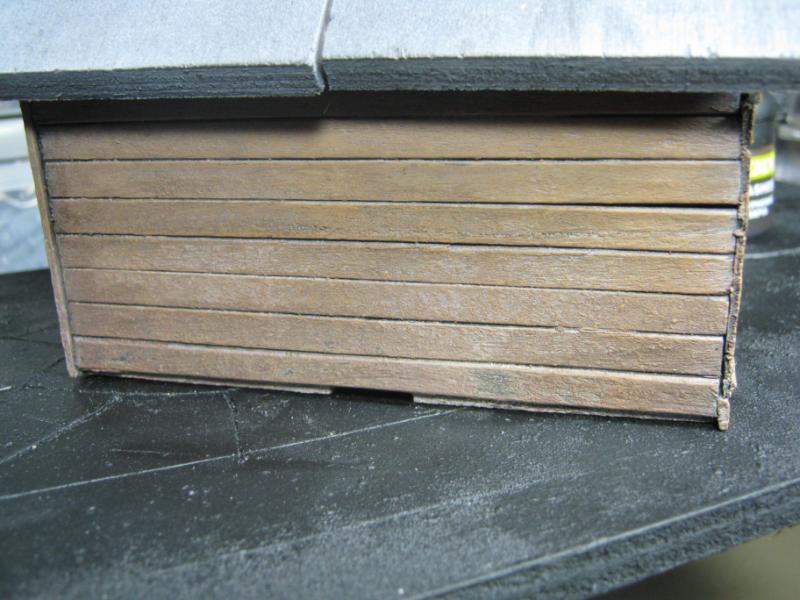
More random WIP shots of progress here and there. Note the marker points on the middle building- those indicate levels measured from the Necromunda bulkhead. This "stock" building will not stay that way long after I get the basic facade finished.
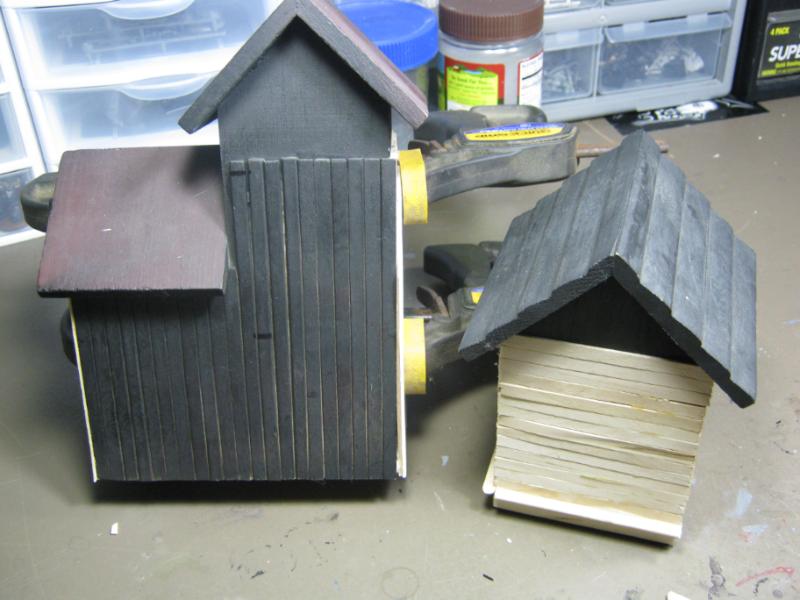
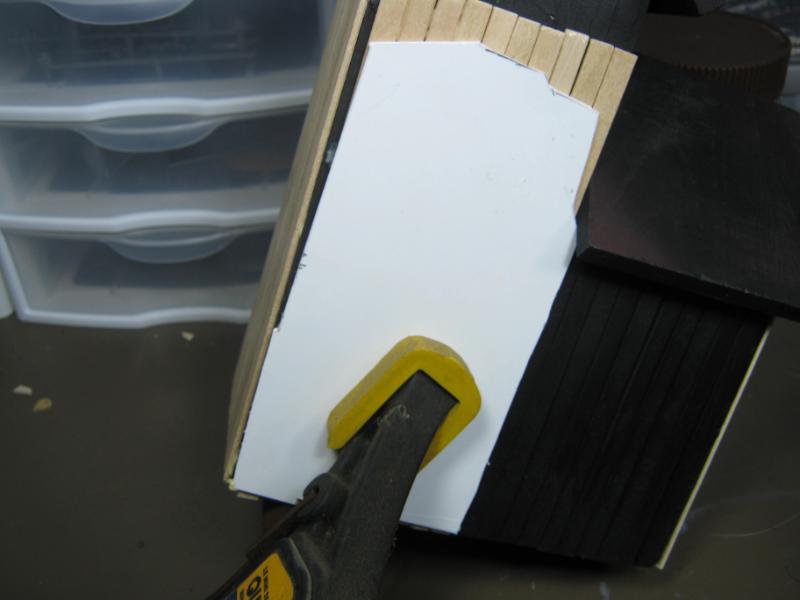
This is the first bit of detail I've done. I did the same thing on both sides. Yes, I've cleaned up the excess / smeared glue. I really like these pics because it's an example of the very minor changes I can employ in my building techniques that is going to make the scale and detail really pop out once I get to the painting stage.
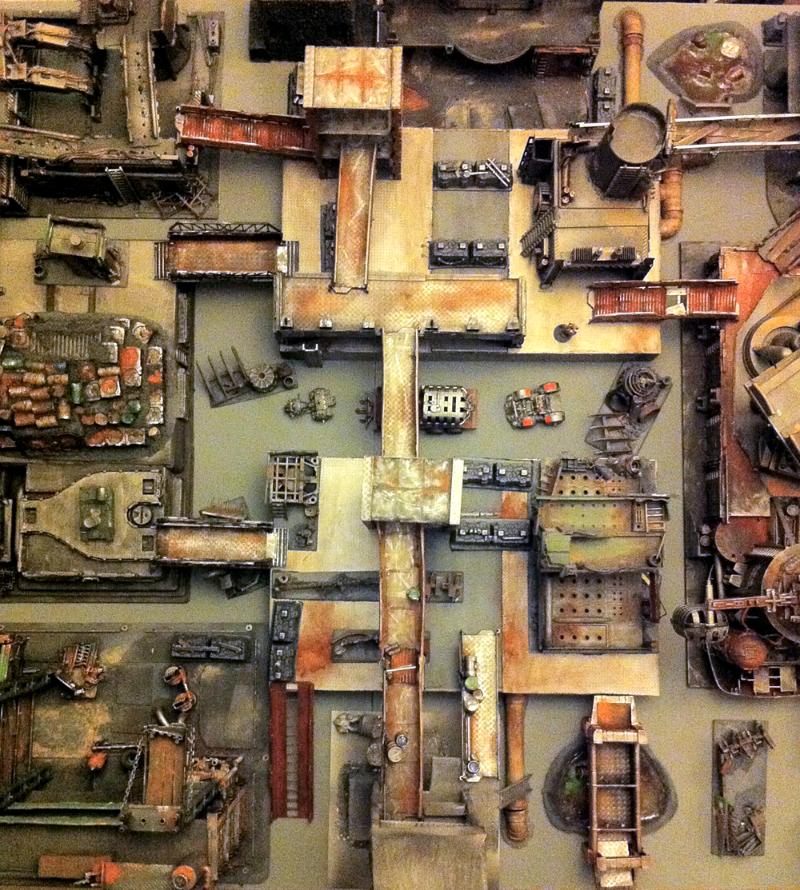
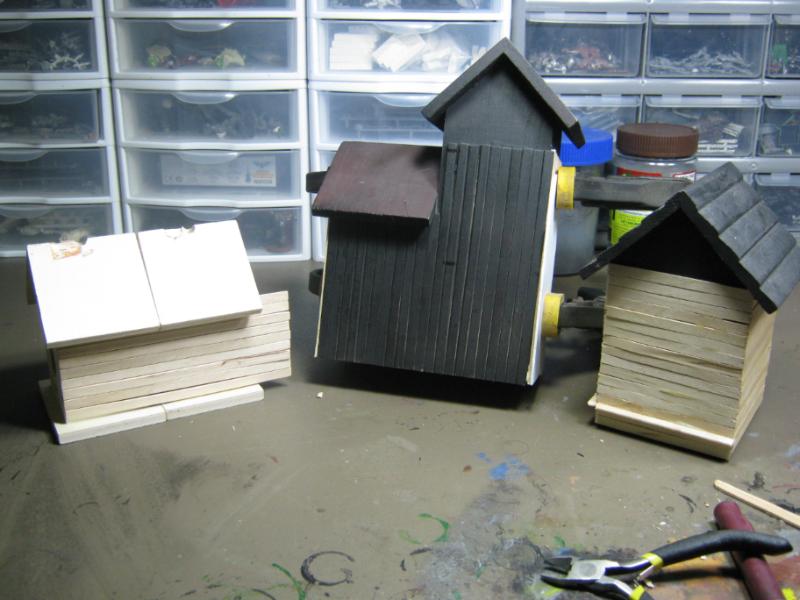
Group shot of the work I've gotten done so far (with Necromunda bulkhead and miniatures added for scale).
That may be if for the weekend, but I'll be back if I can. Thanks for looking, C&C always welcomed and appreciated.
|
|
|
|
2012/06/24 20:47:51
Subject: Re: Terrain Project- Building a Better Battlefield
|
|
Longtime Dakkanaut
|
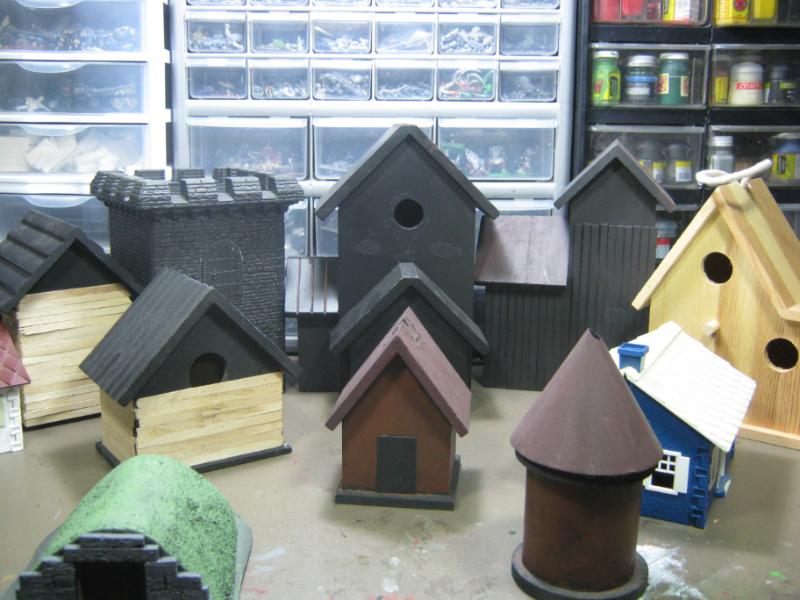
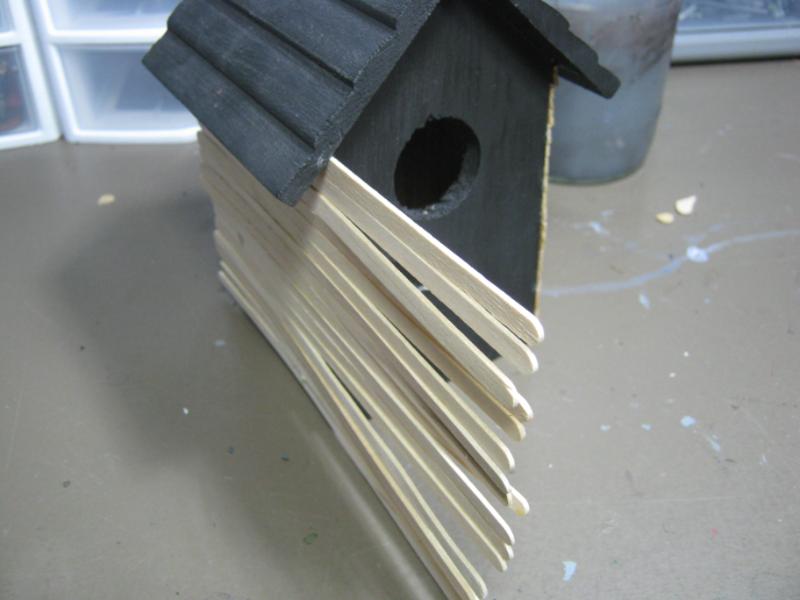
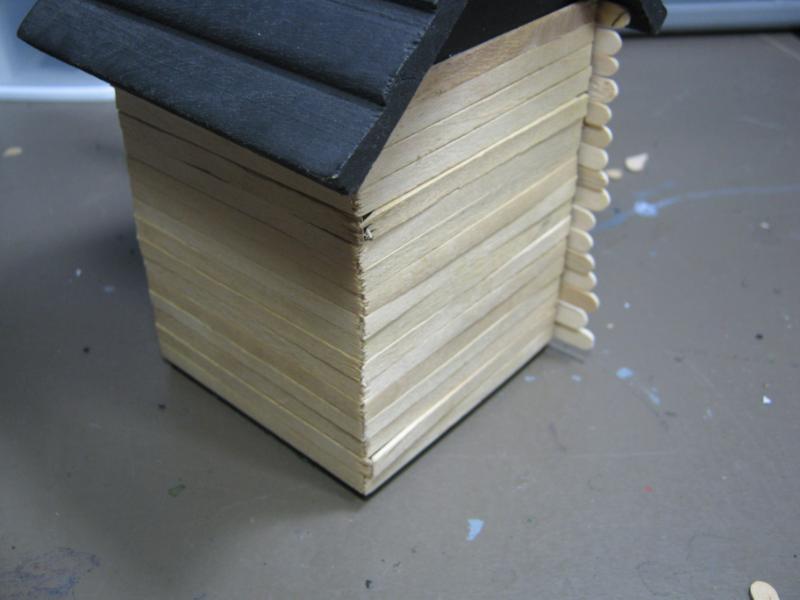
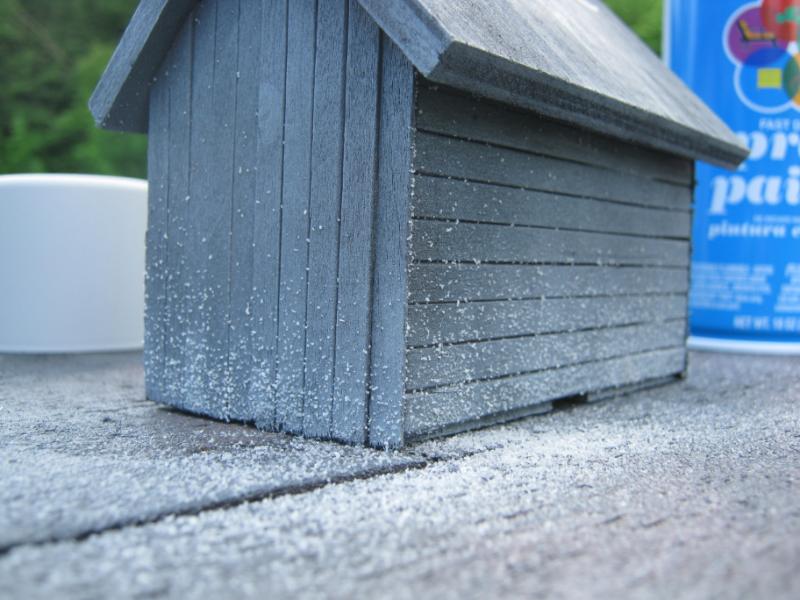
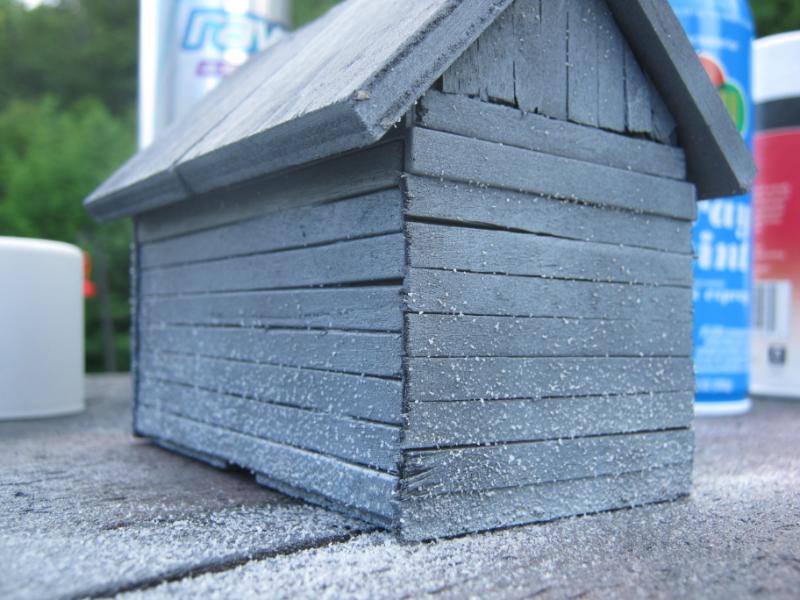
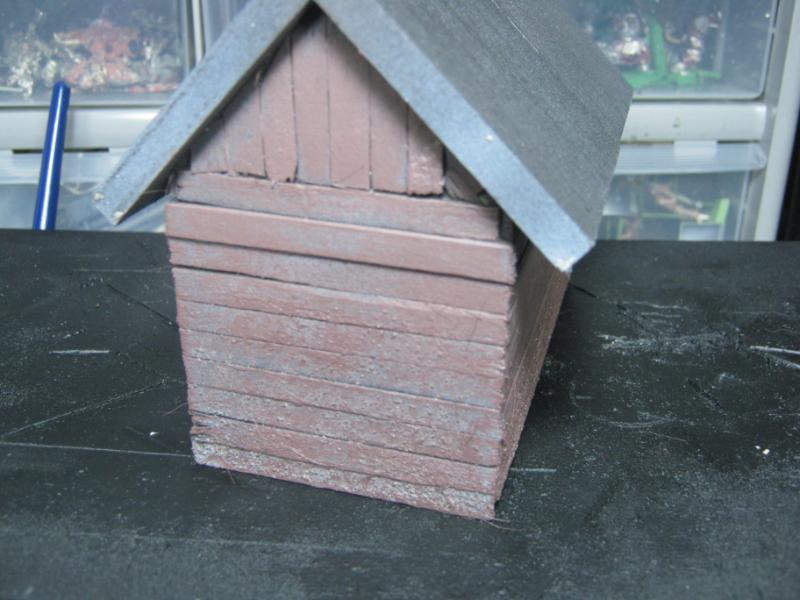
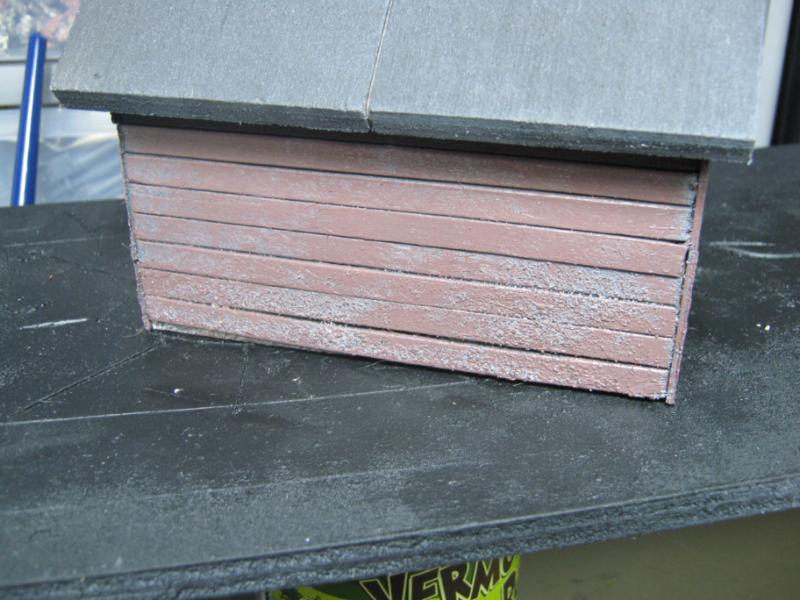
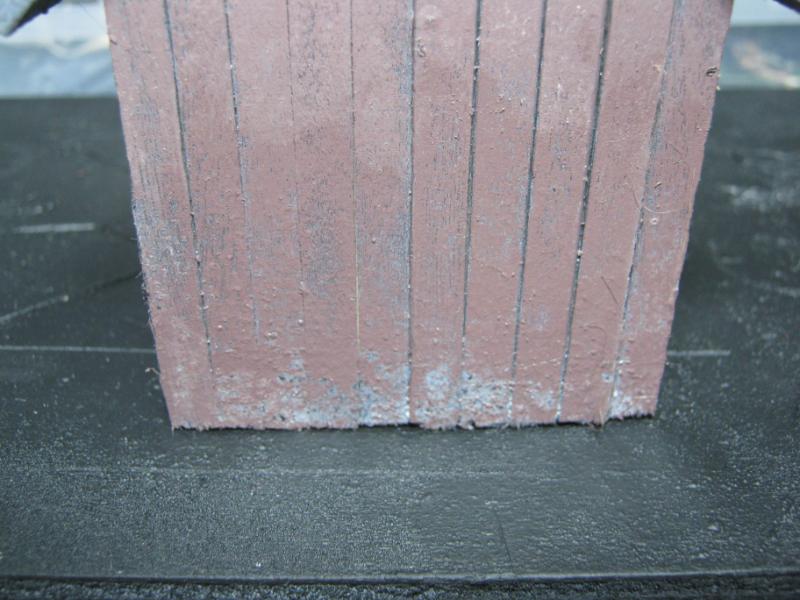
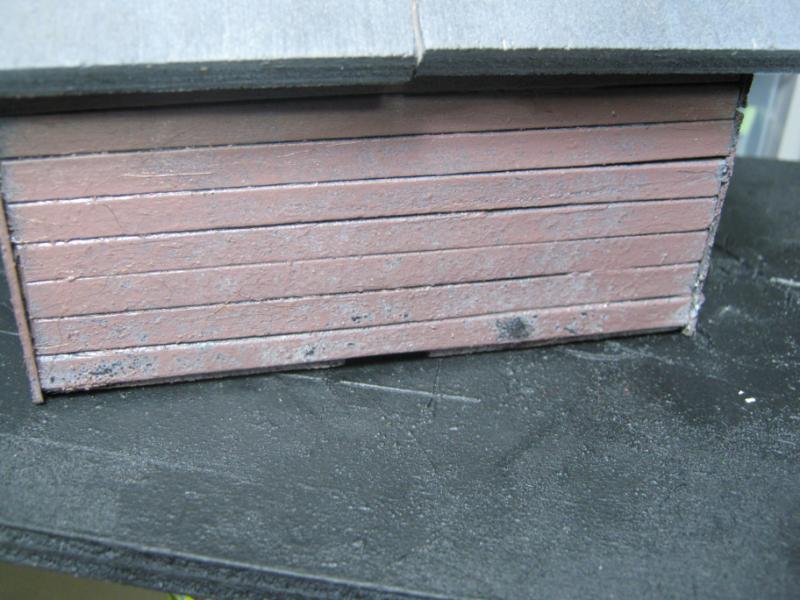
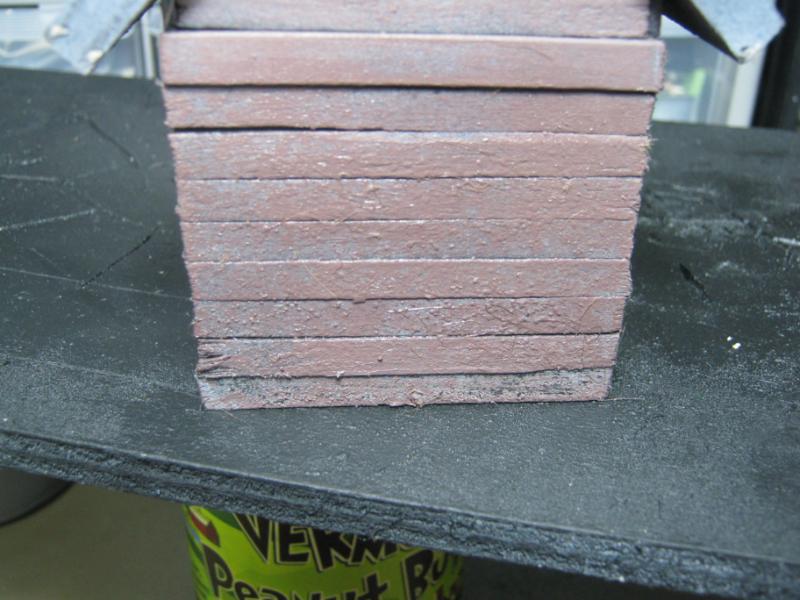
@ RSJake- I really like how the weathering came out. A bit more practice and I'll start getting semi-consistent results. And thank you for the compliment on the bird houses. I don't doubt that more than just a few people said  "huh?". I've made three of them before this and know they will come out decent for WFB, right now I'm curious how the will work for Mordheim.
@ Bruticus- Once again, that completely cracked me up. Were I a more 'diorama' inclined modeler I would completely run with that idea. Thanks for the link, it got me thinking about the stuff I have here and I went digging. See pics later in update.
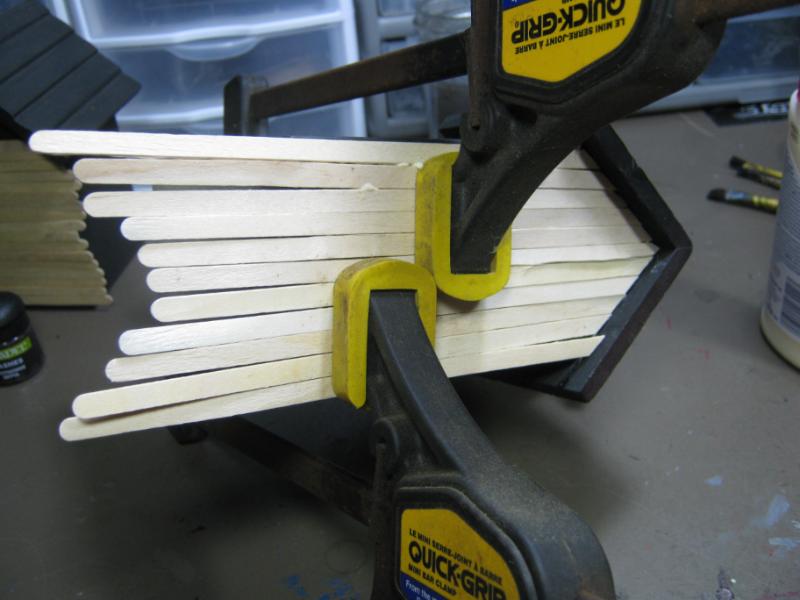
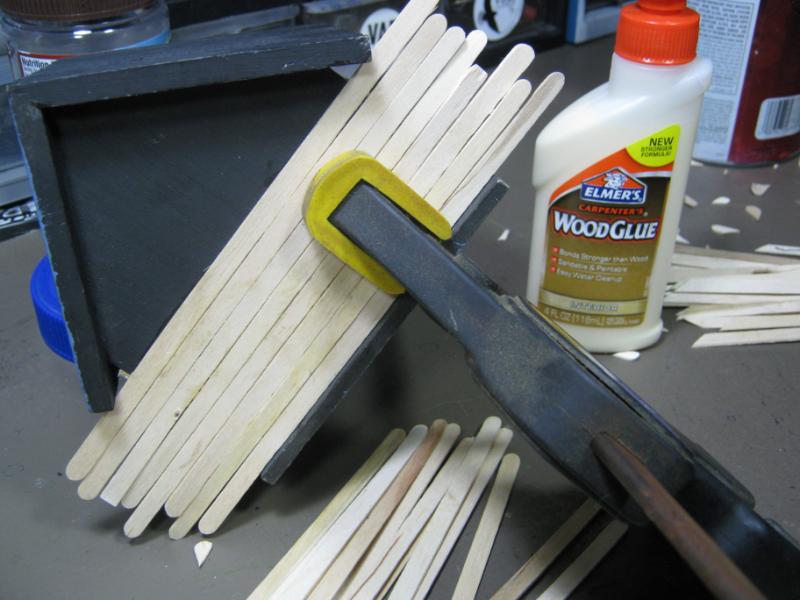
@ Vik- Hope you had a good holiday. The hairspray / salt thing is going to get used a lot more now that I see the results. Even as a novice with limited application experience I can already see a significant improvement in how my terrain is going to look overall. I will be revisiting some old pieces w/ the method after the Mordheim project winds down. On that note, I cut the sticks after gluing for a couple reasons, but most significant is because it is way faster. This is the 'rough' work part. It doesn't matter if I have a 5mm gap or a .0005mm tolerance, it's all going to get covered up with trim and edging. So I'm ripping through this part to get it done and then move on to the bitz that make people go "ooooooh!!" and "awwwwww!!". As far as ruining the sticks go, the vast majority of time they break where I want them to when they are properly scored first. And for those moments that they do not, that's just an added detail feature!
@ dstein- There's a part of me that has been 8 years old during this project... I used to glue Popsicle sticks together for my army men. Then I did it in school to build dioramas for class projects. Now I'm doing it again. If I ever grow up I am going to be so very disappointed with myself. Regarding the sticks and detail, right there with you and what you are looking for is coming. Check out the walkway below, it's a test of a technique I hope works out because it is quick and really easy.
Havn't had a lot of time to work on this, but wanted to stop by and offer something because I know you are an impatient fickle lot and I need to continuously earn your readership.
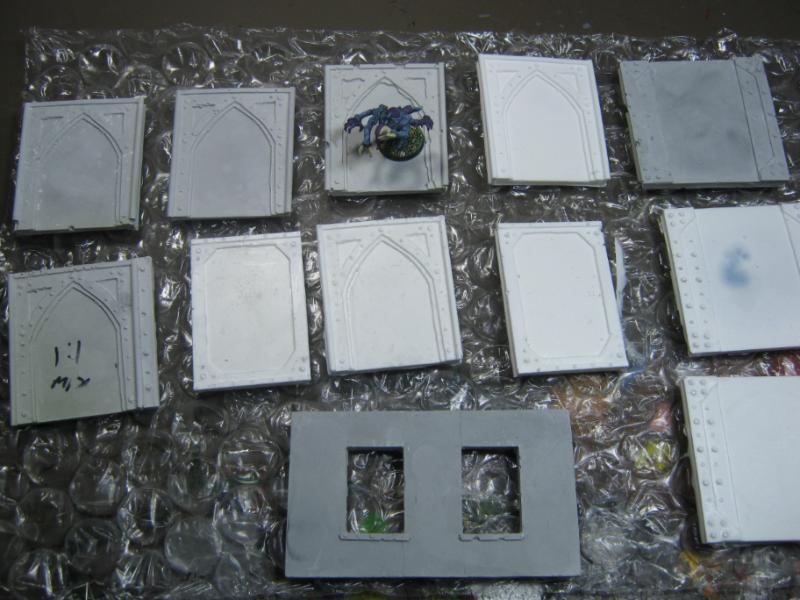
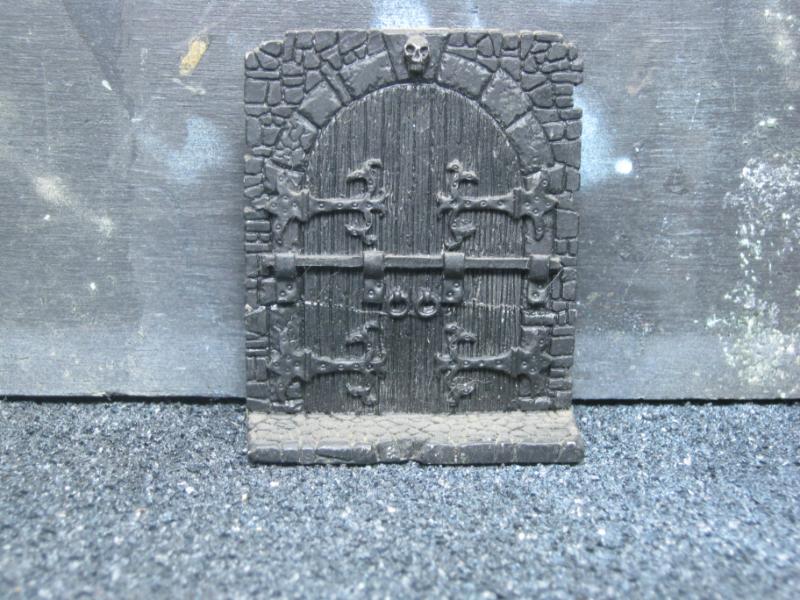
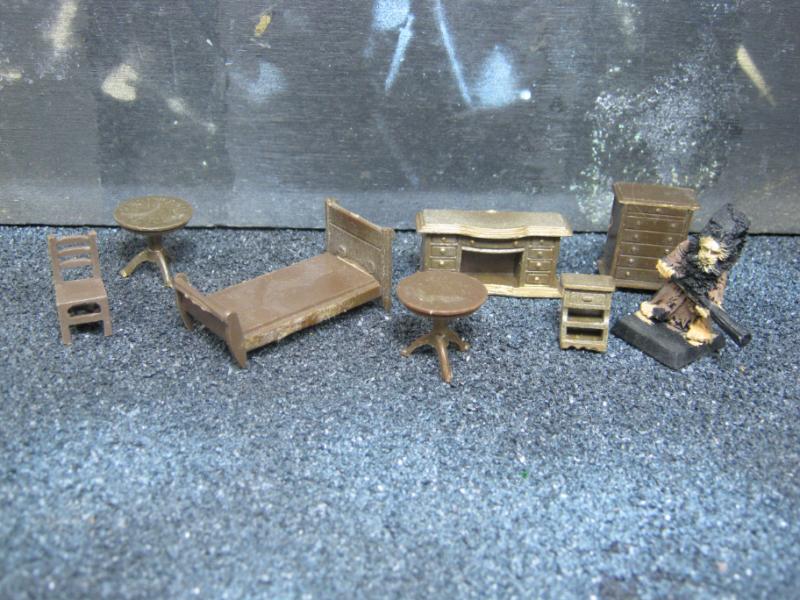
First up are some doors I've found. I also have some GW stuff but I didn't include those here today. I am thinking about making molds of these and casting up some. If another else would be interesting in taking on that task I'd be happy to drop any of these in the mail (even the painted ones) and send them along.
This is one of my favorites. Never painted it because I never got around to it, was using these for AD&D. It has finally found a higher purpose. I absolutely need to some impression molds of this.
front:
back:
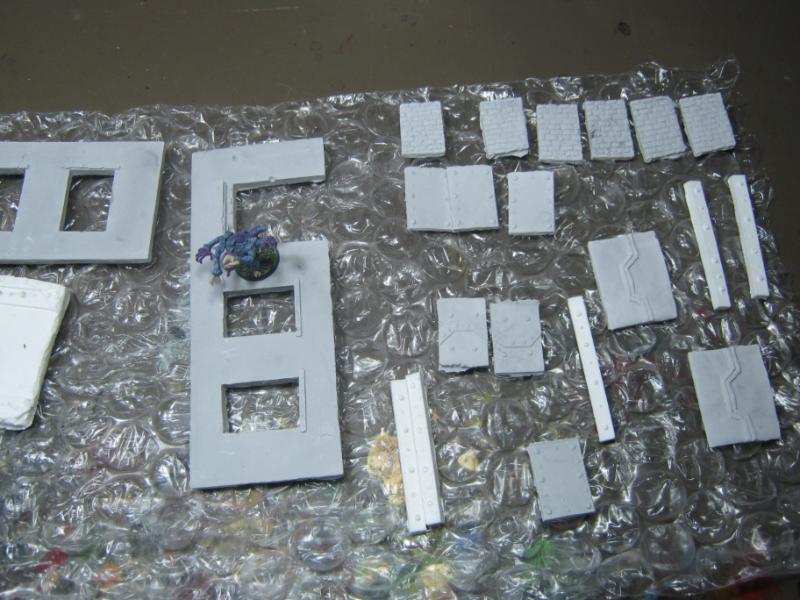
Next are smaller doors I once had completely painted, THEN decided I wanted to make molds of them, had no idea what I was doing, squished them into a splop of latex caulk, ruined my paint jobs, took a long time to clean up the damage. If anyone would like to try it the PROPER way, PM me.
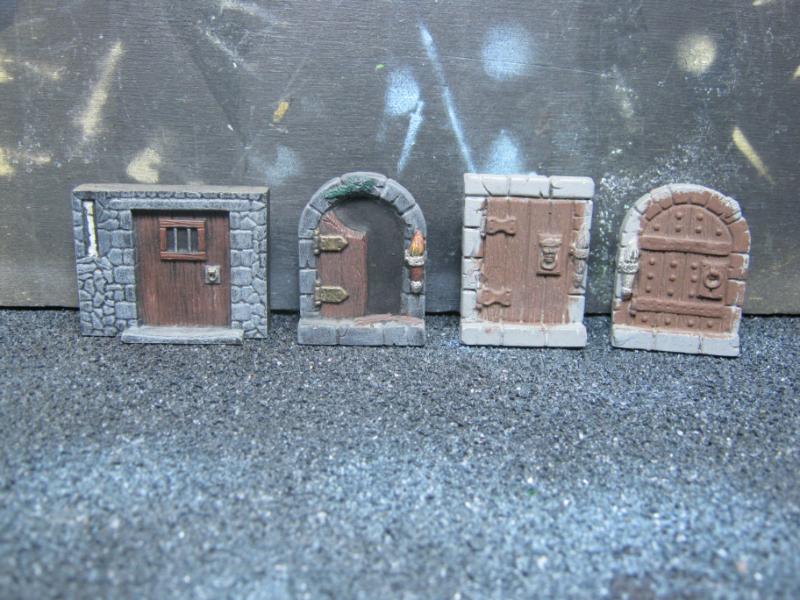
These didn't get the same treatment as those above.
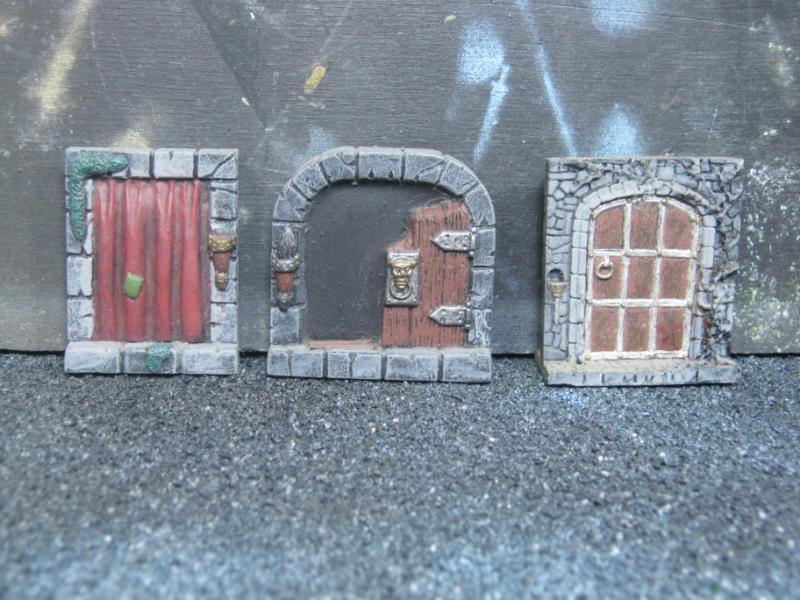
This I would sacrifice the paint to have a few copies of it. It's wicked cool.
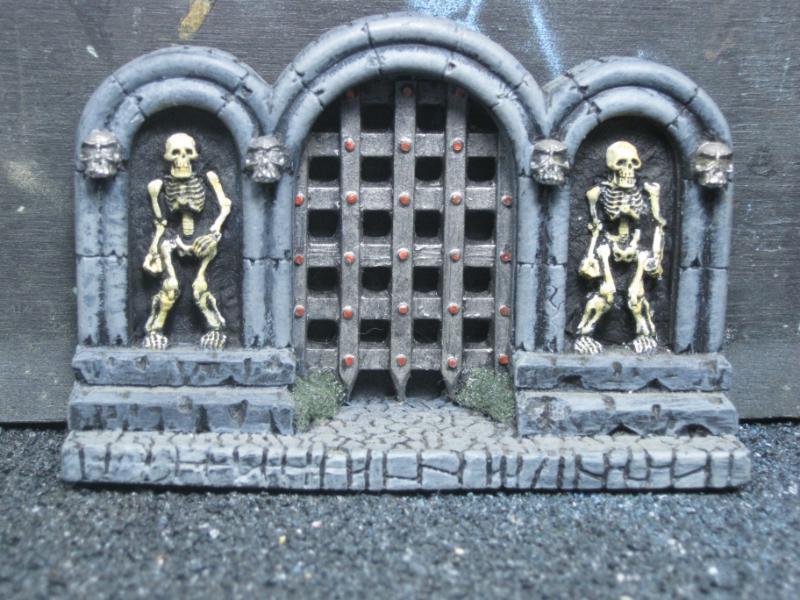
These walls are pretty awesome. Low and thin, nice for walkways, etc.
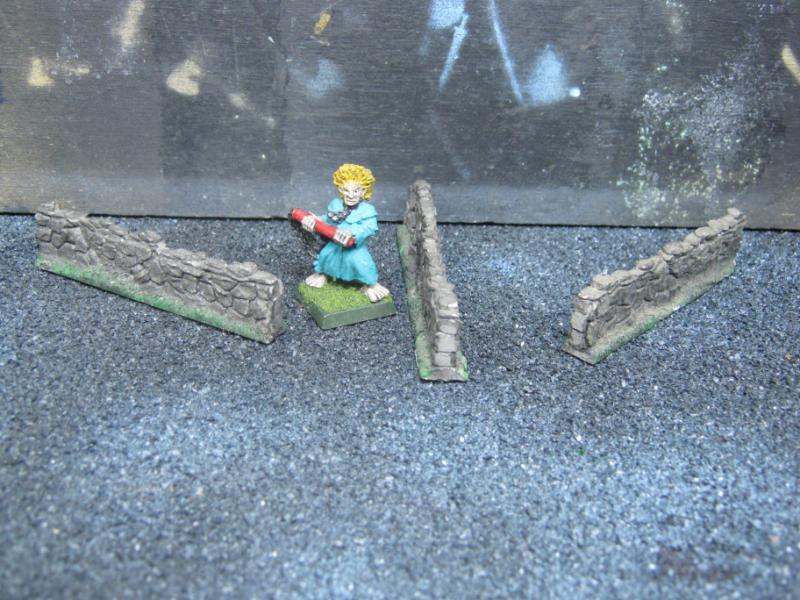
I have a bunch of this stuff. not looking to cast more, just adding it here as an example of the level of detail I'll be adding here and there once I get to that phase of this project.
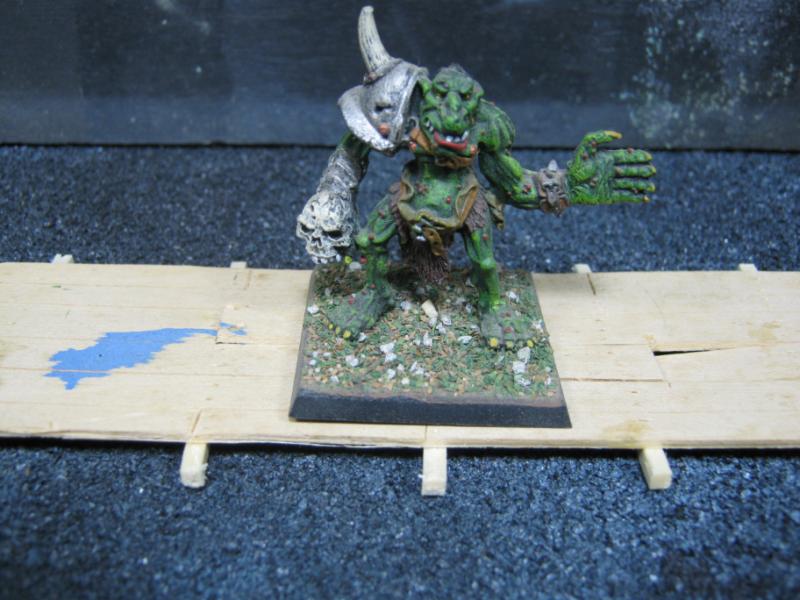
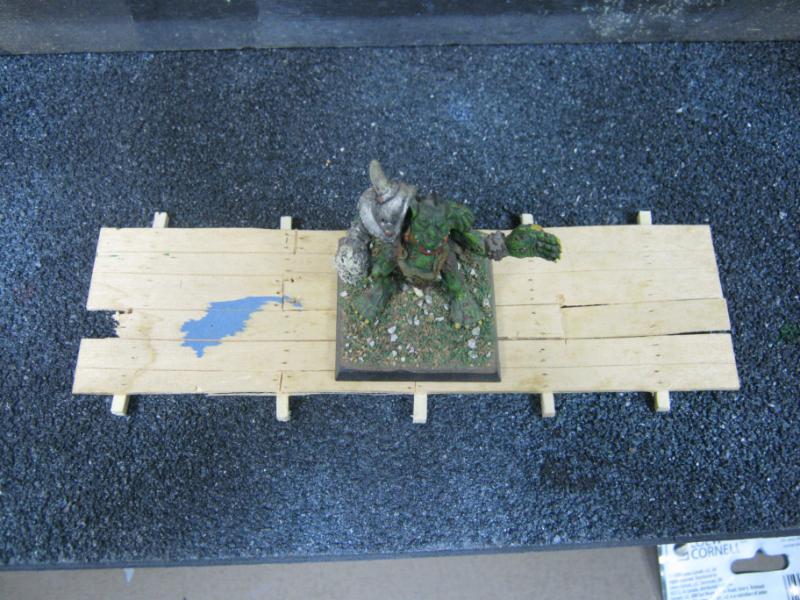
Here's a pic of something I'm actually working on. It's a walkway w/ some detail work. Believe it or not, the planking was 1 single piece of wood that I cut grooves into to make 'boards', even cut a few out to show wear / disrepair. The nail holes were done w/ one of my sculpting tools, just a sharp point. As you can see, this technique would look awesome on my buildings as well. That part is coming soon.
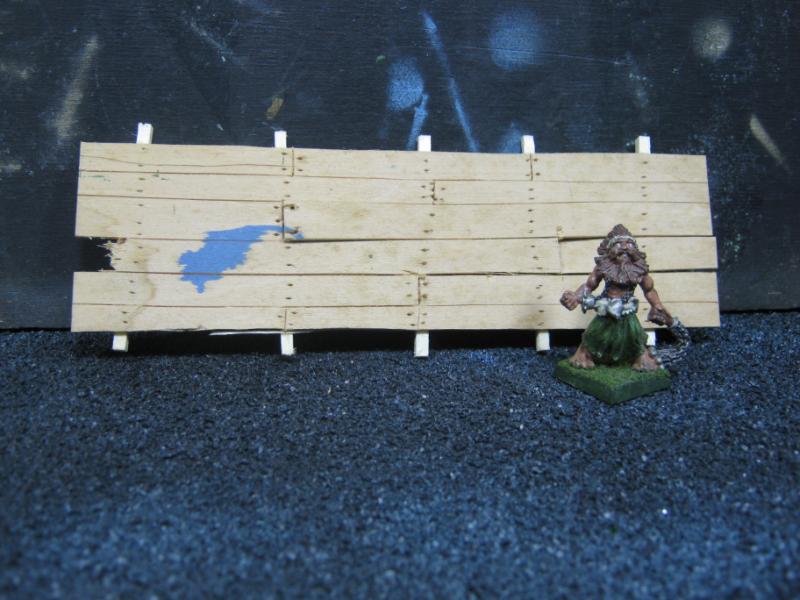
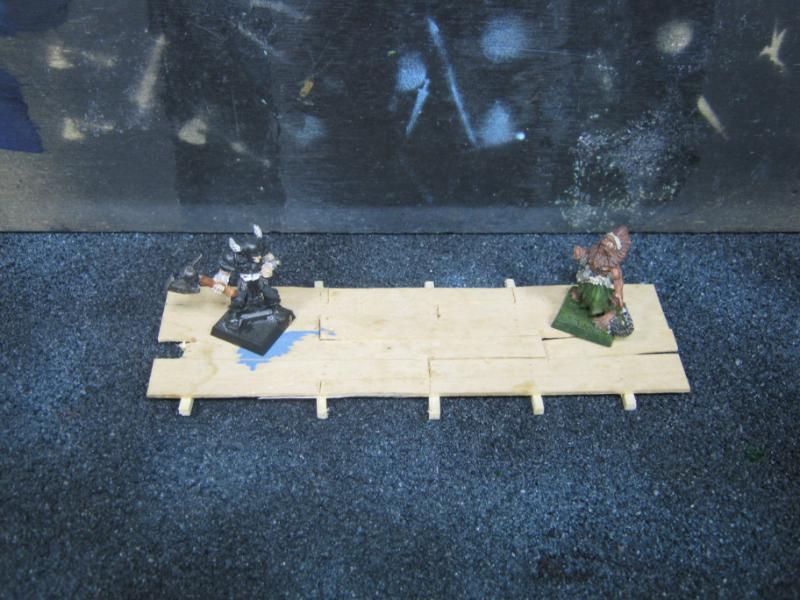
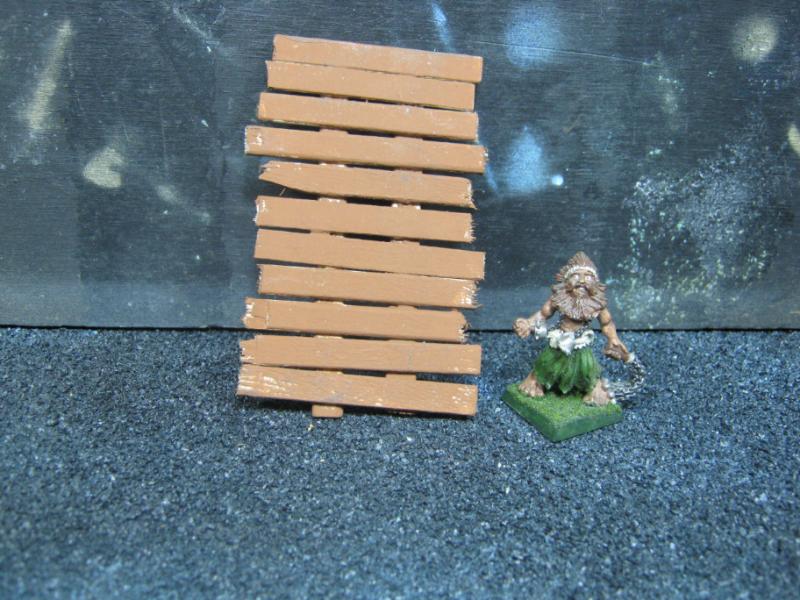
To answer the question of "why so big?", it's a game play issue. These guys have to fit on at least SOME of the walkways:
Last pic is something my son made for me in '09 while he was sitting w/ me doing some modeling stuff. I'm going to put this out there somewhere 'as is'.
I have a lot more stuff coming. Getting really excited about making my first walkways and scaffolding. Thanks foir reading, more coming later!
|
|
|
|
2012/06/25 14:13:10
Subject: Re: Terrain Project- Building a Better Battlefield
|
|
Longtime Dakkanaut
|
@ Galorn- PM sent
@ Bruticus- Oh man, yes I have a BUNCH of that stuff and had completely spaced it. I am giong to dig through it and see what looks cool to use in this project.
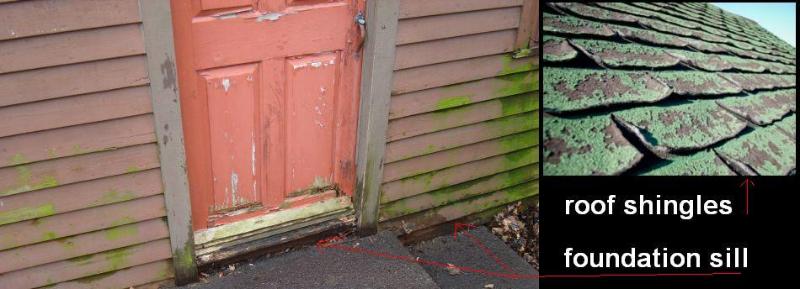
@ dstein- you know, every time I *don't* take one more look at the thread before posting, someone sneaks in one last post. Ha. I am really enjoying this new technique stuff. I'll be taking my first try on wood in the next few days. I'm going to try to replicate that "rainwater stains / decay" look on the sill and try sponge work on the roof shingles. See photo:
For the salt method I'm going to try is base flat gray, salt, spray black, salt again, drybrush brown / red / whatever the primary color is going to be, rub salt from baseboards, wash / touchup detail as needed. For the roof I'm going to try basing slate and add moss / rot afterwards.
Text update for now. Got a lot of work done yesterday (lots of WIP pics) but no change to upload or update yesterday. I focused on finished the "rough in" on 3 houses, they are now based black and I've started to cut rook shingles. I have a lot of trim / edging to do.
It may seem like this process is really dragging on but it's really not, it's flying by when I have the chance to work on it. If I could dedicate 4-5 hours to this I'd have a lot more done. Most of what I'm doing right now is 1 hr here, 45 min there, etc. Too much stuff is going on to offer me much modeling time, but this is something I am enjoying and genuinely want to do, so I'm taking as much time as I can to work on this.
Looking at this project realistically I'm guessing it'll be a few months worth of work to have the layout I'm hoping for. Knowing that 6th Ed is here adds a bit of stress to that becasue my modeling time is likely going to shift back to miniatures instead of terrain. I will find a way to strike a healthy balance that keeps me motivated and interested in working on projects. I've been active and productive since coming back, and in the last couple weeks I've taken the next step towards becoming better at what I'm doing. I'm not going to let that new skill atrophy.
More coming soon, not sure if it will be tonight or whenever, but I will have something new up this week for sure. Thanks for reading!
|
|
This message was edited 1 time. Last update was at 2012/06/25 14:56:04
|
|
|
|
2012/06/26 00:51:48
Subject: Re: Terrain Project- Building a Better Battlefield
|
|
Longtime Dakkanaut
|
@ Galorn- was that for me? If so, apologies, I'm completely missing the reference.
Ok. Taking the time to post those pics I mentioned earlier.
Here's some shots of work where I'm finishing up the "rough in" on a few buildings:
Here I'm pulling out the necessary items so start in on my equivalent of rivets in Warhammer Fantasy- shingles.
I'm cutting the box into thin strips, and then later cutting the strips into shingles with a serrated hobby knife. This is what I make my shingles out of.
In this pic I've also created a shingle strip. I really like these as they go on very quickly, and I used individual shingles as fillers or to break up patterns.
Here are my first three "roughed in" buildings. I'm really excited about having reached this stage because quite honestly I thought these things were going to wind up as kindling for my wood stove 20 years from now when I finally accepted that I wasn't ever going to get around to finishing them. It's a weird energy. I'm nowhere near done but already feel a sincere sense of 'accomplishment' because I've taken something else off my metaphorical Shelf of Shame. I'm actually finishing an idea I had a long time ago.
This is pretty cool. This is my "triumph" so far w/ this project. Check it out. It's not much to look at yet, but it's a pretty important stage for me.
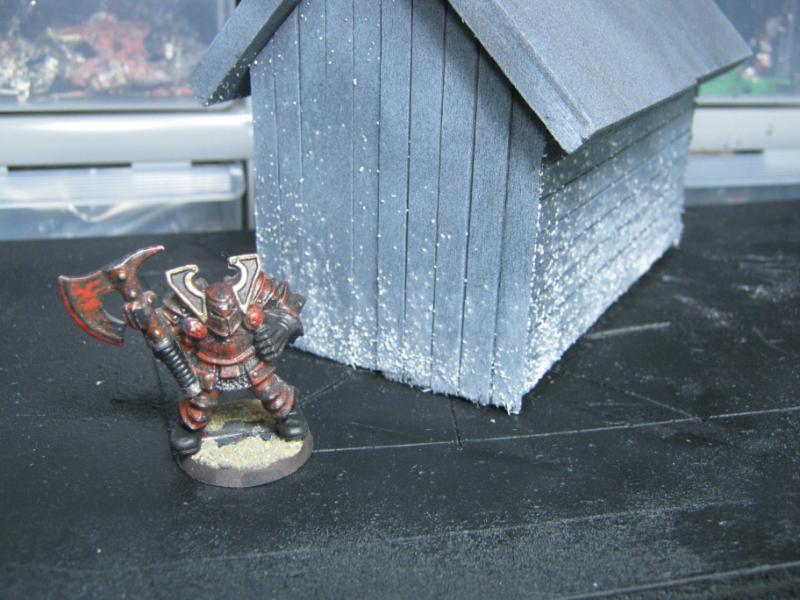
Also take a moment to say "hello" to our new official Mordheim Terrain Project scale representative Mr. Kvlt Grymdark! Kvlt's interests include spilling blood for the Blood God, collecting skulls for the Skull Throne, and enjoys long walks on the beach... of 1,000,000,000 CORPSES!
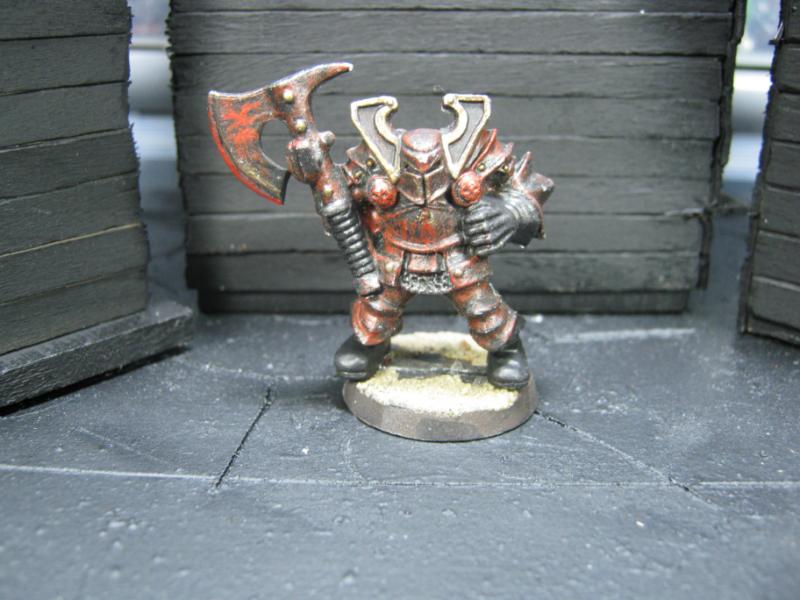 BLOOD FOR THE BLOOD GOD!!! SKULLS FOR HIS THRONE!! RRRRRRRAAAGGGHHHHHHHH!!!!!!
|
|
|
|
2012/06/26 12:38:29
Subject: Re: Terrain Project- Building a Better Battlefield
|
|
Longtime Dakkanaut
|
@ Bruticus- LoES? I'm hoping to not be on this project long enough to qualify a following for shingles. I'm enjoying it and looking forward to getting in a game this weekend if possible, but my main goal interest is still the grimdark of the far future. I'm going to be doing a lot of shuttered windows (there's monsters outside after all) and doors will be taken care of w/ resin / plaster cast items or scratch built.
@ Briancj- I said 'billion' because I remember what happened to Dr. Evil when he said 'million'.
@ Galorn- Ah. Sorry. That is a good idea. I've seen a few that I really liked, and have always thought it would be cool to have a carrying case w/ some character instead of just base utility. I'll keep that in mind.
|
|
|
|
2012/06/26 16:34:17
Subject: Re: Terrain Project- Building a Better Battlefield
|
|
Longtime Dakkanaut
|
@ dstein- Yup. Hoping to really sell the "weathered and unmaintained" look. Really excited about moving on to that next step but I have a lot of work to do first. The temptation to jump ahead is pretty strong. I'm resisting so far.
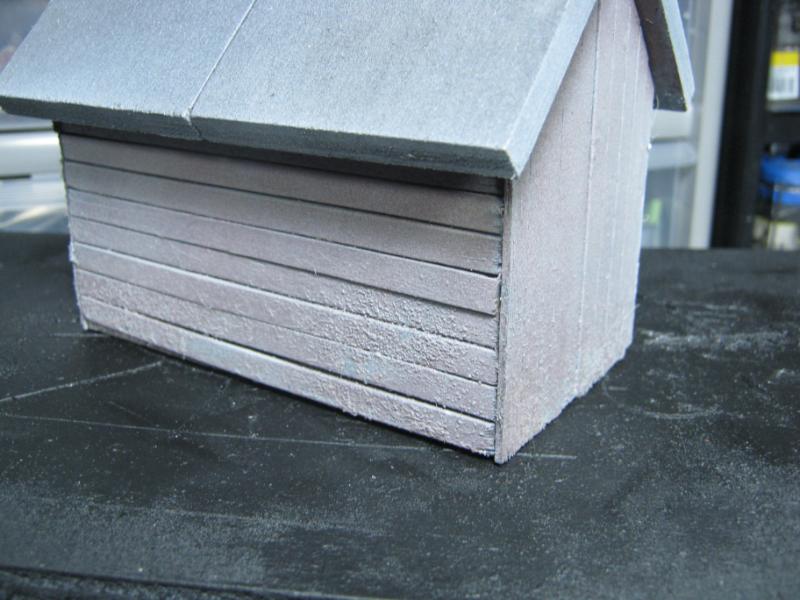
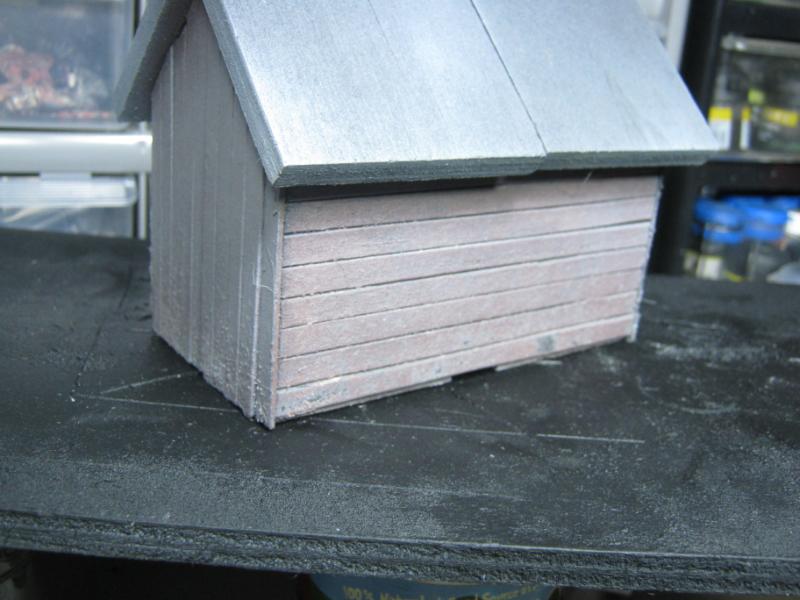
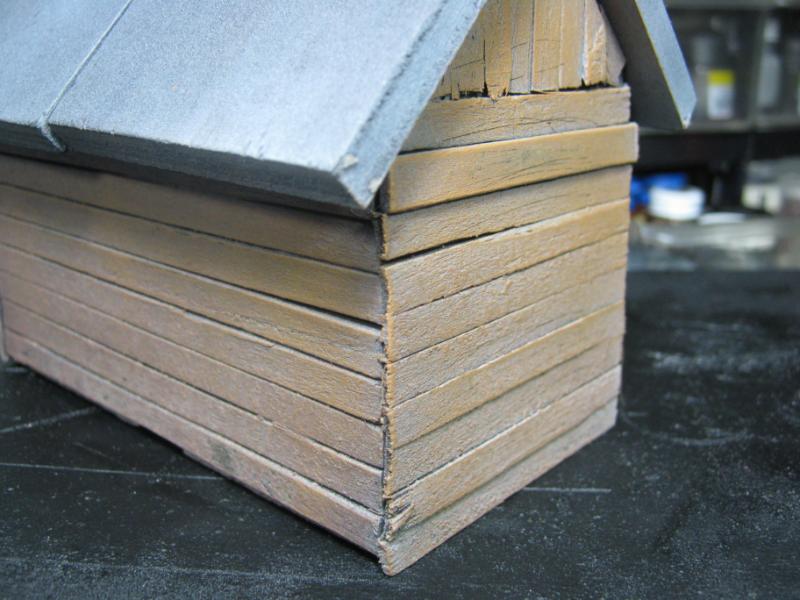
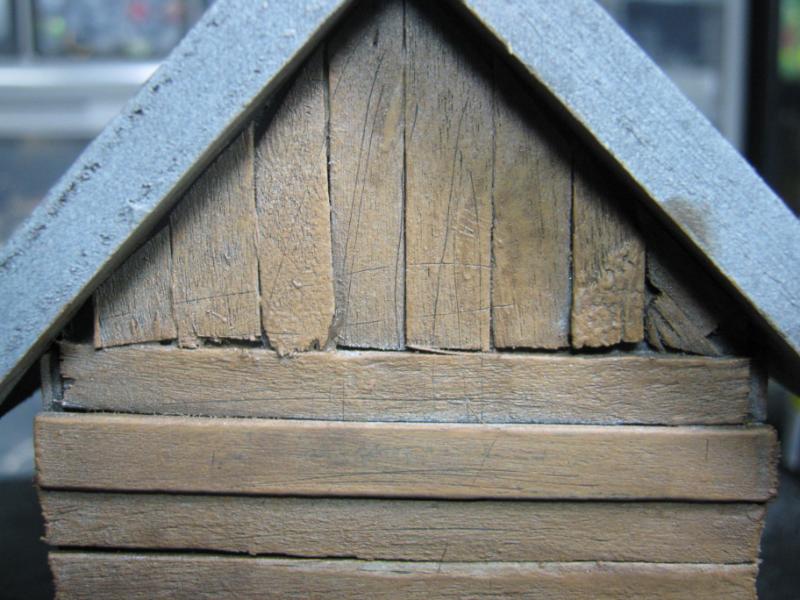
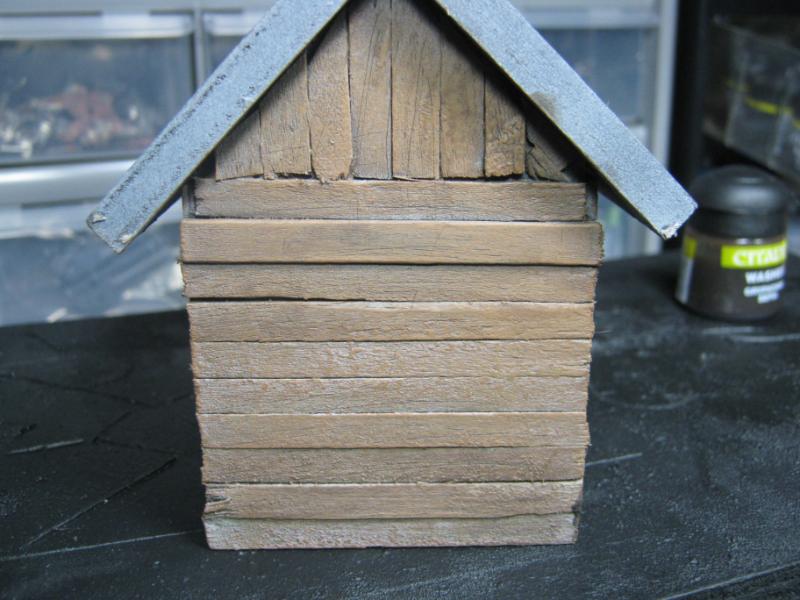
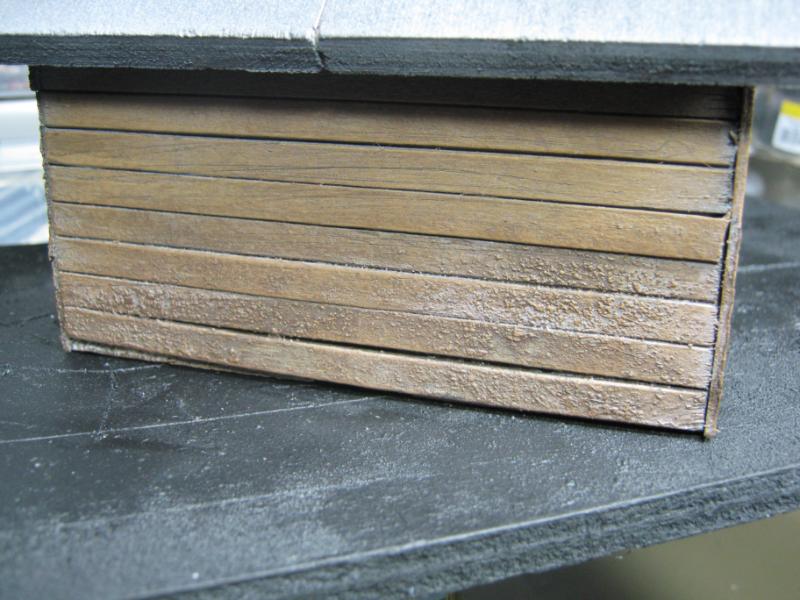
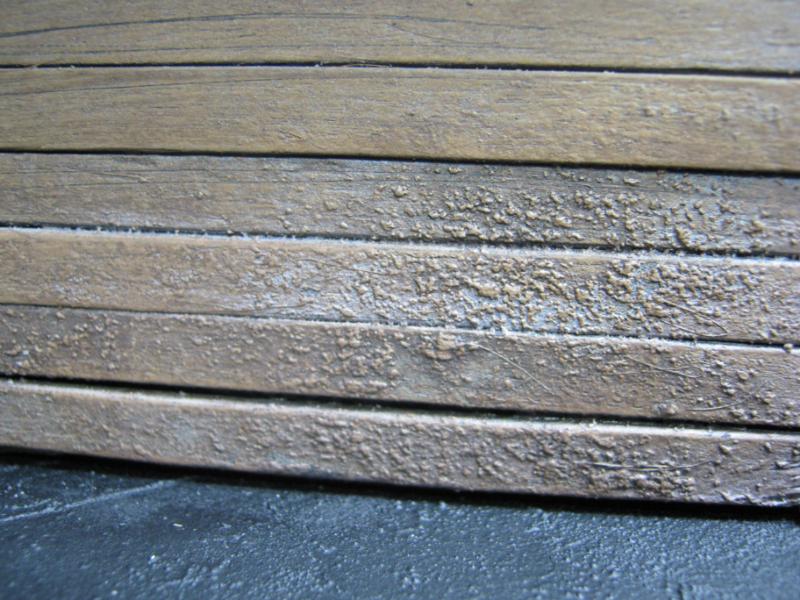
@ Scarper- Thanks for the compliment! Every $ I save on projects like these is another $ I can use for beer. Or other modeling things. Or whatever. Ha. The blue was brushed on, it's a "color match" of Shadow Grey. I have a gallon of it. The whitish parts are actually silver paint, I wasn't sure what to do at first and may have to dot those out w/ a more gray concrete look, there's a lot of 'afterthought' when I'm doing these projects. Steal away, I love it when people can pick something up from what I am doing. Most of what I am doing is stuff I learned elsewhere (salt being the most recent, just started that and sponge painting). The cardboard shingles came from a White Dwarf many years ago. But the birdhouses were all my idea. I originally got them to paint black / drybrush brown / done. Yeah. it looked like a brown birdhouse. A few coffee sticks and strips of cardboard later and I had a wee house for Fantasy. It's been evolving from there. The bird houses cost anywhere from $1 to $5 each, the sticks are free (thank you Starbucks!) and the cardboard is rescued from recycling. That's about as "on the cheap" as I can imagine for somehting like this.
|
|
|
|
2012/06/28 02:13:11
Subject: Re: Terrain Project- Building a Better Battlefield
|
|
Longtime Dakkanaut
|
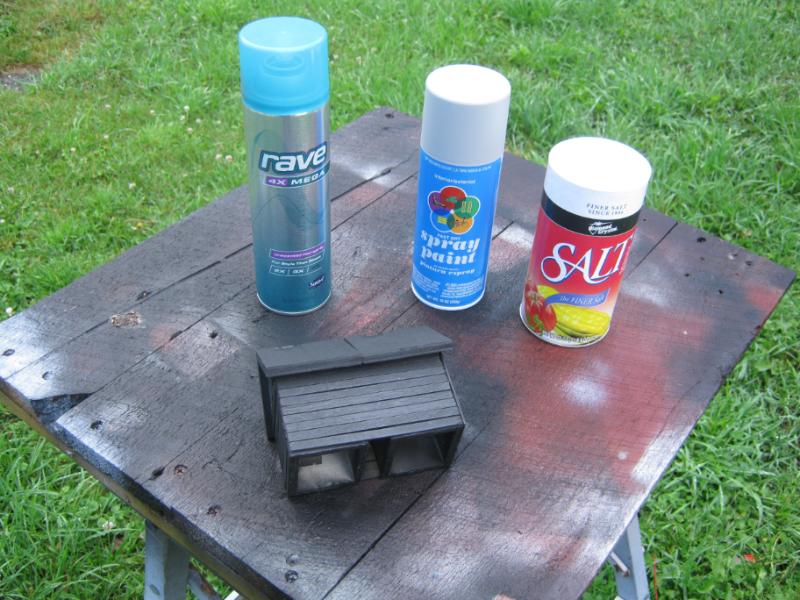
Ok, update w/ photos tonight. Took some time to work on one building. This is a test of the salt method on my buildings. I tried a different process this time, which I'll explain as I go along. I don't know how it turned out, leaving that opinion to you all. I know some things worked out, some things didn't. Some things I'm going to fix, other things are what they are. I will say that this looks way better in person, but then most of my works looks pretty awesome from 3-5 feet away.
Here I'm setting up to get going. Cheap hairspray, cheap spray paint, and cheap salt. I really like the paint because it is FLAT, like "absorb the light around it" kind of flat, and the salt is almost like powder. I'll be using both of those a lot during my future terrain projects.
First I sprayed the lower boards on the building w/ hairspray and then randomly salted.
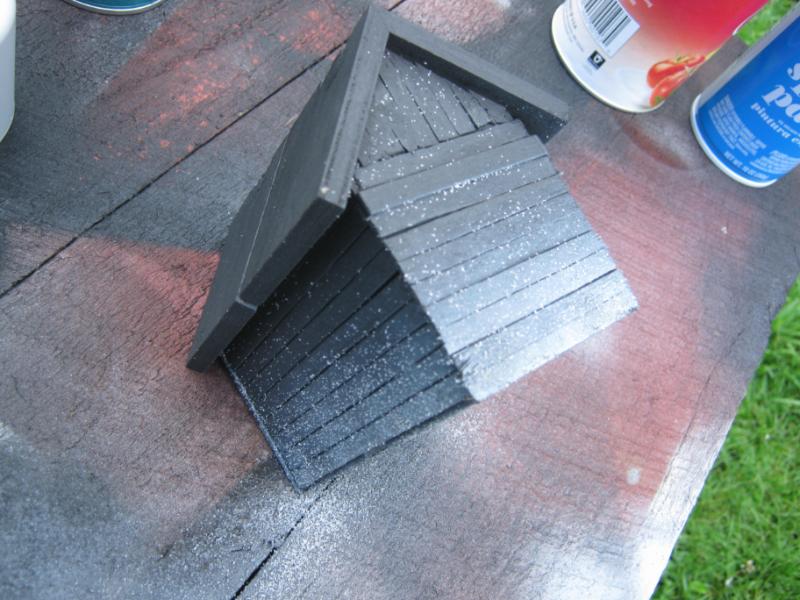
In typical Skalk Bloodaxe fashion I didn't let it dry, I just sprayed it gray, hit it w/ hairspray again again, salted again, sprayed w/ hairspray again. Mistake #1 for the evening. Won't be doing that again. Kvlt Grymdark did not approve.
I did however have the presence of mind to dry the last coat of hairspray. I used my hair dryer for a couple minutes and then drybrushed dark brown. Mistake #2 of the evening? I trimmed my paintbrush and didn't get all the hairs out of it before using it. But not to worry, as you can see they eventually did come off.
Feh. I hit it with the hair dryer again after drybrushing and then gave it a light rub to take some salt off and see what it was looking like.
Clumps. Ugh. Mistake #3. But I kept going with it to see what happened. I also used my xacto knife to scrape some simulated 'wood grain' into the boards:
Some of it didn't come off at all, some of it went all the way to the black undercoat. Really need to take my salting / hairspray in steps from now on. Lesson learned. Next I sprayed everything with a light dusting of gray again.
Next I drybrushed a light brown. I like this effect.
Next I gave it a light wash with Devlin Mud. I think this is where it started to come together. Yes, I know some of the scratches look terrible and I am going to fix them.
It needs more recessed shading and maybe some highlights on the wood to contrast, but it's not the worst work I've done. Kvlt Grymdark approves and said this house is on his Top Ten list of buildings he'd like to burn to the ground. I took that as a compliment.
That's it for tonight. Thanks for reading, C&C always welcomed.
|
|
|
|
2012/06/28 14:04:26
Subject: Re: Terrain Project- Building a Better Battlefield
|
|
Longtime Dakkanaut
|
@ Galorn- Thanks for the idea. I looked into those, likely not going to order them becasue the packages have thousands of sticks and I'm already expecting to have material left over once this project is done.
@dstein- Right there with you. Already using NATO Green for the base, will highlight Goblin Green and touch up w/ Bad Moon Yellow if I get the chance tonight. Also goung to be adding a foundation to it. Much more awesome is coming.
@ Galorn- Yup.
Going to try to get some more work done tonight. I put about an hour into that building last night, should have this completely done w/ a few more hrs of attention. I'm also going to put it on a small base so I can add Fantasy bitz to it and really give it that Old World feel.
Picking up my 6th Ed rulebook tomorrow night after work. Wicked excited for this. Hoping to find some gems in it and get playing soon.
|
|
|
|
2012/06/28 15:36:09
Subject: Re: Terrain Project- Building a Better Battlefield
|
|
Longtime Dakkanaut
|
I have vegetation and other neat details on the roster. My new challenge is figuring out how to make a stone foundation. It'll only be appx 1/4-1/2 inch high but I'm havbing a difficult time figuring out what to use. Tried real rocks last night (slices of slate from the brook out back) and it was immediately obvious that it was going to be way way more work than I want to put into this (with ambiguous expectation of results)... so I'm open to suggestions.
|
|
|
|
2012/06/28 17:24:37
Subject: Re: Terrain Project- Building a Better Battlefield
|
|
Longtime Dakkanaut
|
@ Bruticus- When I did the Galorn walls I used Mixed Up Salt, so I had many different and random shapes. This salt is just slightly more granular than powder. I'm not a huge fan of foodstuff being used as terrain but like you noted, I've sealed it pretty well w/ multiple layers of hairspray and spray paint. Mind you that was not the intended result, I'm still in a 'trial and error and error again" phase of learning this stuff. But the happenstance of technique / result is teaching me new ways to do things. I'm really excited about the breakthroughs I've been making and with practice I'll start getting results intentionally.
@ RSJake- I have, just not sure if I have what it takes. That's a lot of intricate carving, and my carving techniques usually involve a hammer and a kitchen knife.
DSTEIN FOR THE WIN! Dude Yes, I have a bunch of FIMOair! Ok, wow. Duh. So simple but completely eluded me. Yup, that's what I'm going to do. You rock.
|
|
|
|
2012/06/28 18:52:01
Subject: Re: Terrain Project- Building a Better Battlefield
|
|
Longtime Dakkanaut
|
@ Wh40kPicasso- Oh yeah, absolutely. I've always been of the mindset that WFB and W40K exist on the same timeline in the same universe. The Old World is just a lost feral world that has been lost from record to the Imperium and manages along by itself. Back when WFB and 40K used the same stats (2nd Ed) we played a game w/ Orks vs. Orcs. Scenario was the Orks found an entire colony of what they considered Wild Boyz and wanted to have them join the Waaagh! The Orcs were having none of it and threw down. In the end the Orks were victorious (ranged weapons carried the day) but it was a very interesting game.
Plus there's always the scenario that some hapless feral world becomes an unwitting participant in the wars of the Imperium when CSM and IG land to have it out.
I wouldn't mix my Fantasy stuff w/ 40K stuff very much though. It looks weird and w/o a cohesive theme. I'm all about tying things together. The days of throwing miscellaneous terrain on the bale are long gone for me.
@ dstein- Dude, make up my mind already!
|
|
|
|
2012/06/28 20:39:40
Subject: Re: Terrain Project- Building a Better Battlefield
|
|
Longtime Dakkanaut
|
@ dstein & Galorn- Ok, that looks amazing and well within my abilities. Question about durability- I've been moving away from foam as much as I can becasue of nips and chunks taken out here and there, eventually I wind up with a nice piece of garbage. Not so much anymore, but in your experience how does it hold up over time? I'm not rough on my terrain becasue I built it, but sometimes things happen. Just wondering.
|
|
|
|
2012/06/29 15:05:27
Subject: Re: Terrain Project- Building a Better Battlefield
|
|
Longtime Dakkanaut
|
@ dstein- I try that.
@Galorn- Will do, and thank you sharing that inn! I'm ripping your idea off as soon as I get some other work done. I think. Who knows what I'll be doing tomorrow. I can't ( squirrel) concentrate on ( beer) one thing for any ( Dreadnought) amount of ( stapler) time.
@ Wh40kPicasso- I understand what you are saying and if I could get someone else to film, edit, format, and upload I'd be all set. I work in technology and have grown incredibly tired of using 'techie nerd' stuff on my own time. I get annoyed simply by uploading pics to Dakka sometimes, and I genuinely like doing stuff here. I am not going to put a video together on my own.
Pretty excited about this next bit I'm going to share. Last night I picked this up simply to move it out of the way and somehow it turned into my project for the night.
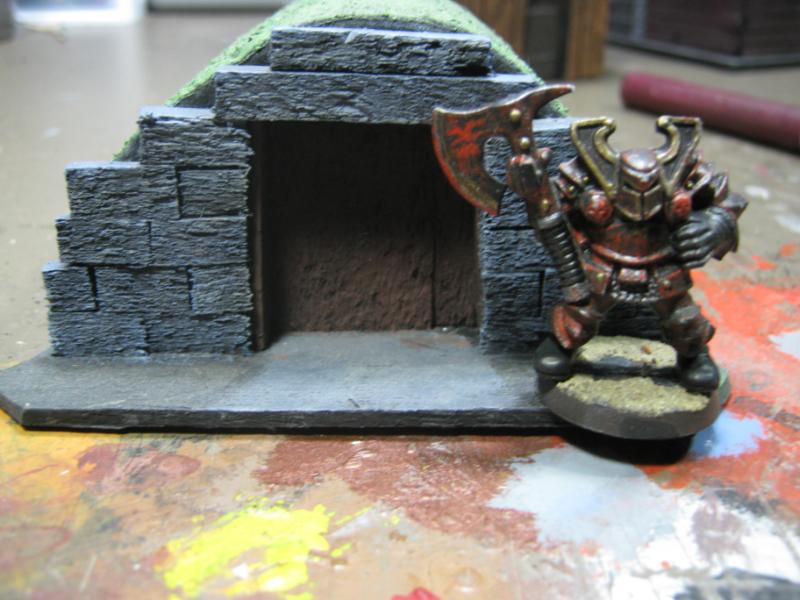
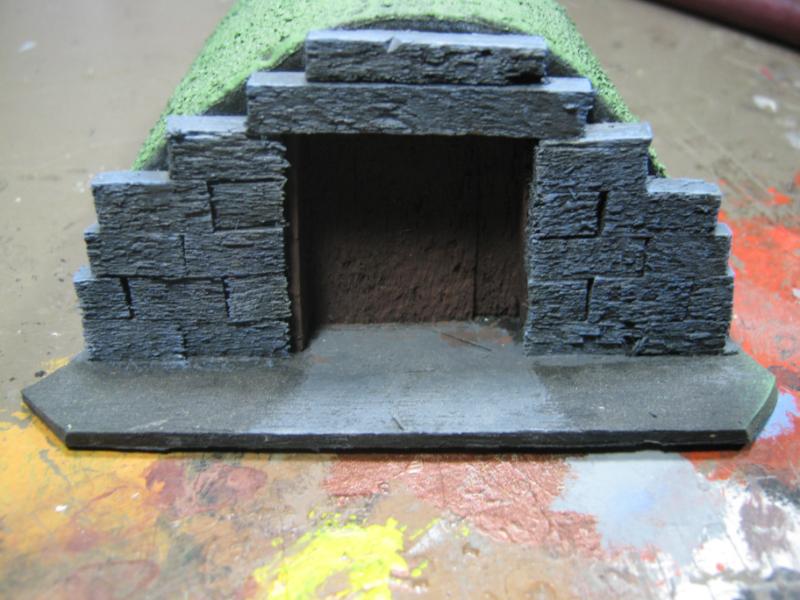
It's a burial mound I made for my Undead army. I used to have a lot more of these in various stages but they were all tossed when I went through the Great Cleanup of 2012. This survived because of how much work I already had on it and it has seen quite a few games already "as is".
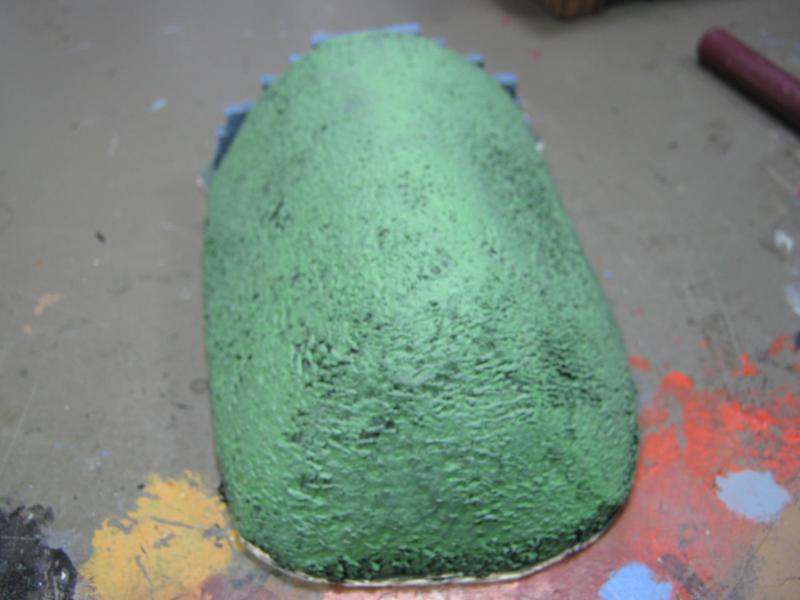
The bulk of it is made from foamboard insulation, cut to rough shape w/ a serrated kitchen knife, used a wood rasp to create the rounded shape, and then sanded to make it as smooth as possible. Cut out where door would be, mounted on a balsa wood base, made door and stone blocks out of balsa wood, slapped it together, painted it the colors you see here, and that was that. Perfect for my game table.
Since I'm setting my standards a little higher these days, I fixed it up a bit. I really like the results:

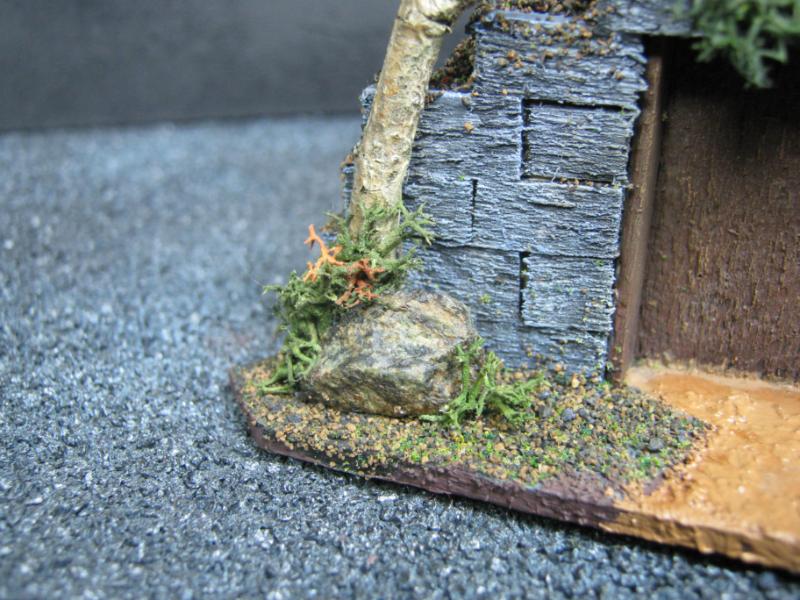
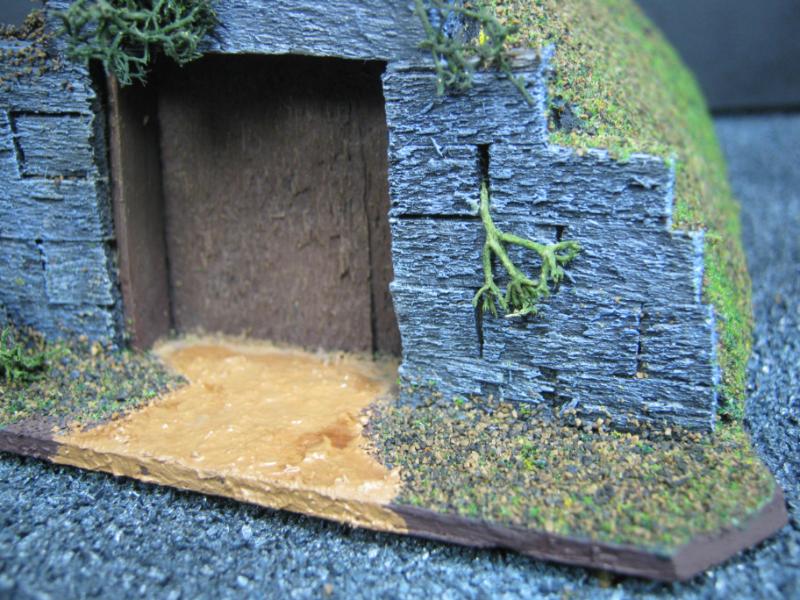
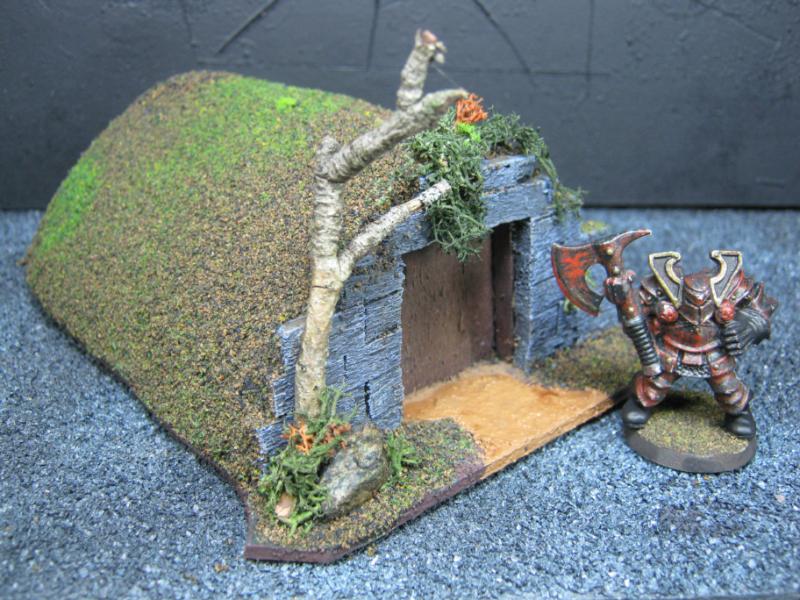
How I did this: repainted the blocks and door to make them more distinct, nearly soaked the 'mound' portion w/ hairspray, sprinkled / shook / tapped flock, added lichen as vegetation (yes, all lichen is glued and permanent), used a rock from my driveway (washed in Grif Sepia), used a twig from my apple tree out back behind my house to make the 'dead tree" that I jammed in behind the rock, for the dead tree behind the rock, made 'mud' from a combo of a couple different paints that are past their prime for painting but apparently really awesome for texture (yes they still look 'wet' now thanks to a clear gloss coat), and a few other fiddle bits here and there. I'm really happy with this and can honestly say that THIS is the expectation I've had of myself for a long time. I see things I could have done different / better, but I'm really happy w/ this and I really do believe I've improved terrain building skills.
Also please note that Kvlt Grymdark is sporting a new base. He says he likes it.
*special thanks to ktbb22 for hanging out w/ me while I did all this*
|
|
|
|
2012/06/29 15:36:16
Subject: Re: Terrain Project- Building a Better Battlefield
|
|
Longtime Dakkanaut
|
See post on Dsteins thread. I'm trying to get to the PO tomorrow.
|
|
|
|
2012/06/29 17:16:34
Subject: Re: Terrain Project- Building a Better Battlefield
|
|
Longtime Dakkanaut
|
@ Briancj- Thank you! I have a feeling I'll be revisiting a lot of my older terrain now.
@ Galon- Sorry I've been so lame. Will do my best to get a supply drop inbound tomorrow, ABSOLUTE latest on Monday.
@ Wh40kPicasso- Thank you for the compliment, and I'm glad you're trying your hand at terrain! I've always felt it is is too frequently given the least amount of time and effort and is the most important stuff on the table. Your Chapter Master can die on the first turn but the hill he was standing on will be there for the entire game. So good luck, and know that you have a wealth of knowledge and support! The comminity is tight decent and people are very cool. About the castle though... by the time I finished that caste, your kids would have died from old age. I don't know of any videos because I have been lacking in that aspect as well. Bruticus / dsteingass / Galorn / Briancj would be better educated on that and would likely help you out.
@ dsteingass- Thanks man! I had a lot of fun w/ this and expect I'll be doing some more stuff w/ similar techniques. The lichen is going to appear a lot more.
I've been looking at the pics more and more, so of course I'm changing my mind about stuff. I think the mud needs to go and get covered w/ flock. What do you guys think?
|
|
|
|
2012/06/29 18:49:45
Subject: Re: Terrain Project- Building a Better Battlefield
|
|
Longtime Dakkanaut
|
@ dstein- Another reason why you are legend in the modeling community. At least I think so. 
@ Wh40kPicasso- Probably nothing new until middle of next week. Going out tonight, riding tomorrow, 40K 6th Ed tomorrow night, riding again Sunday. The season here is too short to spend nice days inside w/ toy soldiers. But no worries, it'll rain for another 2 weeks straight before long. *sigh*
|
|
|
|
2012/07/03 02:48:30
Subject: Re: Terrain Project- Building a Better Battlefield
|
|
Longtime Dakkanaut
|
6TH EDITION RANT!!!
I have the rulebook, I have the official GW errata, and will say without hesitation that so far I like what I've seen a lot. There's still the same nonsensical bass-ackwardsness such as cover saves instead of "to hit" modifiers, hitting the enemy with the butt of your Plasma Pistol in CC instead of burying the barrel into them and blasting a solar hole in their guts, Chainswords are still no different than a bare fist... gahh... stuff like that is still annoying as ever and someone at GW still needs to come play at my house over a few beers. HOWEVER, there is much awesomeness like charge response, Feel No Pain gets a save against almost everything, wounds are allocated on the closest model, grenades can be used as offensive weapons in the Shooting phase again, REAL Psychic Powers are back, and most importantly... most excitingly... most "Skalk Bloodaxe is so stoked his head might asplode"... is THE CULT HAS RETURNED!!!!!!!
So yeah, I'm ok w/ 6th Ed so far. I'll keep you updated.
Didn't get a game in this weekend, but my buddy Daichallar came over on Saturday night and we went through the new rules one at a time. It took a lot longer than expected, and we had to have a few "example scenarios" to put the picture together. Here's an action shot of us figuring out the new CC rules:
Who can attack, who can't, how they have to move, etc. There are a lot of changes, and I'm really excited about learning the rules and getting some basic games in soon. There's a new Tourney starting up at my FLGS and I'm in the mood to get out and play a couple games / meet some new people.
There's a chance that as soon as the new Codex comes out I'll be taking a break from Terrain and getting back to either the Cult or the Death guard. Or I may restart my World Eaters, have been wanting to show them the same love I gave my Plague Marines. But lest we forget all of this started from my Black Crusade force... it could use some attention as well.
The possibilities are nearly endless. I'm pretty excited all around.
Ha, I used a divider to separate my own ranting.
Anyway, here's an update w/ pics. Last Saturday I was at the local flea market and scored these for $20:

They are 8" high from table to top platform. They appear to be O scale and are perfect for the table. Check out this awesomeness-
I blasted them w/ the garden hose and cleaned them up a bit:
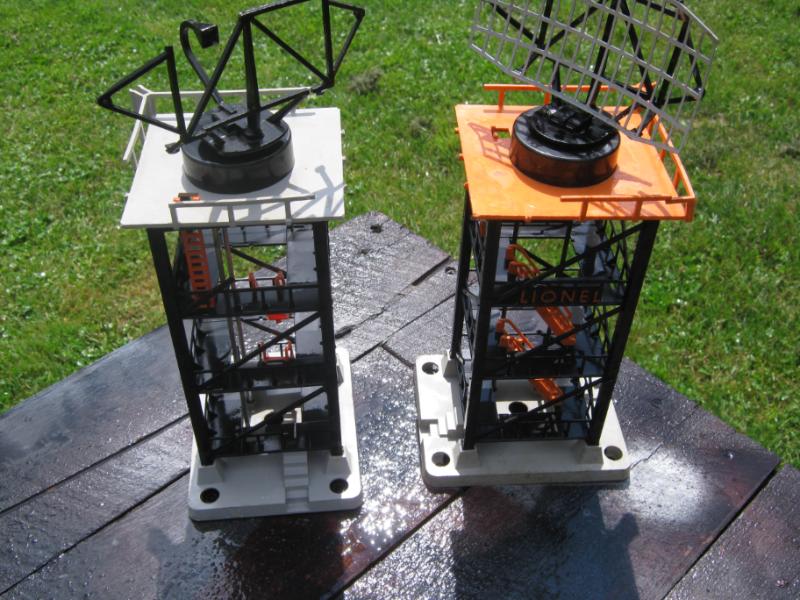
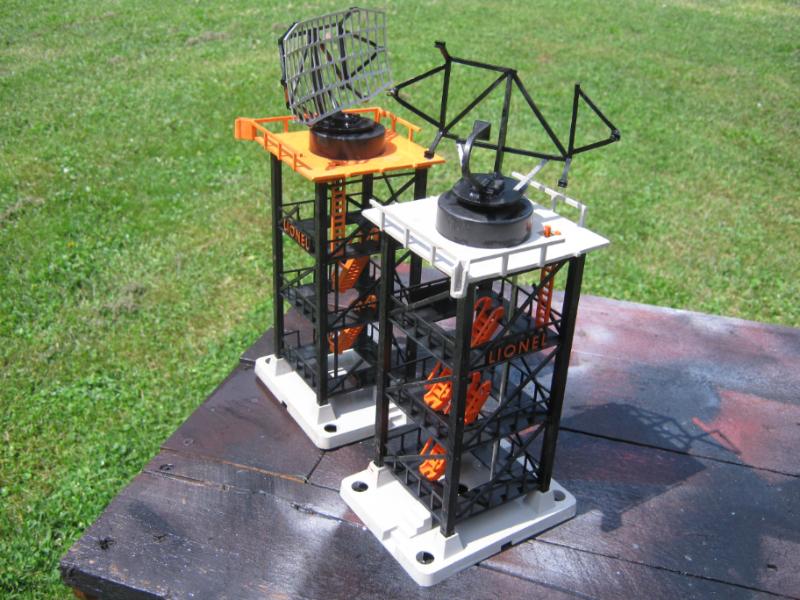
They are both based flat black now and awaiting some conversion and paint. Ideas on what to do w/ them (besides covering up the Lionel plates) are appreciated.
I also bought these at the same place, $1 for 5:

I based them black, hairspray, salted, then sprayed gray:
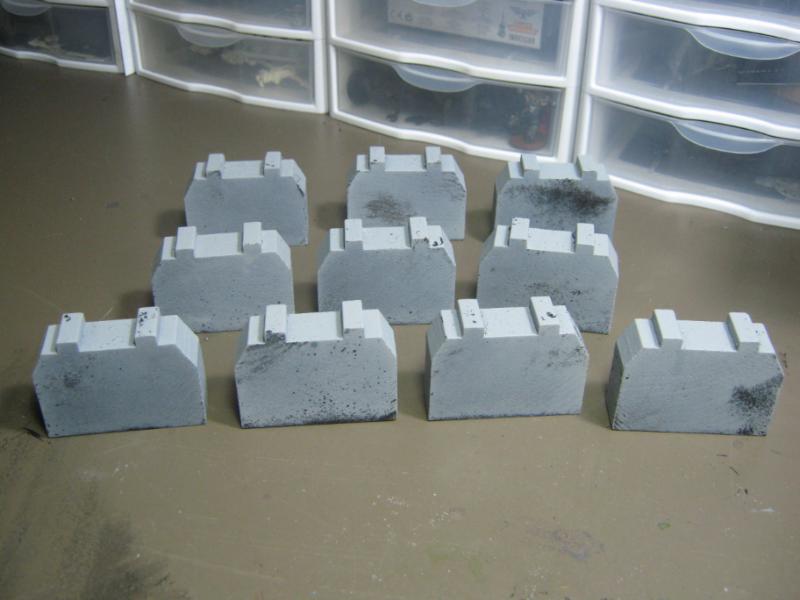
Still a lot of work to be done, but I think they are passable as concrete supports for a pipeline system.
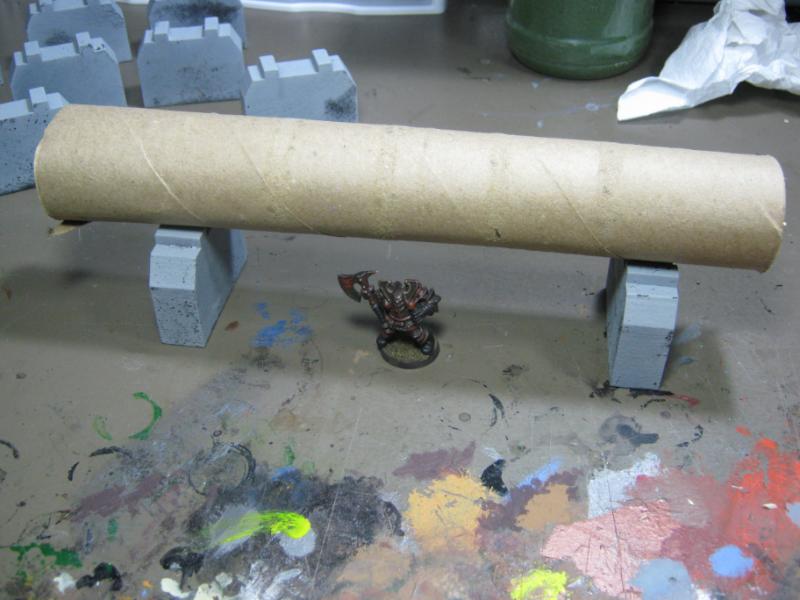
No, I won't be using a cardboard tube, it's just to indicate where I want to go w/ this. I'm going to use PVC pipe when I get to this project. It'll be modular and easily connected together.
Kvlt says "Hello". Actually, he screamed "BLOOD FOR THE BLOOD GOD!!!" but I knew what he meant.

So what does all this mean? Is the Terrain Project headed back to Necromunda / 40K? Well, hard telling. I have a lot of work to be done on the Fantasy buildings and I've not lost sight of that, but I'm also feeling a distinct calling to get back to work on my Necromunda stuff, especially since picking up the new towers I posted above.
At any rate, I'll keep cranking out terrain as I can because I have a feeling my attention is going to shift very significantly very soon. Between now and then I want to get as much QUALITY work done as I can on both 40Kish and Fantasy stuff because once the Cult has rules I'm very likely going to shelve everything and work on miniatures again.
Until then, expect more terrain goodness showing up right here, and since I'll never truly be done with this project I'll be putting new stuff up every now and then as the undeniable flash of inspiration strikes me.
Thanks for looking, comments welcomed, and I'll be back soon!
|
|
|
|
2012/07/03 03:33:39
Subject: Re: Terrain Project- Building a Better Battlefield
|
|
Longtime Dakkanaut
|
@ Briancj-

If this is some sort of model train uber-awesome thing let me know. They have been sprayed black primer, but other than that no other work (a.k.a damage) has been done yet.
@ Bruticus- The guy I got them from wanted $25 each, I told him I was a wargamer and these would not see another train layout in my lifetime. Also asked him how sick was he of boxing up and taking the same stuff over and over. He told me I could take the pair of them for . I think I actually pulled a muscle from reaching for my wallet so quickly.
Models will fit inside w/o issue, likely 4 or 5 20MM round bases. Railings are going to be clipped in a few different places for easier maneuverability of models and to also facilitate walkways being attached. I haven't given thought to what to do w/ them yet, but I'm most likely going to keep one (with the radar dish) as stock as possible, the other I'm going to unleash my bitz box on. I still need to try that "corrugated steel" look from cardboard. This might be the first try. We'll see. Thanks for the input.
|
|
|
|
|
|
|