| Author |
Message |
 |
|
|
|
|
Advert
|
Forum adverts like this one are shown to any user who is not logged in. Join us by filling out a tiny 3 field form and you will get your own, free, dakka user account which gives a good range of benefits to you:
- No adverts like this in the forums anymore.
- Times and dates in your local timezone.
- Full tracking of what you have read so you can skip to your first unread post, easily see what has changed since you last logged in, and easily see what is new at a glance.
- Email notifications for threads you want to watch closely.
- Being a part of the oldest wargaming community on the net.
If you are already a member then feel free to login now. |
|
 |
2014/08/13 19:17:18
Subject: ENTER THE MAELSTROM tourney (1850) Game 3 is up.
|
|

Never Forget Isstvan!
|
Just attended a semi-local Tourney on Saturday in Lafayette, LA which was a 1 day narrative event. It was hosted at the "And Books Too" store which is fairly well stocked and has a rather large comic book collection. TO was a guy named Alex Stanford who is a very nice fellow.
It was a full 7th edition settup, allowing FW and not many restrictions. They did have composition scoring though, so if you brought overloaded HQ or slots your final score would be penalized a bit. Tourney settup was fair though and the missions looked fun so I was raring to test out my new list. Myself and 2 other gamers from my local store reserved our spots and head out with the intention of representing Central Louisiana down in the south.
Heres my list:
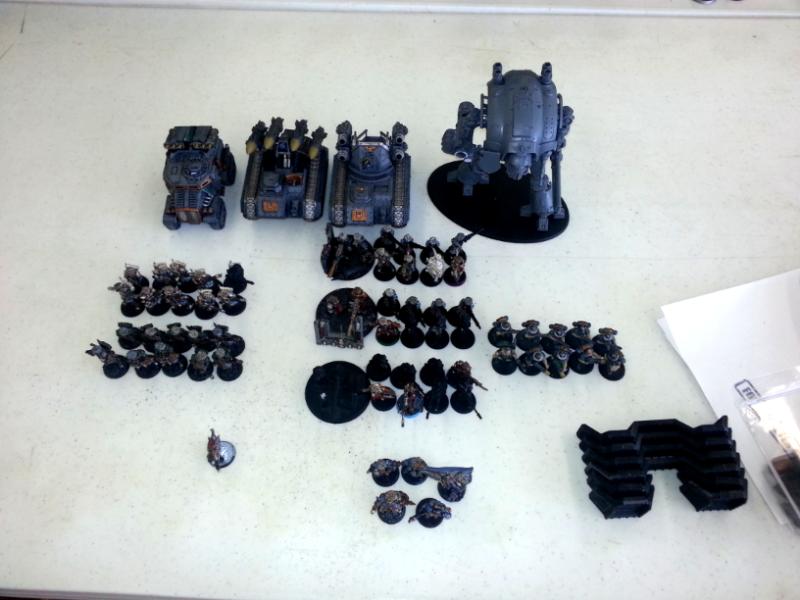
Knights Indomitable (1850pts)
1850pt Space Marines: Codex (2013), Imperial Knights: Codex (2014) (Combined Arms Detachment, Adamantine Lance Formation)
Knights Indomitable (Knight division) - Chapter Tactics
The Knights indomitable chapter fully utilizes the Imperial knights house that lies in their recruiting sector. They have a special company devoted fully to their support on the battlefield.
Iron Hands
HQ (260pts)
Knight-Commander Travexis - Master of the Forge (130pts)
Knight-Commander Travexis is in charge of all the Knight paladin deployments and sometime takes to the field himself if the situation calls for a little extra fire support.
Bolt pistol, Conversion Beamer (20pts), Space Marine Bike (20pts)
Knight-Commander Stoad - Master of the Forge (130pts)
Knight-Commander Stoad is recently appointed after his excellent performance in the Medrengard sector. He is eager to prove that he can lead and assist his Knight Errant division to victory.
Bolt pistol, Conversion Beamer (20pts), Space Marine Bike (20pts)
Troops (345pts)
Support squad Yakkor - Scout Squad (105pts)
Support squad Yakkor specializes in coming in from behind enemy lines and launching key assaults on backfield units to help remove heavy weaponry threats from the Imperial knights they support.
Land Speeder Storm (45pts)
Cerberus Launcher, Heavy Flamer, Jamming Beacon
Sergeant Yakkor - Scout Sergeant (16pts)
A veteran infiltrator who has been in the service of the emperor for 187 years, Sergeant Yakkor leads his support squadron into the rearguard of his enemy, deftly placing his melta bombs or chainsword through the threat deemed most harmful.
Bolt pistol, Chainsword, Melta Bombs (5pts)
Support squad Novos - Scout Squad (120pts)
Support squad Novos is in charge of securing midfield objectives and protecting the deployed Imperial knights from deep striking enemies. As of this date, they have never failed in their mission.
Camo Cloaks (10pts), 4x Scouts (44pts), 4x Sniper Rifle (4pts)
Land Speeder Storm (45pts)
Cerberus Launcher, Heavy Flamer, Jamming Beacon
Sergeant Novos - Scout Sergeant (17pts)
Sergeant Novos has been instrumental in his ability to predict when enemies will try to tactically insert themselves into positions to harm the deployed Imperial knights and has guarded them well, utilizing his LSS's jamming beacon to excellent effect.
Bolt pistol, Melta Bombs (5pts), Sniper Rifle (1pts)
Support squad Piedmon - Scout Squad (120pts)
Following the same combat docterine as Squad Novos, Squad Piedmon deploys in a mannor to keep their Imperial Knight's safe and to hold key objectives during the course of battle.
Camo Cloaks (10pts), 4x Scouts (44pts), 4x Sniper Rifle (4pts)
Land Speeder Storm (45pts)
Cerberus Launcher, Heavy Flamer, Jamming Beacon
Sergeant Piedmon - Scout Sergeant (17pts)
A newley appointed support squad sergeant, Piedmon is a cautious individual who follows the docterine of Sergeant Novos closely.
Bolt pistol, Melta Bombs (5pts), Sniper Rifle (1pts)
Fast Attack (125pts)
Thunderbeast - Stormtalon Gunship (125pts)
The aerial support Stormtalon which is endearingly called Thunderbeast has an impressive record, shooting down over 12 enemy fliers in the last major deployment.
Aerial Assault, Escort Craft, Hover Strike, Supersonic
Skyhammer Missile Launcher (15pts), Twin-Linked Assault Cannon
Knights (1120pts)
Knight-lord Vor'Tosh - Knight Errant (370pts)
Knight-lord Vor'Tosh is a modest leader who places himself on the front lines when necessary to keep his troops safe. He has an impressive battle record and is known for his ability to relegate command to the senior knight commander if he has to focus strictly on the battle at hand.
Knight-lord Ra'Zhoo - Knight Paladin (375pts)
A methodical warrior on the battlefield, Knight-lord Ra'Zhoo fully utilizes his Knights battlecannon during the course of battle. He is responsible for knocking out light transports and hordes of infantry before they get out of hand.
Knight-lord Ki'Oshee - Knight Paladin (375pts)
An aggressive warrior, Knight-lord Ki'Oshee has been known to hold an entire flank by himself against enemy forces. He is relatively young however and has yet to be tested by a competent enemy.
I'll post the games up as i finish fleshing out the details. Participants and results of the tourney were as follows:
alex z stanford--CSM
tim black--AM
mike moore--Eldar
allen campo--daemons
allen broussard--imperial knights
kraus--daemons
daniel "grohl" brunson--SW
david flores--crons
jason swofford--CSM
john koon--Eldar
jody dobberteen--crimson fists
brandon picou--nids
steven wickenheiser--krieg
overall champion (combined tally of all points): mike moore
best general (Battle score + Sportsmanship): allen broussard
best army (appearance + army composition): david flores
best sportsman (sportsmanship + army composition): tim black
not best general (lowest total points): tim black
Note that the prizes were given out first come first serve so if you won a higher up prize you were ineligible for lower ones.
EDIT: I will be adding the missions and the few pictures i have at the end of the reports.
|
|
This message was edited 3 times. Last update was at 2014/08/14 13:56:06
JOIN MY CRUSADE and gain 4000 RT points!
http://www.eternalcrusade.com/account/sign-up/?ref_code=EC-PLCIKYCABW8PG |
|
|
 |
|
2014/08/13 20:35:18
Subject: Re:ENTER THE MAELSTROM tourney (1850)
|
|
Never Forget Isstvan!
|
Game 1 vs Tim Black
 AM
AM/w knight errant
Company command squad
Commisar
3 platoons/w lazcannon
Scion's/w double melta and Taurox
Scions/w double flamer
Wyvern
Manticore
Knight errant
aegis defence line
My surprise to run into another knight in the first match. They werent being widely used so I guess it was fitting however. Tim's a bright, bushy faced individual and i dont get to fight imperial guard often so this was a treat. Our first mission was representative of our army looking for information to better help the rest of the campaign. He won the roll off and elected to deploy and go first. He spread his force's pretty evenly across the table, keeping his knight behind a large ruin to make sure i had no clean shots. He opted to deep strike his scion squads and kept the taurox on the table (probably to contest me if i went for the main objective).
I deployed my 2 sniper squads in bolstered terrain and outflanked 1 of their landspeeders. The other speeder was also in a ruin with one of the squads, in case the oppertunity to take the middle objective was presented. The close combat squad and the empty speeder went into reserve to outflank. My three knights stayed close together to benefit from the formation rules and i planned to run them up the middle, forgetting about the special automated guns on the central objective :(. Both my MotF hung back againgst the edge of the table and out of immediate LOS of his army. I failed to steal the initiative so the game began.
His first turn was pretty standard. He flat outted his taurox onto the central objective and pumped his 3 lazcannons into my knights, doing 1 hull point of damage. He then deleted my left sniper squad (the one with the speeder) with his wyvern for first blood and hampering my chance of taking the central objective. His knight moved up and tried to kill the speeder as well, but i jinked it off.
I then began my turn by pressing my knights forward and into range of the automated guns. They knocked 1 and 2 hull points off my warlord and the already hurt knight respectively really making me regret forgetting about the special rules of the mission. I trudged on however, zooming my speeder forward and shuffling my scouts around. I got some good line of sight with my MotF's and began my shooting phase. The taurox was popped easily and a few guardsmen from the blob were taken out. I also managed to kill 3 of the CCS members and put a single glance on the Manticore after it was all said and done.
Turn 2 had his scions deepstrike in. He attempted to go for my MotF's since melta isnt bad and he didnt like my conversion beamers. His knight moved up flush with the back of the ruin to make it hard for my knights to charge him should i attempt to do so. His shooting phase didnt do much however. He put 1 wound on a MotF and killed 2 scouts from the other sniper squad. I managed to save all the damage done to my knights due to the formation rules however.
This turn i only opted to move 2 of my knights, leaving the damaged one back so that he wouldnt be shot by the automated guns again. My warlord managed to take no damage from them and was in a good position to go for his knight now. My stormtalon came in and flew along the left table edge, in clear sight of his wyvern. My 2 speeders came in from outflank and they mostly went were i wanted. Placing one near the blob squad behind the aegis and the other by a single platoon squad and the manticore on the opposite side of the table. Shooting began and i mostly massacred the infantry, leaving only 1 HWT, the commisar and 5 guardsmen on the left flank, and leaving 4 guardsmen on the right. His company command squad was wiped all the way down to the commander himself, who took 1 wound from a heavy stubber shot, and his manticore was popped by a conversion beamer shot. I also managed to take out the wyvern with a single volley from my stormtalon. Very good turn for shooting. I then opted to charge his knight with my warlord, knowing i would be swinging last because I was feeling lucky. Sure enough, i made it in and he only dealt 3 hull points of dmg to me (leaving me at 2) and i swung back and took 3 off of him. My second master of the forge fired into his scions, killing 2 and then charged them where they would remain for the rest of the game.
Turn 3 for him and he was running out of guns so he just salvaged what he could and opted to recover his backfield. His flamer scions dropped in behind the first squad to support them. He popped my CCscouts speeder and moved his Company commander to join the commisar and remnants of the platoons. He charged the second speeder, only doing a single hullpoint to it. Shooting was uneventful so we proceeded to the knight battle. After the swinging was done my warlord was at 2 hull point still and his was down to 1.
Turn 3 for me was also a bit slow. My melee scouts set up for a charge on the commisar's group and my second MotF fired and chased off the remaining squad on the right. My unhurt knight turned around and moved to charge the flamer scions in case he needed to and we finally concluded the knight combat. Both knights were destroyed as was my snipers speeder due to the explosion. Combat with the scouts was almost a wash as he lost 3 men and i lost 2 scouts. He acctually failed his morale test but his commisar told them not to run with a bullet to the first cowards head.
Turn 4 he didnt have much shooting left so we went almost straight into assault. He killed my CC scouts with his Company commander and commisar's power weapons then consolidated towards my final speeder.
I shuffled stuff around and then finished off the scion squad with a knight charging into them. The other scion squad and the MotF (who had regained his wound), stayed slapping each other.
On the final turn He charged my speeder with his 2 HQ's and they blew it up, however, they both only had 1 wound left and somehow died to the explosion ~)~. Game ended with him only having a single scion left on the table. Neither of us had claimed the central objective though so i got a 2-0 win.
|
|
This message was edited 2 times. Last update was at 2014/08/14 12:59:26
JOIN MY CRUSADE and gain 4000 RT points!
http://www.eternalcrusade.com/account/sign-up/?ref_code=EC-PLCIKYCABW8PG |
|
|
|
|
2014/08/14 12:54:16
Subject: Re:ENTER THE MAELSTROM tourney (1850)
|
|
Never Forget Isstvan!
|
Game 2 vs Mike Moore
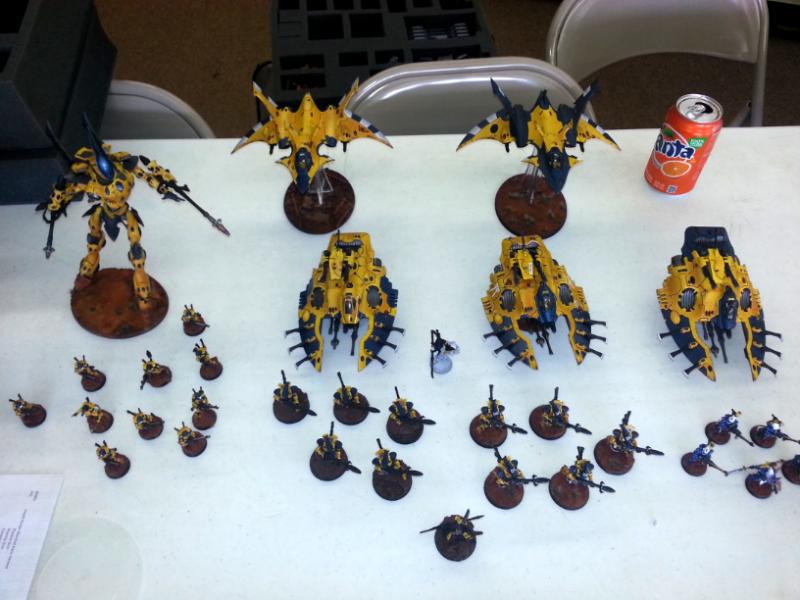
Iyanden Eldar
Prince Yriel
Farseer
Guardians
Dire avengers-Wave serp
5xWraithguard/w D scythes-Wave serp
6xWraithguard/w D cannons-Wave serp
Wraithknight
Hunter
Hunter exarch
In this matchup i was placed againgst a very well painted Iyanden army by Mr. M & M. He definately came off to me as a guy who enjoyed painting his armies up and collecting many different models and his list was much different to the Eldar lists I was used to playing. Our goal this mission was representative of 2 large armies marching forward agiangst each other trying to make ground over the battlefield.
I won the rolloff and elected to go first, bolstering 1 small ruin on my side of the table and a larger one on his right flank, hoping to either lure him to deploying crammed up in it to maximize my blast weaponry and to also provide a late game safe spot for my scouts to hide in. My knights were put in formation directly opposite to the bolstered ruin and my MotF hid safely behind a building on my side of the table. I kept all 3 of my scout squads off the board.
His deployment saw his guardian placed far opposite of me in another ruin along with his 3 wave serpents. He then placed his wraithknight in the bolstered ruins, partly because i had explained how well they could do againgst knights in melee. He didnt have much experience againgst them so I had explained their cababilities before we started and he figured his best bet was to pop my warlord in melee where i wouldnt have a rerollable 3+ ion shield.
He failed to steal the initiative, so we were off. Turn 1 for me however saw mostly nothing on results. I think i took a wound of his wraithknight and forced one of his serpents to jink. I pressed my knights forward, leaving him almost no choice but to charge my warlord.
Which he did. His serpents shuffled to try and get side armor shots plinking 1 hp off while his knight prepped itself and charged in, doing 2 hull points of damage in melee due to some wiffage. I then proceeded to chop him up with a little application of the D.
My turn saw 2 of my speeders come in from the left table flank. I sent one after the guardians and the other after the rear armor of a wave serpent. The guardians did what guardians do best and died to the heavy flamer and bolt pistol shots. I took one hull point off the serpent then proceeded to glance a few more off with all my other shooting. My knights continued to press towards his table edge.
Both his flyers came on and lined up some good shots on my knights. His squad of D-scythes disembarked and Combined fire from the serpents took out the 2 landspeeders and the sniper scouts. He plinked a few more hull points off my knights.
Turn 3 my stormtalon and third scouts came on and I got good firing positions with my knights. I popped the D cannon serpent and the wraithguard inside. I also shot the non-exarch flyer outta the air with my stormtalon. I got 2 of my knights into his deploy zone.
His crimson hunter exarch finished off my warlord and some shots were tossed at my MotF's but they held firm. More scouts were taken out, leaving me with only 3 left in his table edge ruins. After some deliberations on fire efficiency one of his wave serpents took out my stormtalon (they are way too good at anti-flyer duty). Turns were going by quick at this point.
Turn 4 saw me pop another wave serpant and shuffle around some more. Most of my shooting was jinked away. I wiped out the Dire avengers at some point.
He got his farseer and Yriel out and popped my last landspeeder, consolidating into my deploy zone and out of LOS of my knights.
Game ended on turn 5 with me failing to pop his last wave serpent again. I had won 2 of the 3 primary missions and he took 1, granting me a Minor Victory. Overall a very speedy (1 1/2 hours) game and a nice guy. I shoulda docked him 5 points on sportsmanship for bragging about his porche though...........:p
|
|
This message was edited 1 time. Last update was at 2014/08/14 13:01:01
JOIN MY CRUSADE and gain 4000 RT points!
http://www.eternalcrusade.com/account/sign-up/?ref_code=EC-PLCIKYCABW8PG |
|
|
|
|
2014/08/14 13:55:41
Subject: Re:ENTER THE MAELSTROM tourney (1850) Game 2 is up.
|
|
Never Forget Isstvan!
|
Game 3 vs John Koon
FW eldar
Farseer
Ilic nightspear
3x windrider jetbikes
8x Rangers
10x Rangers
Dark reapers
3x Hornets
2x Warp hunter
Scorpion superheavy
So imagine my surprise when i get to final table decisions and have to go up against one of the guys from my local gaming group. Me and john are true rivals on the table top, him being on of the only guys to get me to truly argue about rules while playing. It's all fun and games though, as i'll usually troll him about something then explain that I'm not actually an advocate of doing it and just wanted to let him know I COULD HAVE. He's been having a blast with 7th edition and spamming his hornets in every game (cant blame him, they are OP/good).
He wins the rolloff and deploys his units with a smug grin on his face. The TO is allowing him to use ilic to infiltrate a unit here and this mission has objectives granting armorbane to whoevers controlling them. I do not show any fear however as i place my formation up front and my sniper scouts in cover. I keep my melee scouts and speeders in reserve. He then infiltrates one of his ranger squads in my backfield and places ilic with the dark reapers on the armorbane objective and in clear sight of my knights. At this point I look him in the eye, grab one of my Tablewar dice, and say "I am now going to steal the initiative on you". You see, so far to this point, whichever of us has first turn has won the game's between us. The dice flies into the air and............
BAM! a 6. "F**K!" he yells in frustration.
Turn 1 goes about how you could imagine, I proceed to target the dark reapers and hornets, blowing away about 6 reapers and 2 hornets. He does manage to jink away most of the other incoming damage however. I did do 1 hp off his scorpion with one of my conversion beamers though.
He scrambles to action, shuffling his army about and preparing to inflict some damage to me. He wipes out some scouts and unloads on my warlord with the remaining reapers and the hornet, getting 1 hull point off it. His scorpion then lands both Str D shots on my warlord, but fails to roll a 6. It does manage to take off another hull point though.
2 of my speeders come in on turn 2 and i opt to go after the scorpion and the rangers in my backfield. My knights advance and my MotF gain good firing lines. Shooting pops the last hornet and mows down more dark reapers. The windriders and rangers get flamed and the Scorpion holofields do their job keeping the superheavy safe. My warlord charges the second squad of rangers (who were right near where the dark reapers were) and wipes em.
Knowing my scouts were packing a melta bomb, he opts to do something about em and re positions his troops. He manages to a centrally located sniper squad with one warp hunter and pop the outflanking CC scouts speeder, leaving them staring at the 1 remaining windrider jetbike. His scorpion fires again at my warlord and manages to take him out this turn.
Turn 3 sees my stormtalon fly in. I opt to throw all my shooting into the scorpion doing 3 or 4 hp of damage to it, bringing it down to 4 remaining. The scouts charge and actually miss with their grenades. One of my paladins charges and eradicates a warp hunter. His farseer caught a battlecannon shell to the face at some point.
He's trying desperately at this point to take out my knights, knowing he cant let them get any closer to the scorpion. He gets lucky at this point, finally rolling a 6 and popping one of my paladins, leaving me 1 left. At this point he only has the scorp, 1 warp hunter, a jetbike, and a few rangers left, leaving me board control. Im running short on stuff too though, having 1 paladin (full health), my masters of the forge, my stormtalon, and 3 scouts left on the table.
Turn 4 sees my scouts chasing the scorpion and some templates drop on and take out the last warp hunter. I believe i fired one of my conversion beamers onto his rangers since they didnt have concealment and took them out. My stormtalons weaponry bounces off the scorpion uselessly. The scouts charge, and take another hull point off the scorp.
His jetbike decides its had enough of the scouts and shoots 2 of em apart. He then fires unsuccessfully with his scorp at my remaining knight and only has 1 more turn to remove it. I console him on his bad luck and proceed with the final turn.
Rather surprisingly, i have no luck in my turn either, only managing to kill the last jetbike and shuffling models around onto objectives. He makes all his holofield saves for his scorp and tries one last time to remove my remaining knight. His horrid rolling however continues and he only gets 1 hull point off it, leaving me with a Crushing victory for winning all 3 primary objectives.
We shake hands, and a rib him a few more times about the game, always ending my comments with flattery of course. Were just good friends like that.
** Unfortunately i dont have a picture of johns army, he showed up at the last minute and I never take pictures at our home FLGS.
|
JOIN MY CRUSADE and gain 4000 RT points!
http://www.eternalcrusade.com/account/sign-up/?ref_code=EC-PLCIKYCABW8PG |
|
|
|
|
2014/08/14 13:58:08
Subject: Re:ENTER THE MAELSTROM tourney (1850) Game 3 is up.
|
|
Never Forget Isstvan!
|
THE BATTLE OF FANDAMUS
+++TRANSMISSION INCOMING: PRELIMINARY REPORTS OF A XENOS WRECKAGE IN THE SUBNEXA SECTOR. EXACT LOCATION UNKNOWN. HOSTILE PRESENCE UNKNOWN. CARGO IS SUSPECTED XENOS WEAPONRY….HIGHEST PRIORITY. DETERMINE LOCATION OF CRASH SITE THROUGH WHATEVER MEANS NECESSARY. RECOVER THE TECH. ELIMINATE ANY SURVIVORS. AVE IMPERATOR.
END TRANSMISSION+++
MISSION I
Upon entering the system you notice that the orbital observation platform on Lyksos (a nearby planet) was close enough to Fandamus to track the crash. You decide to stop there and access the platform’s mainframe. The entire platform is automated, and it doesn’t recognize your clearance codes. Just when you think it can’t get any better, you see that someone else appears to have had the same idea.
Deployment Type: Hammer and Anvil
Victory Conditions
Secure the data and blow the station. The station is an objective that can only be taken by a non-vehicle troops choice. Hacking the mainframe takes time, so a unit in base contact must stay there for a full player turn to access the information. Once it is taken the demo charges are considered to be set. At the end of each player’s turn a D6 is rolled and added to the game turn. A sum of 8 or more results in a detonation (blast) of radius 3D6 with S10 AP1 with the instant death rule. ONLY ONE UNIT CAN ATTEMPT A HACK AT A TIME. ANY TROOP IN POSITION TO DENY WILL STOP THE HACK.
Kill points: You may not stop them from retrieving the data, but what good will it do them if they are all dead. For every unit destroyed, earn 1 kill point for every 50 points the unit costs (eg. 234 point unit = 5 kp). Most KP claims this victory objective.
Protect your base: Each side will have an objective placed in their respective deployment zone. The controlling player will get to choose which mysterious objective their home base is.
Bonus Objectives (count towards rank totals) 1 point each
FIRST BLOOD
LINEBREAKER
SPECIAL RULES
Hidden defences: The sentry guns are motion activated. No infiltrating within 12” of the station. Any time a non-flyer moves (during movement phase) within 12” of the station it will be fired upon by the guns. Their profile is S7 AP4 Heavy 4 Twin-linked Rending. The station guns are fired automatically at BS 2, and can be manually fired (as a normal shooting attack) by a unit that has successfully hacked the station (with range 48”). While the station is in base contact with a unit that has hacked it there can be no automatic fire. Units that are removed as casualties by automated fire do NOT count towards the kill point victory condition.
Hold at all costs: Any troop unit within 6” of the station receive the fearless and counterattack rules until they move outside of that radius.
Check your shot, man!: Due to the extremely valuable nature of the station, any unit in base contact with the station (non-flyer) will receive a 3+ cover save.
Impending Doom: If your opponent has a Lord of War and you do not you get +1 to your seize the initiative roll.
All other usual game rules (reserves, night fighting, etc…) will function as normal.
MISSION II
The coordinates taken from the orbital station lead you to Fandamus, an uninhabited planet. You hope that your effort to destroy the station has kept the enemy from knowing the exact location, but at the very best they are still following you. Time is of the essence. In this race, the prize for being second is being the first to die.
Deployment Type: Dawn of War
Victory Conditions
Ultimate Linebreaker: At the end of the game you score 1 victory point for each unit (except Lords of War units) with one or more models in the enemy’s deployment zone. Units that are falling back or that have gone to ground do not count.
A non-zooming, gliding or swooping Lords of War unit scores 2 victory points in each turn in which it ends its Movement phase in the enemy’s deployment zone.
A zooming, gliding, or swooping Lords of War unit only scores 1 victory point in each turn in which it ends its Movement phase in the enemy’s deployment zone. The player with the highest number of VP wins this condition.
Kill points: For every unit destroyed, earn 1 kill point for every 50 points the unit costs (eg. 234 point unit = 5 kp). Most KP claims this victory objective.
Survival: Whoever has the most scoring units left on the table will win this condition. (Units that are falling back will count as destroyed and not survived.)
Bonus Objective (counts towards rank total) 1 point each
Slay the Warlord
Destroy all Fast Attack units (if the opponent has any, that is)
Special Rules
Turning the Tide: For every 3 HP removed from an enemy LoW you get a destroyed scoring unit back in ongoing reserves (dedicated transports too).
Impending Doom: If your opponent has a Lord of War and you do not you get +1 to your seize the initiative roll.
All other usual game rules (reserves, night fighting, etc…) will function as normal.
MISSION III
The wreckage at Fandamus is a terrible thing indeed to behold. Xenos corpses litter the ground like a macabre confetti…a celebration of death and desolation. You’ve made it this far, but the enemy is here as well, and your options are limited. No way to wage a standing firefight here, as you cannot risk letting the archaic weapons fall into their hands. You must press on at all costs, casualties are not a thought you can afford to have. The only hope you have of securing the tech is to get to it first….and use it. May the Emperor have mercy on your soul if you fail, and even more so if you survive the taint of the xenos.
Deployment Type: Vanguard Strike
Victory Conditions
Capture the Tech: Three objectives will be set up precisely halfway between the deployments zones in a straight line, equally spaced apart. Whichever player controls the majority of these objective wins this victory condition. These objectives are *annihilator objectives.
Kill points: For every unit destroyed, earn 1 kill point for every 50 points the unit costs (eg. 234 point unit = 5 kp). Most KP claims this victory objective.
Protect your base: Each side will have an objective placed in their respective deployment zone. The controlling player will get to choose which mysterious objective their home base is.
Bonus Objectives (count towards rank totals) 1 point each
Total Badass: The Warlord who kills the most enemy characters through any means wins this objective
Linebreaker
Special Rules
Annihilator Objectives: The shooting attacks of a unit controlling an objective marker have the Armourbane, Fleshbane, and Interceptor special rules. In addition, a unit controlling an objective marker can choose whether or not all of the models in it have the Skyfire special rule each time they shoot. These objectives can be targeted with shooting attacks, charged, and hit with close combat attacks as if they were an enemy unit. In close combat, an objective marker is hit automatically. Each objective marker has an Armour Value of 15 all around and a 4+ invulnerable save, but is destroyed and removed from play if it suffers a single glancing or penetrating hit. An objective being controlled cannot be targeted apart from the unit controlling it with shooting attacks. Have fun.
|
|
This message was edited 1 time. Last update was at 2014/08/14 13:58:46
JOIN MY CRUSADE and gain 4000 RT points!
http://www.eternalcrusade.com/account/sign-up/?ref_code=EC-PLCIKYCABW8PG |
|
|
|
|
2014/08/14 14:15:37
Subject: ENTER THE MAELSTROM tourney (1850) Game 3 is up.
|
|
Fresh-Faced New User
|
Solid write up, man. I'm glad you had a good time. Hopefully the next tourney will have more players.
|
|
|
|
|
2014/08/15 23:30:50
Subject: ENTER THE MAELSTROM tourney (1850) Game 3 is up.
|
|

Rampaging Carnifex
|
Thanks for the writeup - awesome games, sounds like you played well and that Eldar Iyanden force is very nice looking...
I like seeing some less conventional lists. Great stuff!
|
|
|
|
|
|
|
|
|