Forum adverts like this one are shown to any user who is not logged in. Join us by filling out a tiny 3 field form and you will get your own, free, dakka user account which gives a good range of benefits to you:
No adverts like this in the forums anymore.
Times and dates in your local timezone.
Full tracking of what you have read so you can skip to your first unread post, easily see what has changed since you last logged in, and easily see what is new at a glance.
Email notifications for threads you want to watch closely.
Being a part of the oldest wargaming community on the net.
If you are already a member then feel free to login now.
Well, I was going to wait until I'd painted the whole squad, but I was pleased with the outcome of the first one, so I decided to share Now forgive me for the following text wall, but I always like to explain where my ideas come from - so please bear with me! (You may even find it interesting! - but I'll put it in spoilers for those who want to skip to the good bit )
Spoiler:
Essentially, this guy, and the rest of the squad that will follow in updates, came about after I saw the model for Tyberos the Red Wake - Commander, and possibly Chapter Master, of the Carcharadons during the Badab War. I was really taken by the aesthetics of his armour as it really lives up to it's description as an 'archaic' set of armour. Reading a bit further into Carcharadon fluff, it turns out that their chapter is very much shrouded in mystery, but one thing is certain - they use lots of pre- and post-Heresy Mk's of armour. Looking back through different Mks of power armour, it quickly became evident that Tyberos's armour looks very, very similar to the Mk V 'Heresy' Armour, with the bonding studs and vox-grill almost exactly the same. Reasearching a bit more about the Mk V armour and it turns out that whilst Mk V suits differ greatly, there were two main standardisations. These were:
A) Vehicular Molecular Bonding studs were used as a convenient method to affix additional armour to protect from bolt weapons.
B) On page 71 of The Horus Heresy Book One: Betraya, an image of a Sons of Horus marine with a variant helmet is annotated with '...Helmet fitted with late M.30 'Mantilla pattern respiration unit (later to become standard issue for Mk V Pattern armour.
However, it also turns out that, the helmets of Mk V armour, the so called 'Mantilla' patterns, were derived from prototype Terminator helmets. Putting together the info, I deduced that Tyberos's armour is more than likely of the 'Mantilla' pattern, probably based off the Indomitus pattern. With this in mind, I set about converting a whole squad of Terminators to wear this Heresy Era 'Mantilla' pattern armour. However, just as I'd finished converting their helmets, Forgeworld managed to beat me to the punch, by releasing their Iron Hands 'Gorgon' Terminators. Supposedly, these Terminators wore the very first prototype Indomitus armour designed by Ferrus Manus, and lo and behold - their helmets look very much similar to those that I had already sculpted for mine! So, I took that as further proof that there could very well have been a Mantilla pattern of Terminator Armour, from which the Mk V Helmets were designed.
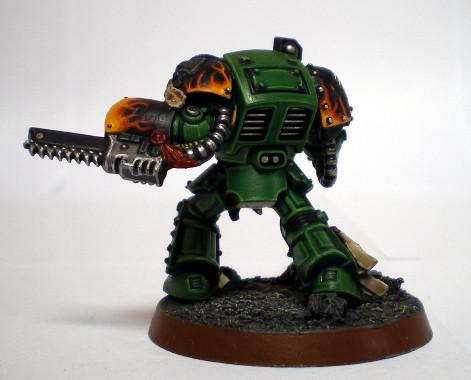
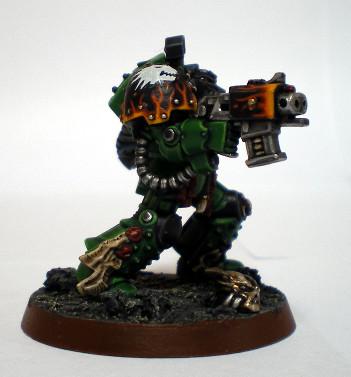
This then, is my attempt at recreating said pattern of Terminator Armour, gifted by Ferrus Manus to Vulkan, and carried through the ages as relics of the Salamanders chapter:
So, hope you enjoy and feel free to leave an C&C you desire!
Love the inspiration and reasoning behind the armour. It's all ways nice to see people going the extra step with their models. How did you create the Mantilla helmet?
And those flames are gorgeous. How do you do them?
@Snrub - In almost everything I do, there's fluff written behind it. From the names of Dreadnaughts and Squad Sergeants, the reasoning behind armour modifications - right down to simply the shape of certain flames I try to think of some reason why it is as it is. My greatest lament is that nobody else wants to read a text wall about it - so I'm more pleased than you can imagine that you took the time to read this one!
On the subject of the helmets here's what I did:
Spoiler:
1.Take a Space Wolves Wolf Guard Terminator helmet - remove the small tab situated on the forehead, the small tab extending down the bridge of the nose from between the eyes and finally remove the respiration gear from between the two studs on the face piece.
2. With those removed, sand down the sharp edges on the 'cheek bones', the very end of the nose (You'll see there are two small incisions at the end of the nose, where the 'cheek bones' come to an end - sand across them to round them off) and the two ridges above the eyes (One either side of the forehead tab)
(At this point, my instructions are rather vague, but you'll have an idea of which sharp edges need to be rounded off)
3. Flatten out a piece of Green Stuff, or whatever modelling putty you prefer, cut to a rough size and press into place across the forehead. This should run along the lines of: Across the back of the forehead, down to each cheek bone behind the eyes, curve over the top of the each eye, and across the front of the nose (In line with the forward corner of each eye. At this point it is crucial to note that you must make sure each eye is visible, and that instead of an angular profile, they are more rounded in aspect. Leave to Cure.
4. With the forehead cured, I then rolled small balls of GS and pressed them onto the forehead to mimic tuds. However, I'd suggest you don't follow this. Instead, it may be easier to buy some 'caviar beads' - Those small beads women glue to their fingernails. 0.7mm is the size you want and all you should do is drill three small holes into the hardened GS (with a 0.7mm drill) put in a small drop of Super Glue (Careful here as it goes everywhere in such a confined space) and pop a bead in - done.
5. Finally, between the two studs on the 'mouth', drill/cut out a cavity between them and stuff with GS. With the GS still soft, sculpt a small vox grill into place. My GS sculpting was sub-par, so I need to find some way of improving these - not sure how yet.
6. Done!
As for the flames:
Spoiler:
1. Mark out the basic shape of the flames with Mechrite Red. Adjust Shape with Abbadon Black (or whatever base colour you're painting onto) if necessary. Apply several thinned coats for a opaque coverage (That goes for all stages).
2. Apply Khorne Red over flames - try to cover 100% of previous layer. This will be your start point. Again, several thinned coats to build up coverage.
3. Mix Khorne Red with Evil Sunz Scarlet - roughly 50:50. At this point, I'll say that all my mixing is by eye. You may find 50:50 is too stark a transition, and that you need to add more of the previous colour of more of the next colour. If so, go for it - just make sure to add in another step to get a smooth transition.
4.Evil Sunz Scarlet:Troll Slayer Orange - 50:50
5.Troll Slayer Orange:Yriel Yellow - 50:50
6.Yriel Yellow:Flash Gitz Yellow - 50:50
7. Now, I find it makes the flames look to cold, but you can go further with a Flash Gitz Yellow:Ceramite White transition, and then onto pure Ceramite white. I haven't in this case.
8.Done! At each stage bring the next layer in, leaving the previous showing at the edges. For the yellow layers, as long as it's a smooth transition, I'd suggest bringing the yellow right into the main body, and leaving any tendrills as orange as you can get them - I find it looks more realistic.
Hope that helps, and once again - sorry for the text walls


 Now forgive me for the following text wall, but I always like to explain where my ideas come from - so please bear with me! (You may even find it interesting! - but I'll put it in spoilers for those who want to skip to the good bit
  )
)