| Author |
Message |
 |
|
|
|
|
Advert
|
Forum adverts like this one are shown to any user who is not logged in. Join us by filling out a tiny 3 field form and you will get your own, free, dakka user account which gives a good range of benefits to you:
- No adverts like this in the forums anymore.
- Times and dates in your local timezone.
- Full tracking of what you have read so you can skip to your first unread post, easily see what has changed since you last logged in, and easily see what is new at a glance.
- Email notifications for threads you want to watch closely.
- Being a part of the oldest wargaming community on the net.
If you are already a member then feel free to login now. |
|
 |
2013/03/27 11:19:12
Subject: Snrubs terrain blog. ~~ Building a cardboard city ~~ Updated 26/2
|
|

Squishy Squig
Cape Cod, Massachusetts
|
Cool looking stuff. I have been using foam board and ceiling texture paint for my terrain instead of cardboard, but free cardboard boxes seems like a good alternative.
I like the balcony and entrance detail.
Do you use cardboard for the base as well or masonite board?
Keep up the good work!
|
|
|
|
 |
|
2013/11/19 15:13:52
Subject: Re:Snrubs terrain blog. ~~ Building a cardboard city ~~ Updated 26/2
|
|
On a Canoptek Spyder's Waiting List
|
Nice to know I am not the only one hoarding cardboard for no apparent reason. Actually have been using it as fire starter but making terrain sounds much more fun. Am currently working on asteroids for a 40K game but your blog has given me some ideas for buildings to sit on top of the asteroids. (Its a scenario from the main book.)
Do you have any of the blue prints from 4th edition that you can post?
Couple questions/comments: Have you thought about using drywall patching plaster over the cardboard? Gives it a stucco patterning and when it dries it cracks giving even more details. A little paint and dry brushing and it looks pretty good. Another thing I have found some success with is a Rust-o-leum paint for decks that dries again with a slate like textured effect. Positive is that they can color it to almost anything you want. Problem is the smallest amount they sell it in is 1 gallon.
Any new buildings?
|
 My basic weapon can destroy your most advanced tank! I will still loose, but it will be entertaining! My basic weapon can destroy your most advanced tank! I will still loose, but it will be entertaining! |
|
|
|
|
2014/01/05 06:31:46
Subject: Re:Snrubs terrain blog. ~~ Building a cardboard city ~~ Updated 26/2
|
|

Fixture of Dakka
|
Ok I am a bad person. I haven't updated this in months. Kinda jumped too hard into the terrain building thing and burnt myself out really quickly. Doesn't help that I've got the attention span of a gnat. 
But with Skalks recent junk pile comp and Cams current LoER terrain comp I've kinda picked up the bug again.
Ok so my entry for Camkierhi's terrain comp is an observation tower. Similar (hopefully) to the kind you might find at an airport.
So to make this tower I've got some corrugated cardboard to use as walls and the roof and the clear plastic lid of a store brought cake that will serve as the observation windows.
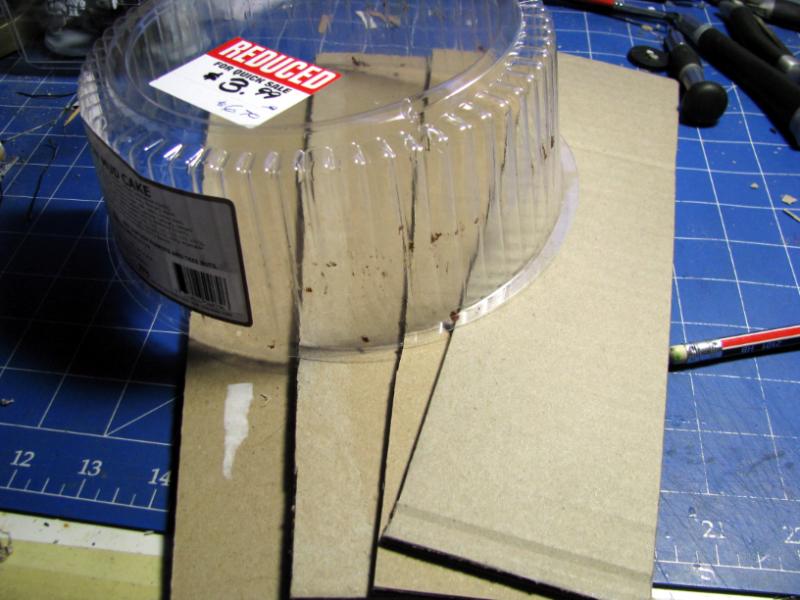
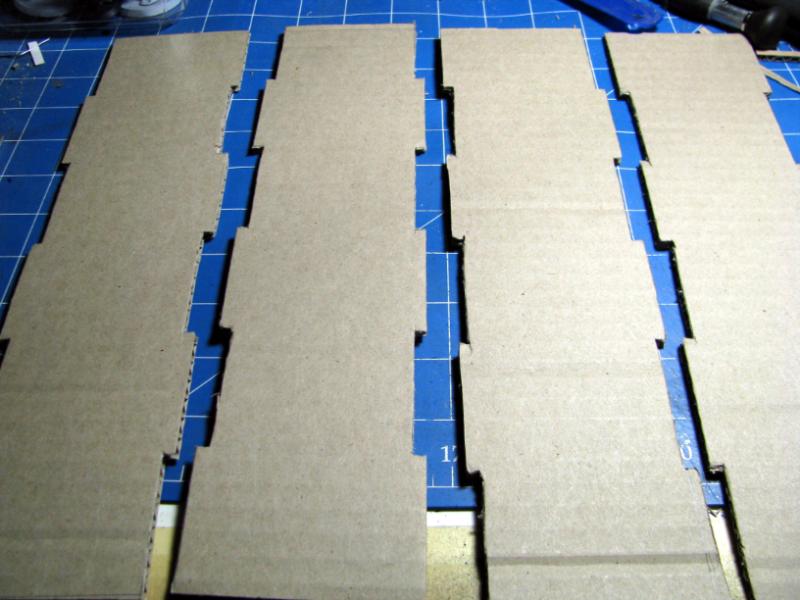
And the walls after being cut out, refined and cleaned up. The jigsaw pattern was a rather nifty idea from my brother and it should help strengthen and stabilise the whole thing.
I'll try to keep the updates coming. 
~~~~~
Also Stormdrake, if your still hanging around, I'll see if I can hunt down my 4th ed rulebook. If I find it I'll scan the blueprints and throw em up.
|
|
|
|
|
|
2014/01/06 16:16:42
Subject: Re:Snrubs terrain blog. ~~ Building a cardboard city ~~ Updated 05/01 - LoER Comp.
|
|
On a Canoptek Spyder's Waiting List
|
Cool and thank you! The jigsaw idea makes a lot of sense and will have to try it myself.
|
My basic weapon can destroy your most advanced tank! I will still loose, but it will be entertaining! |
|
|
|
|
2014/01/06 16:21:34
Subject: Snrubs terrain blog. ~~ Building a cardboard city ~~ Updated 05/01 - LoER Comp.
|
|

Did Fulgrim Just Behead Ferrus?
|
Man, this really brings me back to the good old days when most terrain in GW publications was still scratchbuilt. It really has a charm of its own, very awesome!
Now all you need are some better quality pics! 
|
|
|
|
|
|
2014/01/19 05:54:30
Subject: Re:Snrubs terrain blog. ~~ Building a cardboard city ~~ Updated 05/01 - LoER Comp.
|
|
Fixture of Dakka
|
Stormdrake wrote:Cool and thank you! The jigsaw idea makes a lot of sense and will have to try it myself.
Sorry mate I couldn't find the rule book and don't have a clue of where it might be. I think I might have a solution though. I'll get back to you on that.
Malika2 wrote:Man, this really brings me back to the good old days when most terrain in GW publications was still scratchbuilt. It really has a charm of its own, very awesome!
Now all you need are some better quality pics!
I could have taken better pics but since it's A) a WiP shot and B) only Cardboard, I wasn't too fussed about them looking good.
~~~~~
Made some progress today.
Cut out the both the floor and roof of the observation tower
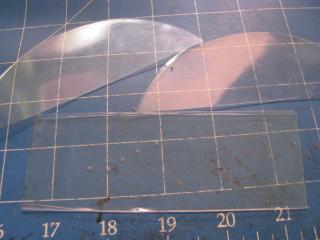
and cut out the windows. The semi-circle windows are going to be cut up to make shattered windows while the rectangular window is staying intact but has some bullet holes drilled out.
I also shortened the tower by 5cm. It was too tall at 30cm so I cut it down to 25cm.
|
|
|
|
|
|
2015/04/09 12:59:40
Subject: Re:Snrubs terrain blog. ~~ Building a cardboard city ~~ Updated 05/01 - LoER Comp.
|
|
Fixture of Dakka
|
*BZzzt*
Clear!
*bumf*
*BZzzzt*
CLEAR!
*bumf*
....*Beep*................*Beep*...............*Beep*................
Good. Now that this thing is alive and kicking again lets get to it.
I've gone and entered myself into the latest League of Extraordinary Riveters contest. This one being hosted by Dr H.
This contest is all about make the "Making the extraordinary from the ordinary". Take everyday household items and turning them into something cool.
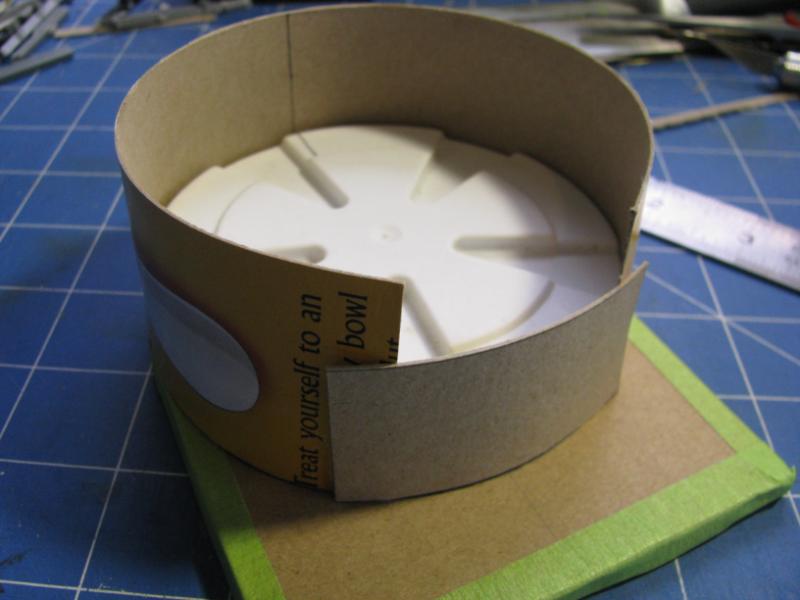
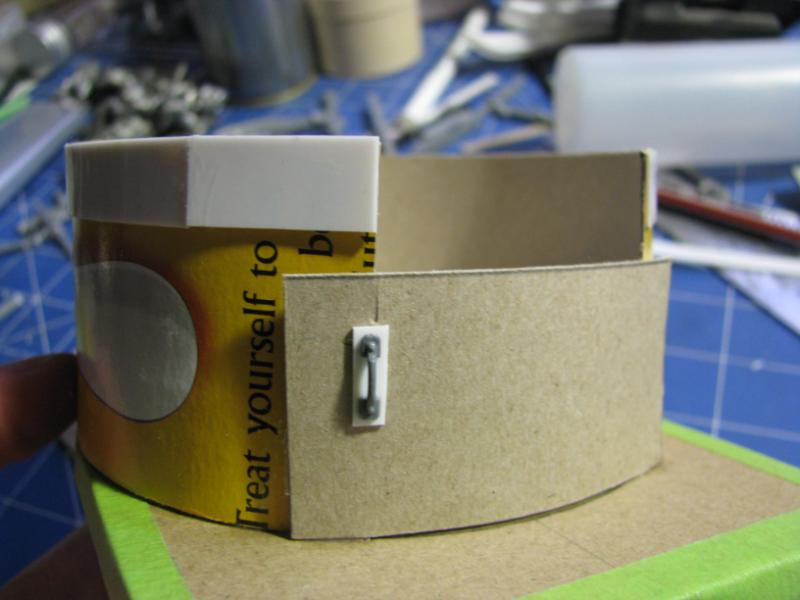
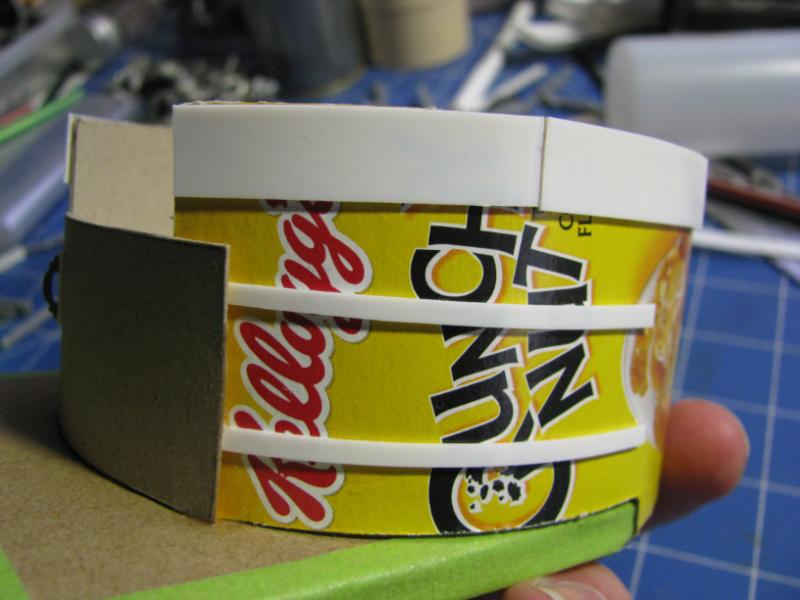
I don't know quite know what I've cooked up. All I know is that I've got an idea and It's already under way. I'm guessing it's going to end up being some kind of pump house or maybe a waste management building or something.
Here's where I'm at so far.
Pre-assembly bits shot.
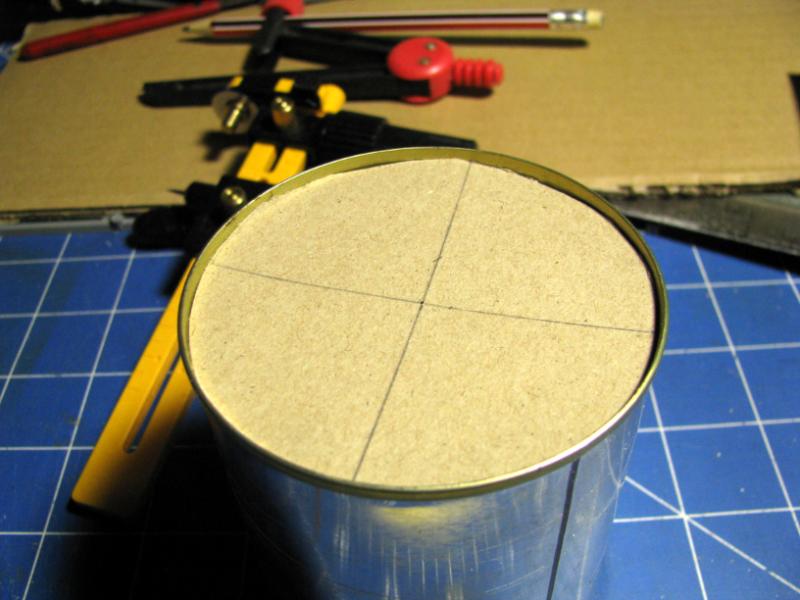
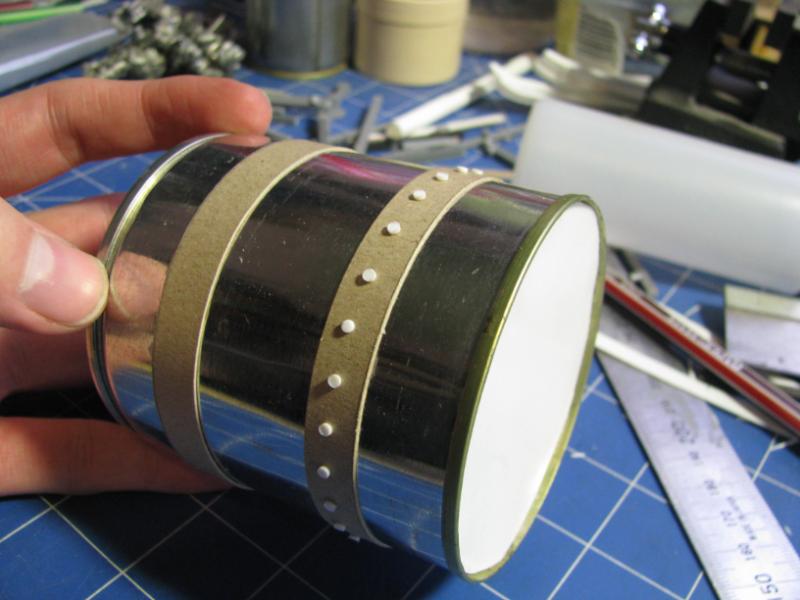
 I made an end cap for the tin can. Because a great big gaping hole in one end is counter productive.
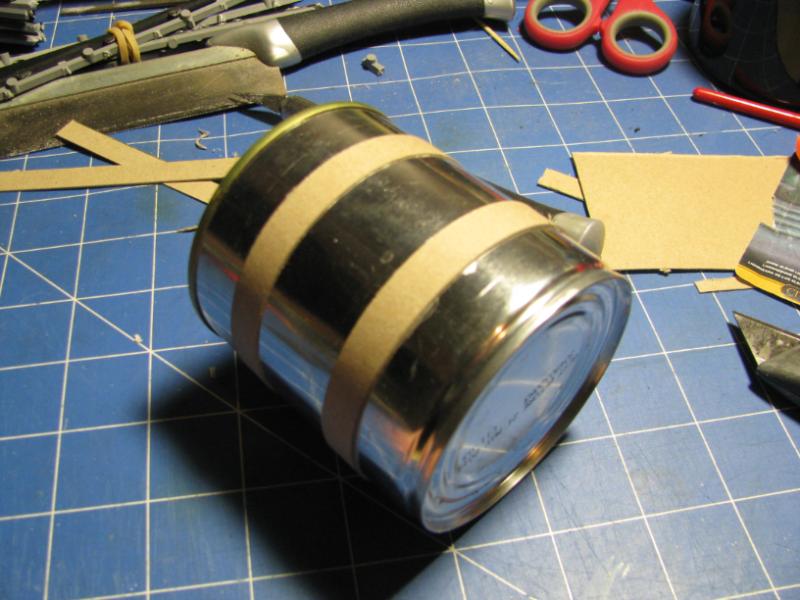
 And some "strengthening" bands out of a cereal packet.
Next up is a mounting frame for the tin can. And if it works out how I'm hoping it will, then I'll be right chuffed with myself.
Thanks for looking. Stay tuned!
|
|
|
|
|
|
2015/04/10 15:25:45
Subject: Snrubs terrain blog. ~~ Building a cardboard city ~~ Updated 05/01 - LoER Comp.
|
|

Shroomin Brain Boy
|
lol...i knew i had subbed to your terrain thread already... but ages ago... 
say... that flowery white bit in the ingredients pic... where is it from?...looks citchenette technical to me in a way?
good luck mate!
|
|
|
|
|
|
2015/04/10 16:55:54
Subject: Snrubs terrain blog. ~~ Building a cardboard city ~~ Updated 05/01 - LoER Comp.
|
|

Ancient Space Wolves Venerable Dreadnought
|
Awesome Plog, exalted!
Doesn't the cardboard warp? Do you seal it in some way?
|
|
|
|
|
2015/04/10 17:45:21
Subject: Snrubs terrain blog. ~~ Building a cardboard city ~~ Updated 05/01 - LoER Comp.
|
|
Ragin' Ork Dreadnought
Deep in the Outer Boroughs of NYC
|
Good progress. Looking forward to seeing more.
|
|
|
|
|
|
2015/04/15 03:08:27
Subject: Snrubs terrain blog. ~~ Building a cardboard city ~~ Updated 05/01 - LoER Comp.
|
|
Fixture of Dakka
|
 Viktor von Domm wrote:lol Viktor von Domm wrote:lol...i knew i had subbed to your terrain thread already... but ages ago...
say... that flowery white bit in the ingredients pic... where is it from?...looks citchenette technical to me in a way?
good luck mate!
Thanks Vik. The flowery white bit is a lid from a jar or Gatorade powder. I've had it sitting around for ages just waiting for the right thing to use it on. And I've got the perfect use for it here. 
 Matthew wrote: Matthew wrote:Awesome Plog, exalted!
Doesn't the cardboard warp? Do you seal it in some way?
Thanks Matt. There is some minor warping with cardboard, but not much. I haven't sealed it (yet). But if I recall correctly the best way to seal it is to cover it in watered down PVA glue. I might have to recheck my facts on that one though. 
Cheers mate. Really hoping I can keep myself motivated to build and update.
~~~~~
Righto then. I had planned on having this project completed by now. However I've been up in Sydney for the last few days and haven't had a chance to work on it. But as of this morning the next step in the process is complete. And I'm bloody happy with it too!
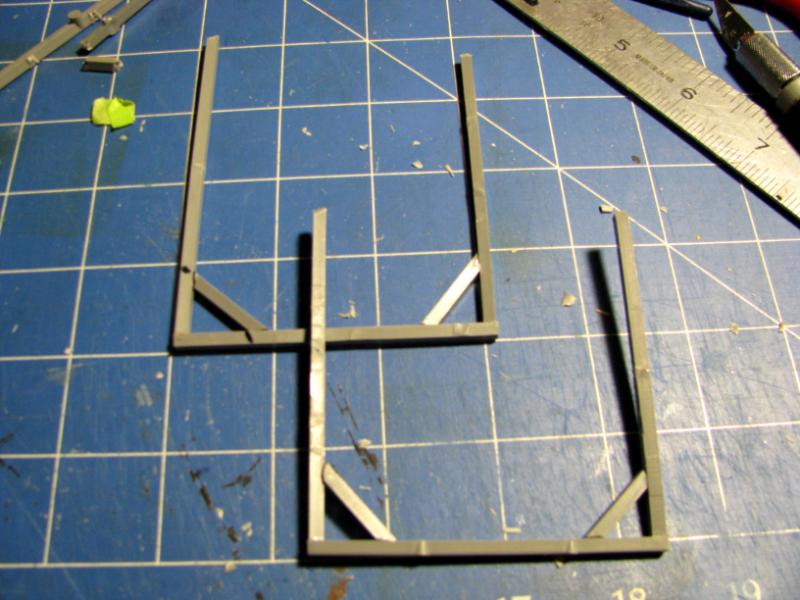
Knocked up a frame for the tin can/water tank out of sprue. Pretty basic thing to do really but was surprisingly fiddly.
Basically I just took six equal lengths of sprue. Cleaned them up of any sticky out bits so that they were flush all along the edges and glued them together to make so separate 'U' shapes.
The next step was add the smaller support struts on the corners. These were the fiddly bits. Getting the angles right so that they were cut flush was more difficult then I was expecting. Got there in the end though.
The end result was...
Next step was to join both 'U's with two more adjoining struts to make a box like structure.
Here's the finished product with a Termie for scale.
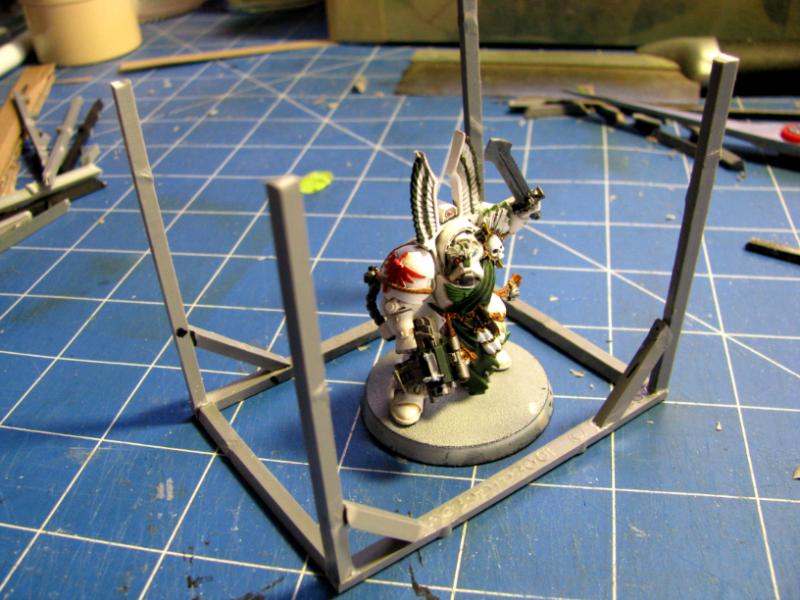
And the finished product with mounted water tank.
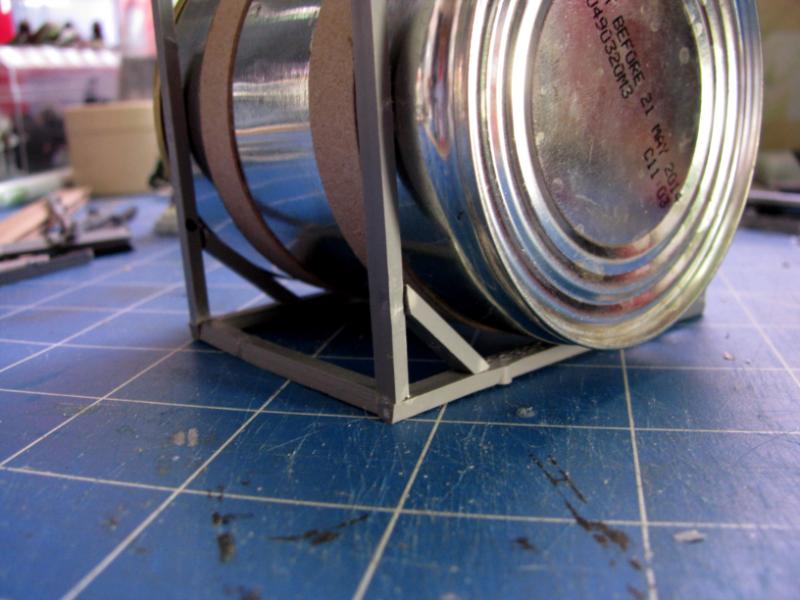
At the moment I'm wondering whether I should add more of the corner support struts or not.
The next step in the build is an industrial sized fan. This is where the Gatorade lid comes into play. I've mounted it on some packing card and I just have to add a protective wall around it to stop errant children falling in and getting mulched. This is going to be mounted on the top of the building next to the tank.

That's it for now. I should hopefully have another update later today
Thanks for looking.
|
|
|
|
|
|
2015/04/25 12:51:06
Subject: Snrubs terrain blog. ~~ Building a cardboard city ~~ Updated 05/01 - LoER Comp.
|
|
Shroomin Brain Boy
|
way too late for my part again looking in here...
but the sprue work is impressive... i have so much myself...but my patience is always too short too clean the amount of sprue needed for constructions...
more progress!
cheers, vik
|
|
|
|
|
|
2015/04/26 07:18:26
Subject: Snrubs terrain blog. ~~ Building a cardboard city ~~ Updated 05/01 - LoER Comp.
|
|
Fixture of Dakka
|
Viktor von Domm wrote:but the sprue work is impressive... i have so much myself...but my patience is always too short too clean the amount of sprue needed for constructions...
Thanks Vik. The sprue cleaning is a bit laborious. I cleaned up the sprue while watching TV. Neither need much attention paid to them so doing both at once kinda complement each other. Same as punching out rivets with a leather punch and some plasti-card.
~~~~~
Bit more work on my treatment plant.
Fan Barrier and gate.
Added a handle to the gate and some "reinforcement" to the top of the safety barrier.
And some runners so the gate would be able to slide.
And added some rivets to the storage tank.
|
|
|
|
|
|
2015/04/26 09:51:55
Subject: Snrubs terrain blog. ~~ Building a cardboard city ~~ Updated 05/01 - LoER Comp.
|
|
Shroomin Brain Boy
|
ah... the obligatory rivetes!
and... got me there... punching out rivets is really a good way to spend the time whilst watching telly^^
not sure with the door thingy there...but i am currently not seeing the piece as you... so i have faith and patience
|
|
|
|
|
|
2015/04/26 10:58:17
Subject: Re:Snrubs terrain blog. ~~ Building a cardboard city ~~ Updated 05/01 - LoER Comp.
|
|
Fixture of Dakka
|
You'd be surprised how many rivets you can punch out while watching a few episodes of QI.
The door is reminiscent of the rear sliding door on a van.
Something like

Only curved.
|
|
|
|
|
|
2015/04/26 11:32:39
Subject: Snrubs terrain blog. ~~ Building a cardboard city ~~ Updated 05/01 - LoER Comp.
|
|
Shroomin Brain Boy
|
ah... now i see...thus the sliding strips...some nice weathering will later be possible for that part of the models!
also... i know that i have to take breaks from punching rivets, as it easily gets me a sore wrist after a certain amount of time...ach...poor wretched me... 
|
|
|
|
|
|
2019/12/06 00:05:38
Subject: Re:Snrubs terrain blog. ~~ Middle Earth ruins ~~ Updated 6/12/2019
|
|
Fixture of Dakka
|
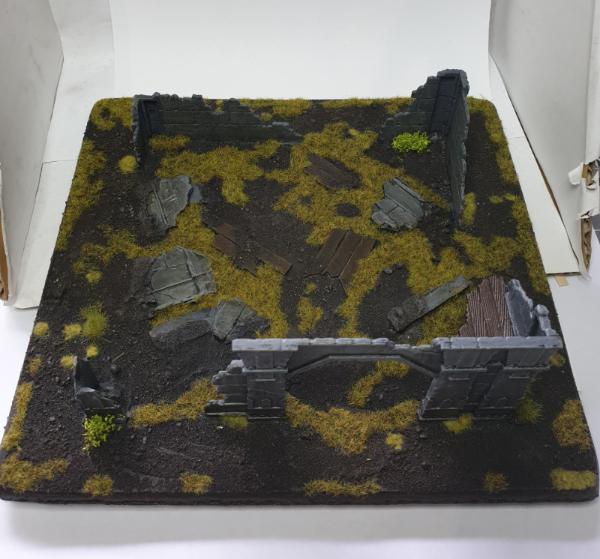
Terrain. I'm good at starting it, not so good at following it through to the end. It's somewhat of a failing of mine...
Spurred on by my recent plunge back into the realms of Middle Earth, and what with the imminent release of the Rohan terrain (which i'm absolutely frothing over!) I thought it would be good to ease myself back into terrain game by making some!
I've had a set of the very old and out of production Lord of the Rings ruins kicking about for many years and I thought it was time to do something with them.
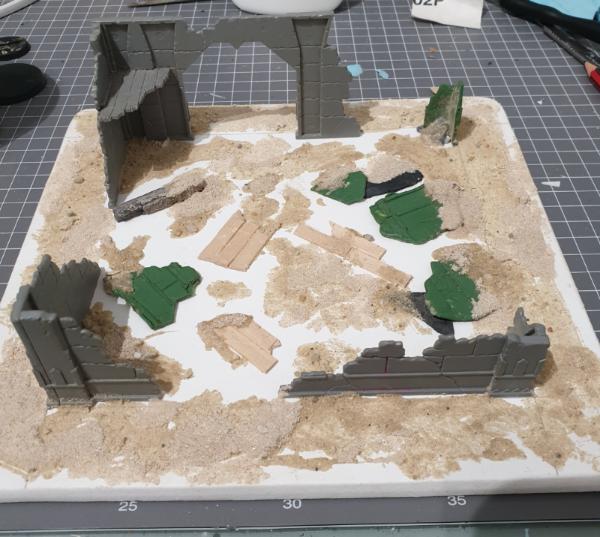
I've mounted them on 5mm foam board along with some pieces of slate and some battered up coffee stirrers to represent floorboards.
I also made a press mould of some wall sections and used greenstuff to make a few extra broken down wall segments. Helps make the single sprue of ruins go a bit further.
A liberal dash of both coarse and fine sand to tie it all together.
I beveled the edges of the board, which overhang the ruins by 30mm so a warrior can comfortably stand there, and gave them a few coats of watered down PVA glue to seal them.
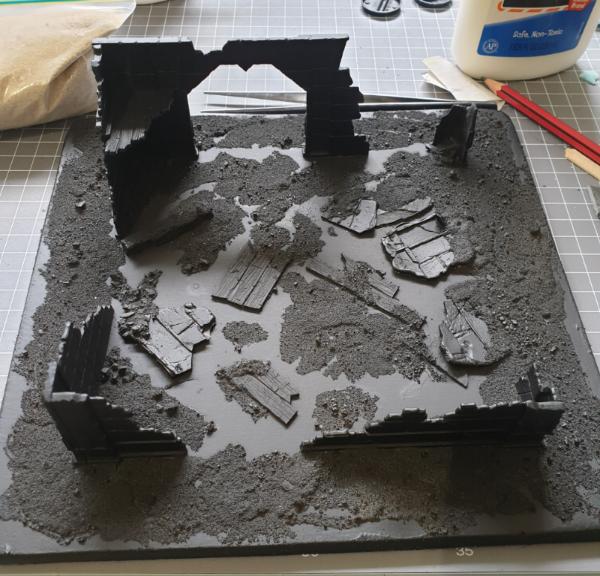
A healthy dose of black spray paint, at it's ready to go!
Thanks for checking my thread out! Comments and criticisms are always welcome.
|
|
|
|
|
|
2019/12/13 05:54:53
Subject: Re:Snrubs terrain blog. ~~ Middle Earth ruins ~~ Updated 6/12/2019
|
|
Fixture of Dakka
|
And finished!
-Used alternating coats of both burnt and raw umber topped off by a drybrush of mid-tone grey to paint the dirt.
-Ruins were multiple rough and patchy coats of the same mid-tone grey just sort of smashed on. They were then given a wash of Secret Weapon Miniatures stone wash, before a drybush of mechanicus standard grey and a final, light drybrush of celestra grey.
-Wooden planks were just scorched brown, agrax wash and a drybrush of vajello beastly brown.
-Grass was mix of "patchy" and "spring" grass and then spot patches of "dead" grass for a bit of variation. Some shrubs were added for a bit of visual interest.

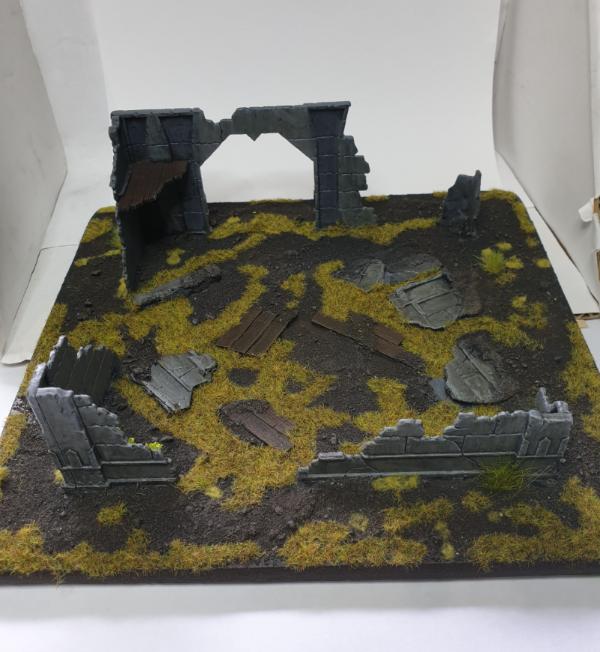
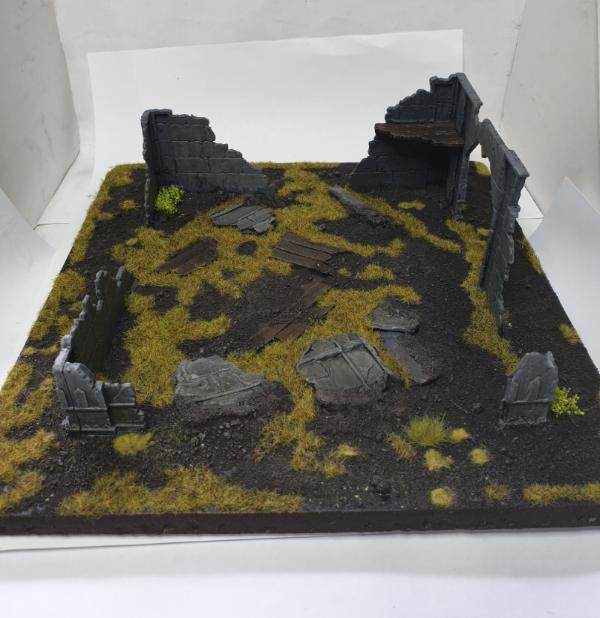
Thanks for having a look. Always open to any thoughts and comments!
|
|
|
|
|
|
2020/04/11 05:49:39
Subject: Re:Snrubs terrain blog. ~~ Middle Earth Walls and Fences ~~ Updated 11/4/2020
|
|
Fixture of Dakka
|
Painted up some Walls and Fences the other day. Real quick job this was. All told about 20 minutes worth of drybrushing. I love drybrushing
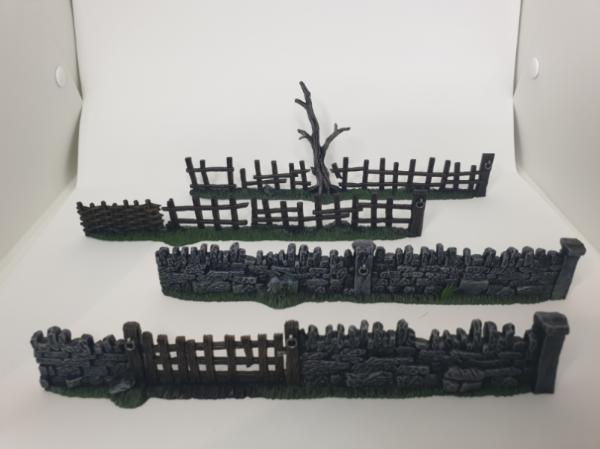

Been playing around with the setting on my camera, the pictures are a bit washed out but i'm getting the hang of it!
C&C always welcome. Thanks for looking!
|
|
|
|
|
|
|
|

