SKIP
TO BELOW THE LINE FOR THE OUTCOME
Played a game with this last night.
The Scouring, Vanguard deployment.
I had 4 Vindicare, 4 Culexus, 3 Eversor, 3 Callidus.
My opponent had 2 Hammerheads with Longstrike, 2 Piranhas, 2 Broadsides with 4 Shield Drones, 1 full
FW squad, 1 full Pathfinder with all the goodies, 3 Stealth suits with a few drones, 1 full Pathfinder bare, a Bomber, and his Crisis Warlord with three Suits for company.
He rolled to go first. Objectives were scattered across the whole board, with both 3's solidly on my side, the 4 and a 2 on his side, and the 1 and a 2 in the middle.
He deployed fairly scrunched up in his corner. I think he was counting on
FB and Warlord, and holding his two objectives for the win.
I camped the Vindicares in some ruins on my side, holding the 3's, with good
LoS to the whole field.
Two Callidus hid out of
LoS in a ruin in his deployment. The other sat up next to the Stealth Team.
One Eversor and a Culexus hid out of
LoS, ready to move up on the
FW/Pathfinder group that were prepared to claim #4. Another Eversor sat on #1, out of
LoS, which was close enough to #4 that he could charge out if/when the Crisis Suits Deep Striked down onto it. Another Culexus was by the Eversor, but in plain view, also ready to charge #4. (I depended pretty heavily on Etherium throughout the game, and it paid off.) The final Eversor sat 12" away from the Stealth Team, ready to either support the Vindicares against the Crisis Suits, or move up to claim an objective. The final Culexus sat 18" away from a Pathfinder team, who had a good view of center field.
I managed to Seize with the Callidus, making my conservative deployment slightly problematic. I would've done much better with the Callidus templates if I had known I would go first. The weakness with the Callidus is that her Polymorph only works on the GAME turn she comes in, rather than the following Player turn. This means that, if you go second, they'll get a full round of full-
BS shooting before you can charge.
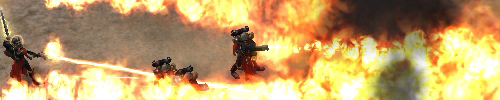
Anyhow, everything surged forward. Callidus moved toward Broadsides. Callidus and Culexus surrounded Pathfinders. Eversor and Culexus moved up on
FW/Paths. Callidus waved and smiled as she threw off her Stealth Suit armour and pulled out a Neural Shredder. I killed a few Pathfinders with the Callidus template, a few Stealths with the template, a few
FW with the Culexus guns. (I rolled a 6 for Power of the Warp, and so had 6 shots from two assassins.) I then got First Blood with the Vindicares. First shot at not-Longstrike and managed to explode it! (I won't expect that as a rule, but still quite a good first outing). The other three shot at Longstrike and caused one
HP. S10 Ignores Cover is really just fantastic, especially when you've got four of them. Not quite as dramatic as the old
4D6 pens...but the Ignores Cover more than makes up for that.
Most of my stuff was in the open at this point, but also most of it had psuedo-Invisibility for protection.
He didn't move much, except to scrunch up the wounded Pathfinders so my template could get even more hits next round.

The Piranhas dropped back to shoot at a Callidus.
Then there was LOTS of shooting. He killed an Eversor (
FWs and Pathfinders both had to fire at him, and I forgot I had
FnP), gave two wounds to the Broadside Callidus, gave two wound to a Culexus, and that was that. It was about statistically what you'd expect...but it wasn't enough.
Callidus flamed Pathfinders again, killing a few more, and she and Culexus charged into them. It was overkill, but they definitely wiped the squad, both consolidating toward his backfield.
Callidus flamed Stealth suits, missing all the 4+ wounds, and charged. Killed all but one, and Swept that survivor.
Culexus moved up on
FW, killed two more with shooting, and missed his charge (I needed a 7).
The wounded Culexus didn't shoot (not enough
WC) and advanced on the Pathfinders near #4, dying to Overwatch.
The final Culexus ran forward toward the Tau firebase, but was out of range of everything.
Backfield Eversor moved up on the Stealth suits to claim the objective, worth 2.
Callidus killed a Broadside drone, survived
OW, and killed the remaining three drones before getting stomped by the two mecha. It was ok, though, since I had big plans for my Vindicares.
Speaking of the snipers, I used all four on Longstrike, who only took one
HP. (Yes, I rolled three 1's on penetration.)
Crisis Suits came in on #4, because two Culexus and an Eversor is a lot to deal with. Piranhas moved forward again, hoping for a lucky kill.
LOTS more shooting from Tau managed to kill one of the Culexus threatening #4.
The Callidus who killed the Stealths didn't get much attention, because she was pretty far away from the action. Piranhas gave her 1W.
--------------------------------------------------------------
Now I'm tired of writing, and y'all are prolly tired of reading, so I'll sum up the rest.
We went to T6. I killed everything except the Fire Warriors and the Pathfinders, who managed to hold #4, for a total of 4 points. The Bomber was also flying about, and I didn't have Skyfire. (It only caused two wounds total in the game.) He must've had around 400pts of models left.
He killed 9 of the 14 Assassins: I had all the snipers and a Callidus left, 745/2000 points. I was holding 8 points of objectives, and I scored
FB, Linebreaker, and Warlord, as well as killing a Fast, for a total of 12 points. (I would've had 2 more objective points, but an unlucky save against a Fusion gun from a Piranha melted my Eversor in one hit.)
All told, I had a good time. It was certainly a strange list, and I want to try it again. It's Battle-forged and only uses one source, so that shuts down the complaints from lots of people. It does have three formations and two detachments the way I had it, or 14 detachments if you don't use the formation. That may be pushing things....


 8500
8500 1500
1500

 6000
6000

 2000
2000 5000
5000
 2,500 points
 2,500 points
 1,500 points

 " rule.