Forum adverts like this one are shown to any user who is not logged in. Join us by filling out a tiny 3 field form and you will get your own, free, dakka user account which gives a good range of benefits to you:
No adverts like this in the forums anymore.
Times and dates in your local timezone.
Full tracking of what you have read so you can skip to your first unread post, easily see what has changed since you last logged in, and easily see what is new at a glance.
Email notifications for threads you want to watch closely.
Being a part of the oldest wargaming community on the net.
If you are already a member then feel free to login now.
2014/10/28 12:52:29
Subject: Captain Shaky-Hands Requests Help for Tyranid Carapace
I am using a GW tutorial book to paint Hivefleet Kraken Tyranids. I am happy enough with the non-carapace portion of the models. However, for the carapace, the tutorial states to basecoat red (done), then wash with a fleh wash (done), then highlight a line with a lighter red along the edges of the carapace (not done). I have fairly shaky hands so this part is very dificult for me to do for models this small. Lines come out looking shaky and bad.
Are there any alternate methods to make the carapaces pop more that aren't so exacting? (I was thinking about dry brushing the lighter red against the entirity of the carapace sections, but haven't tried on a test model yet)
This message was edited 4 times. Last update was at 2014/11/02 14:50:02
2014/10/28 13:50:37
Subject: Captain Shaky-Hands Requests Help for Tyranid Carapace
How are you thinning your paint before the highlight?
Also, heres two things I have found to steady shaky hands:
-For detail work, I use a magnifying visor. Your mileage may vary, but I find when I can see the tip of the brush closer, my hand steadies a bit.
-When I paint, I rest both of my elbows a little below chest height. Finding the right chair/desk work area to allow this more comfortable position helped significantly.
2014/10/28 13:57:24
Subject: Captain Shaky-Hands Requests Help for Tyranid Carapace
I was using a detail brush...Iam not sure of the exact size as I'm not home atm.
I am thinning my paints with distilled water. I basically add drops one by one and stir until I achieve a slighlty milky paint composition.
On top of my shaky hands, I have very bad depth perception. I wonder if a maginifying visor works on top of glasses, as I'm basically blind without my glasses...never tried one. If I can't find another method, I'll try and lock my elbows down against my desk and see if that helps steady things out.
2014/10/28 13:58:30
Subject: Captain Shaky-Hands Requests Help for Tyranid Carapace
Gragga Da Krumpa wrote: What kind of brush are you using?
How are you thinning your paint before the highlight?
Also, heres two things I have found to steady shaky hands:
-For detail work, I use a magnifying visor. Your mileage may vary, but I find when I can see the tip of the brush closer, my hand steadies a bit.
-When I paint, I rest both of my elbows a little below chest height. Finding the right chair/desk work area to allow this more comfortable position helped significantly.
Good advice here.
I would suggest another method: lean back in your chair, rest your fore-arms / heels of the hands on your chest, touch your holding hand with your painting hand's pinkie and ring finger to steady.
I would observe the "source" of the shakey: arm, wrist or fingers?
Restrict or limit whatever that area is.
If you only hold the base of the model I have found sometimes my hand cramps holding it, try temporarily mounting on a wider diameter base or longer (pill bottle, paint bottle, pin vice).
Good luck!
<edit> "Bad depth perception" you do like a challenge with your hobbies! Good for you sticking with it... I would suggest aligning an edge so you are looking at it as the actual edge of the model rather than straight-on which should help.
So if I was painting the back carapace spine I would view from the side with the back in profile and pick at it from there.
Strong lighting from multiple sources will also help with removing shadow that would make some depth perception a challenge.
I hope you prime white or grey: black primer is BRUTAL for picking out detail.
This message was edited 1 time. Last update was at 2014/10/28 14:04:07
A revolution is an idea which has found its bayonets.
Napoleon Bonaparte
2014/10/28 14:01:19
Subject: Captain Shaky-Hands Requests Help for Tyranid Carapace
Dry brush sounds like a good idea, then just neaten up afterwards. Nids have nice raised edges that are perfect for that.
Just make sure you don't load your brush too much and you should be fine.
I suggest using the shake to your advantage and feathering. Very forgiving, and once you get the hang of it, pretty quick.
Thin down a little bit of the original red, and add just a touch of a buff / tan (VMC deck tan / PA light mud / Rakarth flesh). With your pointy brush get a very small amount on the brush and practice making short, quick, brush strokes in the air. Once you have the movement 'locked' move your hand closer to the model until the tip of the brush just touches it. Your hand will still make the same motion, but you move the model slightly to move where the stroke goes.
I have pretty shaky hands (too much caffeine, lol), so to get a fine line I have to practice the move to get it locked (holding your hand slow and steady is hard, but a practiced move is easier).
You want a streaky look where the strokes start, going to a more solid finish where the strokes finish (and cross over etc). The stroke starts mid-carapace and goes off over the edge.
Add more tan and repeat the process, with your stroke starting just a bit closer to the edge.
More repeats makes for a smoother finish. Work up to quite a strong tan colour for the very edge.
Don't worry if this looks pinkish (it will). Don't worry if you get spots just past the recesses.
Use the original red with the same sort of process to get rid of any spots. The raised edge makes an easy 'stop' for this.
Now mix a bit of black with the original red, thin it down a bit and feather that into the recess.
You should at this stage have a nice contrast between blackish red and buff-pink (peach yoghurt-ish sort of colour is the aim).
Now to make it red. Ideally I'd suggest a red ink watered down a fair bit, but the original red thinned will also do. Glaze this (that means little paint on the brush - you don't want it to flow off like a wash) onto the carapace.
This message was edited 1 time. Last update was at 2014/10/28 14:20:13
2014/10/28 14:57:30
Subject: Captain Shaky-Hands Requests Help for Tyranid Carapace
jasper76 wrote: I was using a detail brush...Iam not sure of the exact size as I'm not home atm.
I am thinning my paints with distilled water. I basically add drops one by one and stir until I achieve a slighlty milky paint composition.
On top of my shaky hands, I have very bad depth perception. I wonder if a maginifying visor works on top of glasses, as I'm basically blind without my glasses...never tried one. If I can't find another method, I'll try and lock my elbows down against my desk and see if that helps steady things out.
Sounds good. I was checking if you were practicing thinning and if you were using a decent brush. Those two things make detailing significantly harder, shaky hands or not, if you do not do them!
And, as for the visor over glasses, they should, depending of the type of visor. The visors destroy your depth perception anyway.
2014/10/28 15:20:23
Subject: Captain Shaky-Hands Requests Help for Tyranid Carapace
His paint for 'feathering' is waaaaaaaay too thick and overloaded. When it's right you'll notice that the colour is much stronger at the end of each stroke (remember we do hundreds of strokes, very quickly indeed), and almost imperceptible where you started. Each stroke will dry in a very quick time - by the time you've gone from one side of a head plate on a gaunt to the other, where you started will be dry enough to go over again.
Glaze mediums can help if you're having trouble with loading the brush too much (they cut the opacity but keep the paint slow flowing). But really you want to get the load in the brush right (that leads on to many other techniques that help like glazing etc).
For the sake of reference, feathering started as a renaissance technique using an actual feather to pull oils across a canvass. With acrylics we have to approximate the effect by using thin enough paint with a low enough brush load to drop a bit of paint and pull it across the surface with the brush, leaving little behind the stroke.
This message was edited 2 times. Last update was at 2014/10/28 15:22:14
2014/10/28 15:27:11
Subject: Captain Shaky-Hands Requests Help for Tyranid Carapace
Yep. It's easy to test - when you make a stroke, it'll be a line, stronger at the end of the stroke. If that's what's happening, you're doing it right, and you'll get a really nice smooth gradient without having to do loads of different mixes.
If your stroke is the same strength at start and end (as in the video) there's either too much paint on the brush and it then flows out too fast (though if your consistency is right this tends to end up behaving like a wash - running off everywhere), or the paint is too thick and isn't being pulled from where you put it.
Doing it wrong (with too thick paint) is easier, but it isn't faster, and it doesn't look as good- you need to use many mixes to get a smooth gradient doing it that way.
Once you get the hang of it, you'll use the same sort of technique all over the place, so it's worth getting it right.
This message was edited 1 time. Last update was at 2014/10/28 15:40:55
2014/10/28 15:45:27
Subject: Captain Shaky-Hands Requests Help for Tyranid Carapace
When you are painting a line in this feathering manner from mid-carapace to endpoint, do your strokes go along that line, or perpindicular to the line? Hope that question makes sense
2014/10/28 15:45:45
Subject: Captain Shaky-Hands Requests Help for Tyranid Carapace
On shaky hands... I know others have mentioned it: but for me it was a critical change...
Low chair, high desk. This works because my wrists can rest firmly on the edge of the desk, supporting the model, while my hand/model remain close to my eyes - so I am not tempted to hunch or lift the model up to my vision (super shaky!).
Also good lighting really does make a difference. When you can see well you are less tempted to be holding up the model at different angles before your eyes just to catch a tiny area in the light.
When you are painting a line in this feathering manner from mid-carapace to endpoint, do your strokes go along that line, or perpindicular to the line? Hope that question makes sense
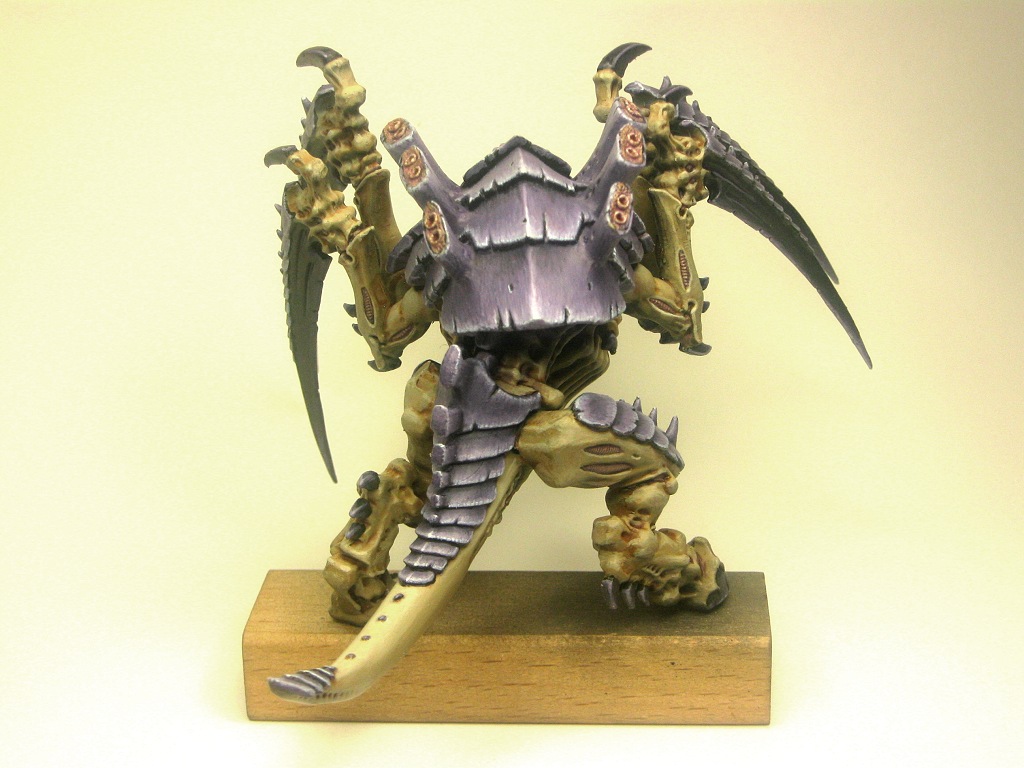
Many strokes, perpendicular to the edge you are highlighting, ending at the edge you are highlighting.
End result should look similar to this after 3 mixes (2 highlights and a shade):
Note that on the tail's 'top' plate the dark shade is toward the middle of the plate, so all 'outer' edges are highlighted. Feathering direction is along the tail.
This message was edited 1 time. Last update was at 2014/10/28 16:25:14
2014/11/02 07:41:16
Subject: Re:Captain Shaky-Hands Requests Help for Tyranid Carapace
I use edge highlighting for the edges of armour plates.
Put your normal amout of paint on your bursh that you normally use and hold your brush so the side of it is at a 45 degree angle to the edge of your plate or in your case, the carapace and in a stead but quick move, bring it along the edge from left to right or right to left. What you wont get with this technique is the nice gradients along the top of the flat areas.
2014/11/02 08:28:26
Subject: Re:Captain Shaky-Hands Requests Help for Tyranid Carapace
I was able to get some minor improvements to my edge highlighting technique with help from recommendations in this thread.
Not presenting this picture because I think they're great or anything, as I know I'm a novice painter, but this is an improvement to what I was producing before:
This message was edited 3 times. Last update was at 2014/11/02 14:49:32
2014/11/02 09:31:18
Subject: Captain Shaky-Hands Requests Help for Tyranid Carapace
@winterdyne: I'm not mixing colors as I'm a bit too novice to know how to do that well. Just using the citadel pots straight. I hear what you are saying, though, although something was indeed lost in the photo from my phone cam. I don't have any other camera but my phone camera and it makes everything look about 2x as 'purply-red' as they actually are. (what I mean is when I put the model next to the picture on my computer screen, the red is way, way redder than it looks purple, and the light color is a bit more yellow than it looks beige)
There is a red wash on the carapace...could I add a bit of black paint to the wash to darken it up a bit.
On the light color, that is two layers of wash, Do you think it would look better if I just did 1 wash...lighter bodies I mean?
This message was edited 1 time. Last update was at 2014/11/02 10:02:51
2014/11/02 10:12:59
Subject: Captain Shaky-Hands Requests Help for Tyranid Carapace
If you really want to improve your painting, there are a few things you need to sort in your head.
First and most crucial:
Don't think of painting with a particular paint. Ever. You're only concerned about colour and opacity. If a particular brand / paint name does what you need, buy it. Chances are you'll need it again. When paint shopping, look for colour first and think how it fits in with what you already have.
Second:
Don't think you need to use a paint as it comes from the pot. Almost universally, you shouldn't. The only exceptions I can think of are the Vallejo PU primers which go through my airbrush neat, and occasionally GW shades (which are pre-thinned).
Third:
NEVER dip your working brush in the paint pot. Use a palette (I strongly suggest making a wet pallette - waterproof box with a lid, layer of sponge in that, topped with baking parchment or non-coated baking paper). Transfer paint from pot to pallete, and work from there.
Those three points lead on to the last thing - which rather than a habit is an actual technique - the use of the palette.
A wet pallette is great, because it's level and keeps the paint fresh while you're working - you can keep a small blob of water in one place, and blobs of paint in others. You can then take a small amount from your on-pallete blob, put it down, add tiny amounts of water (with your brush) and get the consistency to exactly what you want.
To work a progression (from one colour to another, like the highlight mixes) simpy space out the blobs of paint, and mix an intermediate from those into a separate blob between them. Repeat, dividing the space if you need multiple mixes. In most cases however you won't need more than 3 or 5. (So you get 6 or 10 little blobs of paint, including the ones you add a touch of water to as needed to use).
Ok, that should pretty much cover everything you need to know.
In terms of what I think you could do with doing - it looks very much like your wash went over the entire red area, too thickly and has 'filtered' the contrast out too much. So yeah, you need to work a little more black into the recess, and a little more highlight onto the very edges (don't edge line as suggested above, dot it, or you'll lose the 'ridged' effect).
If you need to reapply the filter, just concentrate more on the centre of the carapace plates.
2014/11/02 11:27:30
Subject: Re:Captain Shaky-Hands Requests Help for Tyranid Carapace
Thanks man. I'll take what I can to heart ref points 1, 2, and 3. I have no peculiar love of Citadel paint...its just the only paint besides Army Painter paints thats even available at my flgs...I live kinda sorta in the sticks. I think some of the palette stuff you are mentioning is a bit complex to learn from text for me terms of execution and might require some student and teacher face-to-face time where I can see this stuff in action, and ask real time questions back. At least I know some questions to ask my more advanced painting buddies. Thanks so much for taking your time!
This message was edited 3 times. Last update was at 2014/11/02 11:37:39
2014/11/02 13:48:43
Subject: Captain Shaky-Hands Requests Help for Tyranid Carapace
I think part of your problem is that your brush is too small. Get a number #2 flat brush or even a #4 flat and use the flat edge of the brush for the highlights.


 Legion: Dark Angels