There was a post a couple of days ago with a how to paint visor lenses, so I thought I would contribute to the effort with a how-to on glowing eyes. This is a pretty easy way to do eyes that anyone who edge highlights their models can do!
I'm sorry I don't have step-by-step pictures (I pulled out a couple of already-painted minis from my cabinet), but the instructions are pretty simple. First, the picture:
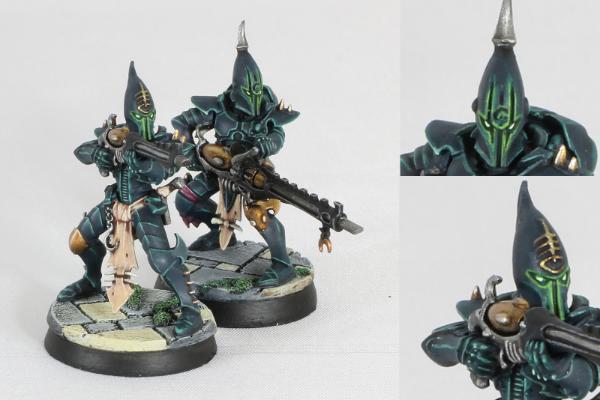
The basic technique is to paint the eyes white and use a glaze (not a wash!). Then, use a two-layer edge highlight around the visor area. If you're using a 2-layer highlight on the model anyhow, use the same first layer as you're using elsewhere. On the second layer, use a brighter, more flourescent (or "game-like") pigment. Do not do final highlight on corners, because the emphasis should be on the area closest to the eyes.
Here are the steps for the Dark Eldar Kabalite in the picture.:
1. Preparation: Basecoat the helmet the same color as the armor, Incubi Darkness. Wash the recesses with Nuhln Oil, either being generous on the eye recesses, or giving it a second wash to darken it.
2. Paint the visor lenses white, using White Scar, but leave a gap between the eye cavity and the eyes. If there is a recessed gap between the visor/eye and the helmet edge, this is very easy to do neatly. Otherwise, if you overpaint the white, no big deal: just use black, mixed in with a tiny bit of Incubi Darkness to correct it. If you need to, put a second coat of White Scar; you need the visor opaque white.
3.
Glaze the eyes and the area around it (that would glow). In the
GW line, there are 4 glazes - red, blue, green, and yellow. I used Waywatcher Green. Do NOT use a wash, because where a glaze will colorize the white and make it a vivid color, a wash will darken and muddy it. Let it dry, and repeat the glaze until you're happy with the color of the eyes.
4. On the helmet edges around the eye or visor, use a thinned paint to paint a first, fatter highlight. I used Kabalite Green, the same color I used to do a first layer on the edges for the rest of the armor plates.
5. For the immediate area around the eyes only, use a bright color to paint a second, very thin line. I used Moot Green.
It is important NOT to use the same color on the second highlight as you do to highlight the armor of the model. In my case, I used Sybarite Green for the edge highlights, so it was important to choose a color more vivid than this. Otherwise, there isn't the illusion of glow. For example, my Dark Angels are highlight with Moot Green, and just look highlighted, not glowing). Also, if you wish, give the area closest to the eyes a second coat, or gently lighten your brush as you paint further away from the eyes, if you want to emphasize the glow.
Hope that helps!

