Forum adverts like this one are shown to any user who is not logged in. Join us by filling out a tiny 3 field form and you will get your own, free, dakka user account which gives a good range of benefits to you:
No adverts like this in the forums anymore.
Times and dates in your local timezone.
Full tracking of what you have read so you can skip to your first unread post, easily see what has changed since you last logged in, and easily see what is new at a glance.
Email notifications for threads you want to watch closely.
Being a part of the oldest wargaming community on the net.
If you are already a member then feel free to login now.
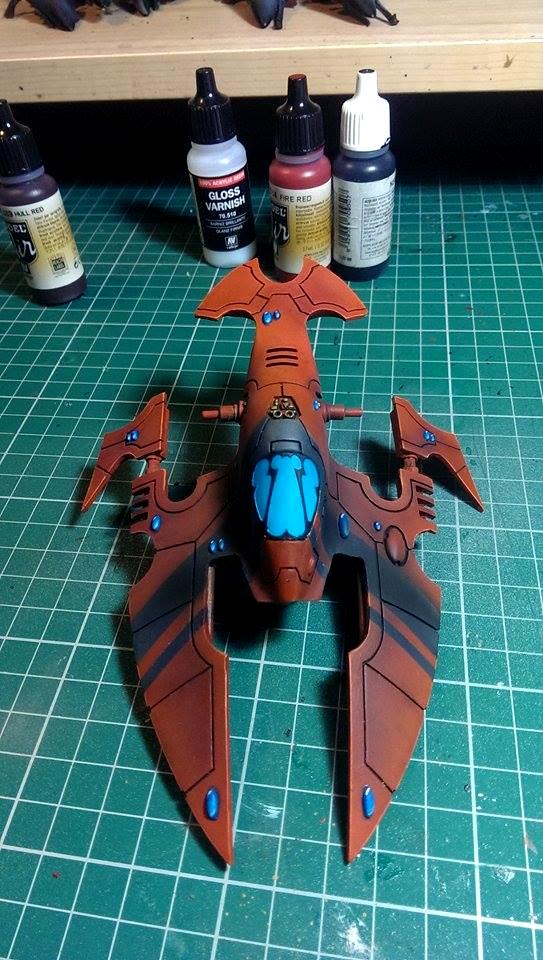
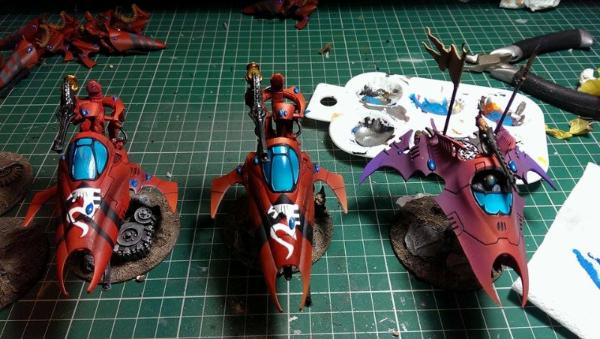
Just picked up a Razorwing Jetfighter and debating how to paint the canopy (clear cockpit window).
On the one hand its quite cool to see the pilot and maybe do a little Heads Up Display. On the other hand it sometimes ends up looking tacky and i've seen some good looking examples of the canopies being painted over.
What do you guys do with yours and how might I achieve what you consider looks good?
Thanks
"That's how a Luna Wolf fights."
"If you can't keep up, go and join the Death Guard"
"It had often been said that Space Marines knew no fear, but when Angron charged, he ran"
I left mine clear with a dark wash, as if they were tinted. You can still the piolet etc but its not a claring piece of clear plastic. Of course I painted the frame work in the canpoy too.
My own chapoter, The Broken Swords. Almost a full company.
1500
Check out my painting page on Facebook. Wartable Painting.
Thanks, glad you liked my article. I appologize for the delay, been busy. Youre right, Future can loosen or desolve un-cured Tamiya very easily. However, what I do is make sure the underlying Tamiya tint has had plenty of time to dry and cure, usually within a few hours..to be safe. The subsequent layers of Future can then be applied without fear of disturbing the tinted undercoat. So just for clarification, here are my exact steps for tinting canopies with Tamiya:
1) Canopy Prep- I clean the canopy with a Q-tip soaked with denatured alcohol or Polly S plastic prep and set it aside to dry.
*A word on Denatured Alcohol Solvent (DNA) and Tamiya acrylics. This is by far the best and most consistant thinner for Tamiya I have ever encountered. It thins Tamiya superbly, blends colors (even metalics) more thouroughly than Tamiya's own thinner and when the paint film is dry, adhesion is comparable to enamels! Whats more is, that it's available in any hardware store paint isle, and it only cost between $3-$4 per US Quart! I've airbrushed fine lines with no tip dry for long sessions and it is comparably non-toxic as rubbing alcohol, 70% Isoprophyl and Tamiya thinner. Also, it is (I strongly supect) the main ingredient of Polly S Plastic Prep. So, I've found that it is also an excellent cleaner for my airbrush too. It's a mystery to me why other modelers haven't tried this wonder thinner for Tamiya Acrylics! Ok, on with the rest of the steps.
2) Future coat- Using a clean Q-tip, I soak (not dripping) the swab in Future and apply a thin coat to the inner and outer sides of the canopy and set it aside in a dust-free container to dry over night. When applying with Q-tips, use light, quick strokes. Resist going slow and spending to much time in an area. Also, like brush painting, avoid re-wipping previously wipped areas. Thin coats of Future starts drying fast and this can cause fibers to get stuck in the Future and create lap marks, ruining the application. If this happens, soak the canopy in Windex for 5 minutes, wipe clean, let dry and start again.Grumpy [|(]
3) Tamiya tint- Choose your required color tint and thin it with denatured alcohol or Tamiya thinner (if you must) at a ratio of 1:1. Airbrush the canopy, and build up the tint layer and intensity slowly to achieve the desired effect. Usually this is approx. 1 or two light coats. I then set the canopy in a dust-free plastic container to dry for approx. 3 hours or more.Whistling [:-^] When dry, the canopy may look dull, but it's OK. The final Future coat sealer will clarify the canopy in the next step.
4) Future layer sealer- I apply a thin layer of Future over the tinted canopy using a moistened Q-tip. Be carefull not to alloy the Q-tip to dry out as mentioned in step #2. Otherwise, you'll have to soak the canopy in Windex again and start over.Banged Head [banghead] Keeping the Q-tip wet (not dripping) will prevent this and insure even application. Apply this final coat to both sides of the canopy for superior clarity.
5) Final step- Now set the canopy aside to dry and cover with a dust-free container to cure overnight. Your canopy should be tinted, near crystal clear and shiny! Mask and paint as normal.Make a Toast.
There you go.
A revolution is an idea which has found its bayonets.
Napoleon Bonaparte
Haven't had call for clear canopies in my armies, thus far, but like Talizvar, I'd take my advice from the real experts - the aircraft modelers who have been perfecting clear and tinted canopy techniques for decades. A Future dip and careful masking can have a simple clear part looking like real scale glass in a frame.
The Dreadnote wrote:But the Emperor already has a shrine, in the form of your local Games Workshop. You honour him by sacrificing your money to the plastic effigies of his warriors. In time, your devotion will be rewarded with the gift of having even more effigies to worship.
I leave the canopy glass clear and paint the armored frame, if you paint the actual glass, its best done with airbrush/couple highlights/clear varnish.
Sorry Stu, but I can't say I'm a fan. I can see why people don't like a clear cockpit, but personally I think that more often than not painted cockpits look worse. If the frame is painted, the only way I wouldn't like clear plastic is if I thought tinted windows were more appropriate in the first place. Which is almost never the case. Maybe for things like the Dark Eldar flyers, but when I imagine a Space Marine flyer or a Vendetta, I can not imagine the windows being anything other than clear.
This message was edited 1 time. Last update was at 2014/11/27 14:04:59


 My own chapoter, The Broken Swords. Almost a full company.
 1500
1500