| Author |
Message |
 |
|
|
|
|
Advert
|
Forum adverts like this one are shown to any user who is not logged in. Join us by filling out a tiny 3 field form and you will get your own, free, dakka user account which gives a good range of benefits to you:
- No adverts like this in the forums anymore.
- Times and dates in your local timezone.
- Full tracking of what you have read so you can skip to your first unread post, easily see what has changed since you last logged in, and easily see what is new at a glance.
- Email notifications for threads you want to watch closely.
- Being a part of the oldest wargaming community on the net.
If you are already a member then feel free to login now. |
|
 |
2014/12/12 00:34:53
Subject: Teras' Norsican Ogres
|
|

Regular Dakkanaut
|
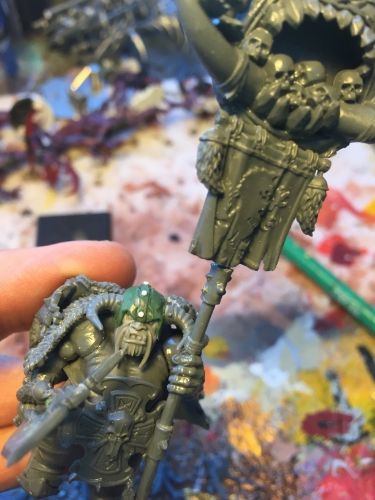
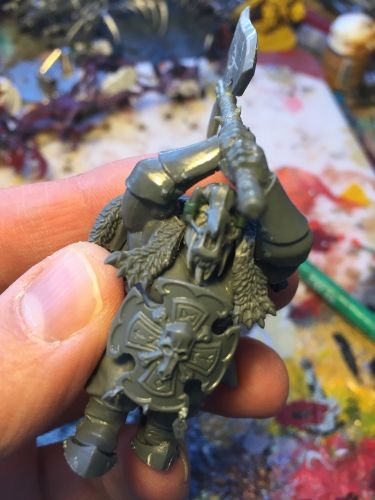
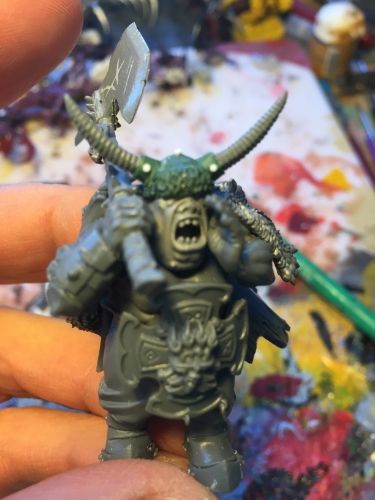
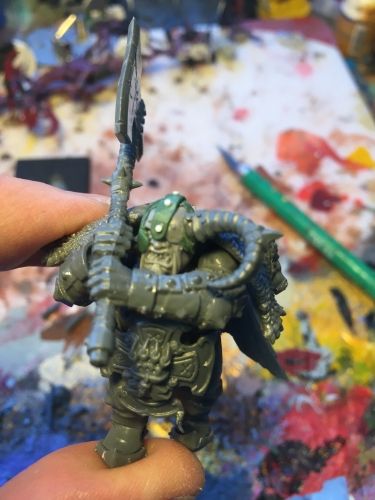
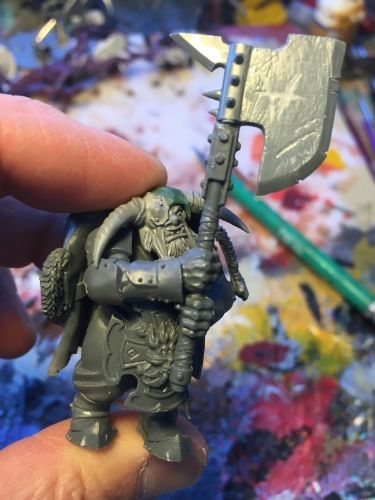
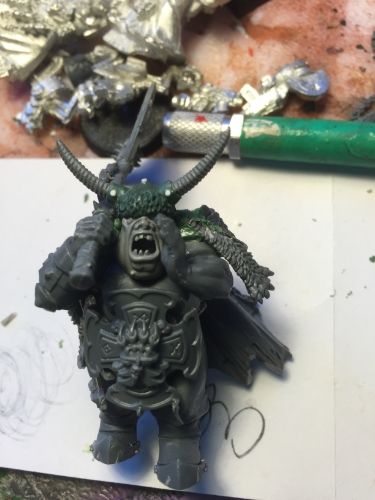
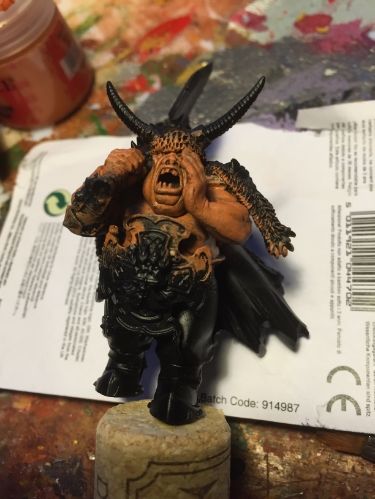
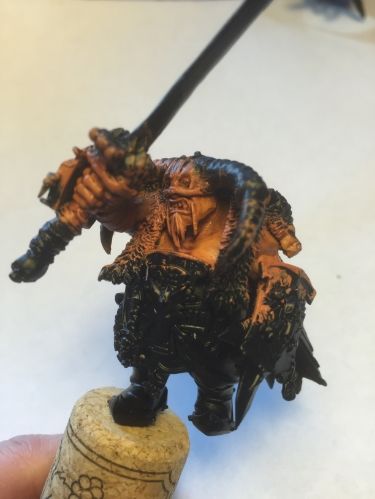
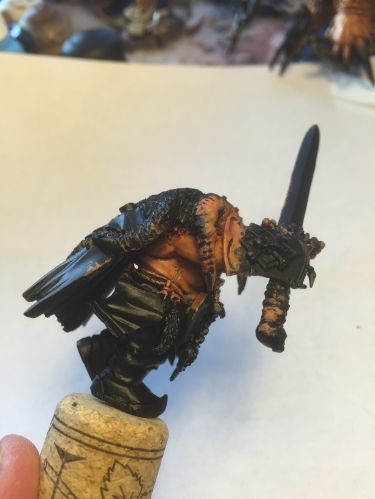
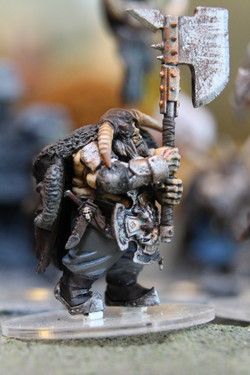
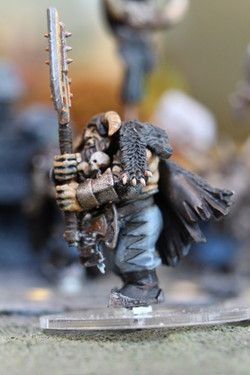
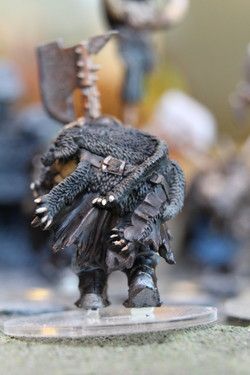
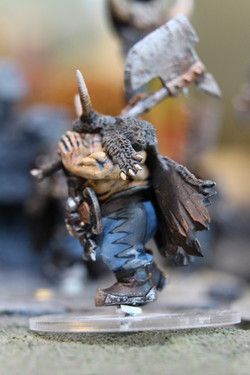
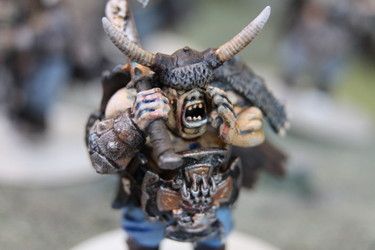
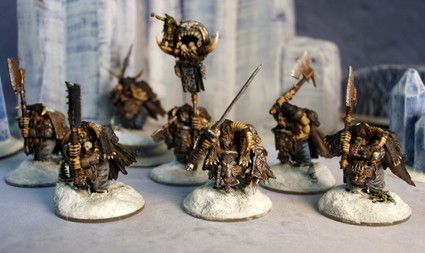
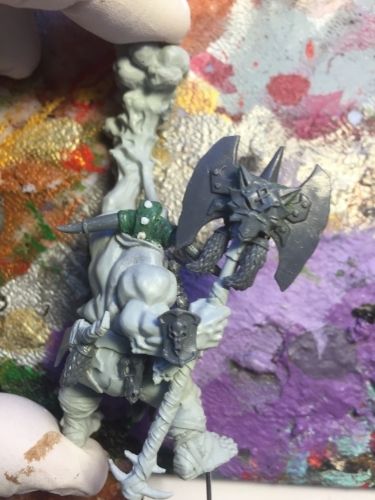
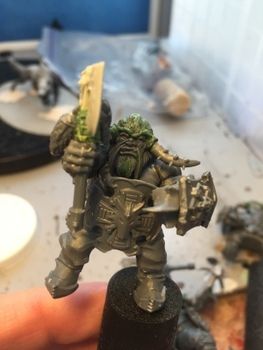
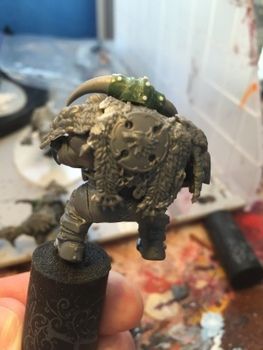
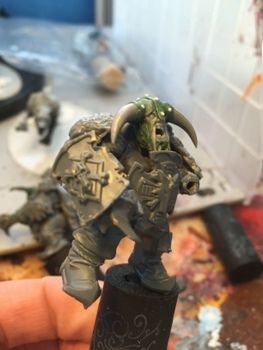
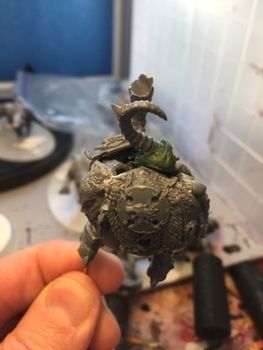
Hola!
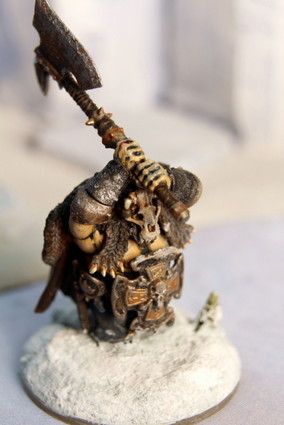
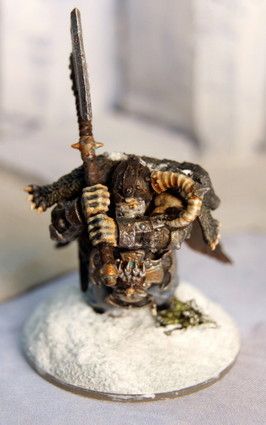
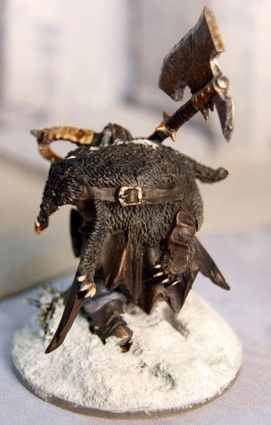
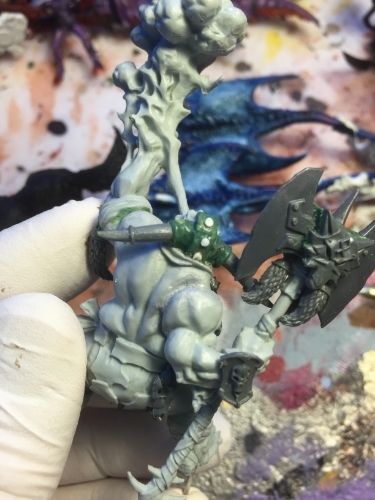
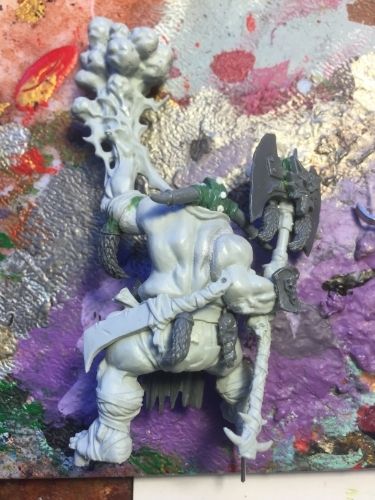
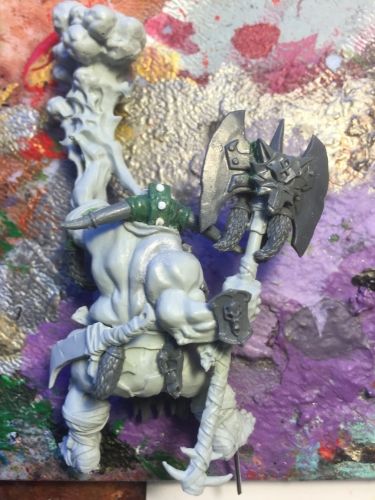
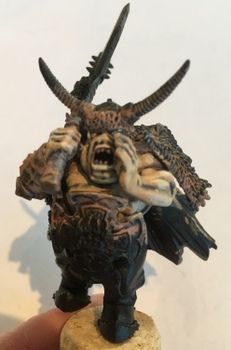
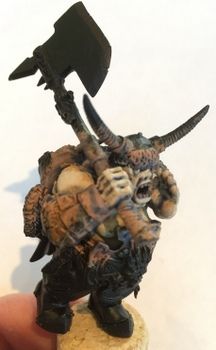
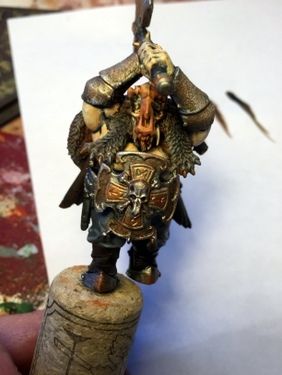
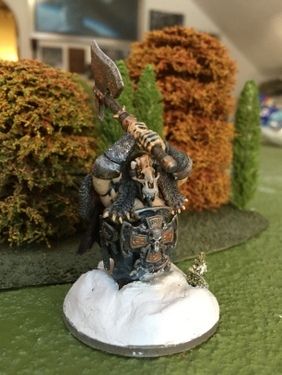
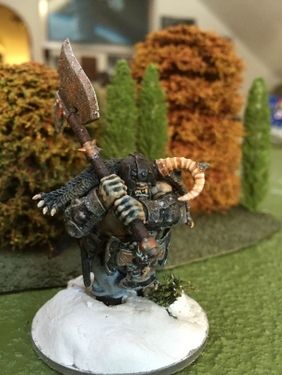
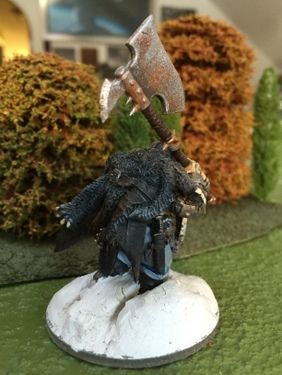
I am bringing my Ogres to Adepticon this year as I have been challenged to build a WHF army. Here is a quick shot of them so far.... More soon.
Teras
Geek Nation Tours
|
Geek Nation Tours
Holidays for Geeks by Geeks
http://www.geeknationtours.com
|
|
|
 |
|
2014/12/16 22:16:50
Subject: Re:Teras' Norsican Ogres
|
|
Regular Dakkanaut
|
|
Geek Nation Tours
Holidays for Geeks by Geeks
http://www.geeknationtours.com
|
|
|
|
|
2014/12/28 03:54:47
Subject: Re:Teras' Norsican Ogres
|
|
Regular Dakkanaut
|
|
Geek Nation Tours
Holidays for Geeks by Geeks
http://www.geeknationtours.com
|
|
|
|
|
2014/12/28 04:01:32
Subject: Teras' Norsican Ogres
|
|

Ultramarine Master with Gauntlets of Macragge
|
Ogres of the north - cool army idea! What do you have in mind for the paint scheme?
|
Check out my Youtube channel!
 |
|
|
|
|
2014/12/28 04:04:31
Subject: Teras' Norsican Ogres
|
|
Hurr! Ogryn Bone 'Ead!
The Frozen North
|
Looking good thus far!
|
You say that I am crazy. I say that you are right! |
|
|
|
|
2014/12/28 07:22:03
Subject: Re:Teras' Norsican Ogres
|
|
Regular Dakkanaut
|
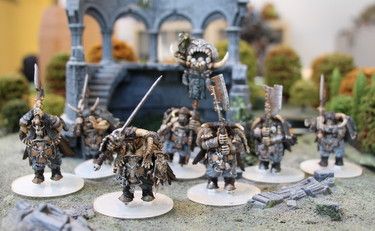
Thank you all!
Really enjoying the project.... I will be painting as close to Space Wolves as possible.
Teras
Geek Nation Tours
|
Geek Nation Tours
Holidays for Geeks by Geeks
http://www.geeknationtours.com
|
|
|
|
|
2015/01/04 01:17:23
Subject: Re:Teras' Norsican Ogres
|
|
Regular Dakkanaut
|
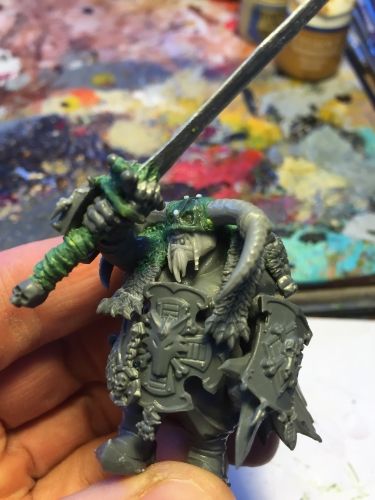
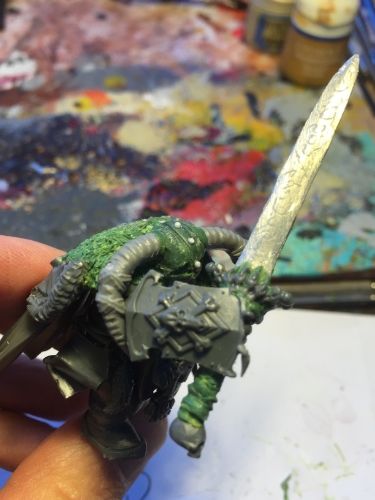
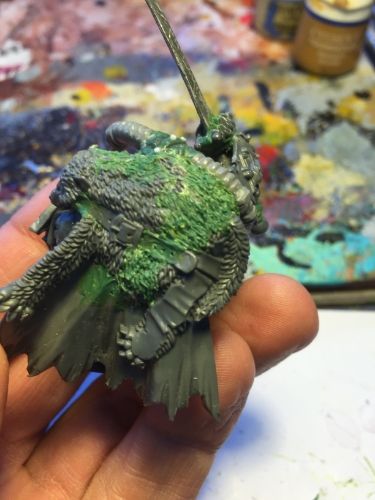
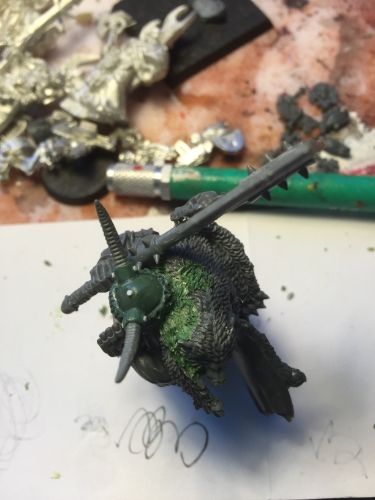
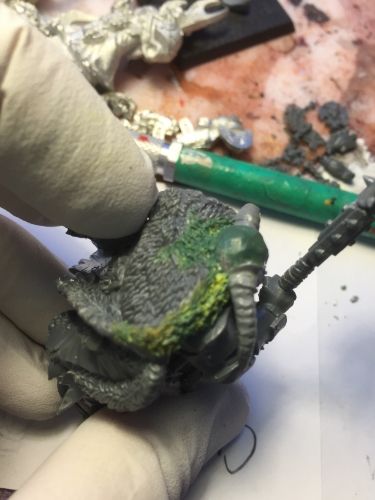
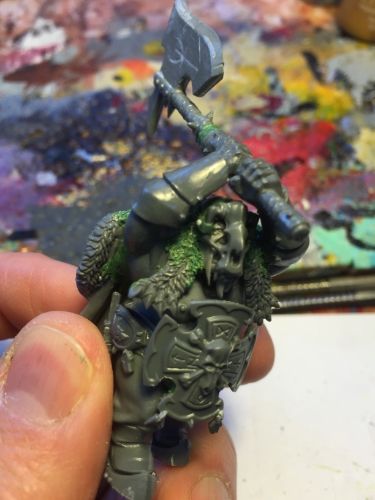
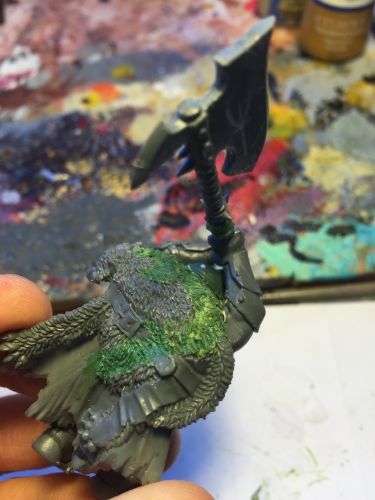
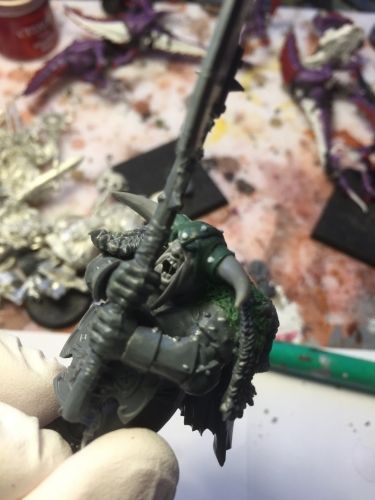
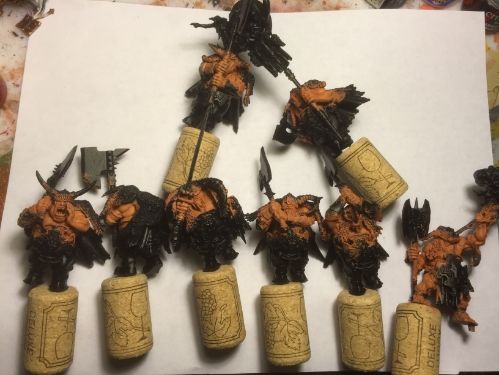
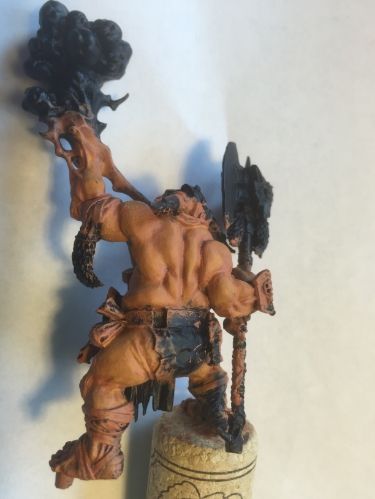
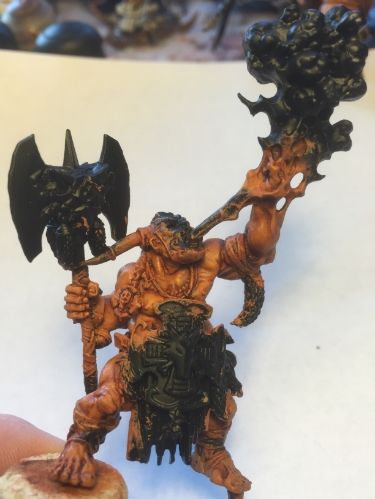
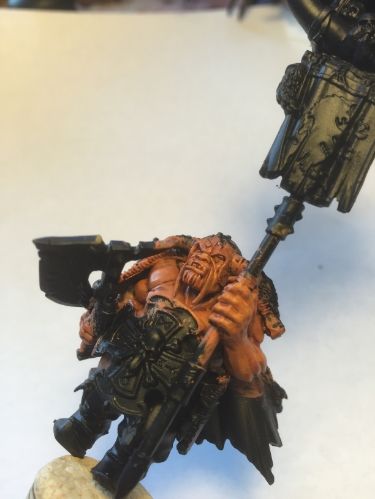
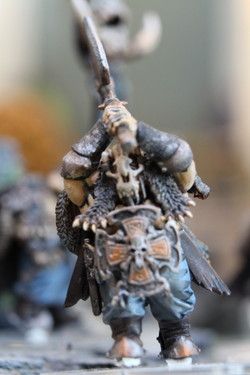
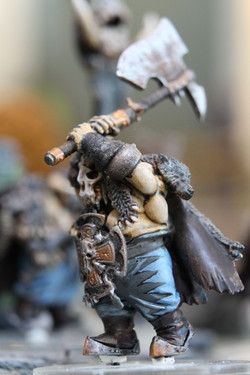
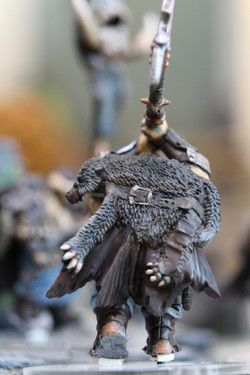
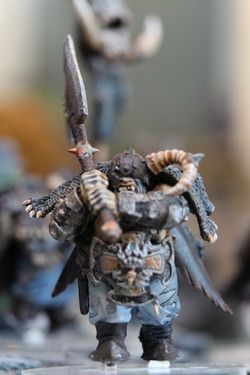
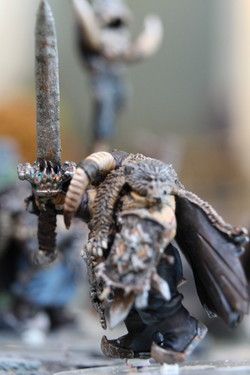
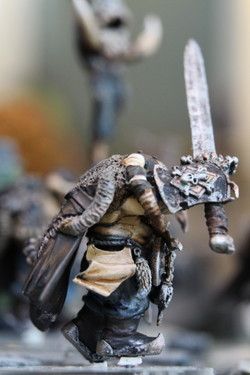
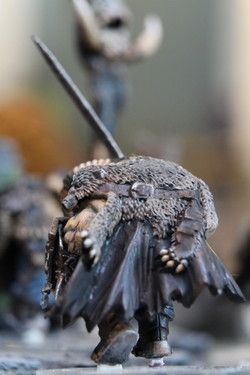
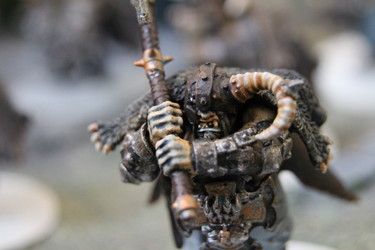
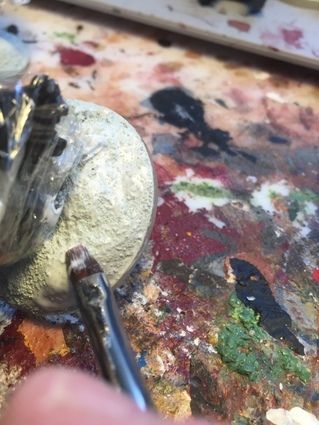
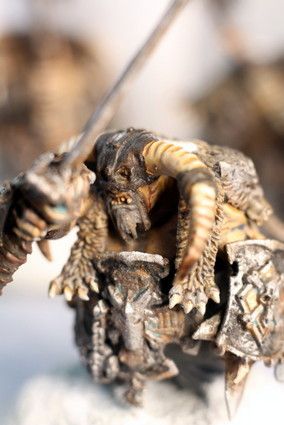
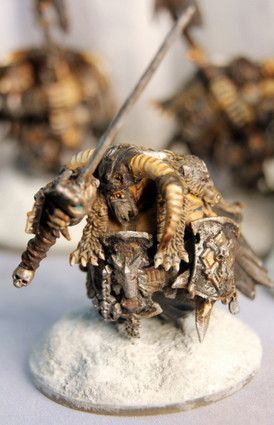
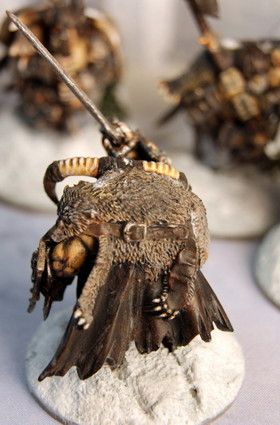
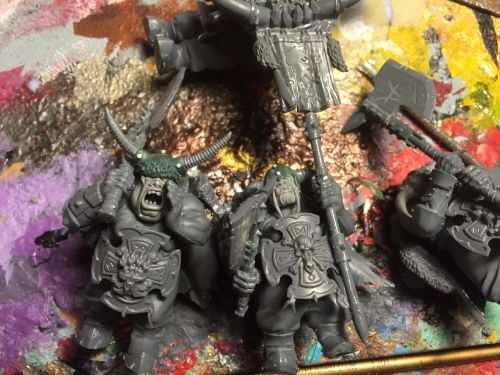
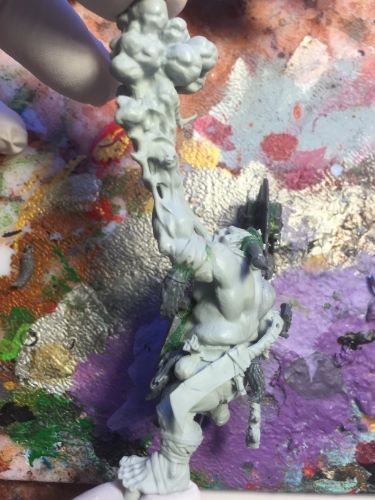
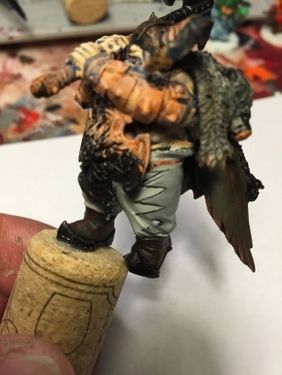
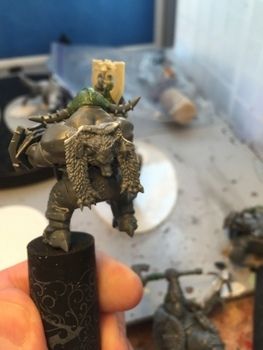
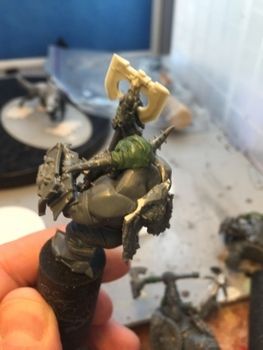
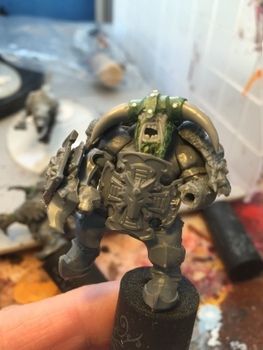
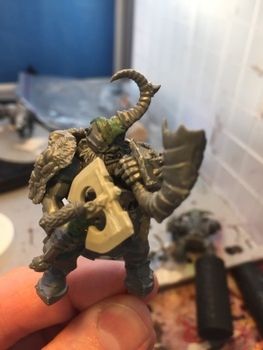
So I am still waiting for my Vallejo paints - Thus no paint on the Ogres yet but I used that time to prime them and finish up my Firebelly…
First I tried to copy Dave’s helmet/head work. After being completely intimidated about the process I now feel I can give the bulk of the heads a go when I do my Bulls. Here are some close ups of what I did…
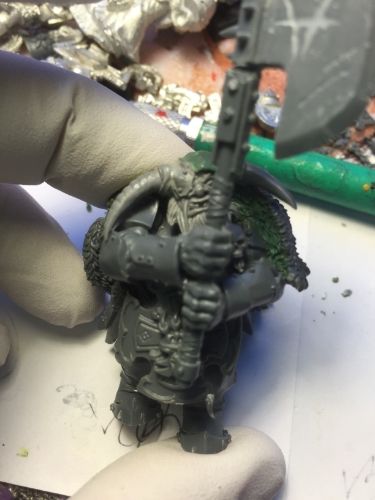
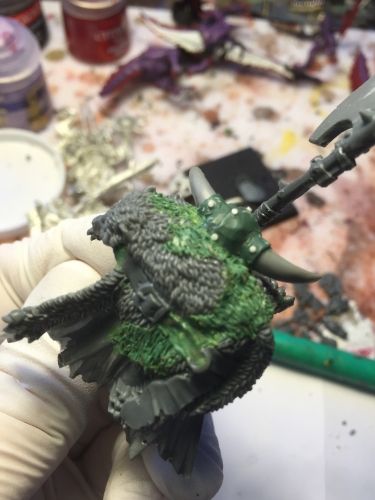
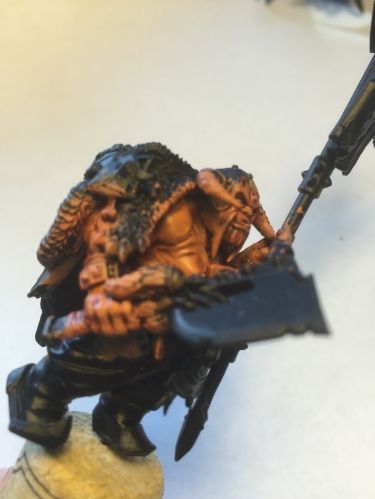
Next I did some back work and added some SW icons and such…
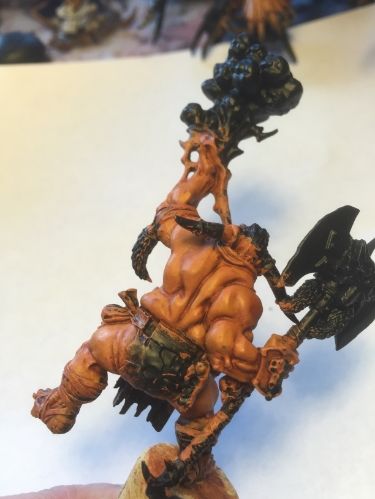
I removed the hammer and added an axe to better mesh into the rest of the arm (plus the SW icons)
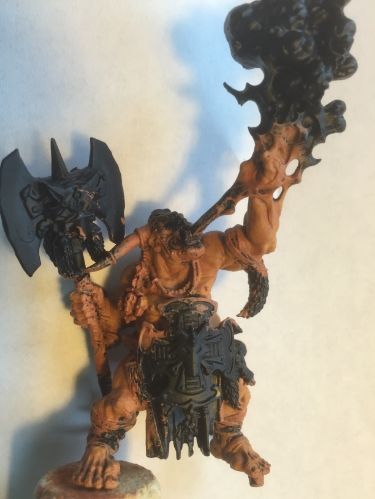
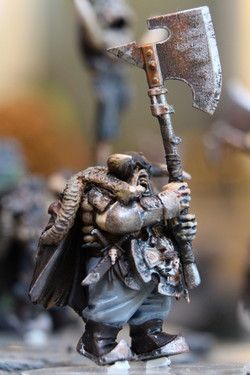
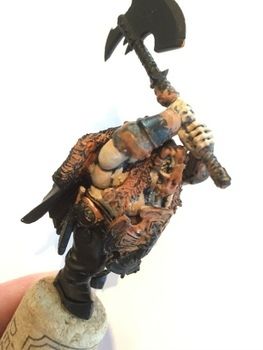
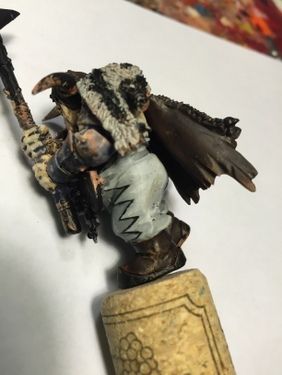
And here is the Firebelly completed. I rather like how he turned out. The heaviness of the axe is my favorite…
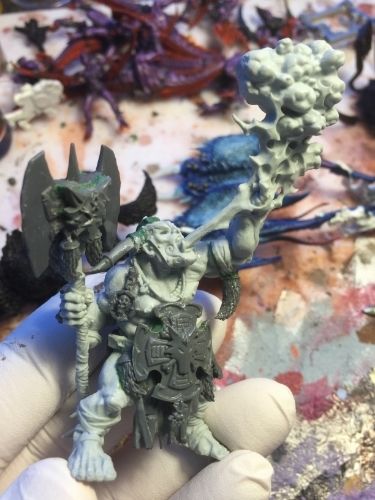
I also worked on my Thunderwolf/Sabretusk but they turned out to be way too big. They will however make awesome Mournfang Cavalry. I have ordered the 40K SW Fenrisian Wolves instead and will post them when I can. I must say however, it was a real pleasure to build the Thunderwolves. What a great kit. Even removing the bionic bits was a pleasure.
One last comment is that the Firebelly was of course GW Finecast resin. I rather liked the experience working with the resin. It was easy to cut and manipulate, glued well and I am still not sure what all the fuss is about. I really think the type of resin is a converter’s dream.
Love to hear your comments!
Teras
Geek Nation Tours
|
Geek Nation Tours
Holidays for Geeks by Geeks
http://www.geeknationtours.com
|
|
|
|
|
2015/02/01 23:41:33
Subject: Re:Teras' Norsican Ogres
|
|
Regular Dakkanaut
|
|
Geek Nation Tours
Holidays for Geeks by Geeks
http://www.geeknationtours.com
|
|
|
|
|
2015/02/02 04:56:54
Subject: Teras' Norsican Ogres
|
|
Mekboy Hammerin' Somethin'
|
Great idea, the theme suits the models so well.
|
|
|
|
|
|
2016/01/09 20:32:29
Subject: Re:Teras' Norsican Ogres
|
|
Regular Dakkanaut
|
Hey Hey!
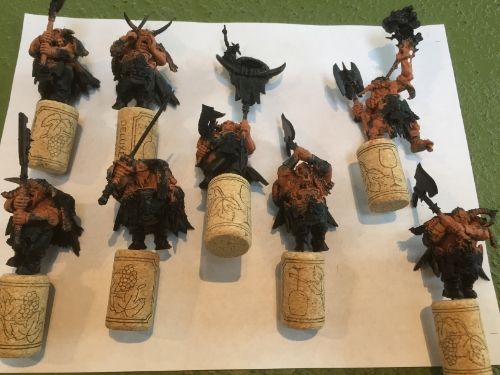
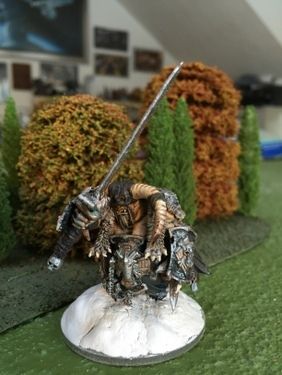
Hope everyone is awesome... I thought I would start this thread up again with a better name... For those interested this thread is a continuation of http://www.theindependentcharacters.com/forums/viewtopic.php?f=8&t=7701&p=100928#p100928 It has been some time since I posted and since I picked up my Ogres, but it is back to them as I rather like the thought of Age of Sigmar. I am happy to create the realm of the Ice King... More on that soon...
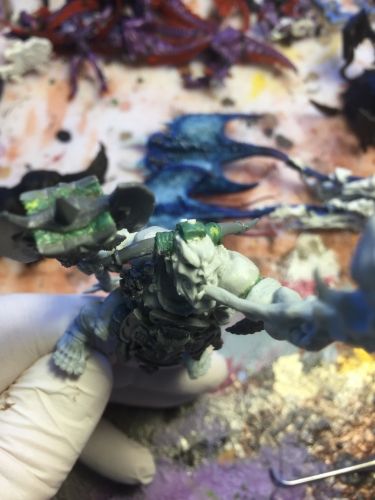
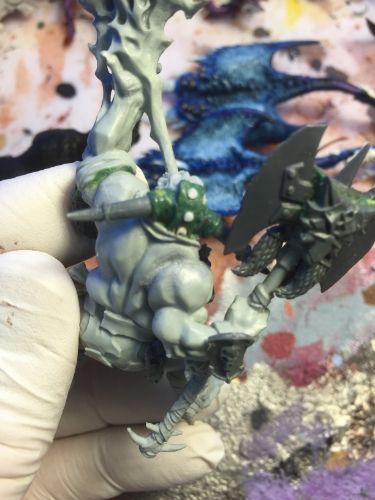
I had to repaint the skin and took the following process...
Kislev Flesh
Guilliman Blue
Kislev Flesh (several layers on smaller and smaller patches to fade in)
Watered down Flayed One Flesh
Watered down Wych Flesh

Now to get them finished up..
|
Geek Nation Tours
Holidays for Geeks by Geeks
http://www.geeknationtours.com
|
|
|
|
|
2016/01/10 13:27:20
Subject: Teras' Norsican Ogres
|
|

Dakka Veteran
|
Awesome looking models dude, and for the greenstuff, what can I say but brilliant. Well done.
|
|
|
|
|
2016/01/10 19:42:19
Subject: Re:Teras' Norsican Ogres
|
|

Regular Dakkanaut
|
Very cool Ogres! I like all the conversion stuff you did so far!
 TIC wrote: TIC wrote:
First I tried to copy Dave’s helmet/head work. After being completely intimidated about the process I now feel I can give the bulk of the heads a go when I do my Bulls.
Who is this Dave? I don't know him, but now you made me curious for his helmet/head work!
And ehm, you drink a lot of wine..... 
|
|
|
|
|
|
2016/01/19 00:00:00
Subject: Re:Teras' Norsican Ogres
|
|
Regular Dakkanaut
|
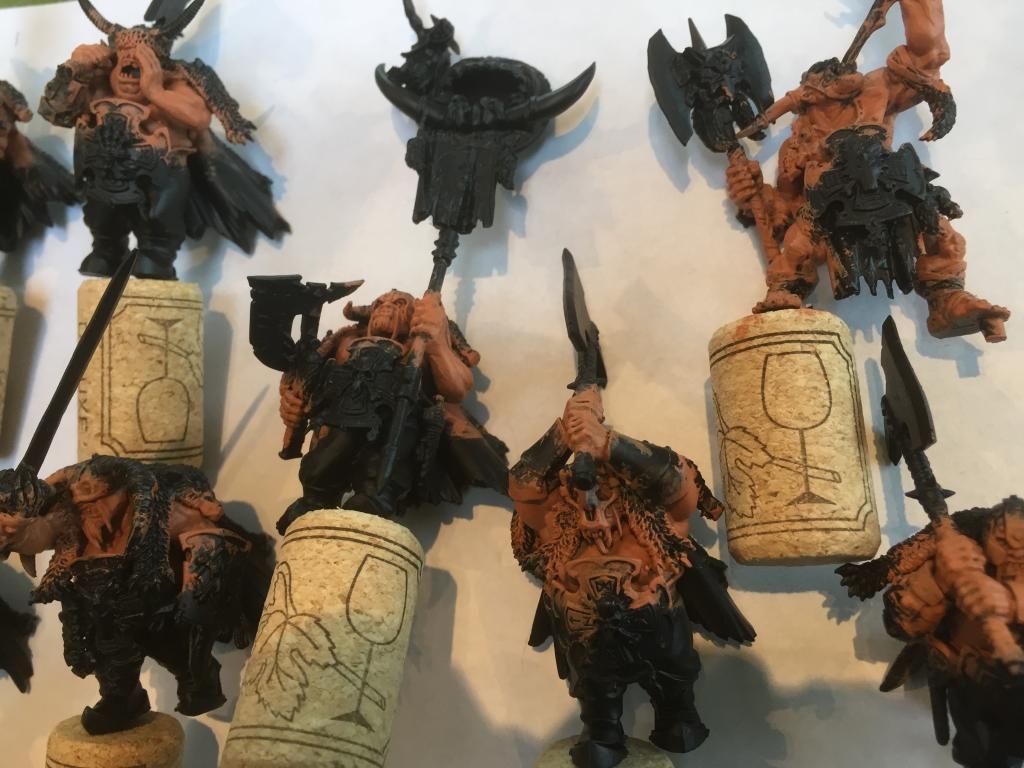
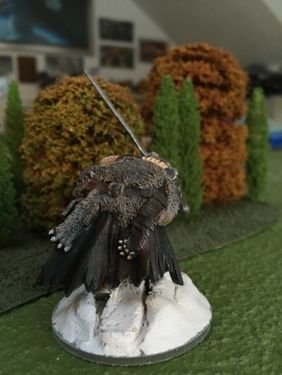
Did some more work over the last days...
First did the pants and gave them traditional Space Wolf patterns. Thought it was a cool pattern to experiment with here...
Then I did some leather work on helms, boots and cloaks... used this handy site to help me with the leather...
http://www.planetfigure.com/pages/Painting-Leather-Boots/
All in all having fun with cold pallets but having trouble leaving my favorite reds out...
More soon...
Teras
Geek Nation Tours
|
Geek Nation Tours
Holidays for Geeks by Geeks
http://www.geeknationtours.com
|
|
|
|
|
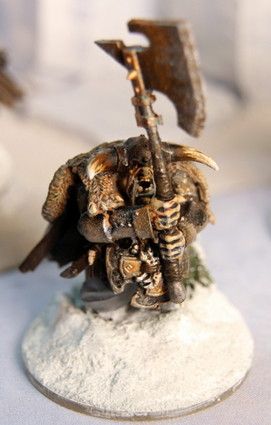
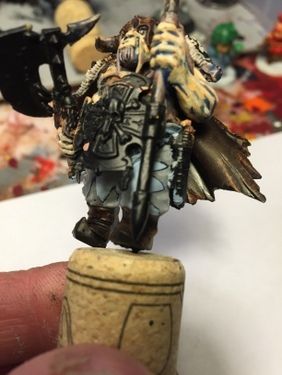
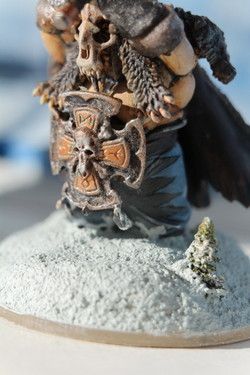
2016/01/23 16:57:22
Subject: Re:Teras' Norsican Ogres
|
|
Regular Dakkanaut
|
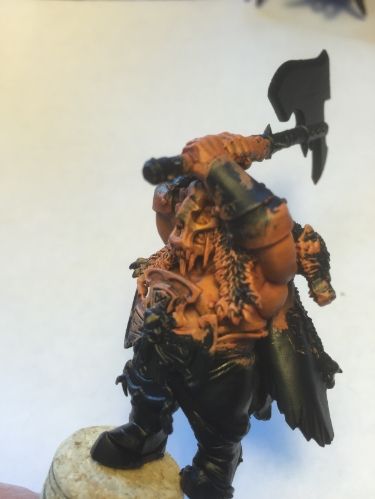
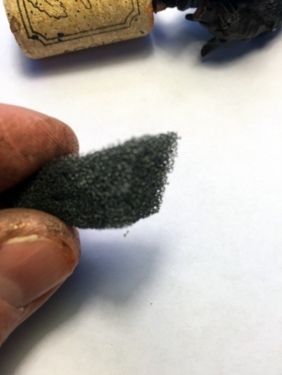
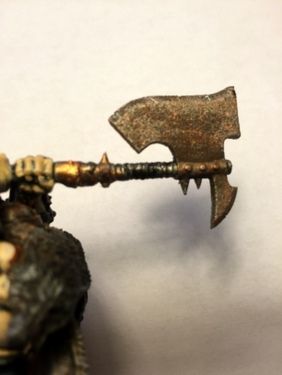
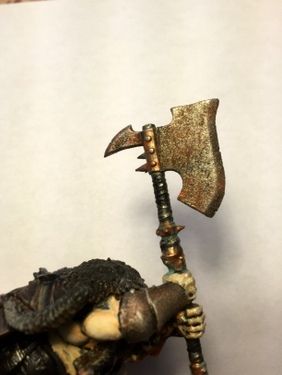
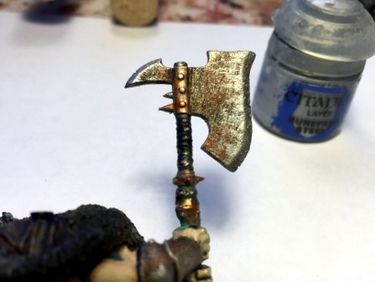
So I did a bit of work on the Ogre weapons... Here is what I used:
Made sure all weapons were painted completely black
Layered/drybushed with Leadbelcher
Any ornamentation was painted in Brazen Brass
Wash Brass with Nihilakn Oxide (in crevices)
Highlighted with Dwarf Bronze After
Highlighted all Leadbelcher with Runefang Steel (not sure if needed)
Washed Leadbelcher with Typhus Corrosion
Dry Brushed Ryza Rust
Sponge on Leadbelcher very lightly and then sponged on Runefang Steel
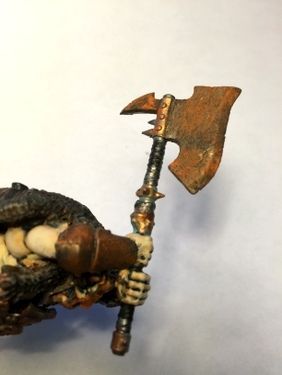
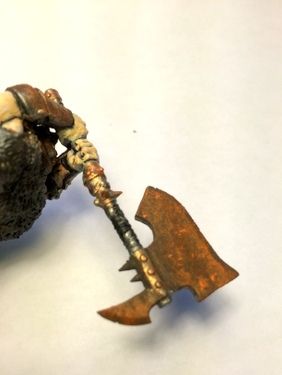
Now to do the belts and clean up...
Teras
Geek Nation Tours
|
Geek Nation Tours
Holidays for Geeks by Geeks
http://www.geeknationtours.com
|
|
|
|
|
2016/01/28 21:50:27
Subject: Re:Teras' Norsican Ogres
|
|
Regular Dakkanaut
|
|
Geek Nation Tours
Holidays for Geeks by Geeks
http://www.geeknationtours.com
|
|
|
|
|
2016/01/29 01:16:26
Subject: Teras' Norsican Ogres
|
|

Crazed Flagellant
|
Love the theme on these
I love the metal effecte thankyou so much for the details on how you achieved it, I'm going to try and repoduce this style on my Orc weapons
|
Every day I learn something new! But I forget 2 things I knew yesterday |
|
|
|
|
2016/01/29 16:40:29
Subject: Teras' Norsican Ogres
|
|
Regular Dakkanaut
|
Thanks... Just to remember to really dry out the sponge prior to using it to build up the silver and you will do fine 
Teras
Geek Nation Tours
|
Geek Nation Tours
Holidays for Geeks by Geeks
http://www.geeknationtours.com
|
|
|
|
|
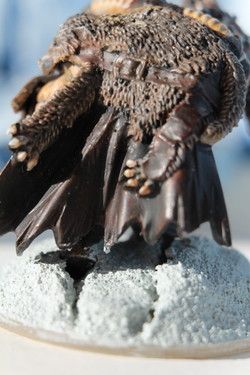
2016/02/08 19:20:30
Subject: Re:Teras' Norsican Ogres
|
|
Regular Dakkanaut
|
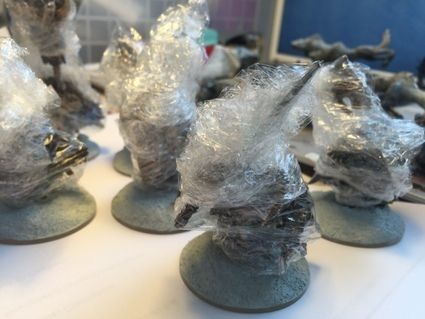
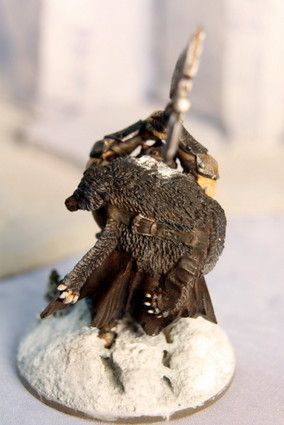
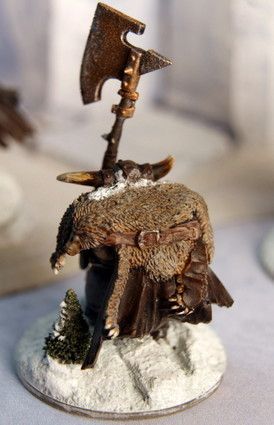
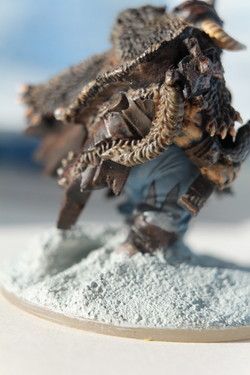
Well now the bit that I have dreaded the most - actually getting the snow down. I experimented a bit with GW Mourn Mountain Snow and a snow effect from a company called Precision Ice and Snow - http://www.precisioniceandsnow.com/. The snow effects from this company that I have seen are stellar. However, the product is very expensive and thus I hope it works well for me…
I have not seen much YouTube or forum help on how to make deep snow so I really am making this up as I go. With that said the snow really has become an interesting project. Nasty at the same time as fun… Loads of thinking for sure.
So I gave it a try and after a few tries this is what it looks like. The real trick is to figure out what to use to set the snow to the base. P I&S recommended spray adhesive and I tried Elmer’s spray but even after a build-up of 5 coats it took too much time to get a good coating of snow. P I&S does not offer a second “lock down” coat. Only spray adhesive and then the powder snow and that is it (although more layers of adhesive and snow can be added to slowly build up the snow fall). The snow is really affixed to just the glue it happens to be sitting on… I am not sure how Elmer’s or any other spray (they recommend hair spray too) will hold up under gaming conditions. It might be OK for a diorama that is going to be covered, but gaming you need something more solid… Another bad experience with spray adhesives is that it offers poor adhesion and stickiness wherever there is spray but no snow.
There is also the issue that I don’t want to spray my bases - which have my Ogres already on them – because it lacks the control I need. I don’t want snow on the ogres except for a bit on the very top. The spray would cover the complete miniature, but while snow does show up on the shoulders and heads in a snow storm, it does not accumulate there. I don’t need them to look like they are snow ninjas raising up from the snow - but that they are walking in it. I will carefully add some to both the shoulders and the heads plus the mouth areas later. Instead, the base will then be built up with Das clay so that I can have a bulge where the feet are going and a deep snow trail behind them as they walked through the snow. I have to put the snow on JUST the base and Das.
From there the plan now is to use GW’s textured paint Mourn Mountain Snow - which actually has a great grey blue colour which I hope comes out in the trenches made by the Ogre’s steps. I hope the P I&S white on top with a hint of grey blue below creates more depth. Again, the snow powder is so fine that if it hits a miniature I am sure it will make it look dull, so I have to avoid the dullness. To do so I will wrap them in plastic wrap prior to snowing the base…
To get the control I want, I created and then painted/dry-brushed a mixture of white glue and water… to make a thinned down version for the glue. Not too thin as to leak into the ground details, as I think you want the snow up top regardless of how deep it is to show off the odd grass or dirt bit below (or in my case the deeper colours of the snow)). This worked a treat as the coverage was almost instant and after two coats I have close to what I need plus the control of putting it where I want.
The snow does have another great property. It kinda works as normal snow does. It accepts liquid and then turns into a slushy water ice consistency. This means I have to avoid Dull Coating my miniatures as the snow turns from snow to ice (hence the Precision Ice and Snow name). This quality does however, allow me to put snow along the mouth and beards and then come in later with a liquid and turn it to an ice/snow look…
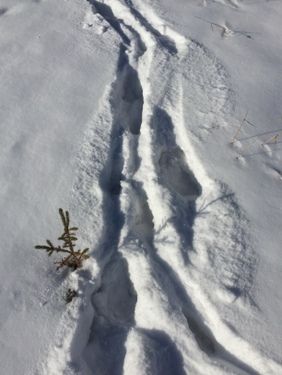
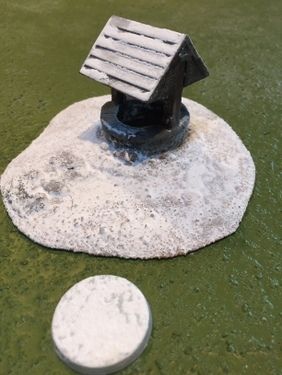
Here are the Ogre bases at the first Das stage of deep snow. Here I build up the area and put in the snow tracks.

|
Geek Nation Tours
Holidays for Geeks by Geeks
http://www.geeknationtours.com
|
|
|
|
|
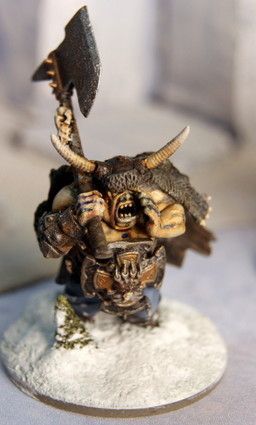
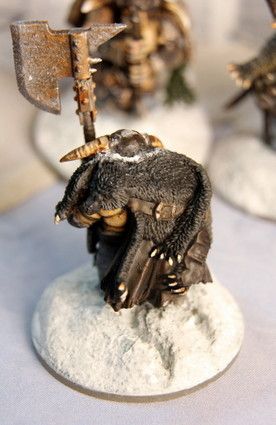
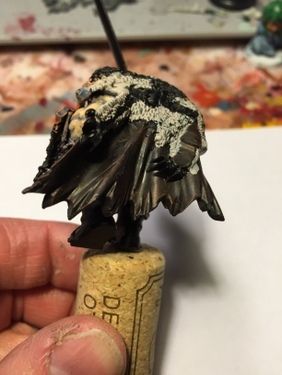
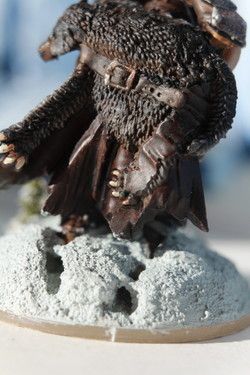
2016/02/21 23:28:38
Subject: Re:Teras' Norsican Ogres
|
|
Regular Dakkanaut
|
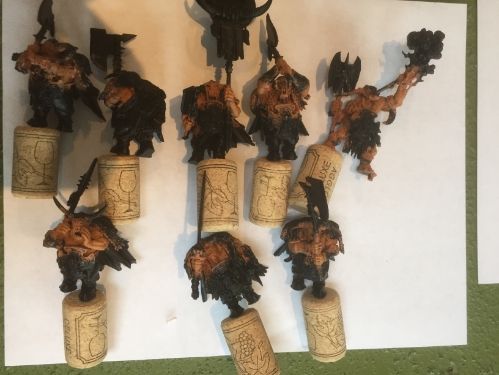
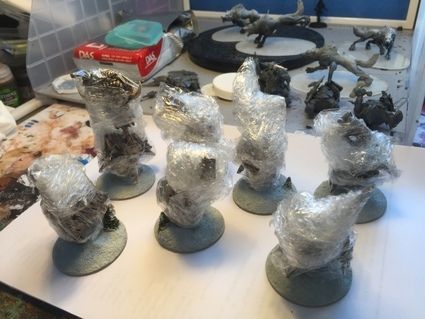
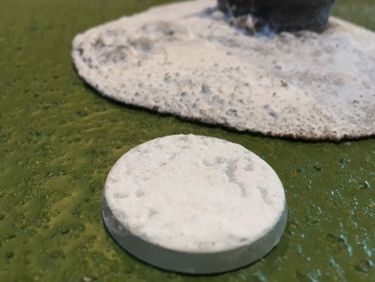
Here are some images of the Ogres just after I added the GW Mourn Mountain Snow textured paint. Next I will be adding several layers of the Precision Ice and Snow effect…
Hope you like em….
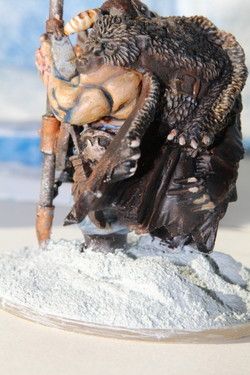
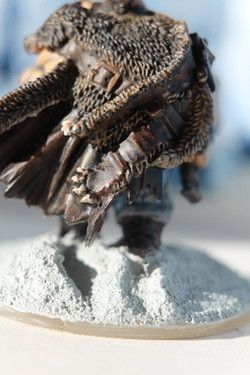
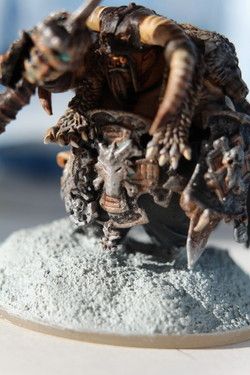
Teras
Geek Nation Tours
|
Geek Nation Tours
Holidays for Geeks by Geeks
http://www.geeknationtours.com
|
|
|
|
|
2016/03/19 21:24:08
Subject: Re:Teras' Norsican Ogres
|
|
Regular Dakkanaut
|
|
Geek Nation Tours
Holidays for Geeks by Geeks
http://www.geeknationtours.com
|
|
|
|
|
2017/05/07 14:55:33
Subject: Re:Teras' Norsican Ogres
|
|
Regular Dakkanaut
|
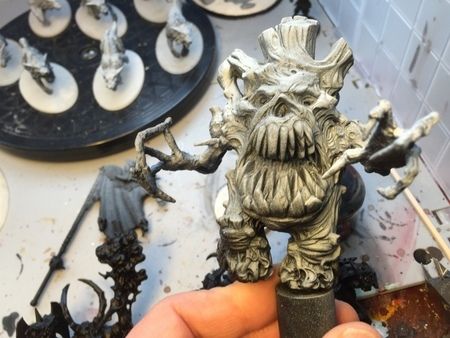
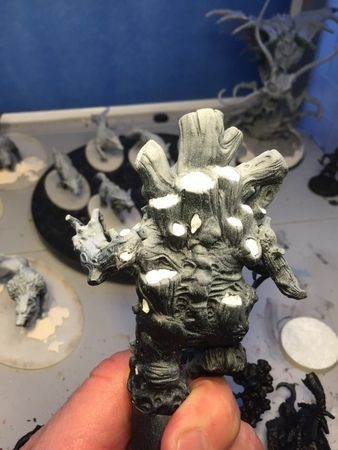
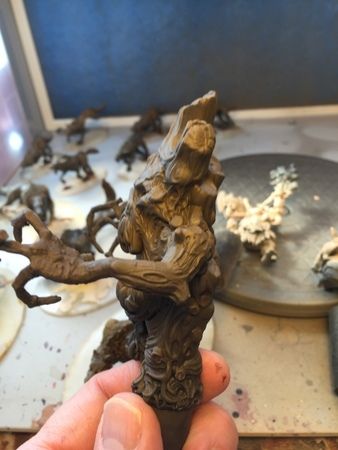
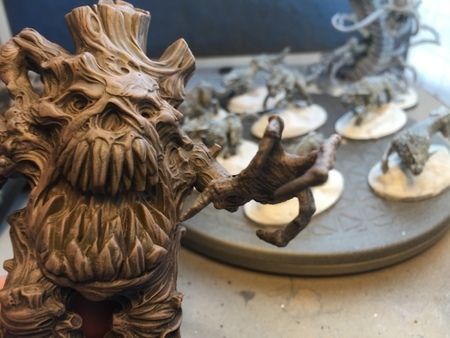
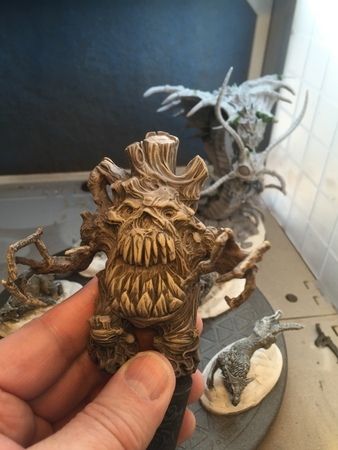
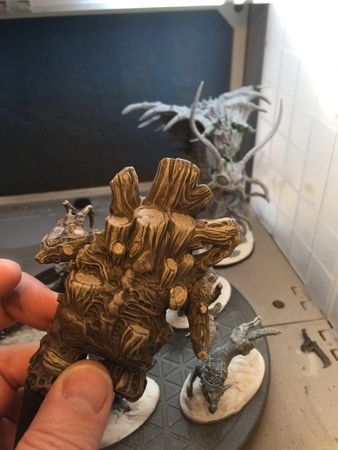
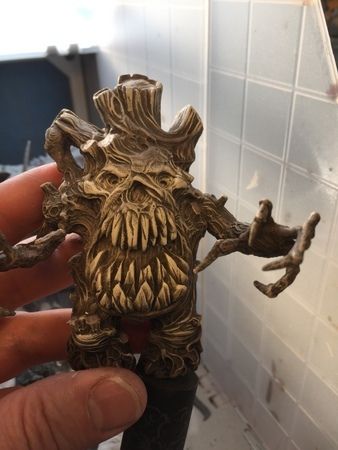
I took a bit of time off from the Ogres to add a Treelord to my Ice King army.
UltraForge produced a great Treeman and I used him for this project. He is a bit more nasty looking than GWs Sylvaneth and my daughter is doing her own Treekin army using GW minis… So it is UltraForge for me. Loved the build and the paint. Everything came together quite nicely, and he is a great addition to the Ogres. What northern fantasy army doesn’t have the trees working for them?
First I primed him black and did a white blast of primer from above. Then I brushed in the tops of the stumps in hopes that would create a lightened effect.
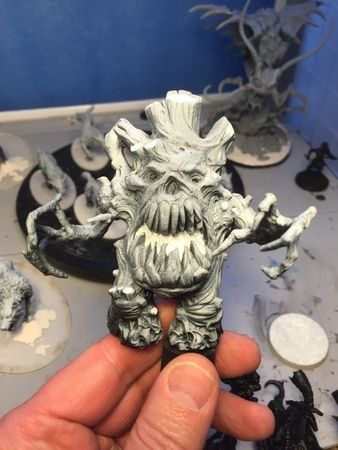
Then I airbrushed Dryad Bark Air on most of the top tying not to hit too many of the back spots in the lower half of the mini... Then I mixed a bit of Balor Brown Air and airbrushed the top with the lightened mixture.
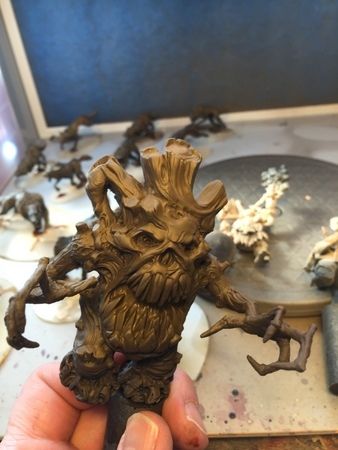
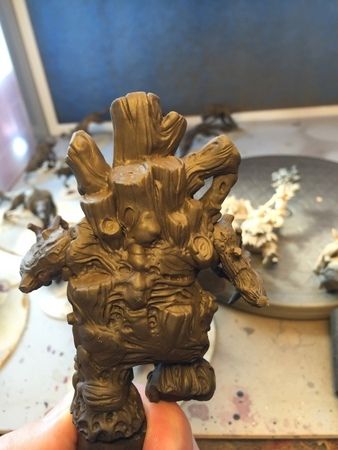
Then I dry brushed with the same Layered paints plus Ushabti Bone
More Ushabti Bone to mix.
Still more Ushabti Bone

And a final highlight with non-mixed Ushabti Bone
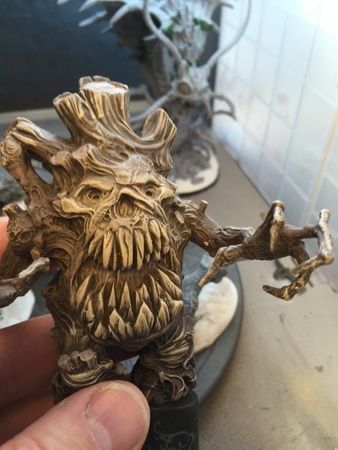
Then a wash of Agrax Earthshade
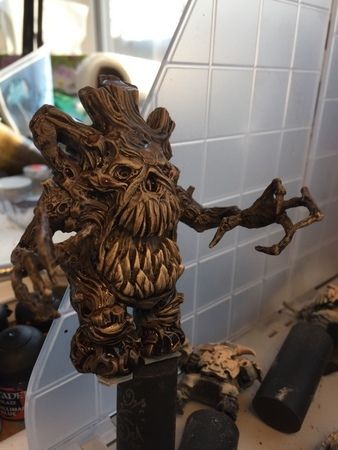
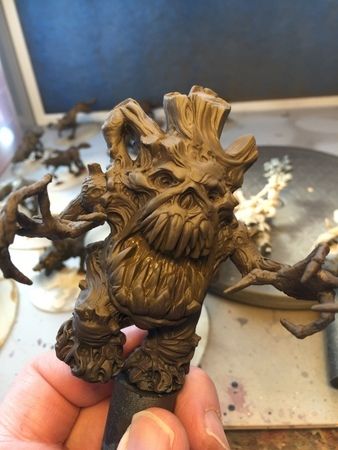
When the washed dried I had this look... Which I am super happy about... Really looked like wood to me...
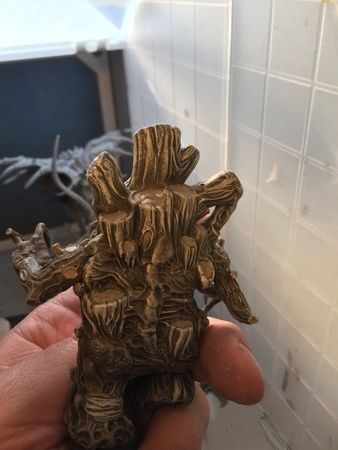
The Treelord Based...
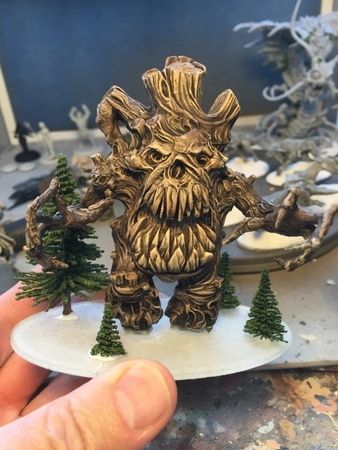
Das modeling clay to build up the snow and Mournfang Mountain Snow applied liberally
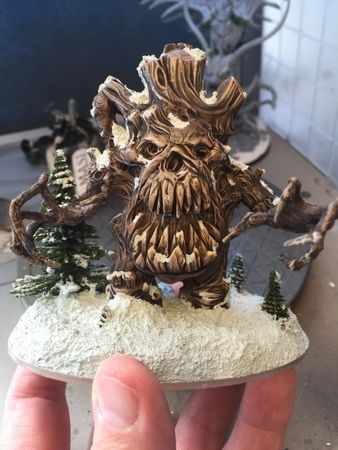
Next post I will put the snow effect on ....
Hope you like em…. And love to hear your comments
Teras
Geek Nation Tours
|
Geek Nation Tours
Holidays for Geeks by Geeks
http://www.geeknationtours.com
|
|
|
|
|
2017/05/08 16:33:45
Subject: Re:Teras' Norsican Ogres
|
|
Regular Dakkanaut
|
Love your suggestion of glowing eyes Crayola... I accept the challenge and will attempt it... Can you give me some suggestions on how to do them?
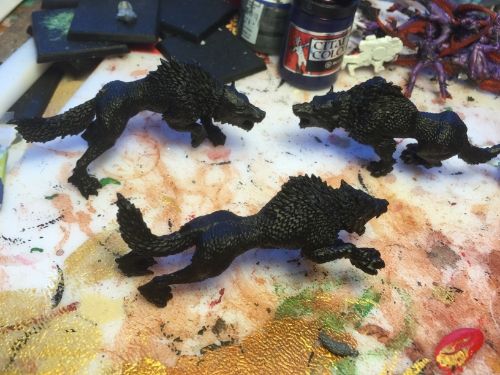
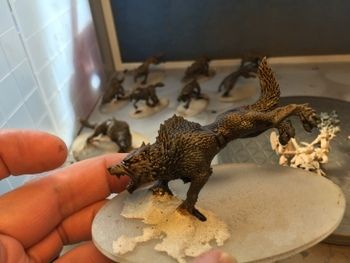
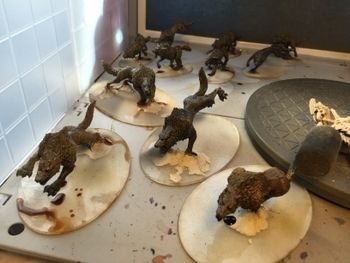
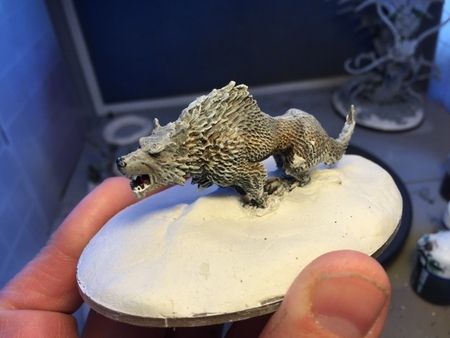
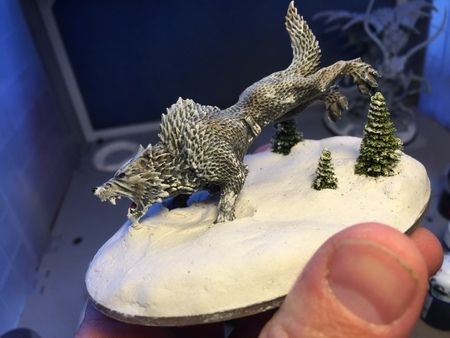
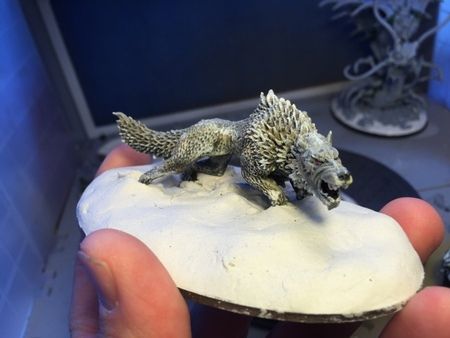
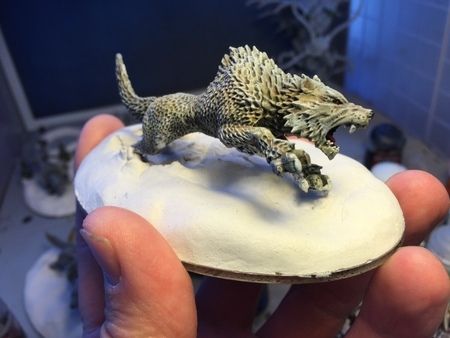
Next I have some Fenrisian wolves I made up as my SabreTusks… Next to put some snow on these too…
With brown under coat...

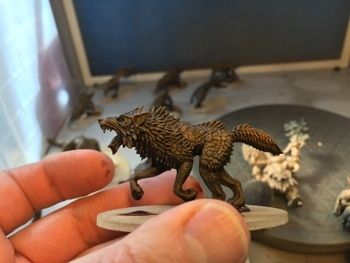
With highlights of bone and white...
More soon,
Teras
|
Geek Nation Tours
Holidays for Geeks by Geeks
http://www.geeknationtours.com
|
|
|
|
|
2017/05/09 16:40:09
Subject: Re:Teras' Norsican Ogres
|
|
Regular Dakkanaut
|
I will give that a go shortly... Need to get the airbrush a bit tighter first....
I did some work on the Dire Wolves for my Mournfang Cav. Instead of using the Mournfang minis I wanted to keep with the wolf/Norse theme and thus I used Space Wolf Thunderwolves instead. The process is taken from this link but I will write it here (with the new colour line for your reference)
Prime black.
Prime white from above only… 45 degrees and directly from the top so bottom of mini is relatively untouched
Airbrush Ushabti Bone from the horizontal halfway line up to top

Add Balor Brown to paint and airbrush upper 1/3
Add Mech. Stand. Gray & Dawnstone Gray and airbrush top ¼ and haunches.
Add Abaddon Black to mix and airbrush top only.
Remember to shake all air paints for at least a miniute and to mix in a separate bowl. Dumping and reusing the paint from the airbrush at each stage. And cleaning the brush at each stage.
Now wash the wolf in Seraphim Sepia and prior to allowing that to dry add Agrax Earthshade to only the top part of the wolf.
Let the mini dry completely.
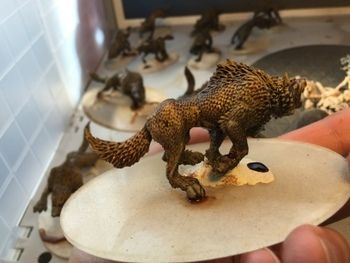
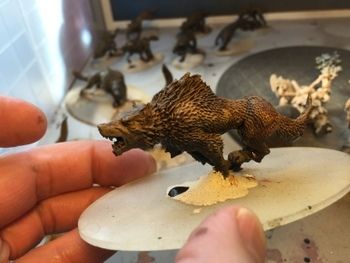
Drybrush the whole mini Ushabti Bone. Not to heavily but cover the entire miniatrure.
Drybrush the whole mini again with a lighter drybrush of Fenrisian Grey and White Scar 1:1 mixture
Then the whole mini again but only the tips of the fur with White Scar
Drybrush the top of the mini only with The Fang
Add Fenrisian Gray to The Fang and drybrush The Fang sections of the mini only
Add more Fenrisian Gray to drybrush very lightly
Drybrush the Fenrisian Gray area’s hair tips very lightly in White Scar
Paint nose, eyes and mouth Abaddon Black
Paint eyes and tongue Wazdakka Red
Highlight with Evil Sunz Scarlet
Paint teeth in Cadian Fleshtone
Paint upper 2/3 of teeth in Ushabti Bone.
Highlight Scar White
Wash only teeth in Seraphim Sepia
Now I hope to be ready for snow effect for the Treelord, Wolves/Sabretusks, and Dire Wolves/Mournfang
More soon,
Teras
|
Geek Nation Tours
Holidays for Geeks by Geeks
http://www.geeknationtours.com
|
|
|
|
|
2017/05/09 16:53:02
Subject: Teras' Norsican Ogres
|
|

Boom! Leman Russ Commander
|
Very cool army, great greenstuff work
|
|
|
|
|
|
2017/05/10 09:24:07
Subject: Re:Teras' Norsican Ogres
|
|
Guard Heavy Weapon Crewman
Rogaland, Norway
|
Excellent work with the greenstuff! Great details.
OJJ
|
Courage is not the lack of fear but the ability to face it."
Lt. John B. Putnam Jr. (1921-1944) |
|
|
|
|
2017/05/13 18:45:56
Subject: Re:Teras' Norsican Ogres
|
|
Regular Dakkanaut
|
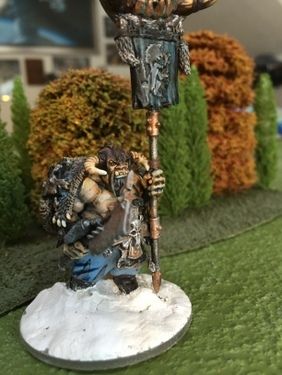
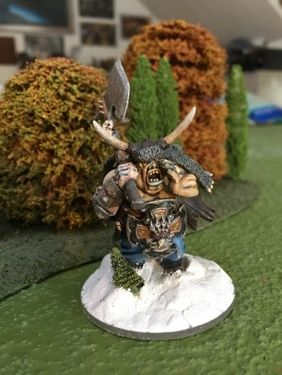
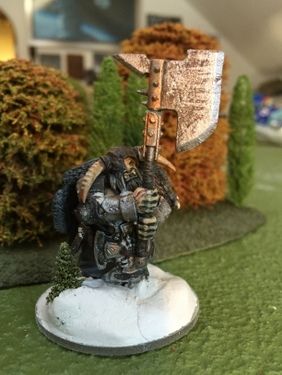
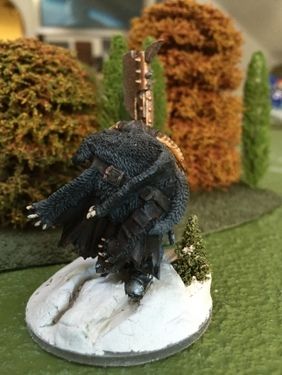
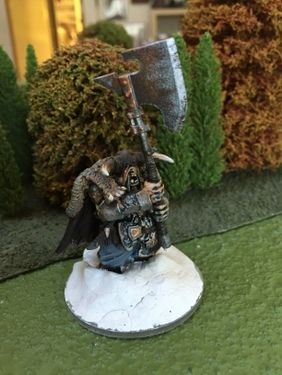
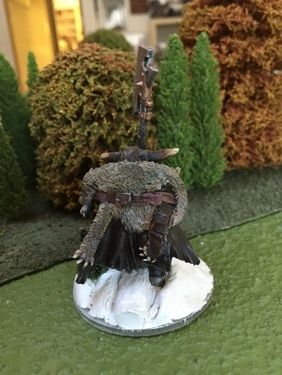
Thanks! And a little more on that....
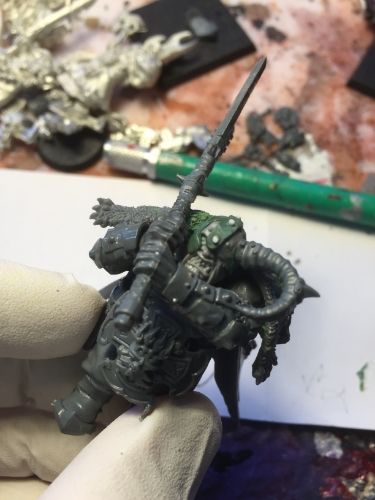
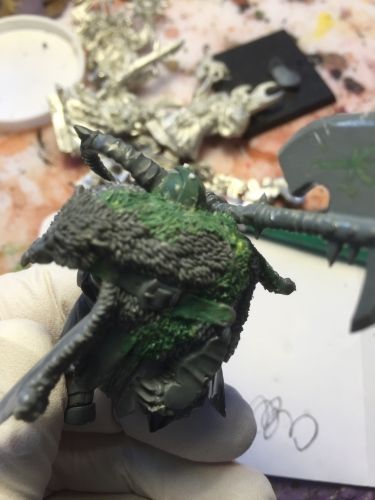
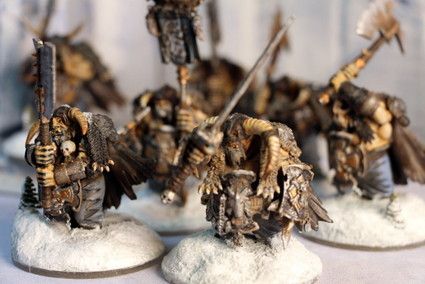
Several people have asked me to discuss how I did the wolf skins… Therefore, I thought to show how my Mournfang riders (Dire Wolf Riders) are coming…
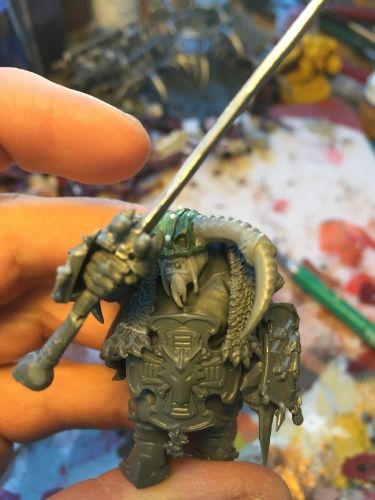
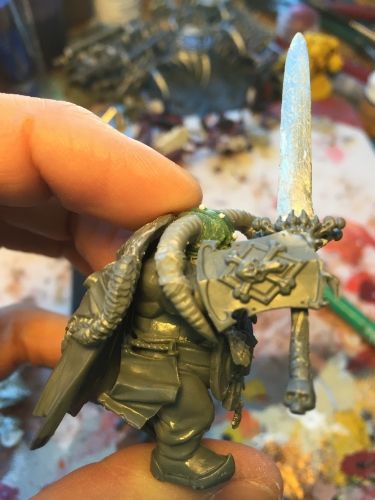
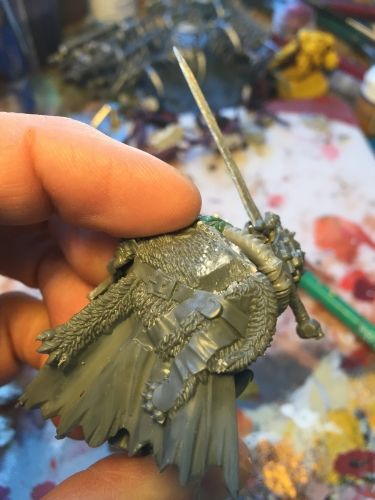
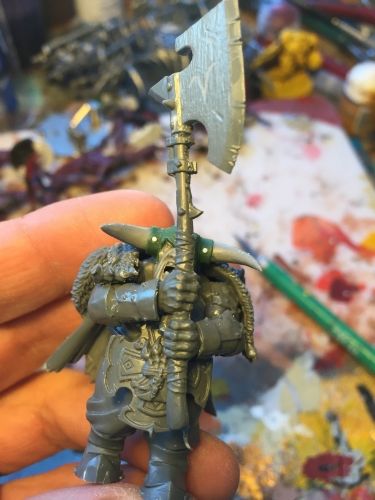
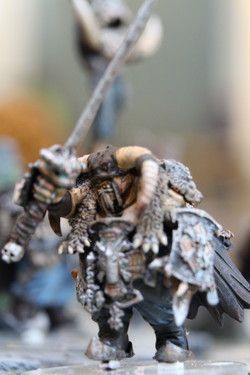
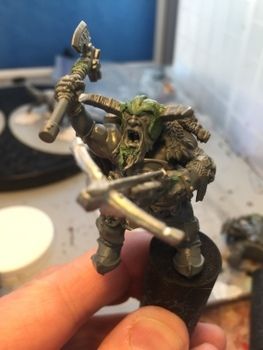
The Standard Bearer is the only Dave Taylor head on this group. I learned from him how to make the others, and really enjoyed the build. A buddy of mine also said the Ironguts looked too Asian, and I should try for a more beardy and Viking look, so I added the green stuff to the beards to build them up...
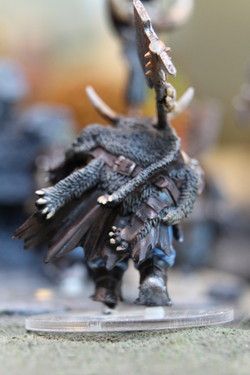
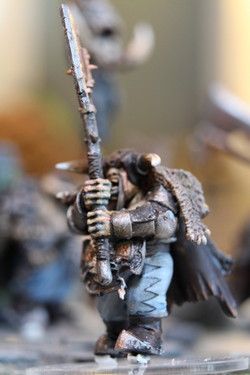
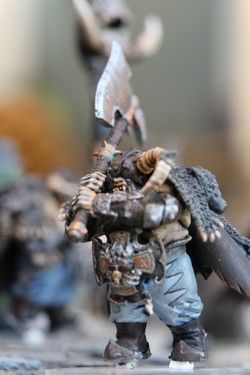
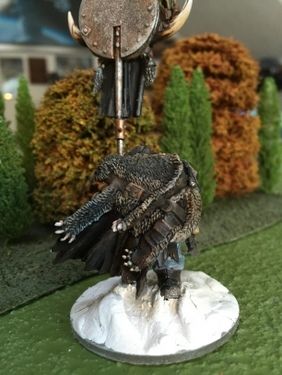
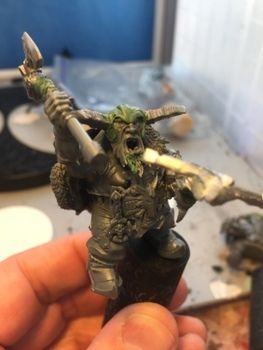
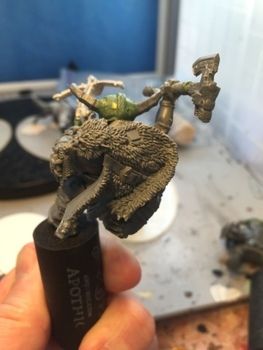
First off is my non-upgraded rider. For him the wolf skin comes from the SW Dreadnought but is the smallest of the skins. Note that I just placed it where I wanted it, and did not worry about how it connects to the Ogre...
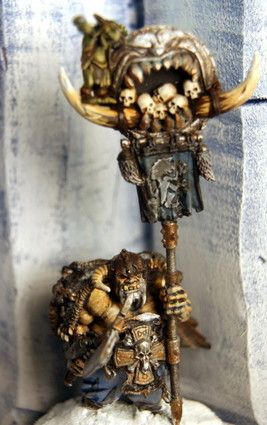
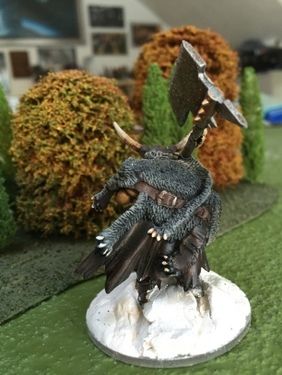
Next are my Standard Bearer and my Horn Blower... Both also use the SW Dread skin (the same one actually), and again placement is the first step how they connect is the second. Note that I switched the skin around on the Ogres so they look slightly different....
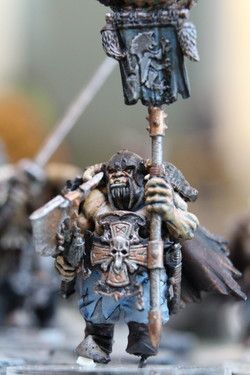
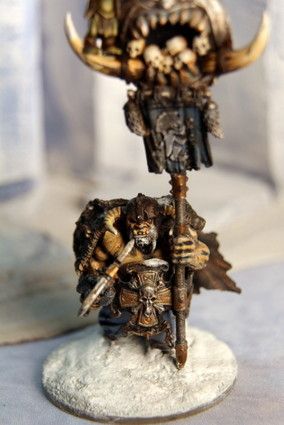
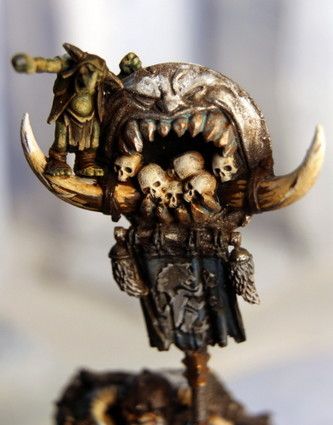
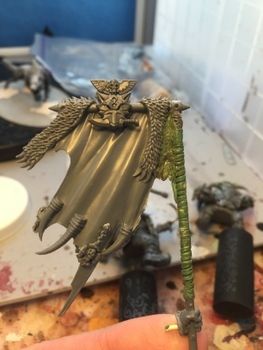
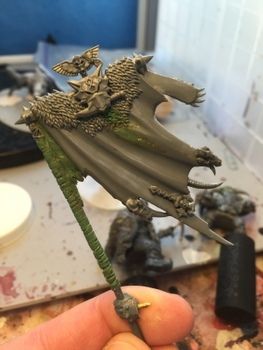
This is the standard. I was not fond of the Dragon skin (I want to include a live dragon in my army one day, and don't want any squabbling), and wanted to continue the Wolf/Viking Motif so I took a Beastman banner and converted it to the below....
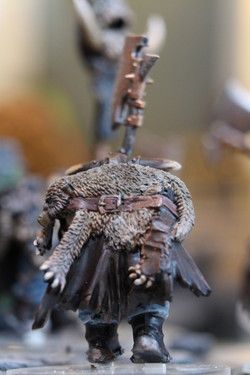
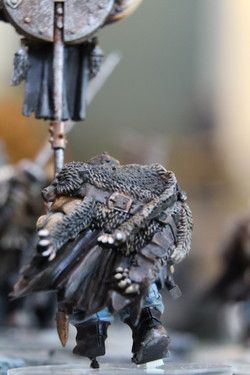
Here is my Crusher. His wolf skin comes from the SW Termi kit... The Ogre shoulders really take this skin nicely. Build it completely first, and then mount on the shoulders. I trim off some of the stuff under the skin after building (but prior to mounting) to ensure a better fit, but this is only a very quick job.... It fits as if it was meant for his shoulders.
Hope you like!
More soon!
Teras
|
Geek Nation Tours
Holidays for Geeks by Geeks
http://www.geeknationtours.com
|
|
|
|
|
|
|