Forum adverts like this one are shown to any user who is not logged in. Join us by filling out a tiny 3 field form and you will get your own, free, dakka user account which gives a good range of benefits to you:
No adverts like this in the forums anymore.
Times and dates in your local timezone.
Full tracking of what you have read so you can skip to your first unread post, easily see what has changed since you last logged in, and easily see what is new at a glance.
Email notifications for threads you want to watch closely.
Being a part of the oldest wargaming community on the net.
If you are already a member then feel free to login now.
I'm working on more 15mm German tanks. What I'd like to achieve is some soft edged camo patterns but when you scale them down to 15mm, the lines that make up the camo pattern become tiny.
Before I give up trying to do soft edged camo and just resort to hard edged camo, does anyone have any tips on trying to achieve finer lines?
I was thinking maybe swapping to enamels might help, as I imagine at lower pressures, smaller openings and and smaller nozzle sizes it'll be less likely to clog the brush, anyone have any experience with enamels vs acrylics and whether enamels might be better suited?
I've noticed moving the brush faster you can do finer lines, I can paint super fine lines on my palette when I'm moving the brush quickly, but then you lose the control necessary to do a good pattern on a complex 3D model, lol.
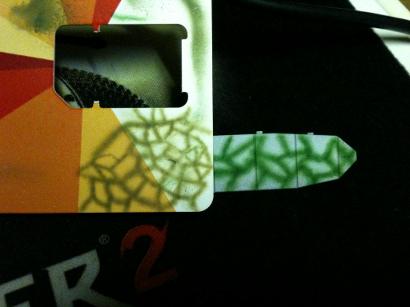
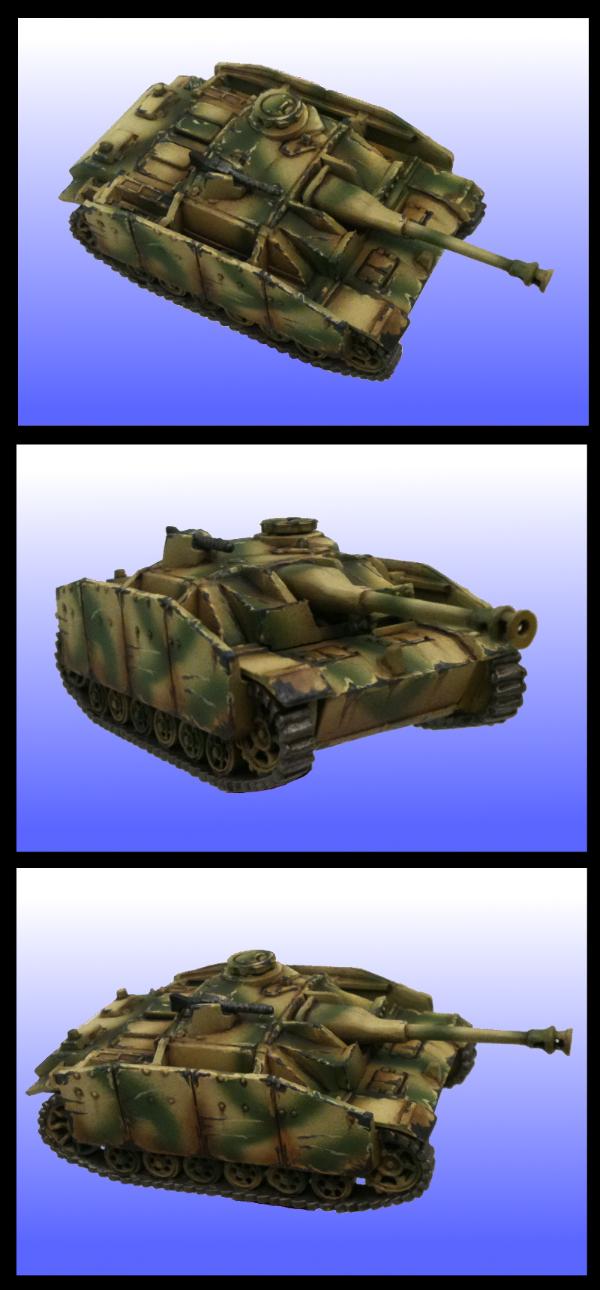
I have noticed that at 15mm most people don't even attempt to replicate the more detailed german camo schemes with airbrushes, so maybe I'm being too hopeful, lol. Here was my first crack of a StuG a few months ago, I'm going to jump in to some Panzer IV's and Tigers next so need to decide if I'm going to do a soft edge scheme or give up and do a hard edged scheme. The StuG was done with a 0.35mm nozzle on a cheap chinese airbrush, I have a new brush on the way, a Runway 13 which goes down to 0.2mm, so maybe that will help?
Sammoth wrote: This guy has some simple techniques I use it's all about trigger control.
I watched through that and maybe I missed them, but did he actually talk about techniques all that much? I mean other than the simple stuff of remove the needle cap and you need to have good trigger control I didn't actually hear anything mentioned, lol.
Also, on flat paper towel, I can totally paint lines that thin as well
Most the time when I see things about how to paint fine lines they are either moving the brush quickly over a flat surface (too fast to create anything more than a slash on a tiny 15mm model) or they're doing it on paper/cloth which is heaps easier.
This message was edited 1 time. Last update was at 2015/02/15 17:30:06
Cocaco wrote: Or you could use a brush and keep your honor and dignity.
That's honestly what I'm considering which is why I made this thread, hoping to get some pointers. The type of scheme I was hoping to emulate were things along the lines of....
When you scale those schemes down to 15mm the dots/lines that make up the patterns become quite tiny, when I did the StuG I was planning a much more dense camo scheme and ended up limited by how thin I could paint the lines (mostly ~2 mm maybe a smidge less, and ~3mm if I made a mistake, lol).
This message was edited 2 times. Last update was at 2015/02/15 21:34:11
What about using a stencil? Get a softer pattern by holding the stencil a few mm away from any tank surface area? Cant say i have ever tried it, but it works in my mind
That's an idea I hadn't considered. I have seen people use blutack and lift the edges but it seems very hit and miss (you end up with a soft edge pattern that randomly goes hard edged in some areas, lol), maybe a stencil that's offset 1 to 2 mm from the surface might work better, hmmm. I haven't tried anything like that before either, would have to test it on something.
It would be tricky (if not impossible) to do on some of the more complicated geometries though.
This message was edited 2 times. Last update was at 2015/02/15 22:32:09
Feathered edge masking is done with rolled up pieces of tape.
Like sticking a tube to the car, allowing some spray to get in the recess created ~ but not loads of it.
You could probably get a similar result with sausages of bluetack at the scale your looking at. Its about how round they are. It wants to be only just sat on the surface so not to give a hard edge, and needs to overhang the line where its stuck to by a good way. ~ also spray lightly, build it up in thin layers. any really wet spray will give hard lines.
That said this is totally doable freehand with propper airbrush control you can draw neat lines as thin as the nozzle. You need to really over thin the paint and build it up in quite a few layers, even when dealing with high end automotive paints. Try it with acrylic inks, or some paint that can be thinned with alcohol.
This message was edited 4 times. Last update was at 2015/02/16 00:01:34
'Ain't nothing crazy about me but my brain. Right brain? Riight! No not you right brain! Right left brain? Right!... Okay then lets do this!!
Maybe there was something wrong with the needle in my brush, but I found if I thinned it any further than what I used to paint that StuG, it'd start spitting. Instead of a nice even cone it start spitting, you could even audibly hear it, so I'd have to crank up the pressure and by the time I got a pressure where it stopped spitting it'd just be blowing the paint around on the model.
So you reckon alcohol thinned paints might work better? Do you mean things like Tamiya paints? I do have some Tamiya paints but I've never tried doing fine lines with them.
This message was edited 1 time. Last update was at 2015/02/16 04:18:32
Sammoth wrote:This guy has some simple techniques I use it's all about trigger control.
I watched this video just now, and I don't think it addresses the OP's need. The lines this guy draws aren't that fine -- not that you could tell on a paper towel, because everything will bleed like crazy, but at 40psi, there's no way you could get the type of ultrafine lines that you'd need to do camo patterns on 15mm scale -- or lines anywhere near nozzle size.
I also have to disagree that it's all about trigger control. I think that distance to surface, air pressure, and having thinned paints is where it's at, but all that being said, in my experience, achieving it on canvas (or at least a flat vertical surface) is doable, but trying to paint superfine details on a 3D model that I'd normally use a brush for -- like eyebrows, eyes, lightning patterns, insignia, or chapter markings -- is a waste of time. At least, at any skill level I'm likely to achieve.
AllSeeingSkink wrote:Maybe there was something wrong with the needle in my brush, but I found if I thinned it any further than what I used to paint that StuG, it'd start spitting. Instead of a nice even cone it start spitting, you could even audibly hear it, so I'd have to crank up the pressure and by the time I got a pressure where it stopped spitting it'd just be blowing the paint around on the model.
So you reckon alcohol thinned paints might work better? Do you mean things like Tamiya paints? I do have some Tamiya paints but I've never tried doing fine lines with them.
Alcohol thinned paints didn't do anything for me (I have Tamiya too) :(
I have three techniques for drawing "fine" lines, none of which I'm enamored with.
1. Use a 0.2mm needle quite close to the surface with low PSI -- I set it at 15, and use a MAC to lower it from there (actual PSI probably like, 9). It is very annoying, because as you say, you must thin the paints quite a bit. The issue is that the paint then covers very poorly, and it's nigh impossible to freehand paint over the same pinstripe 5 times. It does work, if I don't have to actually achieve opacity.
2. Mask it. Tamiya makes some good model masking tape, and you can get great, thin lines on surfaces that don't have a lot of relief this way. But getting 2 pieces of tape down perfectly parallel takes a lot of time, and if you want it very thin, it's not easy to do (because a little bit off, and it will look weird).
3. Use a shield to paint progressive lines. Instead of masking both sides of a line, paint it one block at a time. For instance, paint a swathe of red. Then use a shield to paint a black line that's too thick, against the shield (which will give you one clean edge). Move the shield forward a little and paint another block of red, which will give you the other side of the line. The problem with this is that you have to be pretty good with a shield, and it only works if the colors don't require a billion coats.0
At the end of the day, for me, it seems easier to use a paintbrush for this type of thing.
BlackOps wrote: What about using a stencil? Get a softer pattern by holding the stencil a few mm away from any tank surface area? Cant say i have ever tried it, but it works in my mind
This was going to be my suggestion as well.
That or get a more expensive airbrush (something with a turbine would allow you to paint lined cammo on a 6mm tank.
My experience in painting military models is using trigger control it takes practice. I would say take a piece of cardboard and just try different trigger pressure even try lower PSI to get your desired effect. You can use stencil but, it may mask out the effect. Keep in mind that more of the time in WW2 they were just given some paint and even used oil to make the camouflage pattern.
Some of mine below.
https://www.youtube.com/watch?v=8xqOf-KjdVY
My Hobby Blog:
By the way, I saw once a guide on camo with airbrush, where the person basically stuck patterns of putty on the model and the sprayed the whole thing. It looked very convincing
I am not into historical or camo type stuff (IMO, a tank should have a holo field, shields, or something.. and it should probably fly too ), so I haven't actually tried it.
The reason I suggested alcohol thinned paints is because alcohol is thinner than water, and dries faster.
Im not sure why your airbrush would sputter for having thinner paints... doesnt sound right to me. Perhaps there was a lump in the paint that clogged the nozzle on that occasion?
It can be really important to make sure the paint is evenly thinned.
For illustrating (i.e people who want extra fine lines) its common to reduce the paint upto 300% more than for basecoat coverage. You then run into difficulties of it being really transparent and feint ~ and so need a heavier pigment load in the paint.
Enter the inks, or better yet candys (candy paints are dyes suspended in lacquer, and are what a lot of custom cars and bikes get done with)
I personally can get a line down to approx 0.5mm wide using a 0.2mm airbrush and liquitex acrylic inks. Which tells me you can do the scale you need with the right paint / airbrush setup surely? (it does take some effort and concentration mind you)
As a side note, water seems to fail as a thinner for acrylics when considering illustration. The reason is that the acrylic needs a certain % of the fluid to be polymer for it to bind correctly when curing. And you have to add quite a lot of water to get the viscosity of the paint down to what you want for detail spraying.
Vallejo airbrush thinner is the best store bought option I've found to date. Works perfect fro all the citadel colours i've tried with.
This message was edited 2 times. Last update was at 2015/02/16 20:16:49
'Ain't nothing crazy about me but my brain. Right brain? Riight! No not you right brain! Right left brain? Right!... Okay then lets do this!!
Sammoth wrote: My experience in painting military models is using trigger control it takes practice. I would say take a piece of cardboard and just try different trigger pressure even try lower PSI to get your desired effect. You can use stencil but, it may mask out the effect. Keep in mind that more of the time in WW2 they were just given some paint and even used oil to make the camouflage pattern.
I'm going for a Kursk era force, I could be wrong but I think several divisions had enough access to air compressors that spraying the camo pattern was common, hence the soft edge scheme. If my understanding is correct, later in the war when they tried to standardise the ambush camo scheme they started painting the scheme in the factory using masks and so later in the war hard edged camo was more common.
At any time I think it wasn't uncommon for a tank to just be hurriedly repainted with rags and petrol, but I'm going for the Kursk era field painted sprayed olivgrun over the dunkelgelb base.
Nice looking tanks by the way!
Automatically Appended Next Post:
Talys wrote: By the way, I saw once a guide on camo with airbrush, where the person basically stuck patterns of putty on the model and the sprayed the whole thing. It looked very convincing
I am not into historical or camo type stuff (IMO, a tank should have a holo field, shields, or something.. and it should probably fly too ), so I haven't actually tried it.
If I go hard edged I'll probably just use masking fluid, I have some Gunze Mr Hobby stuff that I've used in the past to create flame jobs on the Aeronautica Imperialis aircraft, which are even tinier than the tanks I'm trying to paint now.
I was considering the idea of stencils and rolled up blutack to create soft schemes, but on consideration I'm not sure it'd work well on such small scale models. I've seen it used to good effect on aircraft and larger tank models, but on those models you can more easily control the angle of the brush relative to the surface you're spraying, with a 15mm tank I think it's going to be problematic because if you spray at an angle the paint ends up going under the mask and spoiling the effect.
Automatically Appended Next Post:
HairySticks wrote: The reason I suggested alcohol thinned paints is because alcohol is thinner than water, and dries faster.
Im not sure why your airbrush would sputter for having thinner paints... doesnt sound right to me. Perhaps there was a lump in the paint that clogged the nozzle on that occasion?
Well since I painted that StuG I discovered the needle of my airbrush has an imperfection, but I honestly don't know if that imperfection was there when I painted the StuG or not, lol. It's my first brush and the needle was fine when I bought it, but the past few times I used it I can feel something on the needle and if I wipe it with a tissue some of the tissue will get caught on the needle so there must be a burr or something (I can't see it, but I can definitely feel it).
So maybe that's why I had problems on the StuG, I'm really not sure unfortunately as I can't pin down when I might have damaged the needle.
I have painted other fine detail stuff, but mostly shading and highlighting where the slight spitting isn't as much of a problem , but when spraying a green on to a yellow it's VERY noticeable.
It can be really important to make sure the paint is evenly thinned. For illustrating (i.e people who want extra fine lines) its common to reduce the paint upto 300% more than for basecoat coverage. You then run into difficulties of it being really transparent and feint ~ and so need a heavier pigment load in the paint. Enter the inks, or better yet candys (candy paints are dyes suspended in lacquer, and are what a lot of custom cars and bikes get done with)
I personally can get a line down to approx 0.5mm wide using a 0.2mm airbrush and liquitex acrylic inks. Which tells me you can do the scale you need with the right paint / airbrush setup surely? (it does take some effort and concentration mind you)
I'll see if I can get my hands on some inks then. As Talys mentioned another problem is the opacity, if you have to go over the line to darken it, that's significantly harder than the first pass!
When you say 0.5mm wide, do you mean on complicated models? That's the part I'm struggling with. If I look at my palette where I practice, I've measured several lines that are in the 0.5 to 1mm range that I managed to paint on the flat surface of my palette, translating that to the miniature though with it's 3D shapes and complicated geometry I'm struggling to get below 2mm, and even there I sometimes make a mistake and end up with a 3mm line where I tried to fix it.
As a side note, water seems to fail as a thinner for acrylics when considering illustration. The reason is that the acrylic needs a certain % of the fluid to be polymer for it to bind correctly when curing. And you have to add quite a lot of water to get the viscosity of the paint down to what you want for detail spraying. Vallejo airbrush thinner is the best store bought option I've found to date. Works perfect fro all the citadel colours i've tried with.
Yeah I've been using Vallejo thinner as well When I first started I went through the process of trying a few different thinners from water to IPA and a few different mixes from different manufacturers and settled on Vallejo's thinner.
++++++++++++++++++++++++++++++++++++++++++++++++++++++++++++++++++++ ==================================================================== ++++++++++++++++++++++++++++++++++++++++++++++++++++++++++++++++++++ Automatically Appended Next Post: Ok!! Well.... apparently half the problem was my needle. It must have been damaged when I painted that StuG as well. I took the exact same AB and exact same needle and polished the hell out of the needle (I couldn't see any flaws, but I could feel them and I have experience polishing other sharp pointy objects so I just went by feel, lol).
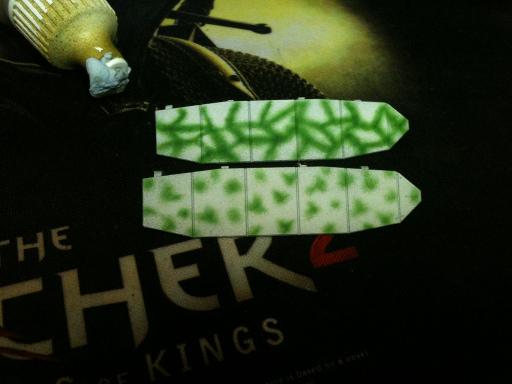
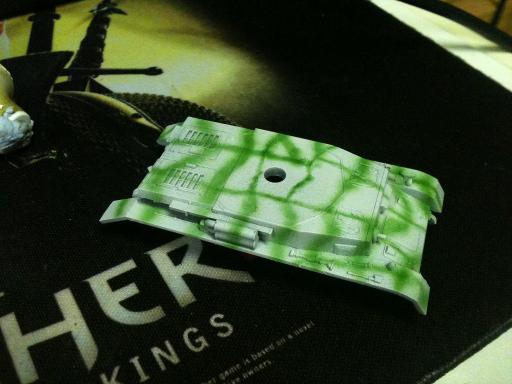
After that I can get much finer lines. Most the lines on the top Schurzen are ~1mm, most the lines on the tank are 1-2mm. I just sprayed over the top of primer because I didn't want to go to the effort of painting a nice dunkelgelb just to destroy it with a bad camo job On the final tanks I'll spend a bit more time planning out the camo scheme, this was mostly just random playing. The Vallejo pot lid in the corner of the image gives you an idea of scale.
So, what I've learned....
1. Trigger control was less important than I thought. There was a wider range that I could lay down lines than I was expecting. That's not to say it isn't important... just that I apparently already possess the requisite trigger control (which isn't much)
2. Distance control is very important. For 1mm lines I needed to be just a few mm away, get much closer and boom, puddle. I think 1mm is probably the limit of what I can happily do, I was able to produce 0.5mm lines but the window for a good spraying distance was tiny and the slightest mistake would mess it all up.
3. The brush needs to be perpendicular to the surface! If you are at an angle, make sure that angle is along the line. If you are at an angle to the line, your line will be softer on one side and harder on the other and you're liable to blow paint across the surface.
4. Clogs and paint build up on the needle are a pain in the arse. You need to clean the needle all the time, like, every inch or so of model you need to clean the needle. Clean the tip but also clean where the needle enters the nozzle, I kept getting a ring of dried paint around where the needle enters the nozzle. If in the middle of spraying a line you notice ANY change in the trigger pull required to get paint or really any changes at all, STOP, just STOP, don't try and keep painting the line, STOP and clean the needle and pull the needle back all the way with full air to clear the nozzle before even considering going back to the model. It's annoying because then you have to pick up the line where you were, but it's better than splattering all over the model.
A couple of times I got very minor clogs that I probably wouldn't have even noticed with normal spraying, but spraying these fine lines I noticed a couple of times a slight splutter, for some reason it mostly happened on the bottom. I cleared clogs inside the nozzle by just spraying heavily on to something (not the model, lol), a couple of times I cleared the clog by blocking the tip with a tissue which forces air back through the nozzle and that seemed to work.
5. Paint consistency is a nightmare, not because it's hard to get the right consistency but because it keeps changing. I thought I mixed the paint quite thoroughly, but after a few minutes of spraying it randomly went thinner (you can see on the left side of the upper schurzen the lines are a bit thicker, it's because the paint randomly went thin and I created lots of puddles that needed thicker lines over the top to fix. It happened a few times, the paint would go thin and I'd have to remix it and clear the old paint out of the passages (just spray for a few seconds to clear it) and then I was good to go again. After spraying for maybe 20 minutes for some reason it felt like the mix had gone too thin so I dropped in another drop of paint without any more thinner and it got it back to where it was originally. I wonder if mixing a much larger amount of paint than you actually need would help, as I only had a few drops in the cup maybe the paint separating was having more of an effect.
6. I found Vallejo Airbrush CLEANER to be a better thinner for these purposes than Vallejo Airbrush THINNER. The cleaner is a harsher solvent and it just seemed to produce nicer lines easier. I thinned approximately 3:2 Airbrush Cleaner to VMA paint (which is already quite thin).
I do still wonder if maybe an enamel like Testors or Humbrol would make things easier or harder. It seems like most my problems were paint drying in the nozzle, paint drying on the needle and the consistency changing all the time.
This message was edited 7 times. Last update was at 2015/02/17 00:09:39
I do camo on my marines, and use a fine tip airbrush (badger sotar 20/20) for a soft edged camo.
I too have some of the problems you have mentioned, and some of the same observations.
A few things that have helped me;
1 - low psi - i use about 13 psi.
2 - very thin paint - I use vallejo model air, or game air, and thin that a bit more using tamyia x20a thinner - it is amazing.
3 - angle - just as you indicated...
4 - trigger control when RELEASING the needle back into the brush - if I let it go back too fast, a clump of paint accumulates on the tip - and then blows onto the model next spray. let it very slowly come back into the brush.
best of luck!
DavePak
"Remember, in life, the only thing you absolutely control is your own attitude - do not squander that power."
Fully Painted armies:
TAU: 10k Nids: 9600 Marines: 4000 Crons: 7600
Actor, Gamer, Comic, Corporate Nerd
Oh yeah, your number 4 is important, though instead of putting the trigger forward to stop paint accumulating on the tip I just give it an extra blast of air with no paint (not pointing at the model) to blow the accumulation off.
I stopped by the hobby shop today and grabbed some Testors Model Master enamel and thinner, I'll give that a shot and see how it goes.
Automatically Appended Next Post: Ok! So, I tried the enamels. There's pros and cons but overall I think the enamels are much easier to get fine lines.
The major con is that pooling seems to happen even more easily. You can't stop moving the brush even for a moment or you'll get pooling. With the acrylic I'd aim at a point and start pulling back the trigger and once the paint started flowing I'd start moving to paint the line, the enamel pools too quickly for that, so I have to move the brush back and forth where I want the line and start pulling back the trigger and just have good control as you see the line starting to form.
Trigger control seems more important with the enamel because of that.
BUT, on the pro side...
- It seems to go on a lot smoother, hard to describe but the lines just form more nicely, more consistent.
- I can run much lower pressures for what feels like the same paint viscosity (I was around 12PSI with the acrylic, I'm down to about 8PSI with the enamel).
- I don't get a build up of paint on the tip, it does still block up a bit around the nozzle but it's easier to clear and happens less often.
- The changing paint consistency is still a problem. I think regardless of enamels or acrylics you just have to stir the paint every couple of minutes. But I felt like it was less of a problem.
- I could spray much more before having to clean the needle, clear clogs, etc.
The pooling issue is a problem though because it really messes things up when you screw up and it's harder to fix. The enamel actually dries to the touch faster than I thought it would, but if you have an old brush and pot of white spirits on hand it is possible to somewhat clean up mistakes (though I think you might end up accidentally filtering the underlying paint).
For people struggling to paint fine lines I'd definitely recommend trying enamels, though it's hard to say if the pros outweigh the cons.
Cleaning the AB afterwards I actually found easier with enamels than the acrylics. You have to use harsher chemicals to clean the AB which sucks, but with acrylics you get little clumps of dried paint and dried paint in the corners of the paint cup you have to get rid of, where as the enamel didn't have as many issues with that, I just sprayed some white spirit through it and it was mostly clean (I still pulled it apart of course to clean all the components, but I found there were far less areas caked in half dried paint compared to when I use acrylics).
I didn't have any more models primed to practice on, so I just practised on a bit of card I have lying around (most of what looks like mistakes are actually just mistakes from previous experiments that I didn't clean off, lol). As you can see I quickly got to the point where I was doing much finer work with the enamel (left) than I was doing with the acrylic on the right.
This message was edited 2 times. Last update was at 2015/02/17 08:32:09
looking good, I thought you would find enamels or really any other paint with a strong chemical thinner (rather than water based acrylics) to spray nicer at fine detail. You could probably get the pressure lower than you did before now, might help ont he pooling by reducing the amount of paint being sprayed. Also being feather light on the trigger, while at the lowest pressure that will still atomise the paint and really close up to the job is how to get micro lines. Thinning the paint quite a bit more than you would for just spraying a base ~ paint will seem to spray okay at much higher viscosities than you want for detailing. Having a play around with the maximum thinning you can really do before the opacity gets too low to find the right amount.
By no means is it easy, acrylics make it harder still. And so do hard non-porous substrates (like our model over say a canvas or a tee shirt), hat off to anyone making the effort to get this level of use from an airbrush.
Pooling can be okay aslong as its not being pushed around by the airflow from the brush.
Your suggestion to keep moving is right. I would say do a bit here then a bit on the total opposite side, if the model is still in parts then a bit on each one and then go back, cycling through them, or through areas of the overall model. This is to let the bit you just sprayed dry before doing some more close to it that will wreck it.
This message was edited 2 times. Last update was at 2015/02/17 19:23:12
'Ain't nothing crazy about me but my brain. Right brain? Riight! No not you right brain! Right left brain? Right!... Okay then lets do this!!
A little update. On my way home from work today I picked up some Gunze Aqueous Hobby Color Olivgrun and also some Gunze thinner to go with it.
WOW! This stuff is awesome. It makes Vallejo Model Air feel like finger painting. It goes on even smoother than the enamels and has a really wide range of viscosities where it works well. I was surprised when I thought I had mixed it too thick it still went on really smooth.
I had used Gunze stuff in the past but never with their own thinner and only ever for coating large surfaces, when you try and paint fine lines it really highlights how great it really is.
The only downside to Gunze is it dries very quickly so if you make a mistake, you're screwed. You can't clean it up, I tried cleaning it with thinner and it stripped the underlying paint before I managed to clean it up and I tried white spirit and it just didn't to much at all. I could try a few layers of varnish to see if that allows me to clean it up, but I have a feeling it won't because the Gunze thinner is a very strong solvent and I think it's soaking in to the underlying paint.
Oddly enough though. in spite of the fast drying time on the Gunze surprisingly it actually clogs and accumulates on the needle even less than VMA).
So now I have to decide, I'm going to stay away from VMA, but I have to decide whether to go with enamels which pool easily but have the benefit of being able to clean up mistakes, or go with Gunze where you're less likely to make a mistake in the first place, but when you do, you're screwed, lol.
This message was edited 1 time. Last update was at 2015/02/20 08:31:09
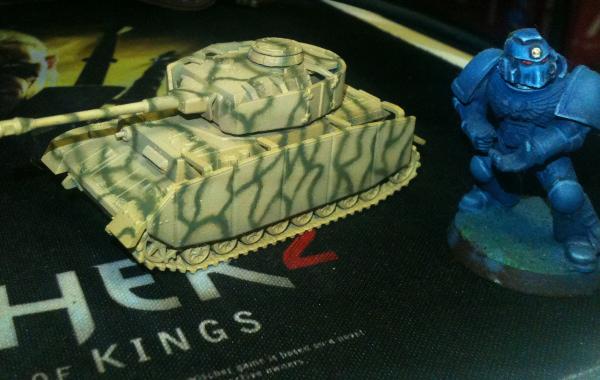
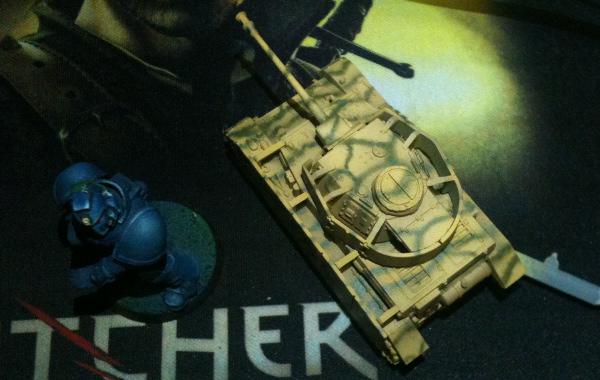
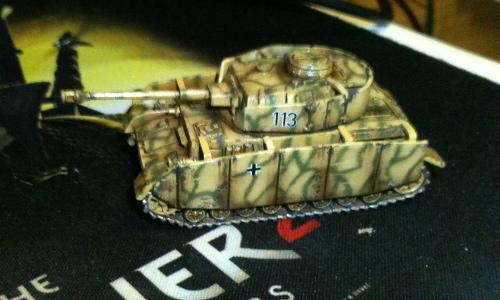
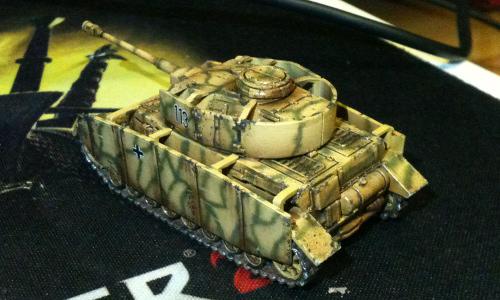
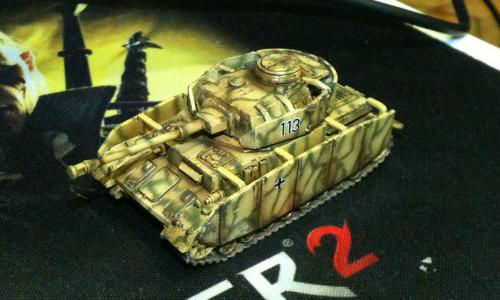
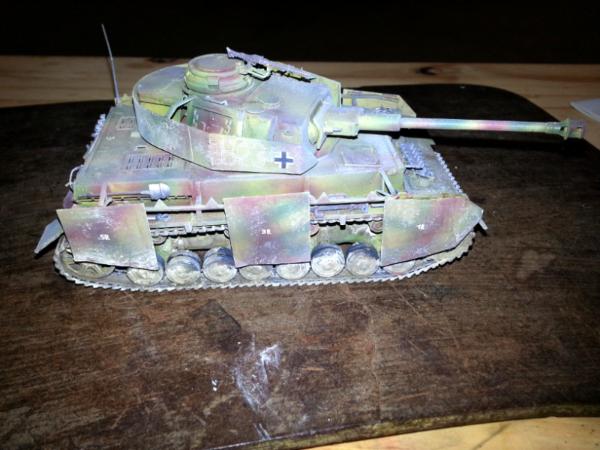
Started working on a Panzer IV. I started off trying to emulate a historically accurate scheme from Kursk but made too many mistakes and ended up just inventing my own scheme
I'm not sure what happened about 10 minutes in my spray pattern started splitting in 2 cones instead of one. I turned up the pressure and tried to blow it out assuming it was a clog and I couldn't fix it, tried wiping the needle off, wiggling it back and forth, just couldn't fix it, I ended up pulling the brush apart and fully cleaning it and then putting it back together and it still wasn't spraying terribly well, a few minutes later it randomly cleared up mostly, but there was still a bit of splutter around the bottom of the spray cone. No idea what's going on there.
This is still using my cheapo chinese brush.
I included a Space Marine for scale since I guess most people don't know how big a 15mm tank is, lol. There are a couple of spots that are messed up, primarily when I got the aforementioned problem.
The hardest part was the hull, getting the line to follow all the little details, corners, etc is really hard. Sometimes where you want paint to go it just won't go because the shape of the model makes deforms the cone.
This message was edited 1 time. Last update was at 2015/02/21 03:14:37
I like the last tank pic, especially. Pic #2 with the space marine (for scale) is fun -- I imagine a blue Hulk picking up the tank by the barrel and tossing it!
I like the last tank pic, especially. Pic #2 with the space marine (for scale) is fun -- I imagine a blue Hulk picking up the tank by the barrel and tossing it!
Thanks!
15mm is a nice scale for tanks. I think it's the smallest scale where you still see a decent amount of detail. If someone paints a 15mm tank well and photographs it well, it can totally pass as full sized vehicle. I'm not quite there yet but I still thought I'd put a Space Marine next to it so people don't mistake it for a poorly painted 28mm model
Simply because I've not figured out a good way of doing mud! I've been playing around with weathering powders but I can't get anything that I both like and also that's repeatable (repeatable is important because I don't want half my tanks looking different).
I've tried on half a dozen models and I just can't produce something I like with mud. Maybe I'll give up on weathering powders and just use paint + plaster + matte varnish.
Gunze and Tamiya paints have pros and cons, most of the pros are airbrush related. A rough list (I may forget things).
They are Japanese, very popular among the Gundam crowd. Gunze doesn't have a huge selection of colours, I think Tamiya is a bit larger but still not as large Vallejo's range. They're available in quite a few hobby stores in Australia, not sure about the USA. When I say hobby stores, I mean those places that sell scale model tanks/boats/aircraft, not so much wargaming stores. Tamiya carry both enamels and acrylics. Gunze's acrylics are called "Aqueous Hobby Color" and they also have a range of lacquers called "Mr. Color".
Pros: - Sprays very smoothly.
- Works over a wider range of viscosities than VMA.
- Dries faster without clogging the airbrush.
- Because you can spray it over a wider range of viscosities, you can mix it a bit thicker and actually get pretty good coverage in 1 pass (if that's what you want) or thin it down to get lower opacity.
Cons -Terrible pots. I hate them. They're screw top which often get stuck. Think back to the days when GW used screw tops. At least these ones are glass instead of plastic. A couple of them I've had to use very hot water to loosen the pot and then open it with a rubber glove.
-Fast drying makes it hard to paint by hairy brush.
-If you want the good properties when airbrushing, you kind of need to use their own thinners (Tamiya X20A or Gunze's Aqueous Hobby Color Thinner). These thinners don't work well with Vallejo paints. Vallejo thinner can with with Tamiya and Gunze but not nearly as well.
-They tend to separate quickly when sitting around so you have to mix them a lot before putting them in your airbrush or on your palette. I think their thinners actually bind them somewhat because once I've thinned them with their own thinners they tend not to separate quite so badly.
-They are alcohol based. They say water based on the pots, so I guess they must have some amount of water, but they also have a lot of alcohol in them. The thinners are also alcohol based. Alcohol will strip acrylics, it's not so much a problem when airbrushing, but when hairy brush painting you actually have to be careful that you don't accidentally strip any underlying paint. When airbrushing you should always make sure you have good ventilation, but it's more important with Gunze and Tamiya paints because of the solvents in the paint and thinners, you don't really want to be breathing in that stuff.
That said, I don't want to go overboard... you can airbrush damned near any paint. I airbrush GW, Vallejo, P3, army painter. All of them can be airbrushed... it's just when you are trying to paint at your limits like I'm trying to do, you really do appreciate the quality of Gunze and Tamiya.
This message was edited 4 times. Last update was at 2015/02/23 13:01:20


 Also weathering your tanks will help cover up some imperfections.