| Author |
Message |
 |
|
|
|
|
Advert
|
Forum adverts like this one are shown to any user who is not logged in. Join us by filling out a tiny 3 field form and you will get your own, free, dakka user account which gives a good range of benefits to you:
- No adverts like this in the forums anymore.
- Times and dates in your local timezone.
- Full tracking of what you have read so you can skip to your first unread post, easily see what has changed since you last logged in, and easily see what is new at a glance.
- Email notifications for threads you want to watch closely.
- Being a part of the oldest wargaming community on the net.
If you are already a member then feel free to login now. |
|
 |
2015/06/08 15:14:09
Subject: Eilif's Toybashig Hut (1/27 Fallout style trucks from Menards)
|
|

Brigadier General
|
Not everything in this thread will be a toybash, but so much of my terrain is built of broken and cast-off toys that it seemed the right time for a re-title.
There are additional Mostly-Toybash similar projects on my earlier thread:
https://www.dakkadakka.com/dakkaforum/posts/list/0/612801.page
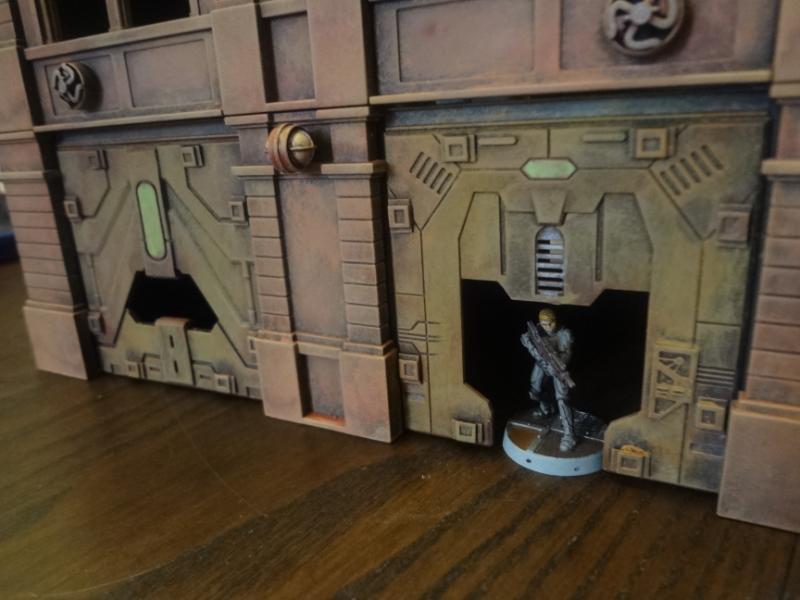
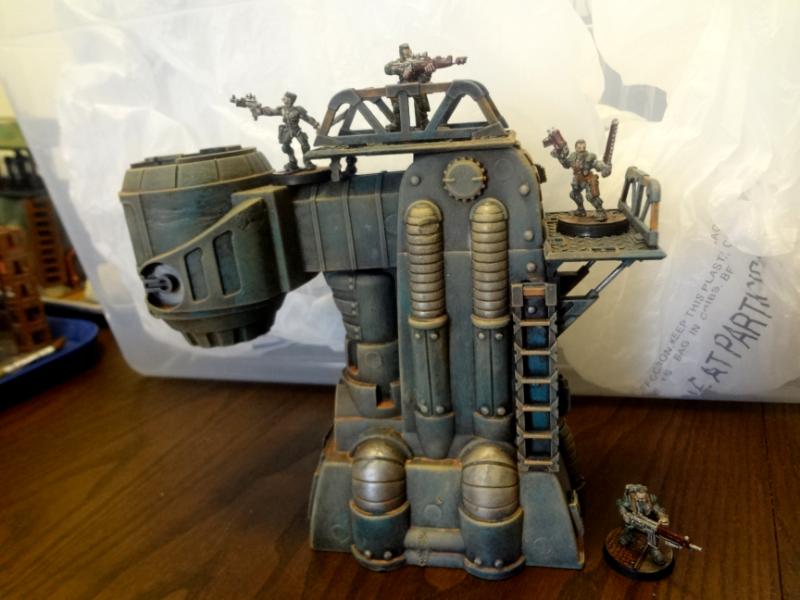
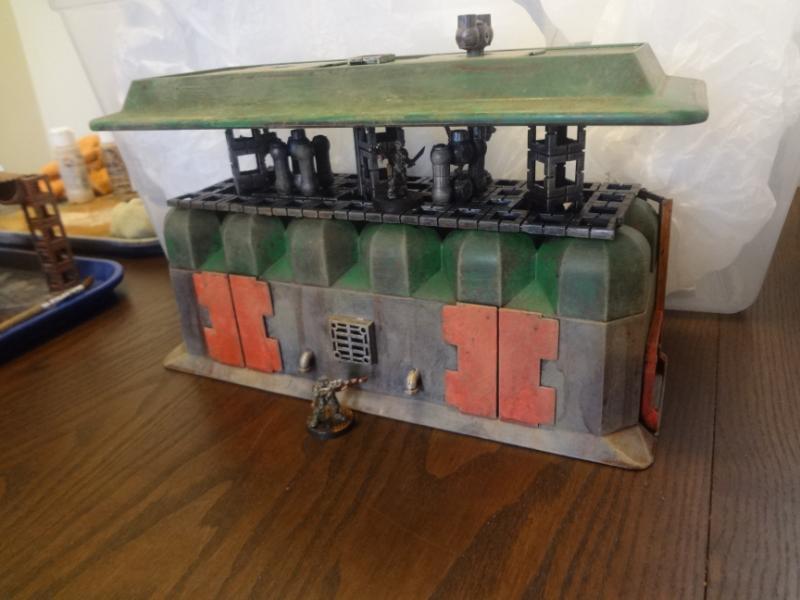
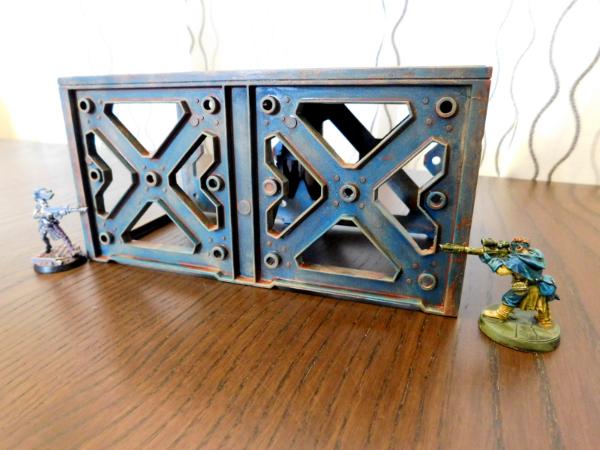
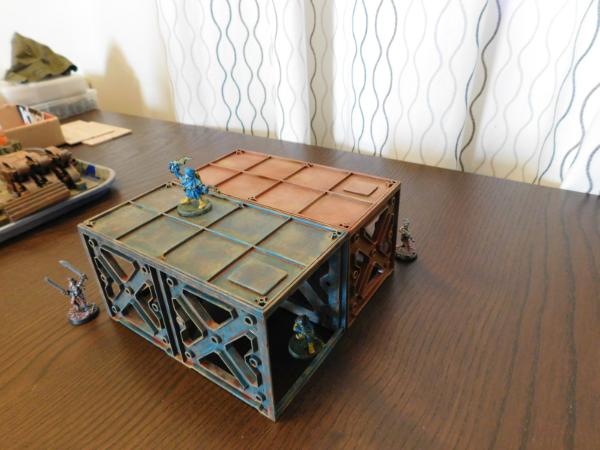
Just finished up 2 Cyberpunk buildings made by combining Mantic Battlezone panels and Dust Warzone Tenements. I've previously built a bunch of structures based on the Warzone Tenement kits, but this combination really brings them further into sci-fi.
Lots of pics and construction kits hints here:
http://chicagoskirmish.blogspot.com/2015/06/dust-tenements-mantic-battlezones.html
A few teasers to get you interested. I really think you're going to want to read the whole post...


|
|
This message was edited 69 times. Last update was at 2026/01/27 16:15:47
|
|
|
|
2015/06/09 16:01:30
Subject: Dust Tactics Buildings + Mantic Battlzone Panels = Cyberpunk City!
|
|
Brigadier General
|
Thanks Folks!
 wrinklestiltskin wrote: wrinklestiltskin wrote:I like that a lot. Stylewise it reminds me of something, but for the life of me I can't remember what.
I like the colors as well.
Glad you liked it. I was thinking of Bladerunner when I made them though I didn't do any reference work.
|
|
|
|
2015/06/10 16:46:08
Subject: Dust Tactics Buildings + Mantic Battlzone Panels = Cyberpunk City!
|
|
Brigadier General
|
My second June Terrain project.
A resale shop "Rokenbok" playset provided me with the basis for two more industrial terrain pieces.
More pics, WIPs, and process here:
http://chicagoskirmish.blogspot.com/2015/06/rokenbok-terrain-bonanza.html#comment-form
A Storage Tank
A Gravel Elevator
|
|
|
|
2015/06/16 17:20:34
Subject: June Terrain Projects. (Update 6/10 Rokenbok-based industrial terrain)
|
|
Brigadier General
|
More buildings from toys and junk to show today. A multi-level chemical facility from a plastic egg box and a smelter from a Creepy Crawlers molding toy.
More Pics, WIP and details here:
http://chicagoskirmish.blogspot.com/2015/06/more-toybashing-creepy-crawlers-and-egg.html
|
|
|
|
2015/06/18 01:23:35
Subject: June Terrain Projects. (Update 6/16 Chem Facility and Smelter)
|
|
Brigadier General
|
wrinklestiltskin wrote:That is just amazingly done. I think my kids used to play with something like that from play-do, never would have figured to make terrain from it.
Thanks!. It's very possibly the same. Creepy Crawler sets in one form or another have been around since the 60's, though some of the early versions looked alot like easy bake ovens.
|
|
|
|
2015/06/19 19:26:09
Subject: June Terrain Projects. (Update 6/16 Chem Facility and Smelter)
|
|
Brigadier General
|
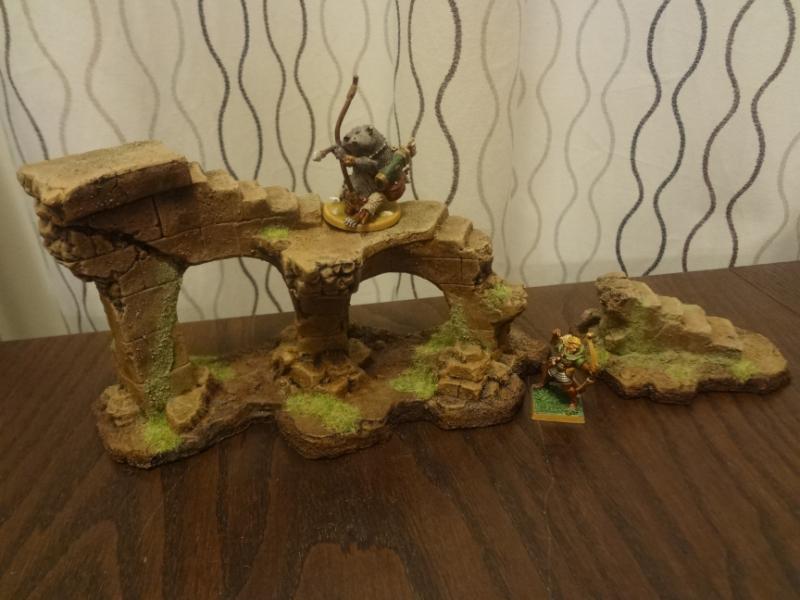
Today I've got a little change of pace from my previous sci-fi offerings.
Recently my friend gave me the terrain pieces from the Reaper "Dragons Don't Share" set.
Despite a couple minor flaws, this is a very impressive terrain set that paints up a treat and by virtue of being sectioned should prove quite versatile. Full pics and review here:
http://chicagoskirmish.blogspot.com/2015/06/dragons-dont-share-but-mike-does.html

|
|
This message was edited 3 times. Last update was at 2016/06/06 13:05:14
|
|
|
|
2015/06/30 19:39:28
Subject: Re:June Terrain Projects. (Update 6/19 "Dragons Don't Share" Ruined Tower Terrain)
|
|
Brigadier General
|
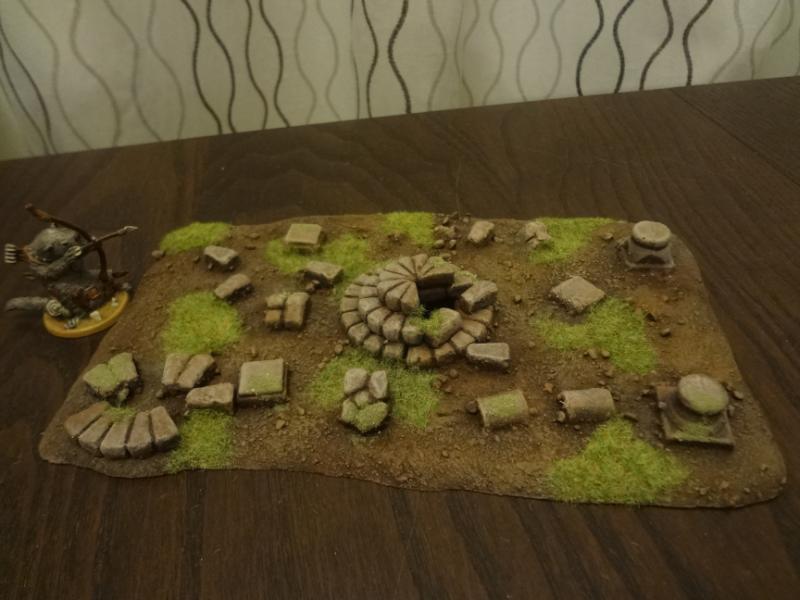
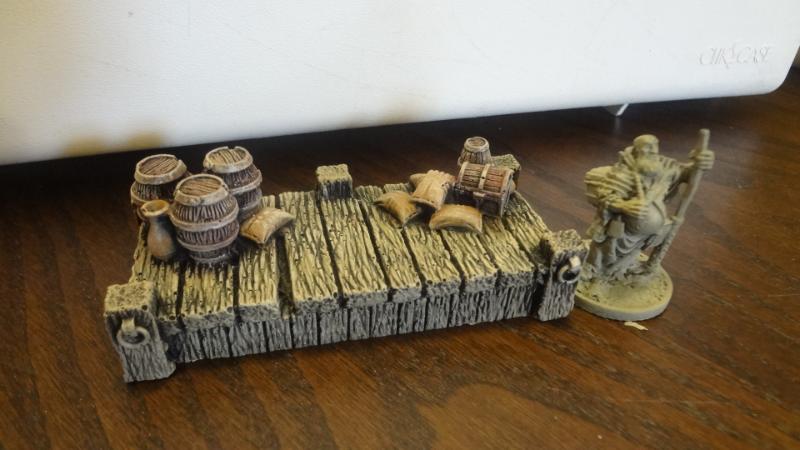
My last terrain projects for the month.
This time it's some very old ruins, a pier and a rowboat.
Full story and pics here: http://chicagoskirmish.blogspot.com/2015/06/fantasy-terrain-bits-and-more-waterfront.html
|
|
|
|
2015/09/05 01:42:42
Subject: Eilif's Many Projects. At least the ones he finishes... (Update 6/30 Old Ruins and waterfront stuff)
|
|
Brigadier General
|
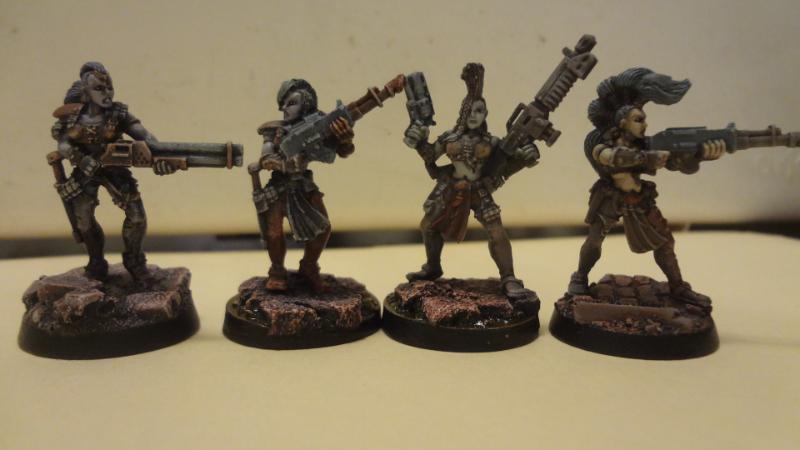
A long overdue update. I've long loved the classic Escher miniatures, but never felt I had the painting ability to do the scupts justice. However, I recently had a friend -whose painting style I really admire paint up my 15 woman Escher gang in exchange for me building him a bunch of custom terrain.
And here they are!

Pics of all figs front and back and plenty of details here: http://chicagoskirmish.blogspot.com/2015/09/the-exchange-with-mattias-part-2-escher.html
They're all stock figures except for the figure on the left which has an interesting history...
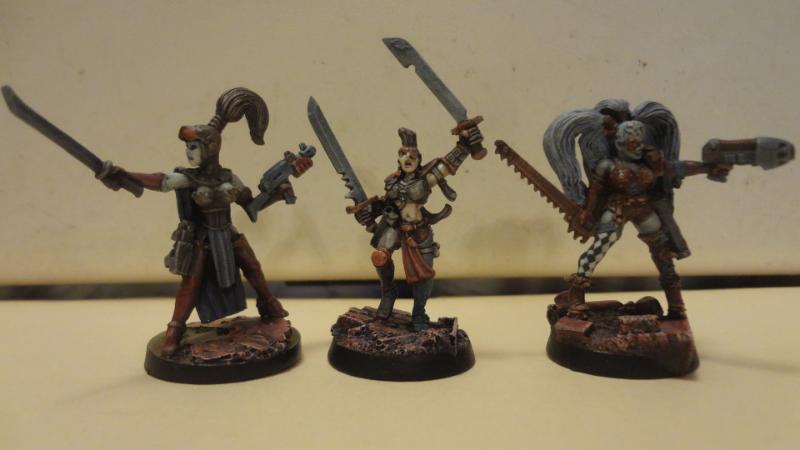
One more teaser to entice you to visit.
|
|
This message was edited 3 times. Last update was at 2016/06/06 13:05:52
|
|
|
|
2015/09/09 15:02:10
Subject: Re:Eilif's Many Projects. At least the ones he finishes... (Update 9/9 Sci Fi containers and truck!)
|
|
Brigadier General
|
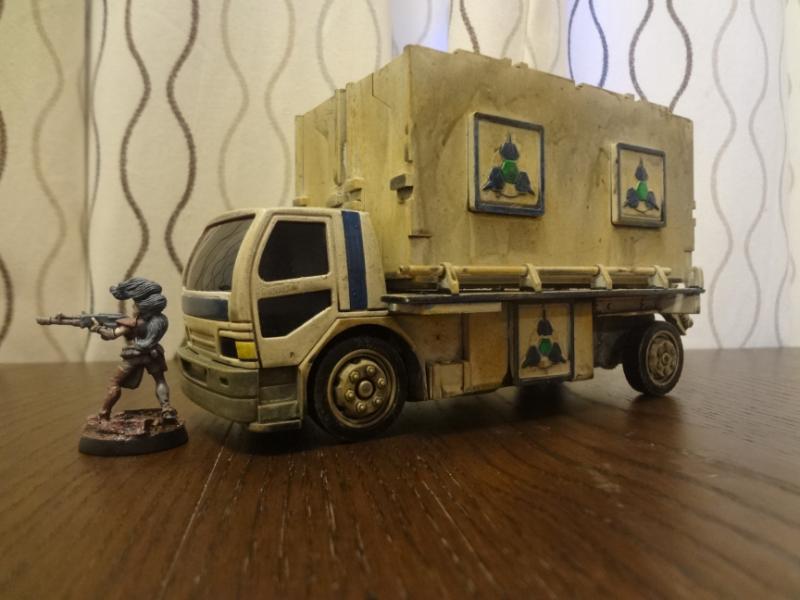
Just some more terrain that I bashed together from cast-off toys and game pieces.
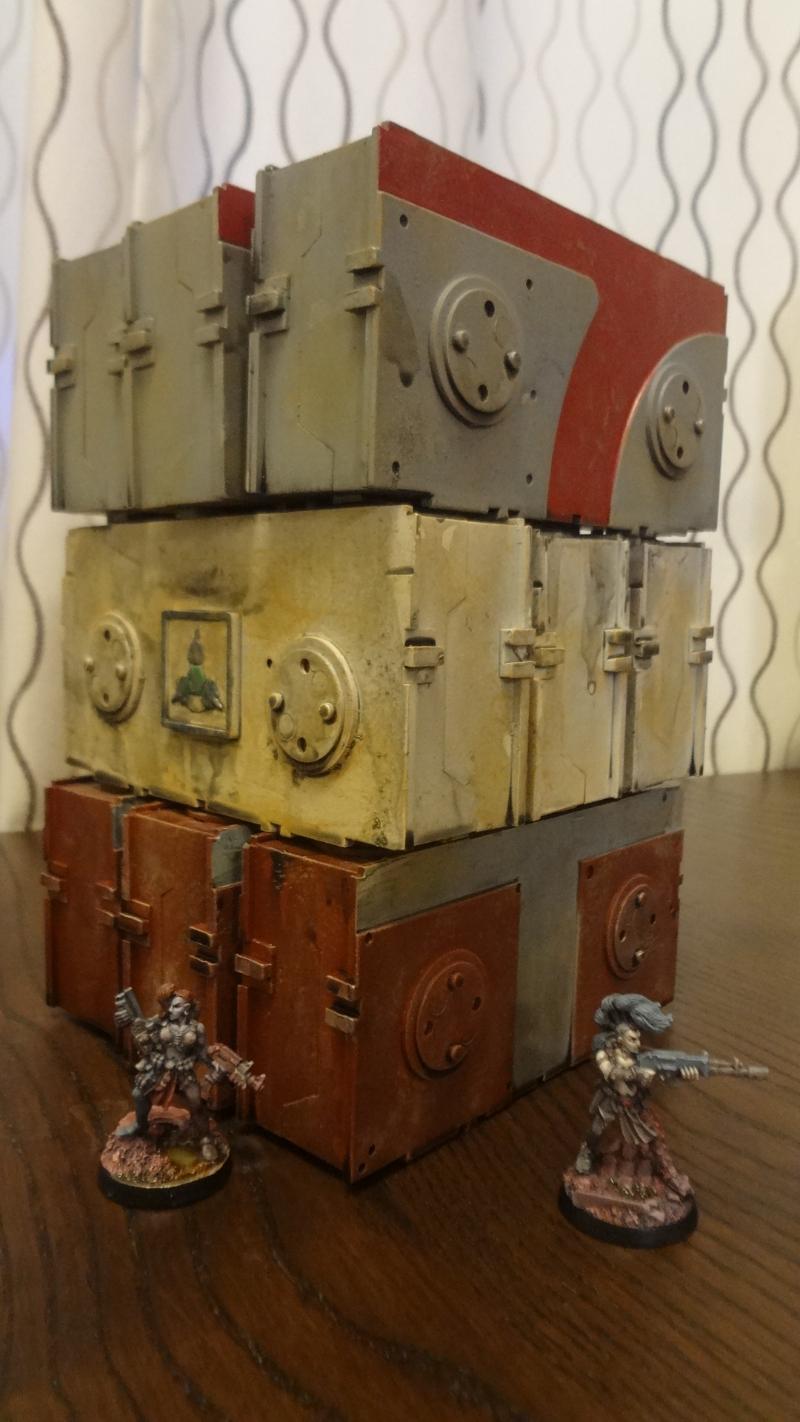
As always details and lots of pics on the blog: http://chicagoskirmish.blogspot.com/2015/09/shipping-containers-from-micro-machines.html
Also a Truck!
|
|
|
|
2015/09/12 00:38:43
Subject: Re:Eilif's Many Projects. At least the ones he finishes... (Update 9/9 Sci Fi containers and truck!)
|
|
Brigadier General
|
Another batch of terrain finished up.
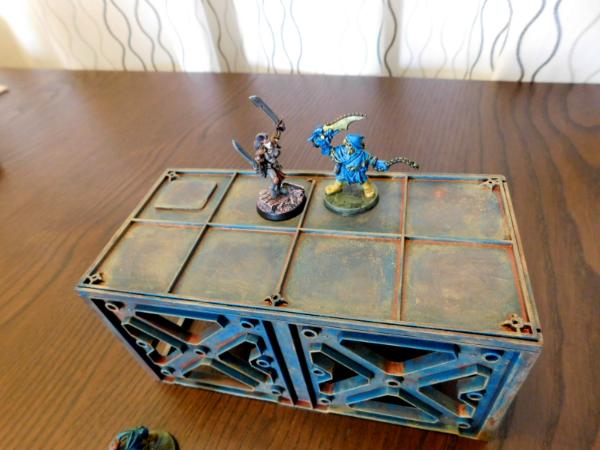
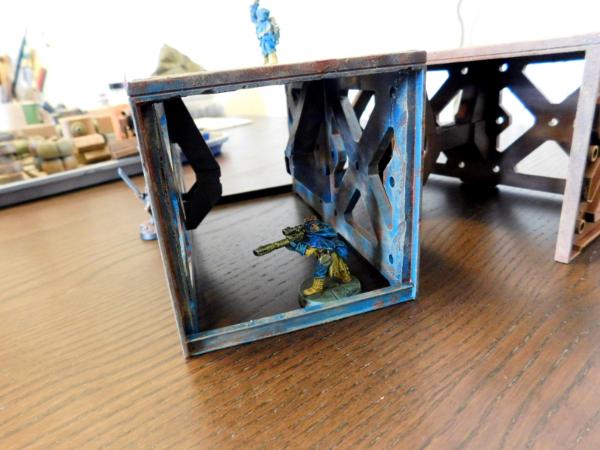
This Time I made 2 Scuttles and 3 bridges, mostly from broken O Gauge train cars.
As usual, full details on the blog here:
http://chicagoskirmish.blogspot.com/2015/09/bridges-and-scuttles-from-o-scale-train.html
Scuttles.
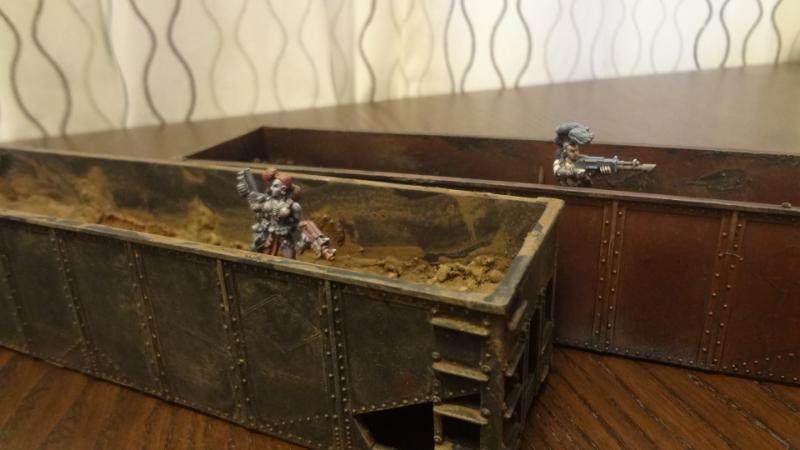
These have turned out to be quite useful pieces that block figures and small vehicles, but with a rather narrow footprint they don't take up too much table space.
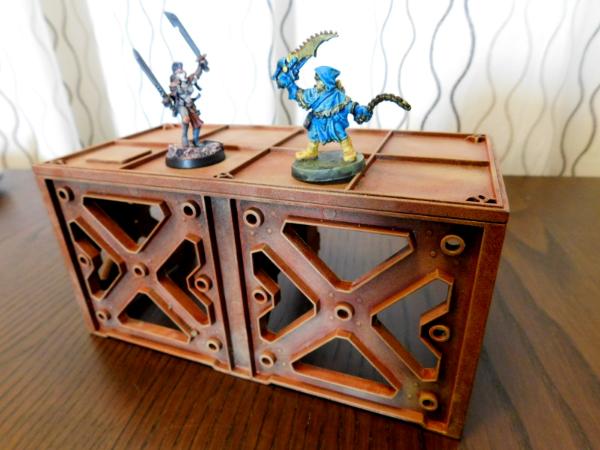
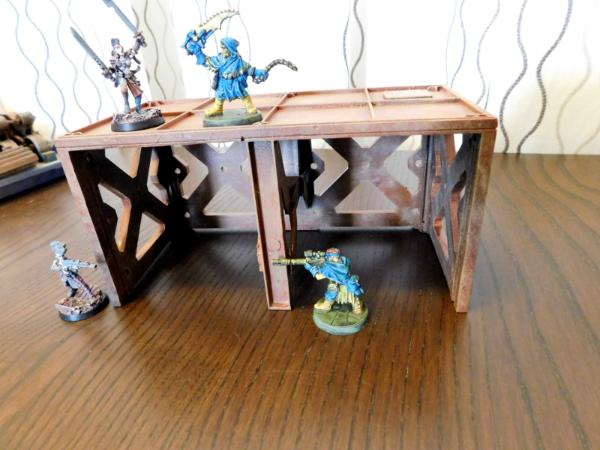
One of the Bridges.

I've been building alot of vertical terrain with useable upper areas. These are great for turning those upper areas from simply being towers to climb into a truly multistory battlefield.
|
|
This message was edited 1 time. Last update was at 2015/09/12 00:42:44
|
|
|
|
2015/11/17 20:19:22
Subject: Re:Eilif's Many Projects. At least the ones he finishes... (Update 9/11 Scuttles and bridges)
|
|
Brigadier General
|
|
|
This message was edited 1 time. Last update was at 2015/11/17 20:20:15
|
|
|
|
2015/11/18 20:05:09
Subject: Re:Eilif's Many Projects. At least the ones he finishes... (Update 9/11 Scuttles and bridges)
|
|
Brigadier General
|
A real update this time.
Here's the finished product:
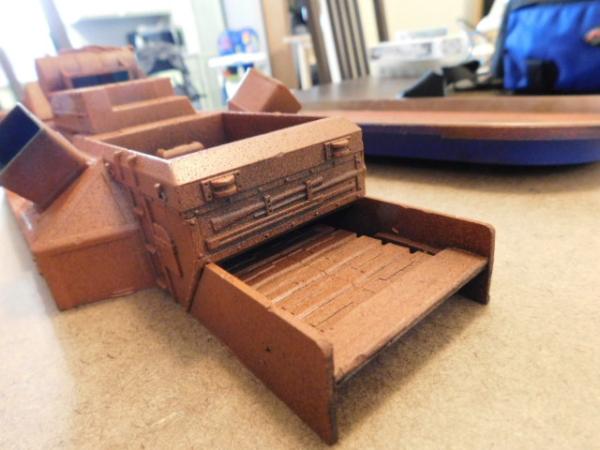
Every bit of this came from a single broken G-Gauge toy mail car. The rear sliding door actually functions!


More completed pics, in-progress pics and construction info here:
http://www.chicagoskirmishwargames.com/forum/viewtopic.php?f=3&t=82&p=464#p464
|
|
|
|
2015/11/19 14:32:10
Subject: Re:Eilif's Many Projects. (Update 11/18 Finished Warehouse from G scale mail car)
|
|
Brigadier General
|
Part 3 for this week.
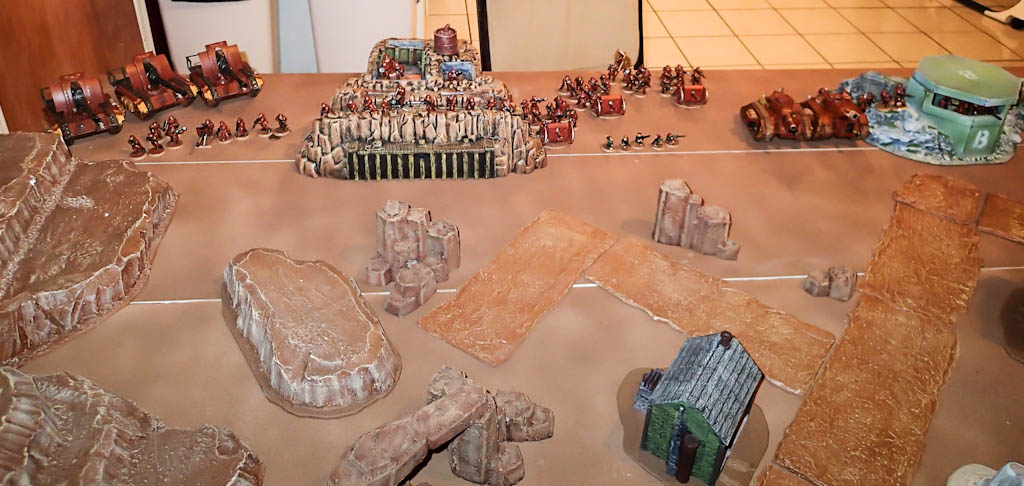
Another project today. This began as a plastic toy mountain that -no surprise- I found at goodwill. The top of the mountain had a molded section of track to attach to Brio/Thomas style of wooden track. I covered this in concrete mix. A black spray prime was followed by dark grey texture paint, sprinkling on more concrete mix (a mix from the hardware store with concrete sand and gravel), a wetbrush of brown, a drybrush of tan, and some matte varnish.

Unlike many similar toys this one has some great flat areas for putting figures on. Perfect for Wargaming!


The inside was completely hollow so I just glued in a piece of cardboard and texture painted it to create the tunnel walls.

I really like plastic toys for this kind of thing because they are so lightweight and sturdy. No risk of chipping or breakage that you get with foam. I think this will fit in well with the rest of my rocky desert terrain set which includes big foam hills/cliffs, smaller Playmobile rocks and the bunker made from Thomas and Friends dock. All of which have received similar treatment as seen here.
|
|
This message was edited 2 times. Last update was at 2015/11/19 14:37:36
|
|
|
|
2016/06/04 20:35:10
Subject: Re:Eilif's Toybashing hut. (Update 11/19 Plastic mountain with tunnel)
|
|
Brigadier General
|
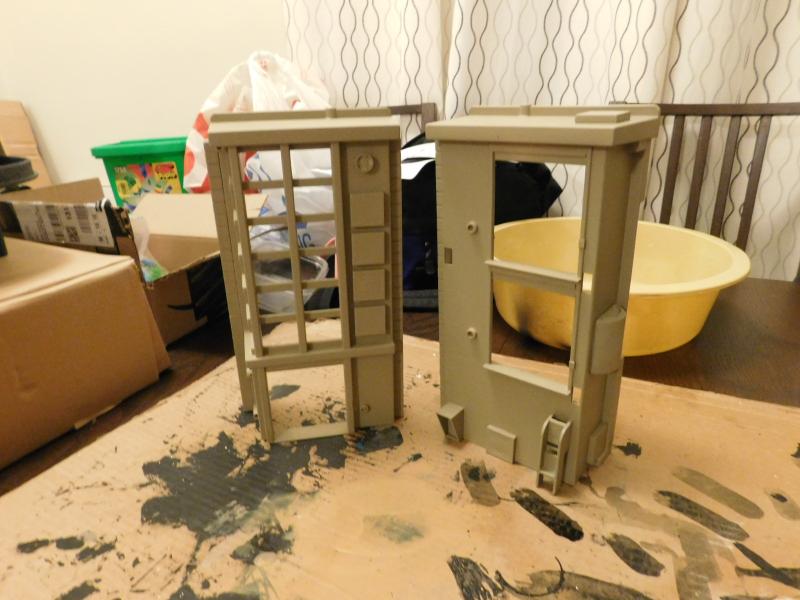
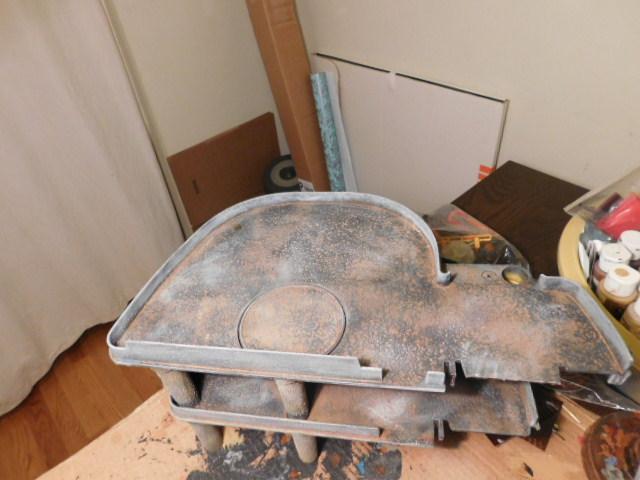
I'm finally working on the Fisher Price Parking Garage that I've had sitting around for ages. This is for a buddy of mine who is painting up a 15 figure necromunda gang for me.
Here's how it started.
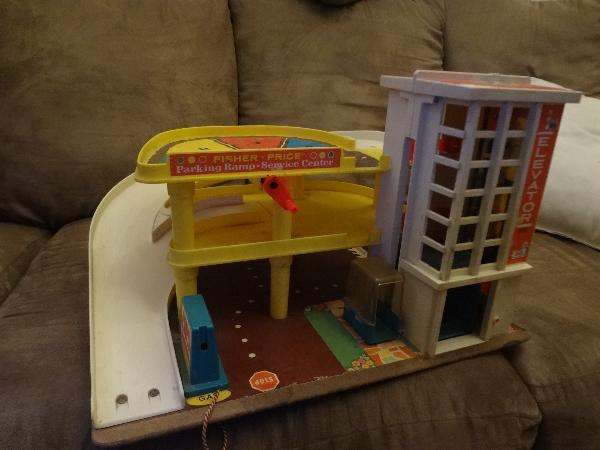
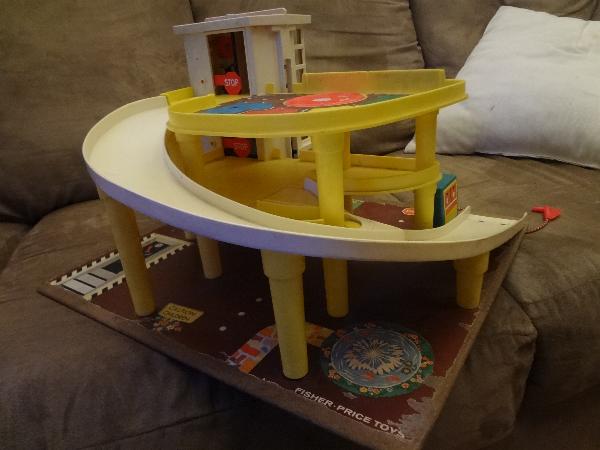
I build most of my terrain with out a base and he was ok with that, so the base came off, it was dis-assembled and the various parts got soaked in purple power to get the stickers off.
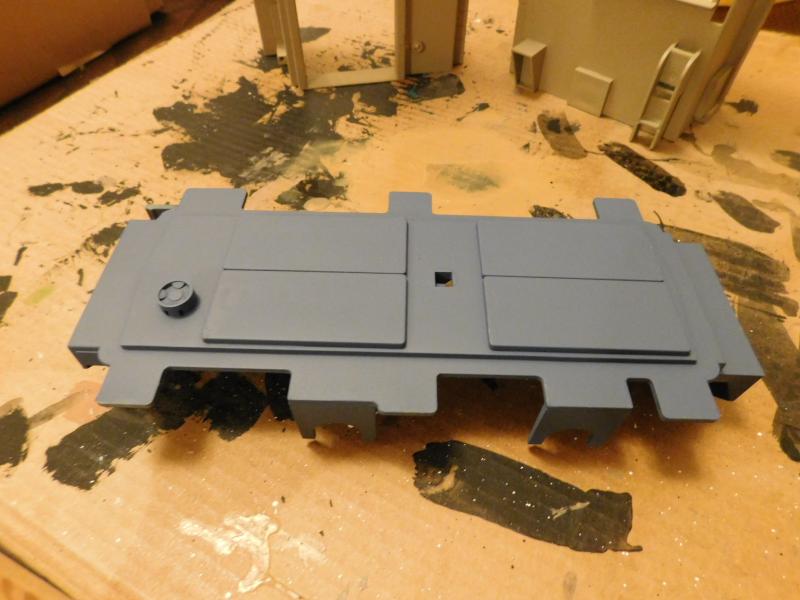
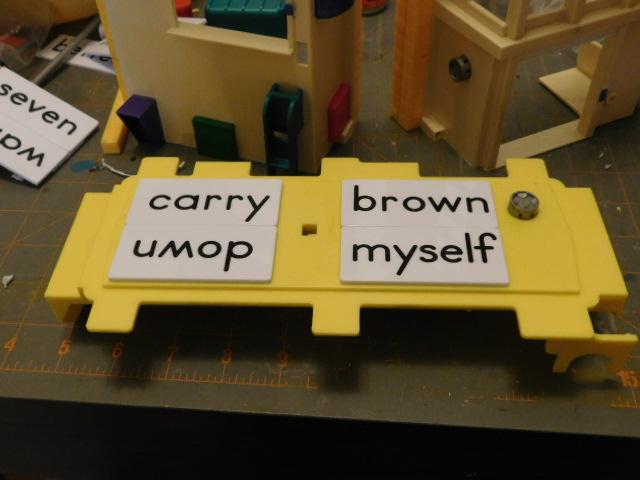
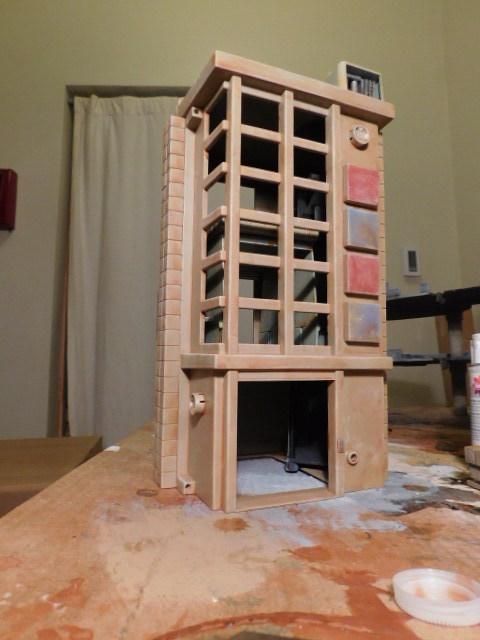
Then I got to work. Just yesterday I found a batch of plastic word cards, base 10 blocks and square tokens at the resale shop and I used some of all of them in this along with lots of other bits. They all seem to be made of plastics that will adhere with MEK based plastic glue which makes assembly alot easier. The actual garage levels aren't shown because asside from removing the red crank from the front I didnt change anything. Virtually all my effort went into the elevator tower.
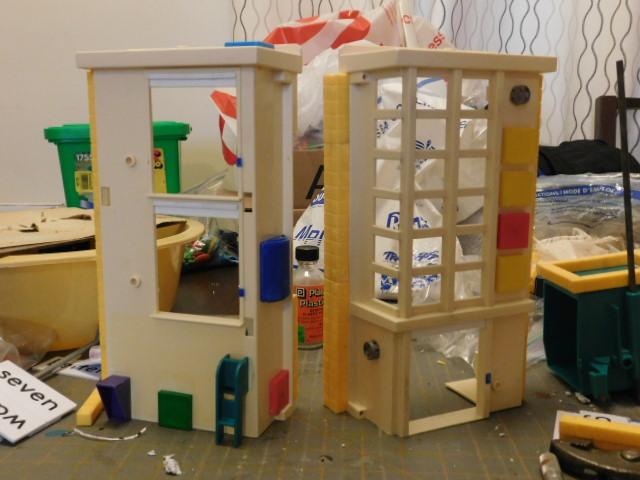
Base 10 bricks, tokens, other bits, etc... Just alot of stuff glued on to make empty space more interesting
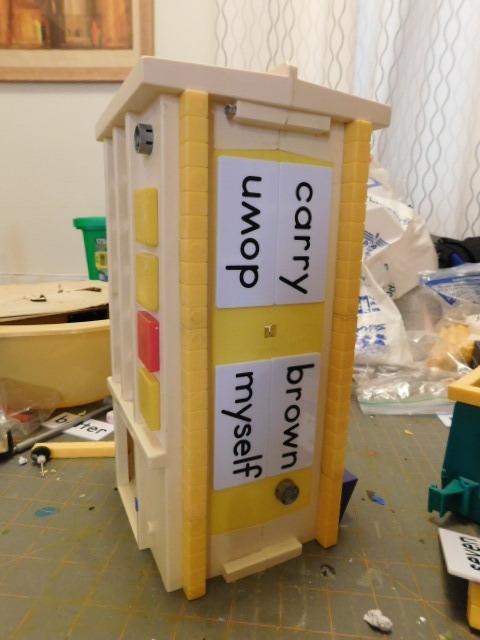
The middle of the side is a separate piece which will make it easy to spray it a contrasting color before assembly. Love those word tiles for covering over the spaces formelry occupied by the elevator crank and bell.
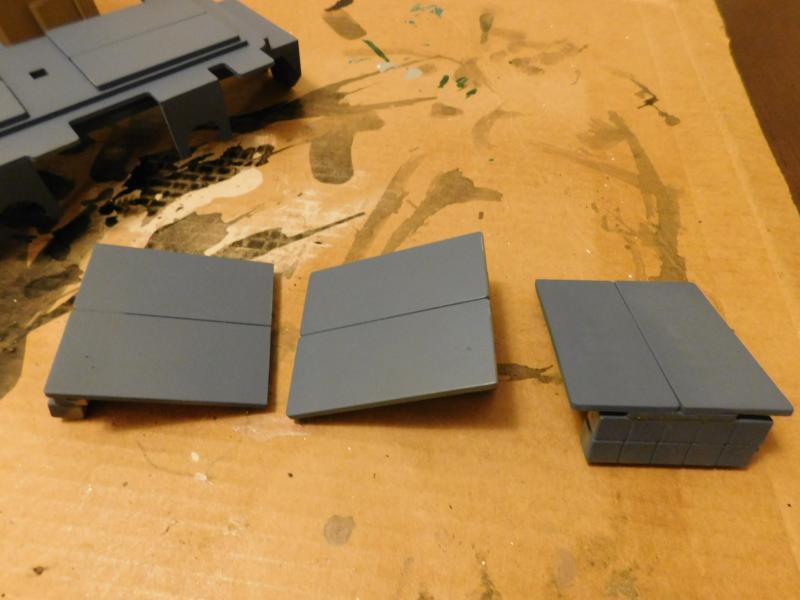
Here's what the 3 wall sections look like together.
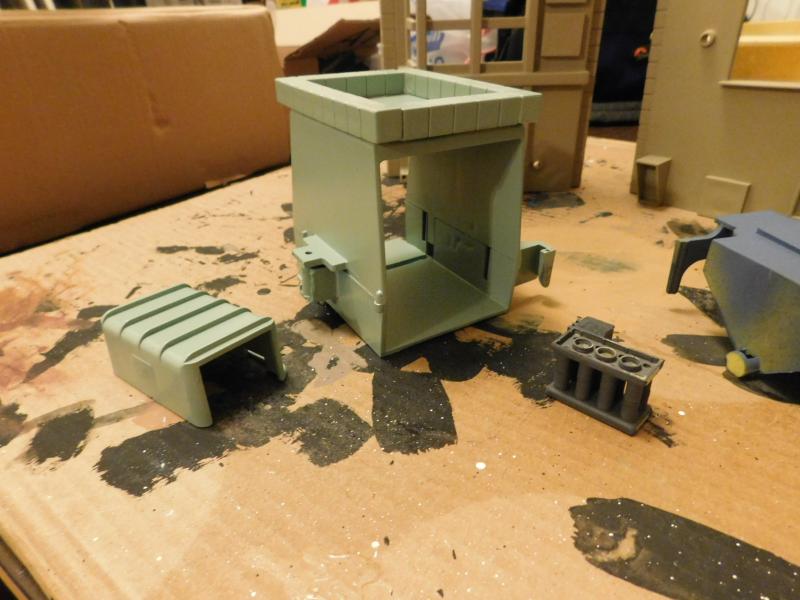
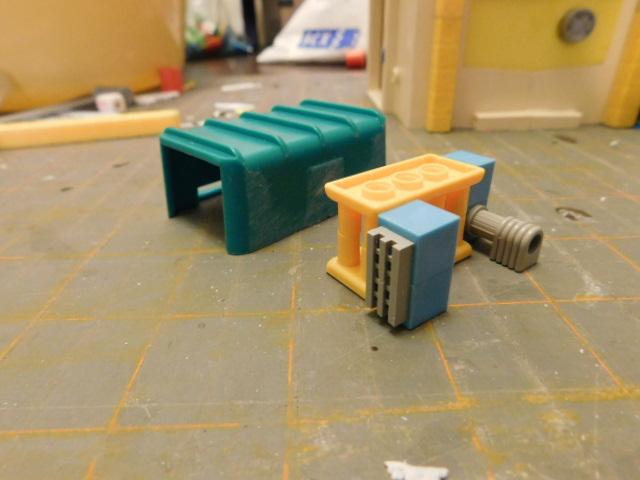
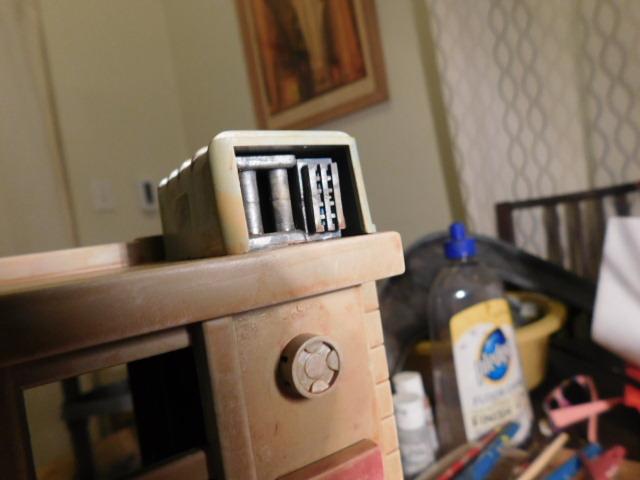
The elevator car and 3 removable "doors". The car will be permanently parked on the second floor so I put some base 10 bricks around the roof to make it easy to put figs on the "third" floor.
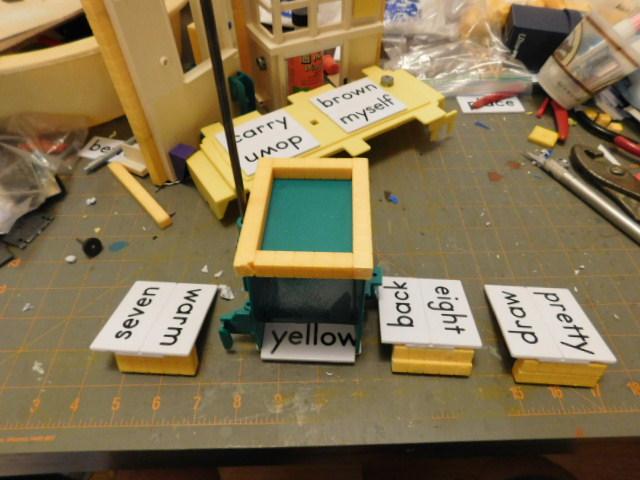
In most parking garages, the passengers ride in the elevator, so the passenger gondola was unecessary. However the bottom section will make a good cover for an AC unit on the roof of the structure. I made the internal AC stuff out of Knex, Mega and Base 10 blocks. I was just throwing it together, but it does have rough representations of some of the major AC unit parts.
Just got finished base coating everything. I should have pics of that up tomorrow.
|
|
|
|
2016/06/05 17:48:44
Subject: Eilif's Toybashing hut. (Update 6/4 Parking Garage Converted)
|
|
Brigadier General
|
Thanks!
Yeah, P&M blogs is a good place. I'll probably be doing more in-progress shots for upcoming projects as well.
|
|
|
|
2016/06/06 02:37:30
Subject: Re:Eilif's Toybashing hut. (Update 6/4 Parking Garage Converted)
|
|
Brigadier General
|
|
|
|
|
2016/06/06 13:07:40
Subject: Eilif's Toybashing hut. (Update 6/5 Parking Garage base-coated/colored)
|
|
Brigadier General
|
Thanks!
Glad you liked it. There should be considerably more coming as I've got a bunch of Sci-Fi scatter terrain to do for another friend and then I can dig into my personal project the Sci-Fi Train.
Also, I just resized some of the older large pics on this page so it should be an easy read from here on out.
|
|
|
|
2016/06/11 14:06:18
Subject: Re:Eilif's Toybashing hut. (Update 6/5 Parking Garage base-coated/colored)
|
|
Brigadier General
|
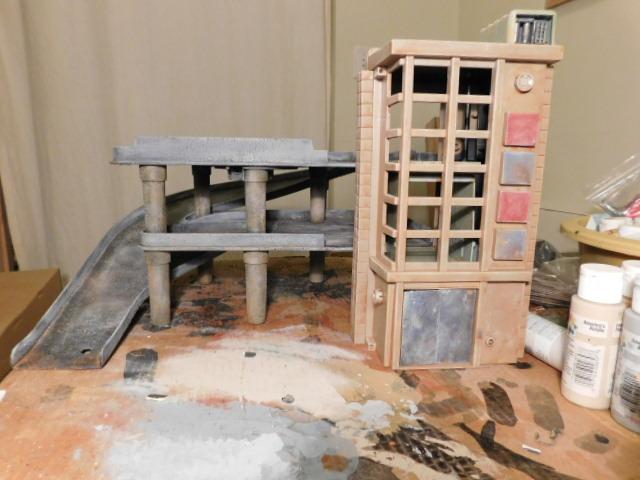
The Garage is Finished!
My buddy decided to keep the 3 sections (ramp, Tower, Parking Structure) separate. I trimmed the tabs a bit, but the parts still fit together snuggly.
First the tower.

With the doors in place.
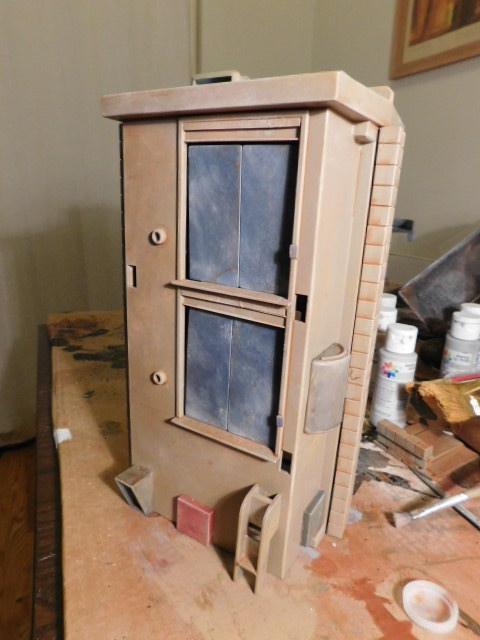
The Rooftop A/C unit
The Ramp
Parking Structure

Love that filthy grime...
Altogether now!

And now it's boxed up and will be off to my buddy on Thursday. I'm super happy with it except for two minor things. First, I had initially put some faded lines on the parking surface, but they were completely obscured by the heavy weathering job. Next time I'll make the initial lines bolder. Second, I somehow managed to leave a short area on the front of each level -where the passenger gondola docked in the original toy) open with no guardrail. Luckily my next project is a batch of scatter terrain. While building them I'll also make two barriers to cover those spots.
These are both pretty modern and don't really affect it's functionality. I don't have any use for a parking garage in my terrain collection, but I liked this enough that if I find another I might buy it just for the tower section which is a very nice looking and compact urban structure.
|
|
|
|
2016/06/27 21:47:19
Subject: Re:Eilif's Toybashing hut. (Update 6/11 Parking Garage Finished)
|
|
Brigadier General
|
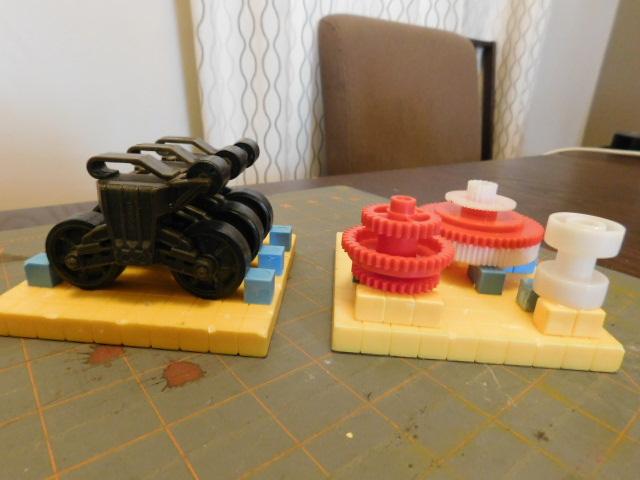
Here's a batch of scatter and small terrain I'm making for a buddy of mine. In exchange he will be painting up 6 or 7 necromunda characters.
All are based on more of the "Base 10" bricks that I also used on my parking garage Once you gouge them up a bit they make great cement floors.
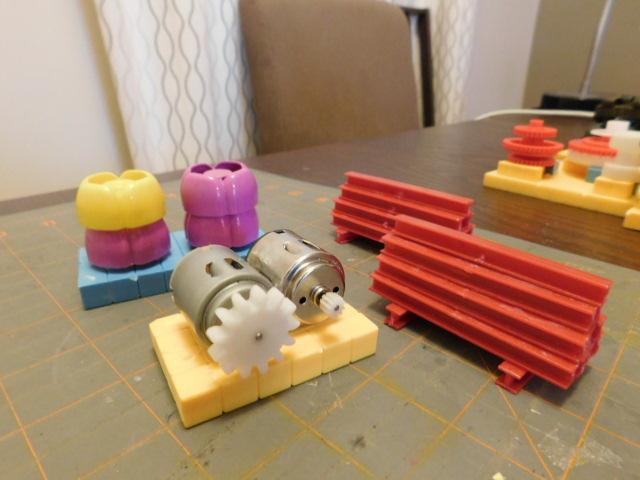
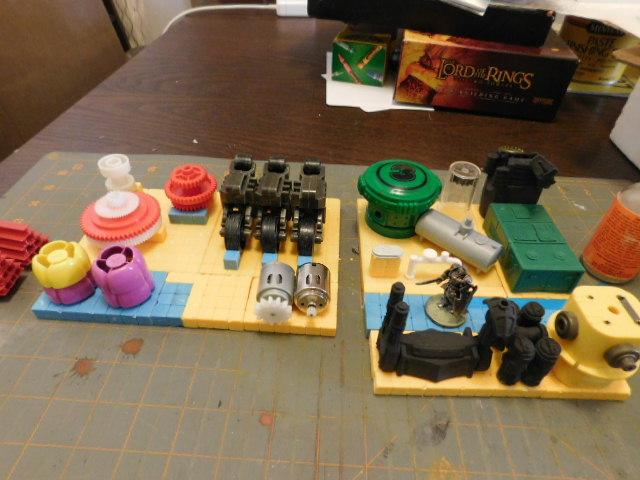
-The first batch is cargo.
Some bogey's from a toy tank and some random gears taken from the inside of various toys. I love these.
Here's some baby food pouch caps, some electric motors (these are in everything!) and two stacks of I-Beams made from Power City (aka Girder and Panel) sets.
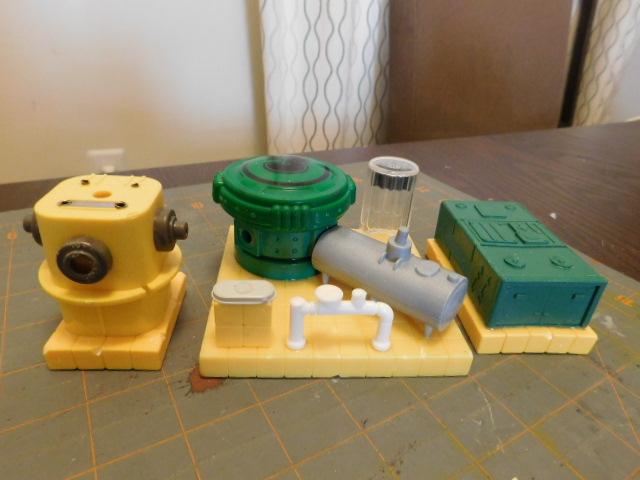
-The second batch is general industrial stuff.
Three bits of machinery all made from leftover parts from the $10 Technolog tanks I built a while back.
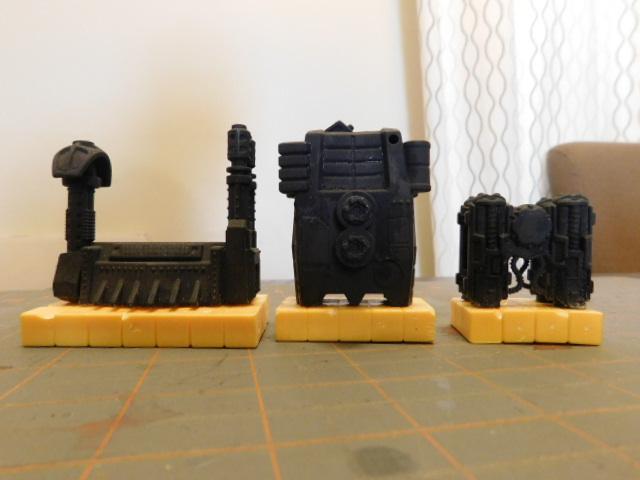
Here's a battery box from a flashlight with some tank wheel pieces. A section with a game piece, a farm oil tank, a contact case jar and a small bit of pipe from a toy. The green box was the back of some old army-men toy.
Here's kind a neat twist. I made two additional walkway sections so that each batch of scatter terrain can be placed together into a larger terrain piece.
Just primed these up I'll snap a pic this evening and maybe even start on painting.
|
|
|
|
2016/07/26 19:32:38
Subject: Re:Eilif's Toybashing hut. (6/27 Scatter terrain before paint)
|
|
Brigadier General
|
Just finished up a couple of Necromunda style platforms based on platforms from the "Tony Hawk Circut Board" series of skatepart toys.
You can see an example of them here:
http://www.dakkadakka.com/dakkaforum/posts/list/688498.page#8635327
Construction process was as follows.
-Cut ends and center out of one and a side off the other.
-Add two supports to bottom of one (it was a bit tippy) and put a tab on top of each to suggest a hatch.
-Remove Roof and glue back on upside down to get the grid pattern.
-Snip off pegs that originally held roof in place to make a level surface.
-Spray prime black with $1 can of flat black from the hardware store.
-Lightly spray orange or blue from a distance to get mottled finish. I used Rustoleum Satin colored spray paint. Even though it's "satin" when applied from a distance in a light dusting, it dries fairly flat. Also it's pretty cheap at around 4 bucks a can.
-Each side was turned face up, drenched in brown wash (Future Floor Finish and paint) then after it dried turn a new side up and repeat, etc..
-Matte Finish to cut the shine
-Drybrush light tan.
Here's the results:
I was tempted to add more detailing on top, but as you can see in the last pic, not doing so makes for a nice wide space that you can stack other terrain on top of in true Necromunda fashion.
A couple other observations...
-I do wish is that I'd gone with either blue for both or orange for both so they'd look more unified when used together.
-The orange one really looks like rusty metal. I'll probably replicate this in the future as a very fast way to make rusty metal.
-I'll definitely be using these satin colored sprays lightly dusted over black again. I avoided them for years because they are satin and not flat, but it turns out to be an extremely fast way to make worn-looking paint and there's a HUGE variety of colors available.
Coming soon, pictures of the Cawdor gang I just received, two of which are in the pics above.
|
|
This message was edited 1 time. Last update was at 2016/07/26 19:38:44
|
|
|
|
2016/07/27 15:40:24
Subject: Eilif's Toybashing hut. (7/27 Necromunda Platforms from Skatepark toys. Finished!)
|
|
Brigadier General
|
 Kid_Kyoto wrote: Kid_Kyoto wrote:Great thread and I am very jealous of the paint job on your Eschers!
Thanks!
The Escher are pretty much my favorite miniatures. They might keep that position for a while too.
However, I'm about to send a batch of 7 Necromunda characters to be painted by a buddy of mine who is an equally good (very different style though) painter in exchange for the scatter terrain so we'll see what happens.
|
|
|
|
2016/08/02 15:21:53
Subject: Re:Eilif's Toybashing hut. (8/2 Industrial Facility from Jungle Cutter???)
|
|
Brigadier General
|
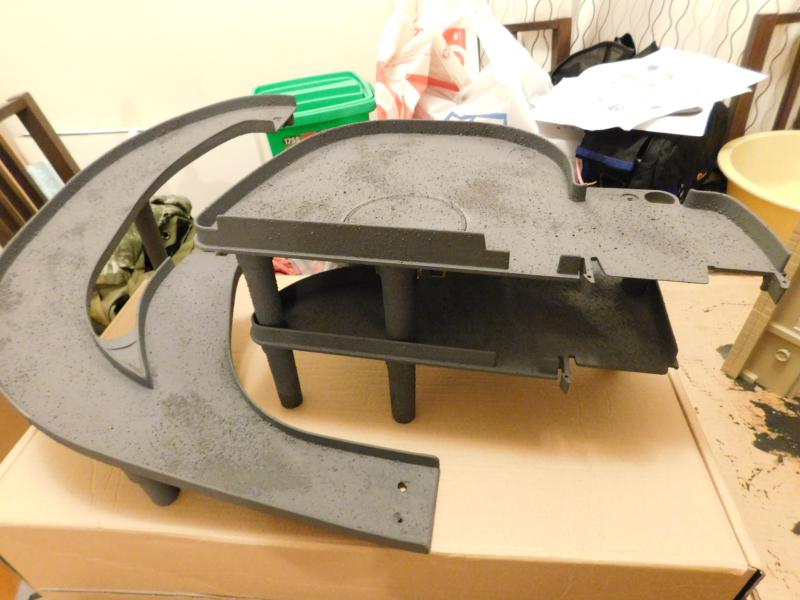
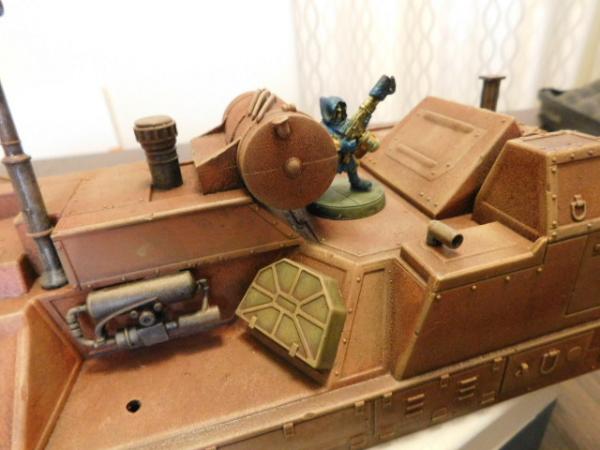
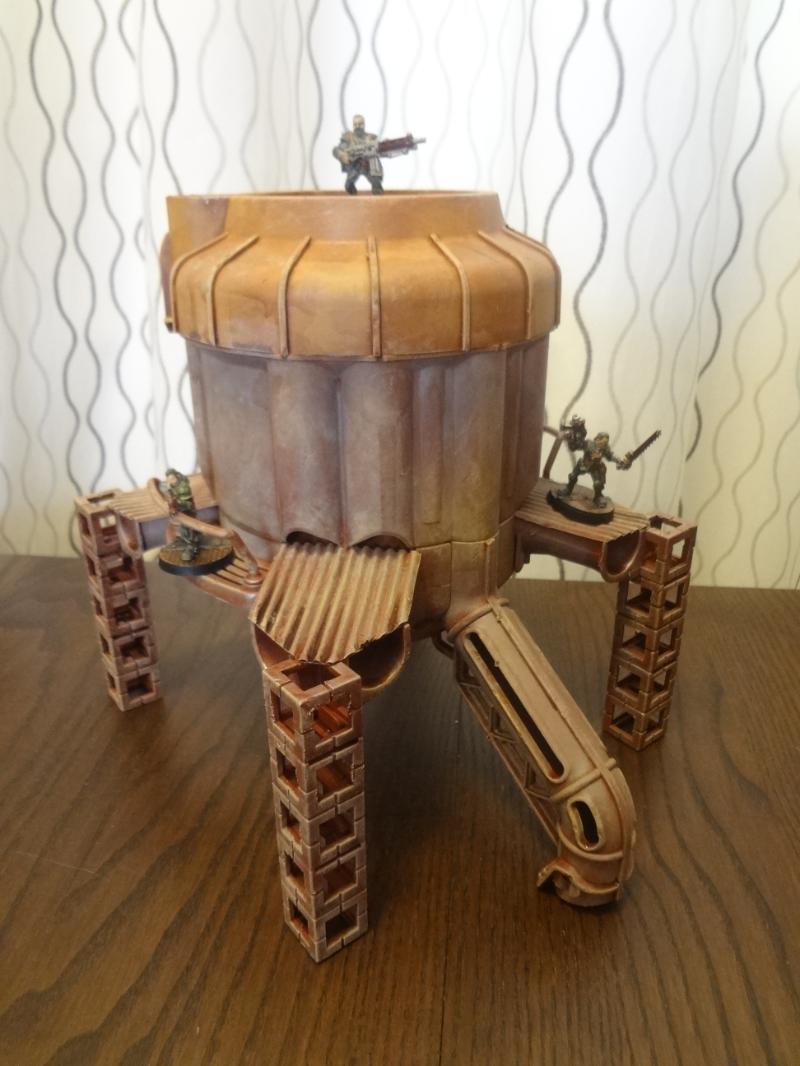
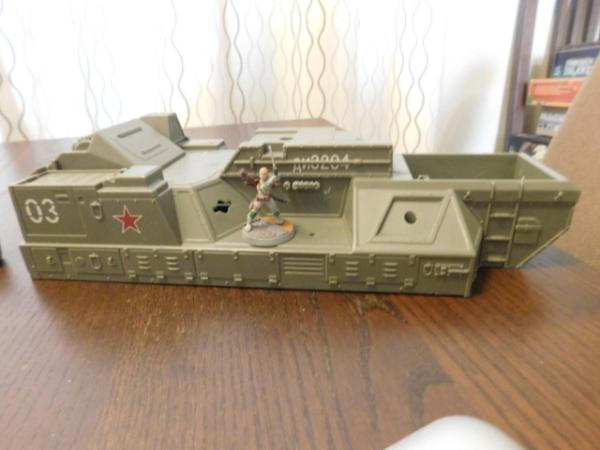
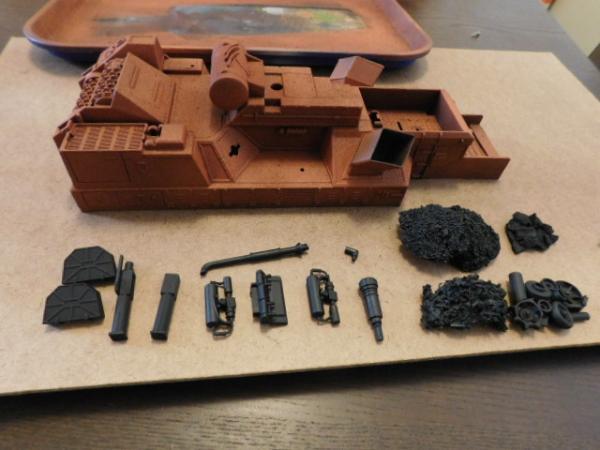
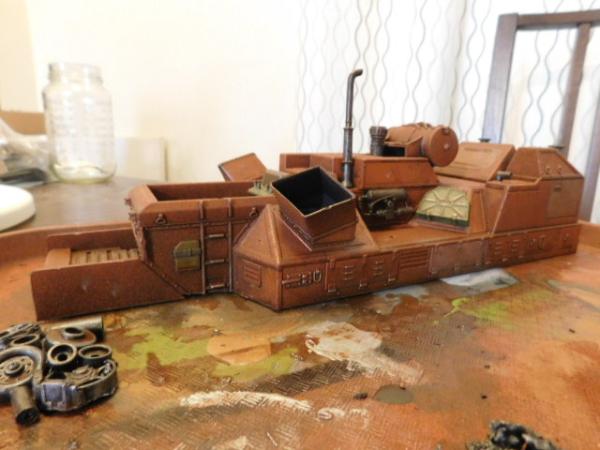
Found this Indiana Jones "Jungle Cutter" (missing a fair number of parts) at the resale shop.
Could be a cool crawler or Ork Tank or somesuch, but I'm going to convert it into an industrial processing/grinding center. Like a couple of my recent projects I'm going to try and use almost nothing except for this model itself in the conversion.
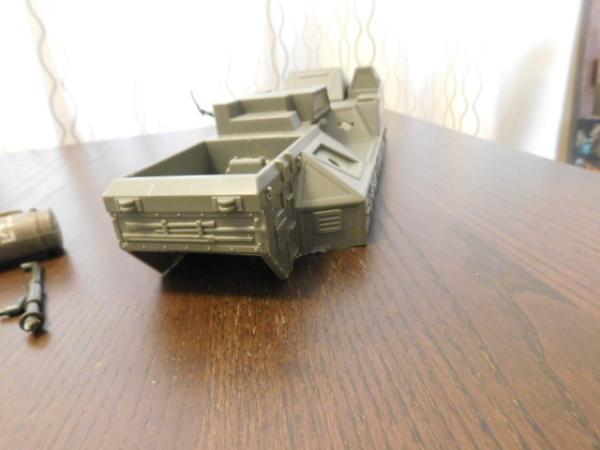
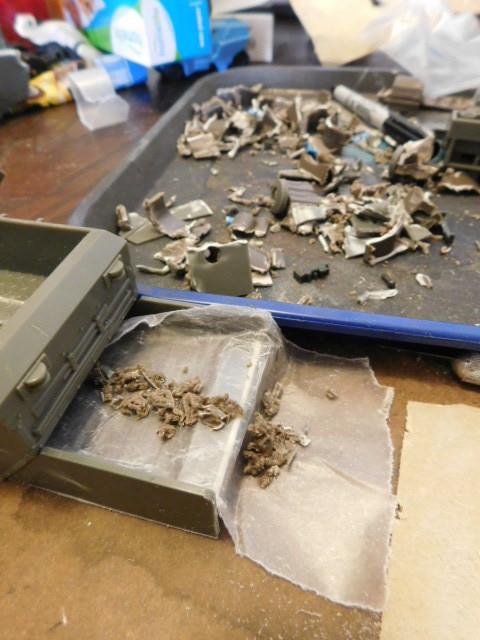
The first step was to remove the treads and the bottom/underside piece.
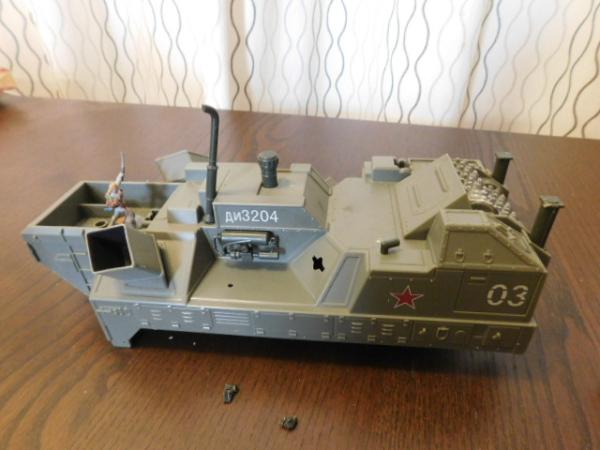
Then I unscrewed and removed every detail piece that I could.
Then I got out my trusty Dremel 543 bit and cut away the lower section of the front so it would sit flat on the ground. I also cut away a few tabs from inside the cockpit area.
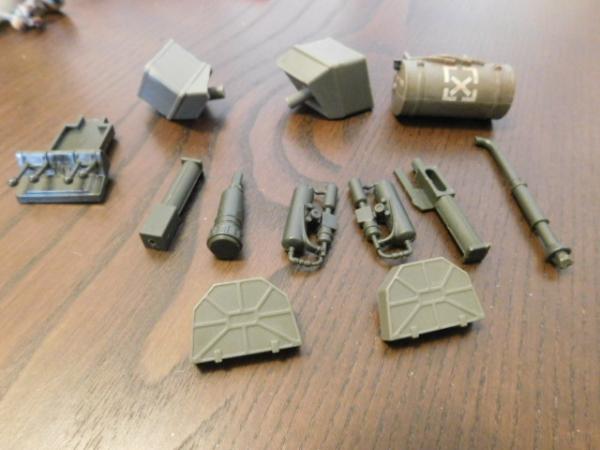
I also took the opportunity to start chopping up the track sections, making sure to preserve some long sections of tread for future use. They're mostly one piece with tiny wheels on the bottom, but when cut apart carefully, there's all kinds of great detail you can save.
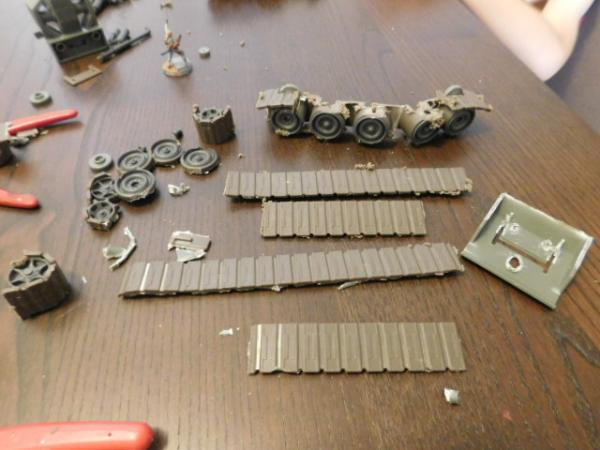
The piece on the far right is a section of the underside that I'll be using in the next step.
Lastly, I saved the shavings and chunks that were leftover.

I especially saved the tiny melted/grinded bits that the 543 bit leaves on the edges. You'll find out why I saved these in the next installment...
|
|
|
|
2016/08/03 19:32:26
Subject: Re:Eilif's Toybashing hut. (8/2 Industrial Facility from Jungle Cutter???)
|
|
Brigadier General
|
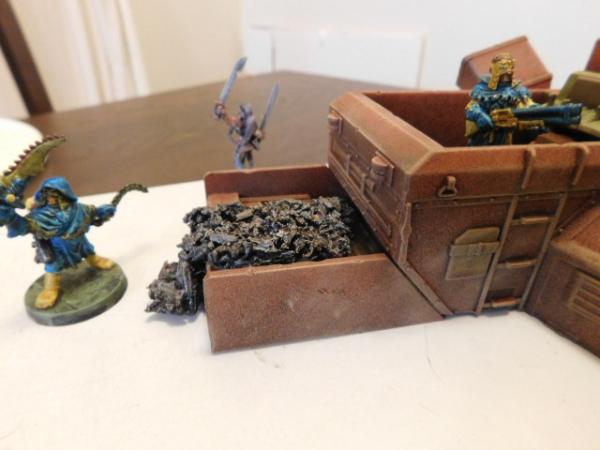
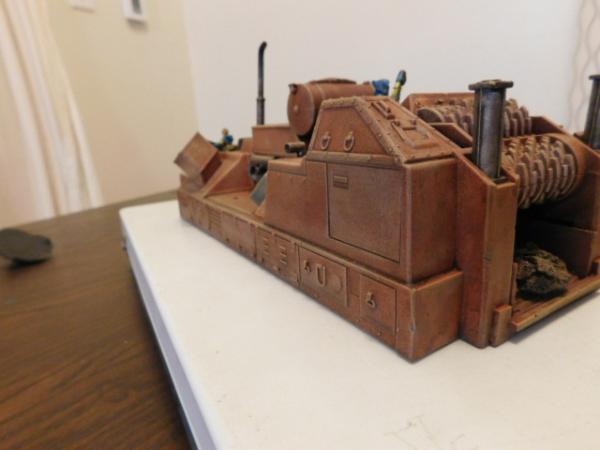
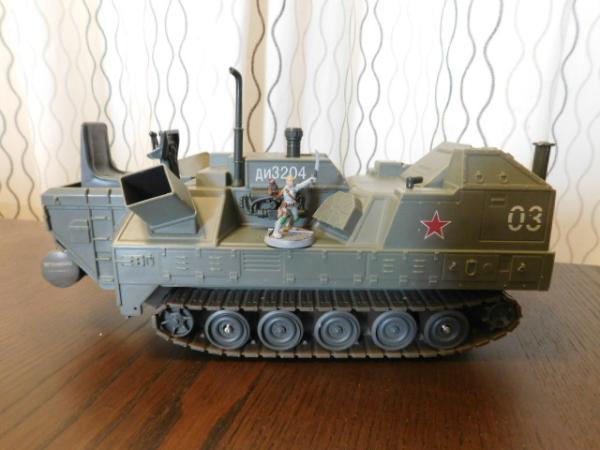
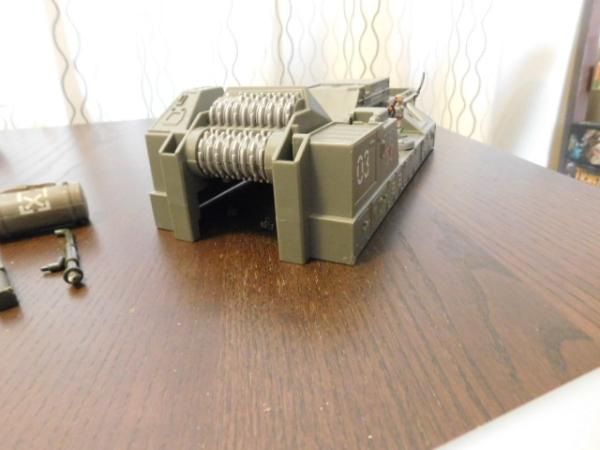
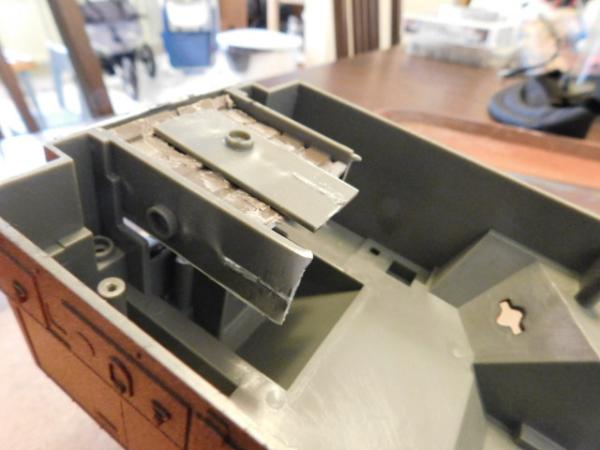
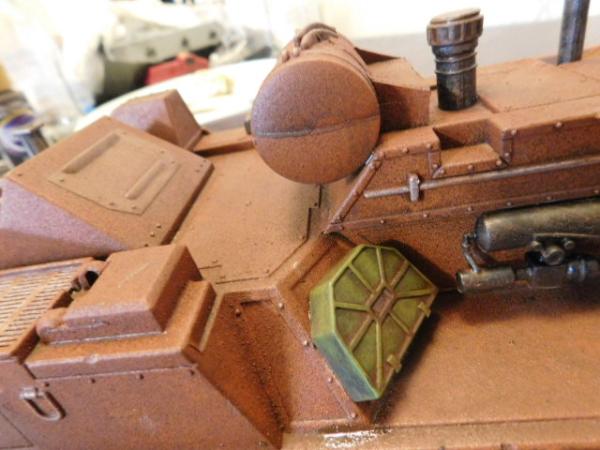
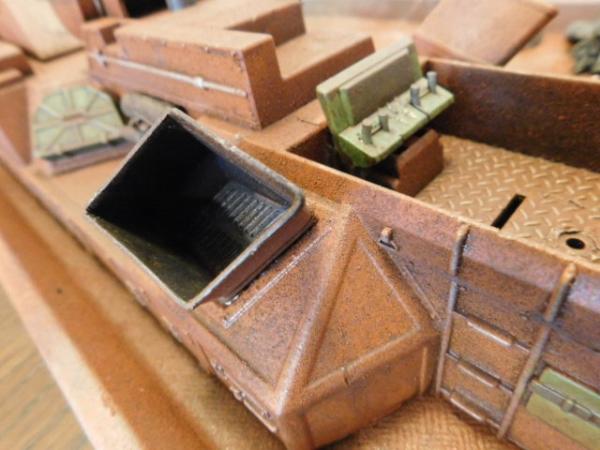
And now for the next installment of the Jungle cutter becoming Industrial Scenry!
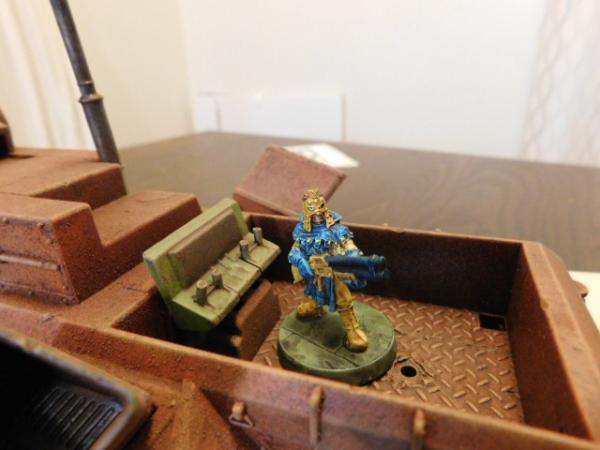
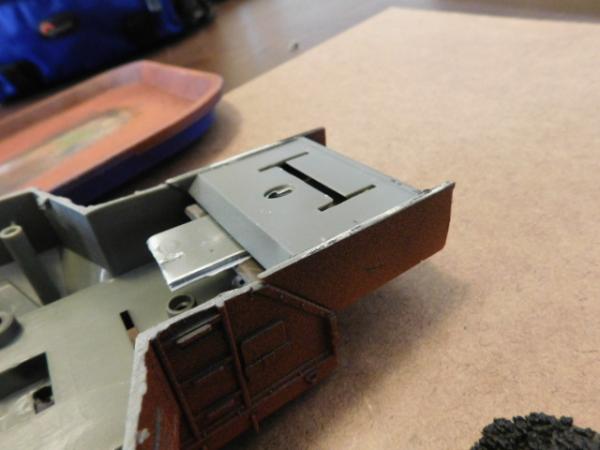
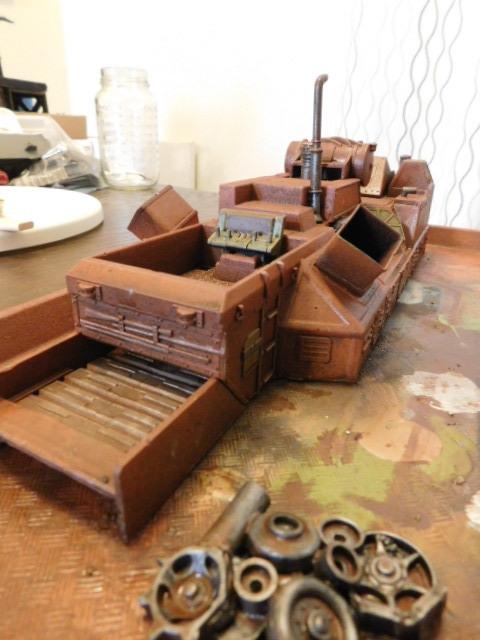
First off, here's two shots showing the input and output ends of the conveyor belt. It's just two pieces of tread, glued together and then held in places with pieces of plastic that I cut from the bottom of the tank hull. Both ends extend just far enough into the structure to give the illusion of a full length conveyor belt and as you can see there's no need to be neat and tidy with the parts no one will see as long as it's nice and sturdy.
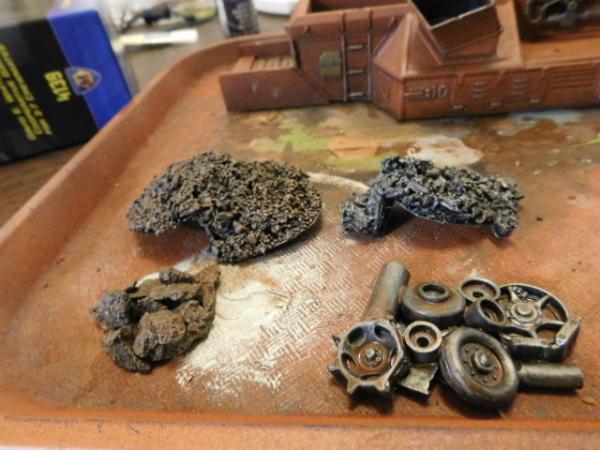
I wanted this shreder/gridner to be useful in both my urban industrial terrain and my dessert mining colony terrain. To that end I created two different sets of scrap that can be placed on or next to the the machinery. For the Industrial version, a pile of metal junk made mostly from offcuts from the tread sections and for the output a bunch of shredded "metal" bits made of those plastic shavings I mentioned saving earlier
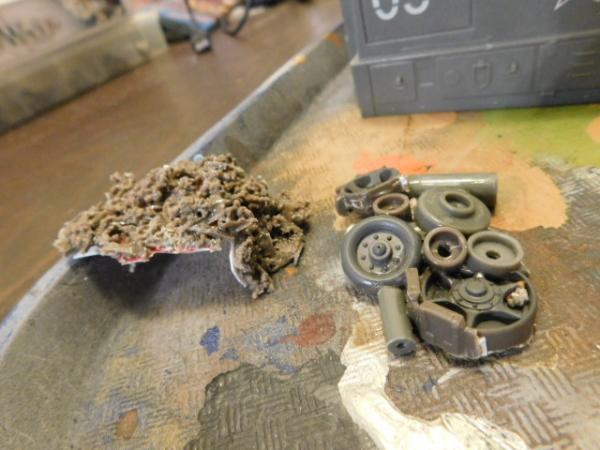
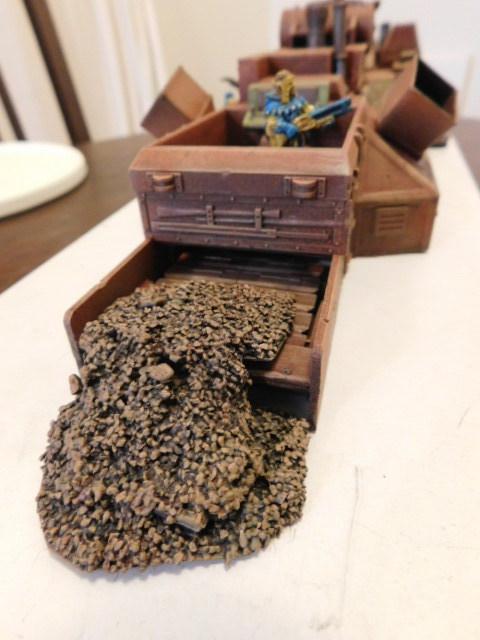
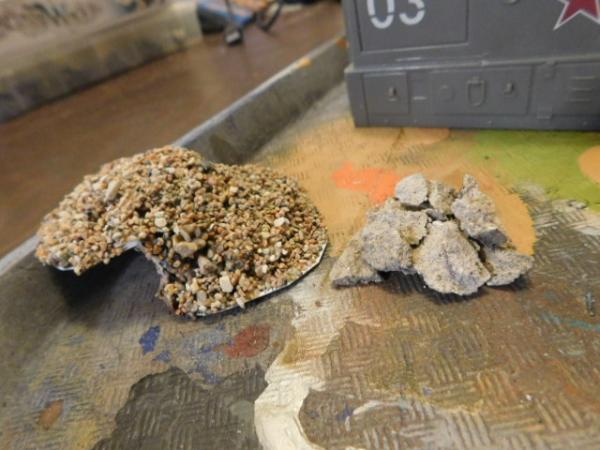
and for the mining colony a small stack of concrete/mortar bits that have fallen off my house (It's 110 years old...) and some ground up rock made from gravel I sifted out of the concrete mix that I use for most ballast and soil.
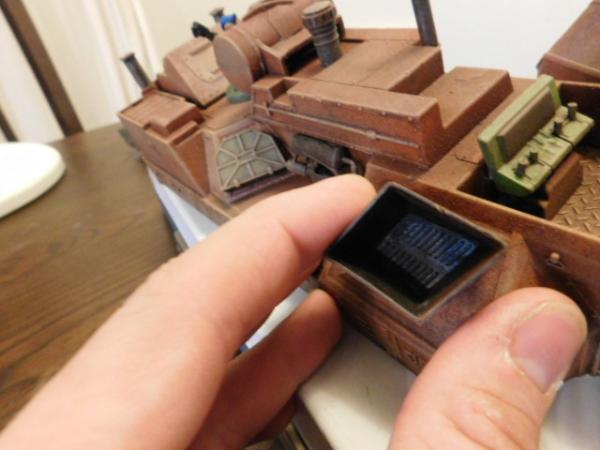
The outputs are glued to pieces of Mc-donalds cup (a cheap source of flexible styrene sheet) and are stepped so they can lay in the end of the conveyor belt and appear to be spilling over.
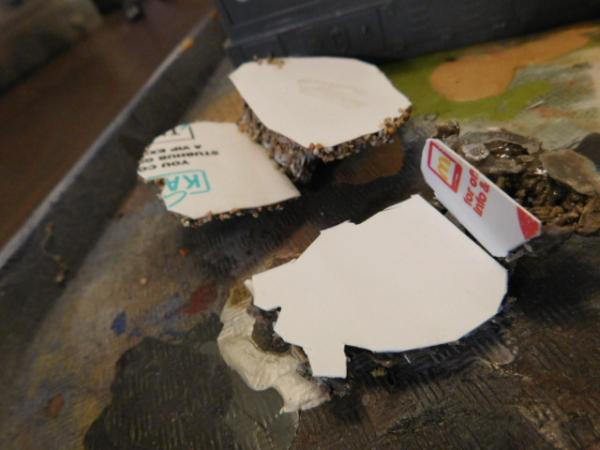
This picture gives you some idea of how the stepeped outputs will look on the machinery. As seen in the picture, originally I tried to just glue them together (without the styrene cup base) on a piece of wax paper. That didn't work very well and it used a ton of glue which probably injured my brain, but at least you see how the stepped effect works.
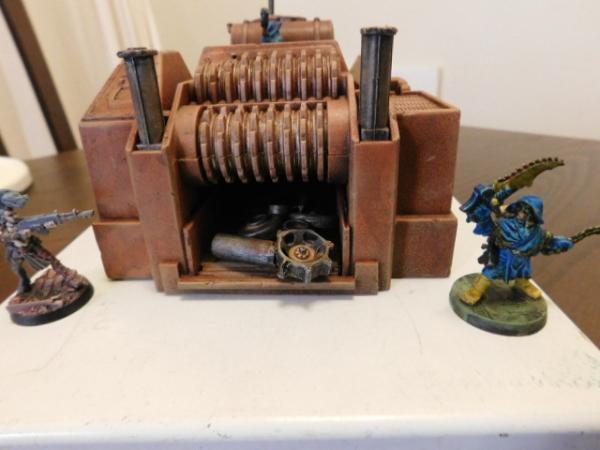
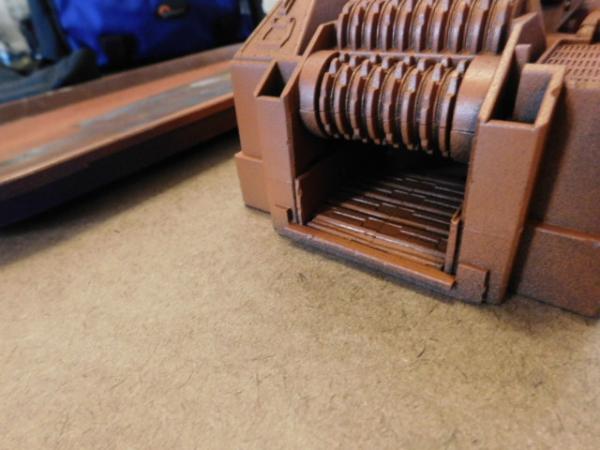
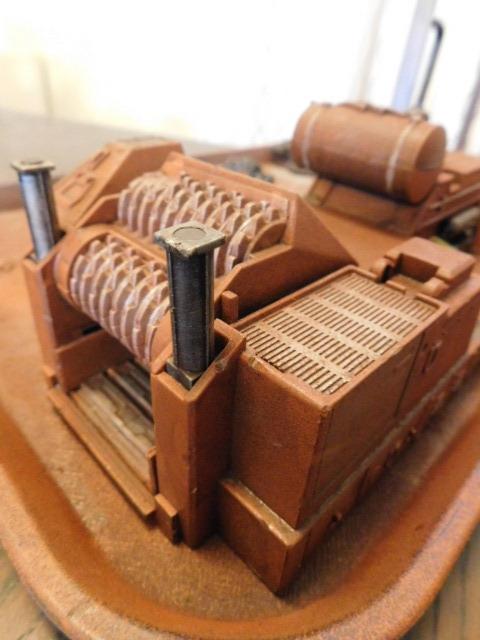
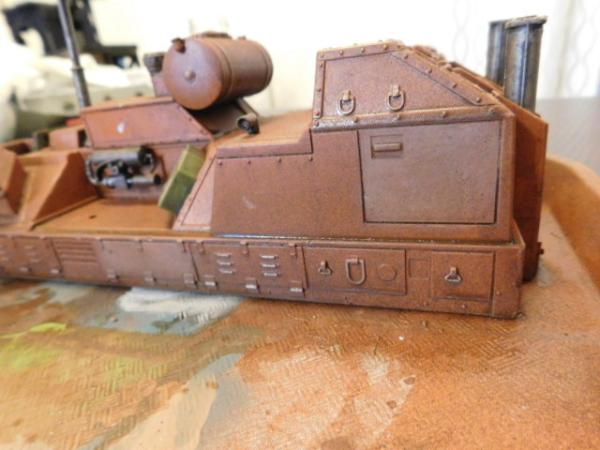
Then I primed everythign with black spray paint. a few of the bits were vinyl and have gotten just a bit sticky but that will be taken care of with time and additional layers of paint. The main structure and the big vents were then sprayed from about 2 feet away with quick bursts from a can of "Rustoleum 2x Cinnamon Satin Spray". Spraying form a distance creates a nice mottled surface that is flatter than satin and looks nice and worn.
The input and output ends of the machinery which also give a bit better impression of the mottled paint effect.
So, this project is chugging right along. Last night I put all the paint on the rest of the parts and the various details and alot of flecks of metalic paint to suggest wear. I'll try and get some pics of that tomorrow. Tonight or tomorrow I should be able to apply the wash and then all that will be necessary is the tan drybrush.
|
|
|
|
2016/08/04 15:12:45
Subject: Re:Eilif's Toybashing hut. (8/3 Industrial Facility converyor belts and scrap)
|
|
Brigadier General
|
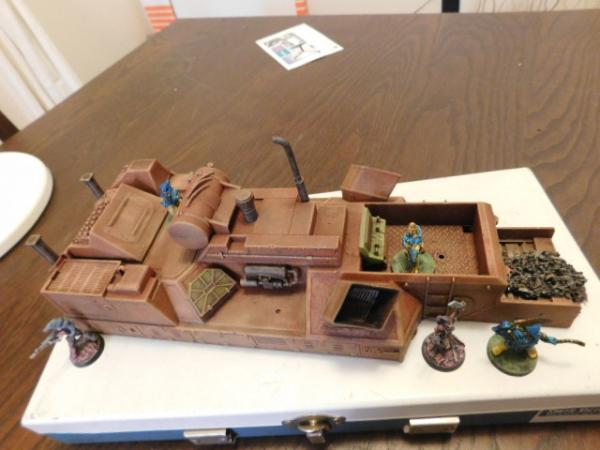
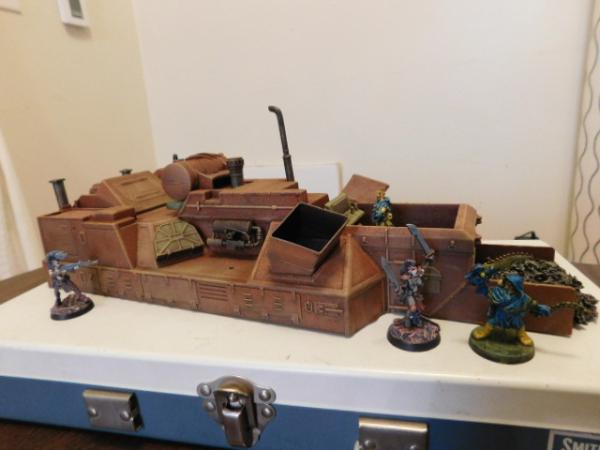
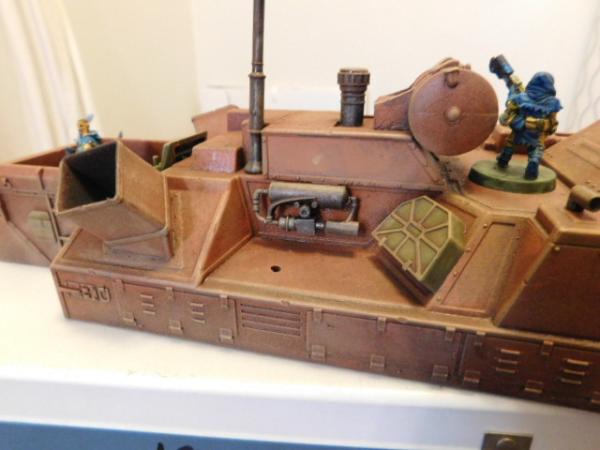
All assembled and with colors brushed on where necessary and two quick and heavy washes. The wash mix is roughly half and half water and Pledge Future Floor Finish with brown paint added to taste.
The difference isn't as dramatic as it would be over brighter colors, but it definitely ups the level of grime and really makes the panels and recesses "pop".
The mounds of before and after junk got the same 2-wash treatment.
I'll try and apply the varnish and drybrush soon and should have the whole thing done and posted by this weekend.
A few notes on process and avoiding a common problem:
Future is cheap and dries very fast, which really speeds up the process of applying washes. I was able to do two heavy washes in one evening. Unfortunately it also dries with a slight sheen. A final coat of Matte varnish at the end of the project makes this go away, but unfortunately a light drybrush ( I usually finish with a light tan drybrush) applied over a hard finish like Future (which is basically liquid Polyurethane I think) sometimes disolves away a bit when you apply the brush-on matte varnish.
The solution therefore is to put on the matte varnish after the future finish (I'll do that next) and then put the drybrush on top of that. The drybrush will adhere well to the matte surface and I probably won't bother applying any sealer/varnish on top of the drybrush.
|
|
|
|
2016/08/05 18:13:21
Subject: Re:Eilif's Toybashing hut. (8/4 Industrial Facility Assembled, painted and washed)
|
|
Brigadier General
|
|
|
|
|
2016/08/08 15:21:45
Subject: Eilif's Toybashing hut. (8/5 Industrial Grinding Facility Completed!)
|
|
Brigadier General
|
 Ruglud wrote: Ruglud wrote:That is a glorious piece and such a great reuse and reimagining from the original toy. My hat is off to you 
Thanks for the kind words!
|
|
|
|
2016/08/09 13:38:51
Subject: Eilif's Toybashing hut. (8/5 Industrial Grinding Facility Completed!)
|
|
Brigadier General
|
Sgt. Oddball wrote:That machine is super awesome!
evildrcheese wrote:That grinding machine looks freaking fantastic
Thanks so much! Very glad you folks liked it.
Kid_Kyoto wrote:That is fantastic. Would adding a corpse to the input section be too grimdark?
It wouldn't quite fit the vibe I'm going for, but I think perhaps to really 40k/chaos it up, another set of input/output with pile of corpses on one end and a bloody, chunky mass at the other end would be appropriate. Or maybe the output could be small cases of Soylent Green?
Wehrkind wrote:Holy crap, I bought that exact toy like 6 years ago, for that exact purpose. Mine is still in a random box somewhere though. Great work over all, really inspiring. I will be digging through here along with my bits boxes for some time to come.
Get to it! I'd love to see what you come up with. If you end up making it feel free to put a link to it here so we can see.
|
|
This message was edited 1 time. Last update was at 2016/08/09 13:39:13
|
|
|
|
2016/08/09 17:27:42
Subject: Eilif's Toybashing hut. (8/5 Industrial Grinding Facility Completed!)
|
|
Brigadier General
|
 Wehrkind wrote: Wehrkind wrote:Will do! Although more terrain is down the queue past finishing up two armies, and I guess my job and dissertation and kids. I guess. It might be a bit 
No worries we'll still be here when you get around to it.
However, it strikes me that perhaps you're giving a bit too much priority to your dissertation and children. Perhaps a revising of priorities is in order?

|
|
This message was edited 1 time. Last update was at 2016/08/09 17:28:41
|
|
|
|
2016/08/22 17:09:49
Subject: Re:Eilif's Toybashing hut. (8/5 Industrial Grinding Facility Completed!)
|
|
Brigadier General
|
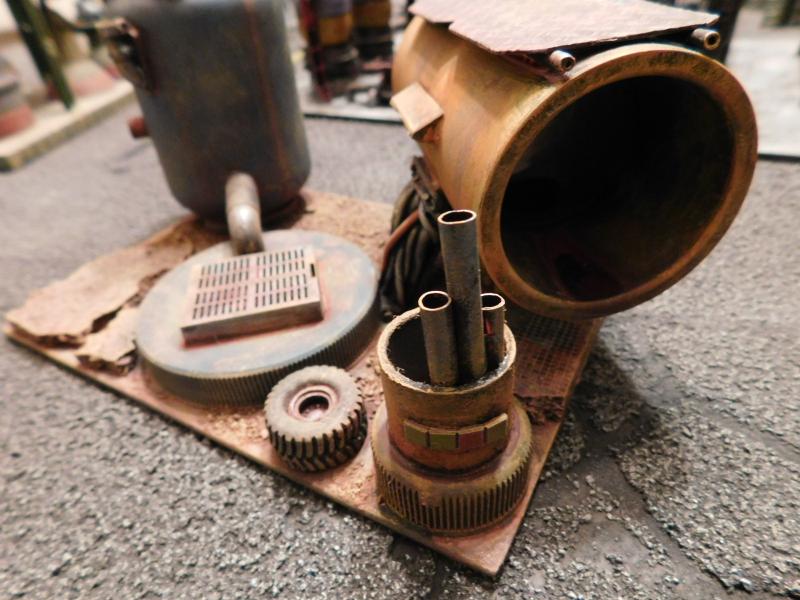
Last week I was in Portland visiting some friends. One of the guys I spent some time with had been one of the founding members of m local club Chicago Skirmish Wargames. We had a bit of a throwback game, playing "WarEngine" (one of the club's early favorites) on a variety of his urban terrain, much of which I had had built for him years ago. I'm going to take 2 posts to show some of my work from a few years back, most of which never got properly documented. Many of these are pieces that he started and didn't like which were then give to me for a complete transformation.
First off, here's a real wargaming classic, a piece of paper/card packaging transformed into a bunker. When I received it, there were a couple of bits glued to it and a doorway, but I added the rest and painted it. Not going to win any awards, but it's a nice old-school piece.
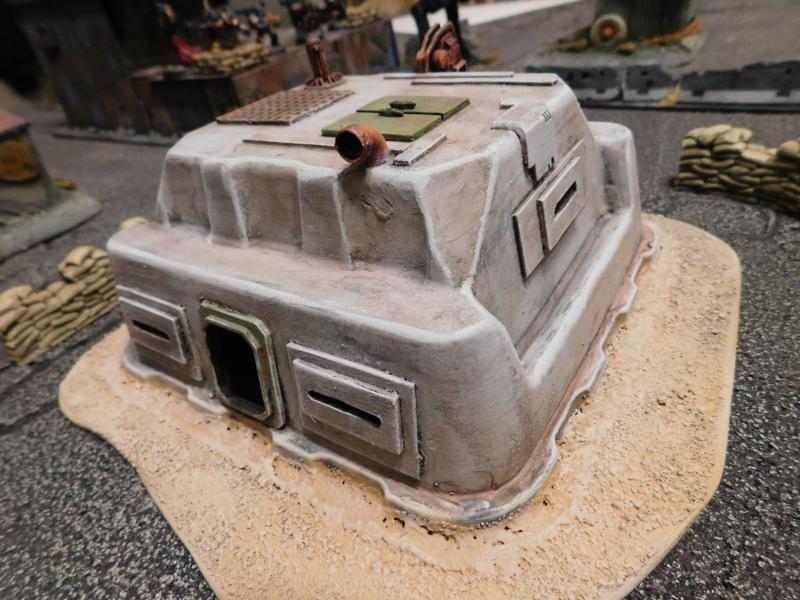
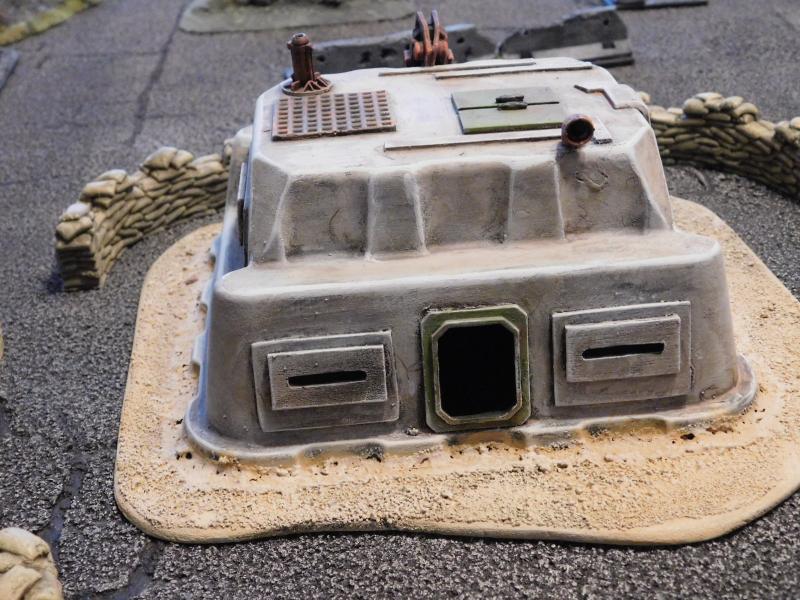
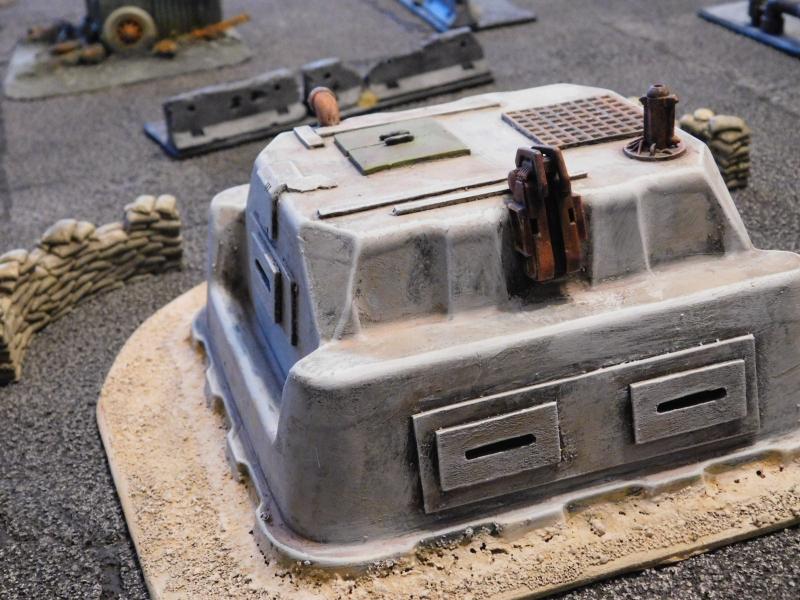
Though I've mostly moved away from making terrain from cardboard and foam packaging, it's still a great method for quickly making really affordable terrain.
Secondly, here's a whole batch of classic wargaming terrain tropes on one base. A piece of PVC pipe, some bottle caps, a piece of cardboard tube and a small plastic jar.
It's like a 1990's Terragenesis special!
Seriously though, PVC pipe -and some of the other elements shown here- can be a bit of a trap. They are cheap and easy, but really have to be greebled properly in order to keep them from looking like what they originally were. I think I added just enough detail work to achieved that with this piece. A sort of vent/outflow/access-point for an underground installation.
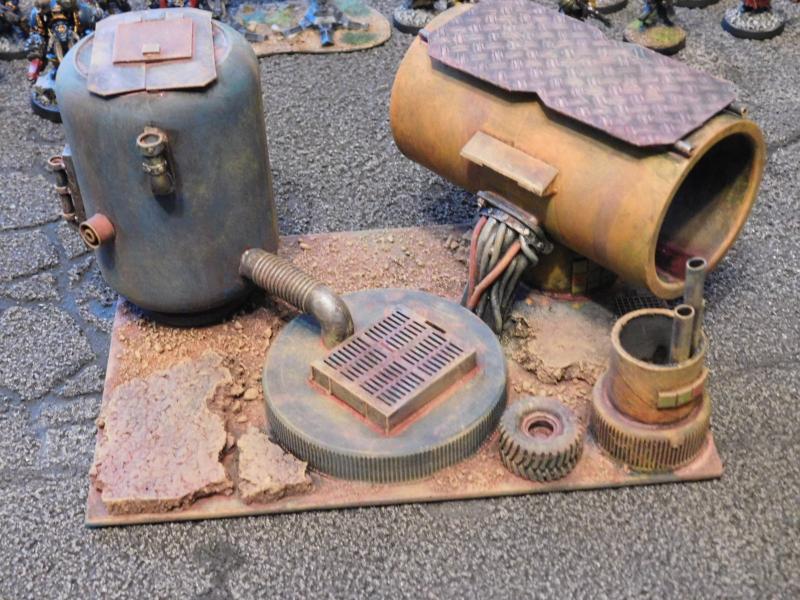
Unfortunately The pics don't do justice to the damp, rusty slime in the bottom of the pipe.
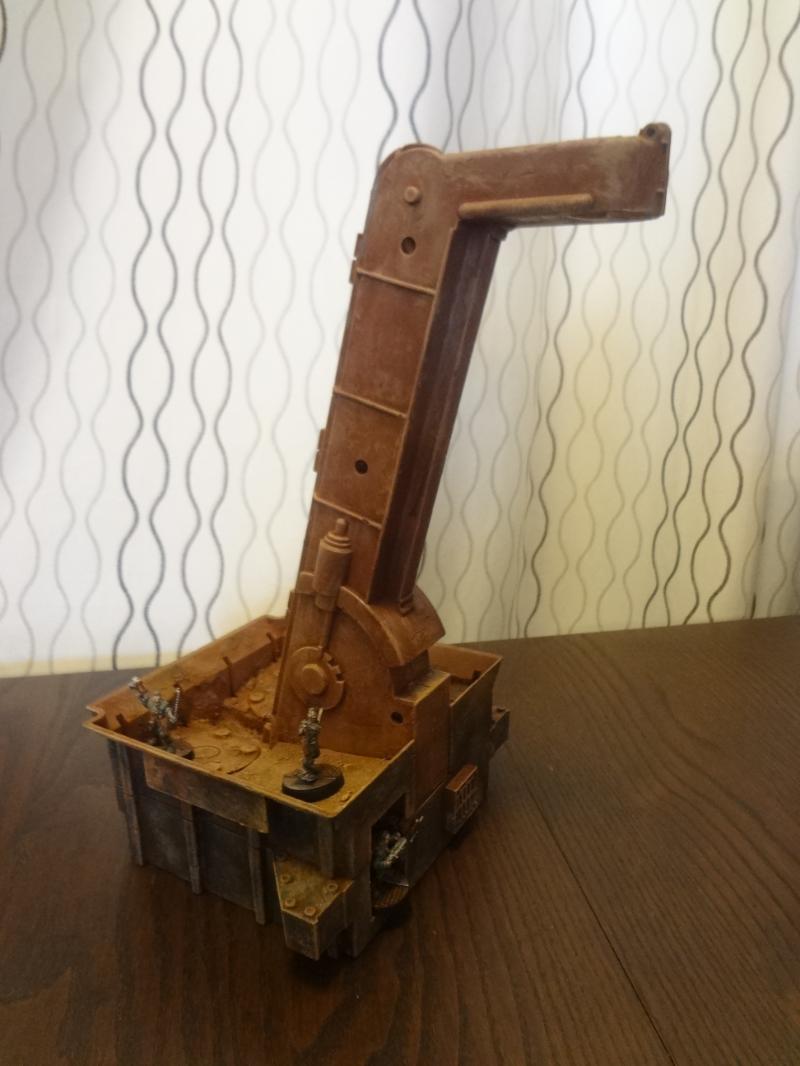
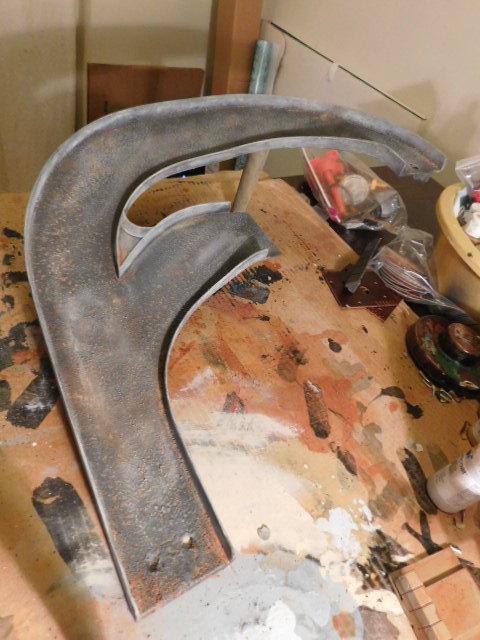
Lastly, here's a couple of additional pics of a piece that I have shown before. This started out as a couple of Halogen bulbs and the tall tank stuck on a desert base. I rebased it, added pipes, platoforms and the I-beam superstructure. This is one of my favorite pieces and one that I often consider building a version of for myself.
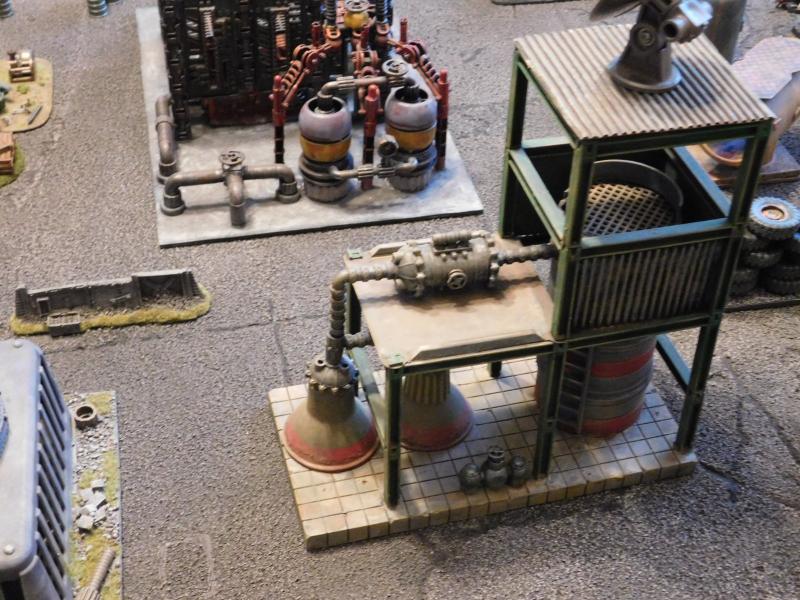
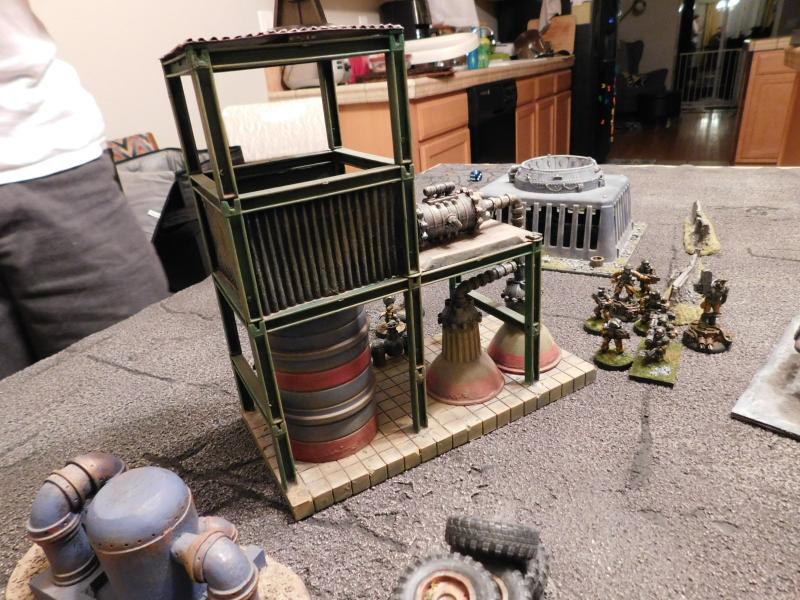
It was great to see this and the other pieces getting some use on the gaming table.
Coming next time, a really impressive piece using the now-rare Pegasus Hobbies "Power Plant" set and alot of other bits.
|
|
|
|
2016/08/22 23:12:43
Subject: Eilif's Toybashing hut. (8/22 Some Sci-fi Terrain)
|
|
Brigadier General
|
Barzam wrote:Is that a Girders & Panels set I see being used in there? I've wondered how well those would work for wargaming. Seems they work quite well.
It is indeed. For a while they were being included in the "Power City" line of toys and I bought a bunch when they were clearanced out. It's polypropylene so you've got to use superglue or epoxy and a plastic specific paint like Krylon "fusion" but the price was right and the results are pretty good. Here's my initial review of the product.
http://chicagoskirmish.blogspot.com/2014/08/terrain-triptych-part-2-power-station.html
Bridge Street toys still sell it as Girder and Panel as well.
Private Benjamin wrote:Fantastic article, was a pleasure to read and the photos really helped too!
Love the sense of humour as well when you tried glue on wax paper
Thank you so much. I'm really glad you enjoyed reading it!
|
|
|
|
|
|