Switch Theme:

Lighting a Chaos Reaver Titan  [RSS] Share on facebook Share on Twitter Submit to Reddit
»
Author Message
Advert


Forum adverts like this one are shown to any user who is not logged in. Join us by filling out a tiny 3 field form and you will get your own, free, dakka user account which gives a good range of benefits to you:
  • No adverts like this in the forums anymore.
  • Times and dates in your local timezone.
  • Full tracking of what you have read so you can skip to your first unread post, easily see what has changed since you last logged in, and easily see what is new at a glance.
  • Email notifications for threads you want to watch closely.
  • Being a part of the oldest wargaming community on the net.
If you are already a member then feel free to login now.


Made in de
Shrieking Traitor Sentinel Pilot


Alright, so after a very long time in the hobby, I've finally gone and picked up a Chaos Reaver Titan. Once I came down from the ecstatic high of unboxing aforementioned beast, I had the spectacular idea to make this my first attempt at LED lighting as well. However, while there are fantastic examples of Imperial Titans being lit (AlterEgo does a great one here), I didn't find much in the way of Chaos Titans. The main issue there is that the cockpit is full of wires, tentacles, and miscellaneous body parts that get in the way of wiring, but I'm going to give it a shot regardless.

So I decided to document my little adventure, so other can learn from my inevitable disaster.

CAVEAT: This is not necessarily the best way to do this.
Or the easiest way.
I am not known for either of these things, just for doing it my way.
Spoiler:

I see what you did there.


So, first: The Goals:
Spoiler:

- Fully light the five 'eyes' in a nifty blue
- Conceal the wiring without being terribly obvious
- Contain the lights, battery, and wiring to the head only (which will be removable)
- Try not to ruin a $700 model's face with poor judgement


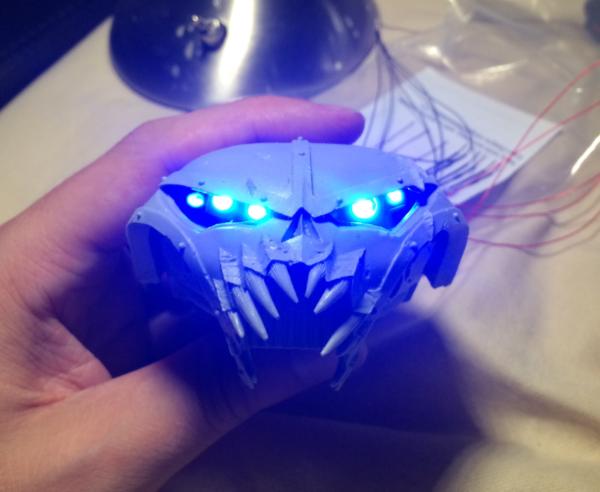
Thankfully, modeltrainsoftware.com sells LEDs in the following sizes: 1.8mm, 3mm, and 5mm, with resistors built in and ready for a 3V power source. The eyes, as pictured above, are about the following sizes (left to right): 2mm, 3mm, 3mm, 5mm, 2mm. Easy, right?

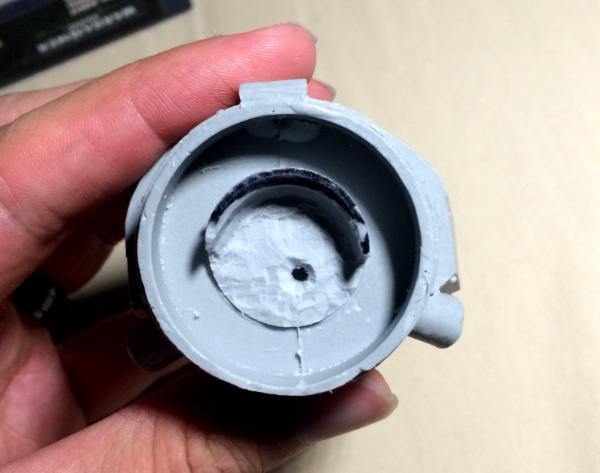
Pictured with holes and channels drilled. I'm not terribly worried about the holes being visible from the inside, since there's a neat control panel/screen that'll cover up all the damage I just did with my drill.

[/url]

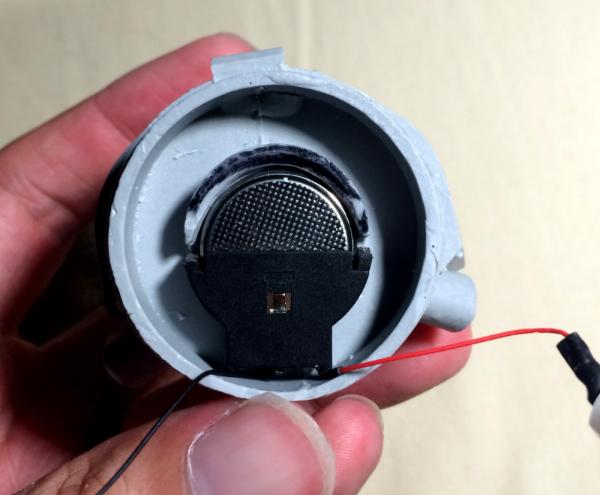
Pictured with wiring in place (test placement). The wires will be glued flat to the sides of the panels, and run along the floor underneath the princeps (or what's left of him)


Once the wires were in place, I ran them through a hole I drilled in the ragged mess at the back of the cockpit. The cables leading from the princeps are made to look like they run through this gap, and there's plenty of space to add in the wires alongside/beneath the resin cables.


Test lighting!


Next stop will be the battery pack (which is going to require some serious drilling), and the magnets to attach the head to the torso. Thanks for reading, have a virtual cookie.

Carry on.


-EoN

War Kitten- Nothing evens the odds like a reaper chainsword to the naughty bits
Sgt. Vanden- And now I'm a whale with panties. Can't see how this day can get any better.

Fiction: God-Fang (Beastmen) / The Flayed Legion (CSM)


Made in gb
Lord of the Fleet


London

Nice read thinking of doing this to my own Reaver but I have a question about the actual circuit: is it as simple as LEDs and a power source, or are there switches and resistors also required?
   
Made in de
Shrieking Traitor Sentinel Pilot


The LEDs from modeltrainsoftware come with resistors built in, so no math necessary. The 3V coin battery I got from them as well has a switch (which I may or may not use depending on how it fits). So realistically, it's pretty plug-and-play.

All that also means I can wire the LEDs in parallel instead of in series.

Links to the goods:
http://www.modeltrainsoftware.com/miniatureleds.html

http://www.modeltrainsoftware.com/3v.html

This message was edited 1 time. Last update was at 2015/07/27 06:12:35


War Kitten- Nothing evens the odds like a reaper chainsword to the naughty bits
Sgt. Vanden- And now I'm a whale with panties. Can't see how this day can get any better.

Fiction: God-Fang (Beastmen) / The Flayed Legion (CSM)


Made in de
Shrieking Traitor Sentinel Pilot


Update, after some delay, with a good news/bad news situation.

The good news is, after extensive drillwork, I've carved out a neat little socket in which to place the coin battery holder.


The magnets to anchor it (some 5mm cubes I have laying around) will be place along that slot in the top. But that's later.

The bad news is, while hand-jamming the LEDs in place, I neglected to use pliers to bend the wires and instead decided to use my Man Hands (tm). The end result of which was that I pulled the LED free from the leads. So now I'm waiting on more LEDs.


War Kitten- Nothing evens the odds like a reaper chainsword to the naughty bits
Sgt. Vanden- And now I'm a whale with panties. Can't see how this day can get any better.

Fiction: God-Fang (Beastmen) / The Flayed Legion (CSM)


Forum Index » Painting & Modeling
Go to: