Valdor Tank hunter
If there's one thing we all can universally agree is that Forge World models are hella expensive! Another thing we can all agree is that they're also hella cool! So, since I don't want to eat ramen and bread for a couple of months in order to be able to afford
FW models, I've decided to scratchbuild one. Besides, it's a great exercise in modelling.
Usually, I built everything by hand, including the primitive shapes. These were built with expanded PVC sheets, since they're cheaper, thicker and easier to cut, although the finish can be a little rough. After that, I covered the PVC sheets with very thin HIPS sheets (also known as plasticard or sheet styrene) to obtain a smooth base shape in order to be detailed later. But usually some of the more compound shapes were either very hard or nearly impossible to make using these methods, so I've started investigating other methods, from making base shapes out of foam or even LEGOs, to then cover in styrene. Then it hit me. Why not use a 3d printer? The technology is cheap and (sort of) readily available. So I did.
For this project I've decided to marry both 3d printing and scratchbuilding. Currently at work, we have a few FDM printers besides an SLA one, so it was only natural that I used them. The first stage was to build a rudimentary 3d model of the hull and the gun mount based on the Malcador templates.
This was then 3d printed in an FDM machine (in this particular case, a 5th generation Makerbot, for those who care)
Then I've cut the side components from the aforementioned Malcador template and mounted them using UHU spray glue on sheets of styrene, cutted and glued them together.
The printed hull and sponsons got covered in Tamiya putty and then, after drying, sanded in order to get a smooth surface. FDM 3D printing, as a result of its additive nature, leaves the layer steps visible, and not smooth, so it needs some finishing. In the image below, the hull wasn't puttied and sanded yet, only the grey sponsons.
 Automatically Appended Next Post:
 So, after the base hull and sides were done, I began work on the barrell. I've 3D printed the gun mantlet, which was basically a cylinder with a beveled end with radial holes around the beveled edge.
After puttying and sanding the mantlet, I've started the barrell construction. using different measures of styrene tubing, I've started to assemble the barrell cowls using a photo of the model as reference. Protip - Before selecting your barrel diameters, MAKE SURE they are telescopic, ie, the inner diameter of the next caliber matches the outer diameter of the previous one.
Obviously I didn't do that and ended up needing to fill the gaps between the barrels with more putty.


The small braces around the barrel were made by using semi circular styrene cut and glued around the barrel. This was made by gluing one end with superglue, waiting for it to dry and then placing more glue on the rest of the length of the brace and wrapping it around the barrel. The excess brace was cut when it met the other end of the brace. After drying, you can fill and sand the intersection to garantee a smooth join.
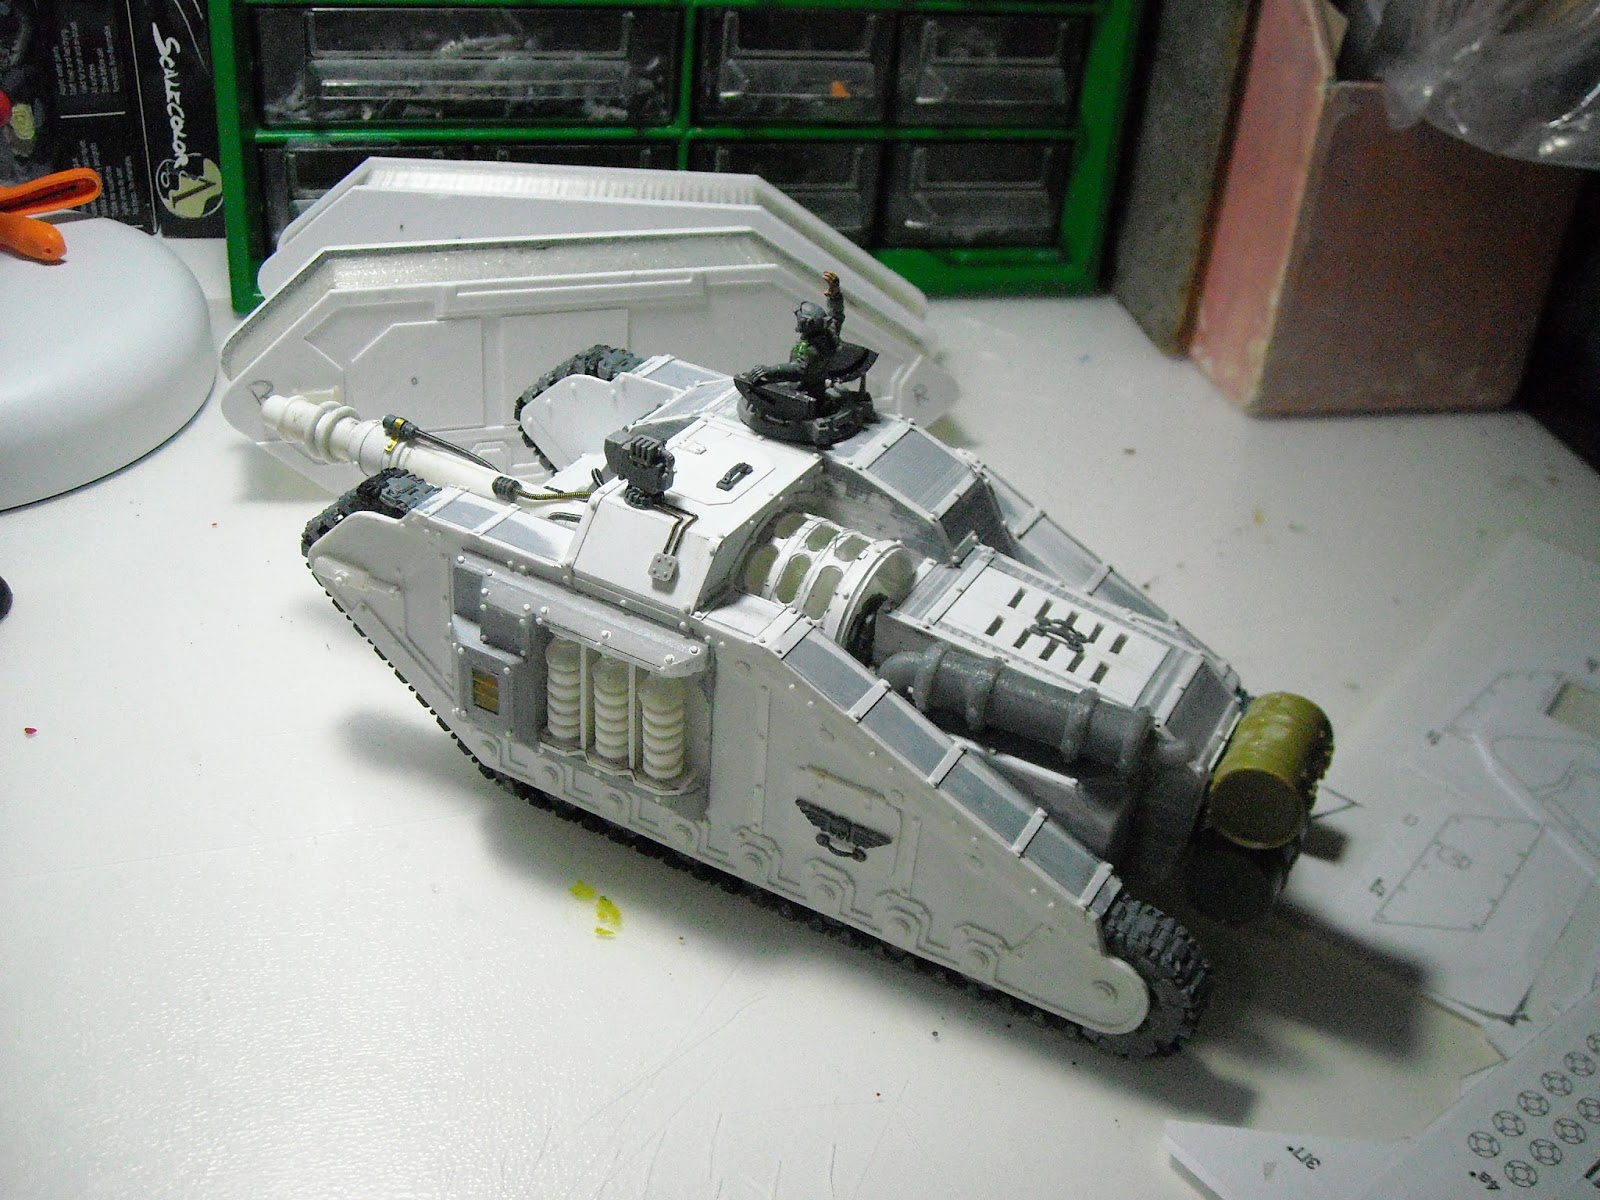
Automatically Appended Next Post: So, the hull was neglected in the previous post and now it's time for it to get some love.
After it had been sanded smooth, I glued the sides in place and puttied the top area of the track guards, since these weren't exactly uniform. I've also cut thin sheets of styrene and glued htem on the raised corner areas of the model, as per the reference pictures. I also glued the crew hatch in place and the engine cover.


The track guards were then sanded smooth. Some more details were the glued in place like the sponson viewport and it's lascannon, taken from the Dark Angels flyer.


The gun was then test fitted in place to see if everything was alright.
 Automatically Appended Next Post:
 With the hull well underway, I've finished detailing the capacitor sponson. the coil was done by 3d printing it's head, which is a small beveled cylinder, and then, with different caliber tubing, making the ribbed capacitors, all 3 of them.

The gun then got some more attention while the capacitors dried. Additional tubing was placed in the mantlet to fill the area aound the battery and a battery cover was made using styrene and glued in place to make the curve.


A cover for the gun assembly was then made using styrene and test fitted in place
Automatically Appended Next Post: nd this is where the tank is currently. Tracks have been glued in place. I've used regular Leman Russ tracks and wheels. the rivets have been cut and glued out of 1mm styrene rod.
I've also printed an exhaust in my SLA printer to place in the back. The original
FW design has 2 but I prefer an oversized single one. That leaves me the other side open for some stowage placement.
For final detailing on the gun, I've made an optical sight attached to the barrel itself and a secondary electronic sight on the hull, over the gun. the electronic one was easy, I've just used a space marine hunter killer missile's sight and box and glued it over a swivel mount made from a LAV25 part I had lying around. The wires that connect it to the control box in the hull are made with guitar string, bent and glued in place.
the optical sight was made with a bit of an comms array antenna that comes in Astra Militarum vehicles and some brass sheet to hold it in place. The cabling connecting it to the gun is just a bit of flexible spring wire used to place drapes.
Now it "only" needs stowage and paint