Forum adverts like this one are shown to any user who is not logged in. Join us by filling out a tiny 3 field form and you will get your own, free, dakka user account which gives a good range of benefits to you:
No adverts like this in the forums anymore.
Times and dates in your local timezone.
Full tracking of what you have read so you can skip to your first unread post, easily see what has changed since you last logged in, and easily see what is new at a glance.
Email notifications for threads you want to watch closely.
Being a part of the oldest wargaming community on the net.
If you are already a member then feel free to login now.
2015/09/30 21:53:05
Subject: How do you hold a model while airbrushing?
I just got my first airbrush and I'm trying to figure out how do people set up their models while airbrushing?
From what I see, most people keep most of the bits separate and on sprue brackets "puttied" to the piece they want to paint. For example, if I'm going to paint a basic Space Marine. How would I go about assembling/setting up to paint him? Would I keep the backpacks separate, legs, torso, guns, etc?
Not entirely sure if I'm explaining myself very well!! Any tips would be helpful really. I tried youtubing /googling how to set up airbrushing models and it hasn't been very successful.
Thanks!
2015/09/30 22:00:20
Subject: How do you hold a model while airbrushing?
The trick is getting places that are invisible, and doing as little as possible.
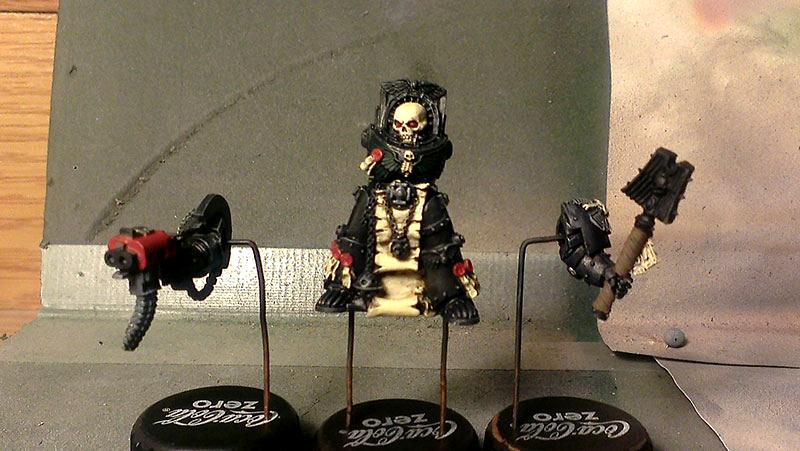
For my marines, I did the following;
- pinned the feet through to a cork cone
- left the heads on the sprue
- assembled one torso and left it on the sprue
- assembled the other torso, mounted it on blutac and held it up with a clamp
- drilled into the arms on the join, pinned and mounted to cork
- drilled into the backpacks above the connection point, pinned and mounted to cork
I rarely paint my models fully assembled, so for space marines:
- legs + upper torso I stick onto a popsicle stick from the dollar store with double-sided tape. I airbrush 1-5 per stick.
- Arms, I hold by the shoulders (which aren't painted anyhow).
- Heads I leave connected to the bottom sprue
- Backpacks I use double-sided tape onto a sprue with lots of parallel verticals (like a head sprue) and paint 10+ at a time.
- strange items that have no unpainted part, like wings or an axe, I hold one end, paint the other, let it dry, then pain the first.
For items that are of multiple colors that I want to airbrush, I will often use my thumb and/or saranwrap to cover the areas I don't want to hit with the airbrush.
2015/10/01 03:38:22
Subject: How do you hold a model while airbrushing?
I ran into trouble with the 'pin in cork' method when I tried painting a chunky metal model with no central pinning point - the only contact was either foot and they were spread off to the sides. For that model, I switched to holding the pin with a pin vice (one of the cheap, double-ended jobs that I wouldn't use for actual drilling) for more secure grip. That stronger hold that resists torque, coupled with the elongated and skinnier handle (for more dexterous manipulation), means that I much prefer the pin vice to the cork.
Lighter flat-bottomed models/parts just get some poster tack to stick them to the top of craft paint bottles. 'Peg and socket' pieces generally have the socket on the smaller bit, so I just friction fit a cut-down toothpick in there and stick the bigger bit (body, generally) on a bottle or hold it with the aforementioned pin vice.
The Dreadnote wrote:But the Emperor already has a shrine, in the form of your local Games Workshop. You honour him by sacrificing your money to the plastic effigies of his warriors. In time, your devotion will be rewarded with the gift of having even more effigies to worship.
2015/10/01 03:52:17
Subject: Re:How do you hold a model while airbrushing?
I know a friend of mine takes a stirring stick you can get at a hardware store. He uses some white school glue and glues the minis to the stick, put them in a box and sprays them in that. But that's only if you're trying to paint a whole unit the same. Works well for priming and basecoating at least.
Shadowrun is the best game ever. It's the only thing I have ever played in which I have jumped out of a shot out van with a chainsaw to cut a flying drone in half before leveling a building with ANFO assisted by a troll, a dwarf, an elf, and a wizard.
2015/10/01 04:53:12
Subject: How do you hold a model while airbrushing?
Mount it, base and all, on a cork, film canister (younger people may need to ask a parent what that is ... and they might know it as their "club stash" ) or a length of dowel.
I'm OVER 50 (and so far over everyone's BS, too).
Old enough to know better, young enough to not give a ****.
That is not dead which can eternal lie ...
... and yet, with strange aeons, even death may die.
2015/10/01 09:34:41
Subject: How do you hold a model while airbrushing?
I never pin the models to cork, even though it sounds like a great idea I just can't be fethed spending more time drilling on the feet and pinning it to a cork. Usually by the time I finish cleaning mould lines and assembling the model I'm too impatient to spend more time on it pinning to a cork before painting.
Sometimes I blutack parts to sprue, sometimes I leave part of the sprue attached (if the attachment is in an area that's going to be covered in the end anyway), sometimes I just hold it, if it's a magnetised bit sometimes I'll just mount it to a strip of metal. Often I attach the model to its base and then blutack the whole thing to the top of an old paint pot.
Occasionally I've actually superglued the model to a piece of sprue then when I'm finished painting I just trim it off the sprue again and attach it to the base.
The aircraft model I'm currently working on I have no choice but to hold it in my palm from the bottom when painting the bottom then holding it by the top when painting the bottom and to do primer and varnish I've done one wing first and let it dry so I have something to hold it by when I'm doing the other wing.
This message was edited 2 times. Last update was at 2015/10/01 10:19:12
2015/10/01 12:43:30
Subject: How do you hold a model while airbrushing?
I paint my models already on their bases, do I just wear a glove (latex or nitrile) to keep my hand unpainted.
"Through the darkness of future past, the magician longs to see.
One chants out between two worlds: Fire, walk with me." - Twin Peaks
"You listen to me. While I will admit to a certain cynicism, the fact is that I am a naysayer and hatchetman in the fight against violence. I pride myself in taking a punch and I'll gladly take another because I choose to live my life in the company of Gandhi and King. My concerns are global. I reject absolutely revenge, aggression, and retaliation. The foundation of such a method... is love. I love you Sheriff Truman." - Twin Peaks
2015/10/01 12:53:07
Subject: How do you hold a model while airbrushing?
For small parts, I use a paint stir stick and some blue painters tape turned sticky side up. I also use paper clip pins and large cork stoppers. Another good way to hold stuff is alligator clips on bamboo skewers. I use a large block of styrofoam to stick all of the skewers in to hold them.
For larger stuff like vehicles, I like his rotating painting stand from Tamiya:
d-usa wrote: "When the Internet sends its people, they're not sending their best. They're not sending you. They're not sending you. They're sending posters that have lots of problems, and they're bringing those problems with us. They're bringing strawmen. They're bringing spam. They're trolls. And some, I assume, are good people."
2015/10/01 17:05:47
Subject: How do you hold a model while airbrushing?
I used to drill and pin all parts I was doing, fixing the pin in with a bit of superglue.
It was a decent way of getting things done, but took a while to cut and glue all the pins (paperclips!!).
As I mainly paint GW minis, with most of them being plastic, I find that a much better way of doing it is to just pop a small hole in a part in an area that won't be seen, and then stick a cocktail stick in. As its mainly small, light plastic parts, friction will keep the stick in there fine.
I then just use an upended plastic tray from a box of chocolates with a few holes in it to put the sticks in to hold them up as the parts are drying. The bonus here being you have an excuse to eat a box of chocolates to get the tray.... and an excuse to have to check more than one type of chocolates to get the best plastic tray... life is hard sometimes..
2015/10/02 00:31:05
Subject: How do you hold a model while airbrushing?
I use regular paperclips to fix em to sodacaps. The caps are filled with hotglue and I reuse them. I make it as few parts as I can get away with. One thing though, everyone that says "if you can't reach it you won't see it" is just full of sh-t
Also, if I am working on a whole squad in parts I simply use a marker and write a number in the top of the cap. So every part marked 3 are from the same model.
This message was edited 1 time. Last update was at 2015/10/03 23:59:34
// Andreas
Dark Angels 4th Company (3,830pts) 950pts fully painted
2015/10/04 05:33:45
Subject: Re:How do you hold a model while airbrushing?
Also, if I am working on a whole squad in parts I simply use a marker and write a number in the top of the cap. So every part marked 3 are from the same model.
I take a pointy tool (an awl) and scratch roman numerals into parts that will ultimately be covered. For instance, on the torso, where an army would attach; the shoulder where the arm will be covered by a shoulder pad; the inside of a backpack, etc.
I don't really worry too much about heads. Usually, when I'm doing an army, I'll do like, 15-20 helmeted and 5-10 unhelmeted heads all together, and then just pick and choose afterwards.
2015/10/04 07:02:28
Subject: Re:How do you hold a model while airbrushing?
granander wrote: One thing though, everyone that says "if you can't reach it you won't see it" is just full of sh-t
For display, yes.
I'll be entirely honest, for tabletop, if I'm speed-painting, I paint from the angle you're going to see them, and the brain fills in the rest.
It's absolutely shameful but I took part in a major GW tournament last month and realised 80pts of IG were in my case unpainted about an hour before the game started. I sat in the hotel and painted head, face, shoulders, base and plasma glow from the rifles. The stuff you'd see standing above them, and need to work out what they are.
Nobody noticed in five games, and we played against staff twice... The brain is a very good improviser.
I'm not remotely proud, but it just shows how much we fill in mentally.
This message was edited 1 time. Last update was at 2015/10/04 07:03:06
Buttery Commissar wrote: Nobody noticed in five games, and we played against staff twice... The brain is a very good improviser.
Or nobody mentioned it
Unless the rest of the army is so poorly painted that it all blurs in to a mess, I tend to notice such things.
If you prime everything black before assembly and then assemble and don't paint the areas you can't reach, that would probably be the least noticeable, and if you use a particularly dark scheme it may not be noticeable at all.
But for the most part "if you can't reach it you can't see it" I think is pretty false, if I can't fit my brush through a gap smaller than about 3mm, it doesn't mean I suddenly go blind and also can't see through a gap 3mm large


 Dark Angels 4th Company (3,830pts) 950pts fully painted
