Forum adverts like this one are shown to any user who is not logged in. Join us by filling out a tiny 3 field form and you will get your own, free, dakka user account which gives a good range of benefits to you:
No adverts like this in the forums anymore.
Times and dates in your local timezone.
Full tracking of what you have read so you can skip to your first unread post, easily see what has changed since you last logged in, and easily see what is new at a glance.
Email notifications for threads you want to watch closely.
Being a part of the oldest wargaming community on the net.
If you are already a member then feel free to login now.
2015/10/19 21:00:44
Subject: Quick step-by-step guide for improving miniature photographs
Hey guys! I sincerely hope I posted this in the right subforum, somebody yell at me if not!
A couple of months ago I remember seeing a bunch of threads where people asked for tips on taking better pictures of their painted minis. I know there is an article in the FAQs section of dakka, and there are probably some other threads covering this topic already.. but I wanted to give you guys my take on the subject. Hopefully it can help somebody else out! If you want to view the original blog for this article, you can check out my website linked in my signature. I just copied the same information here but I would love the traffic to my new site
How to Improve Pictures of Wargaming Miniatures!
Today’s topic is picture taking. I have seen a lot of posts around different forums asking roughly the same question: “How can I take better pictures of my miniatures?”
I am going to answer this question with a simple a cost effective solution that I came up with when I first started selling painted models on eBay. If you don’t like reading scroll down to find this guide in video form, or check it out on my Youtube channel directly.
Where to start?!
A lot of people think you need a nice camera to take nice pictures of miniatures. While it is true that the guy rocking a $700 DSLR will probably take better pictures than you sporting your Mom’s digital, you don’t NEED a fancy camera. If you have a smartphone, that little lens in the back will probably pack enough punch to take care of business.
So where do we start? Along with your smartphone, there are two other things you will need to take some decent pictures: adequate lighting, and a light box to help amplify it. If you don’t know what a lightbox is, don’t worry. I’m going to show you how to make one of your own right now for less than $5.
The Light Box
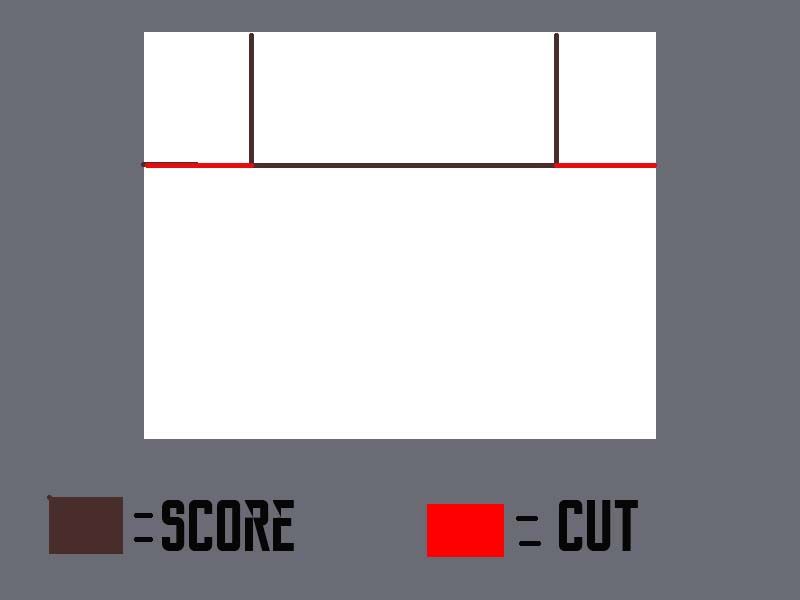
As I write this guide two things are apparent to me, I can’t spell very well and I am not good at using Photoshop. I did my best and made this fancy diagram for you guys to illustrate what I am about to tell you.
We are going to start with a piece of foam board. Foam board comes in large sheets and should be available at your local craft or hobby store. Cut out a smaller section that will make up your lightbox. If you’re not sure what size you want, you can check out my pictures below for reference.
Once you have your piece cut out, we are going to make a few more cuts.
3 of the cuts will be scored, denoted by the brownish black lines above. To do this simply cut through one layer of paper and into the foam, but don’t cut through the paper on the other side. This will create a hinge effect. For the lines denoted in red go ahead and cut all the way through everything.
When you are done, you should have something that folds up to look a bit like what I have here. Some people like to make an actual box, but this setup seems to work great for me.
Taking the Shot!
Now you’re ready. Simply place your lightbox so it can capture your light source. If you can, point your light directly towards the backboard of the light box. Once you’ve done that, you can place your miniature in the middle of the box and snap a couple pictures. You should see an immediate difference in the quality of your pictures!
Now that you’re a pro, you can even think about experimenting with different colored backgrounds. A darker color can work very well depending on what you’re taking a picture of, so feel free to experiment! The same store you just got home from probably sells different colored foam board for a variety of options.
If you want to take this whole process a step further, you can use any photo editing software to spruce up your pictures a bit. Be careful here, messing with things like saturation or color intensity can make your pictures look fake or over edited. I like to adjust the white balance and exposure (sometimes called tone) settings sometimes to make sure my picture are “bright” enough. My understanding is by doing this we are compensating our picture for the type of light that was present when it was taken. LED lighting is very different than direct sunlight etc.
Usually hitting some variety of an auto adjust button can make a few SUBTLE improvements to your original shot, which is what we’re after.
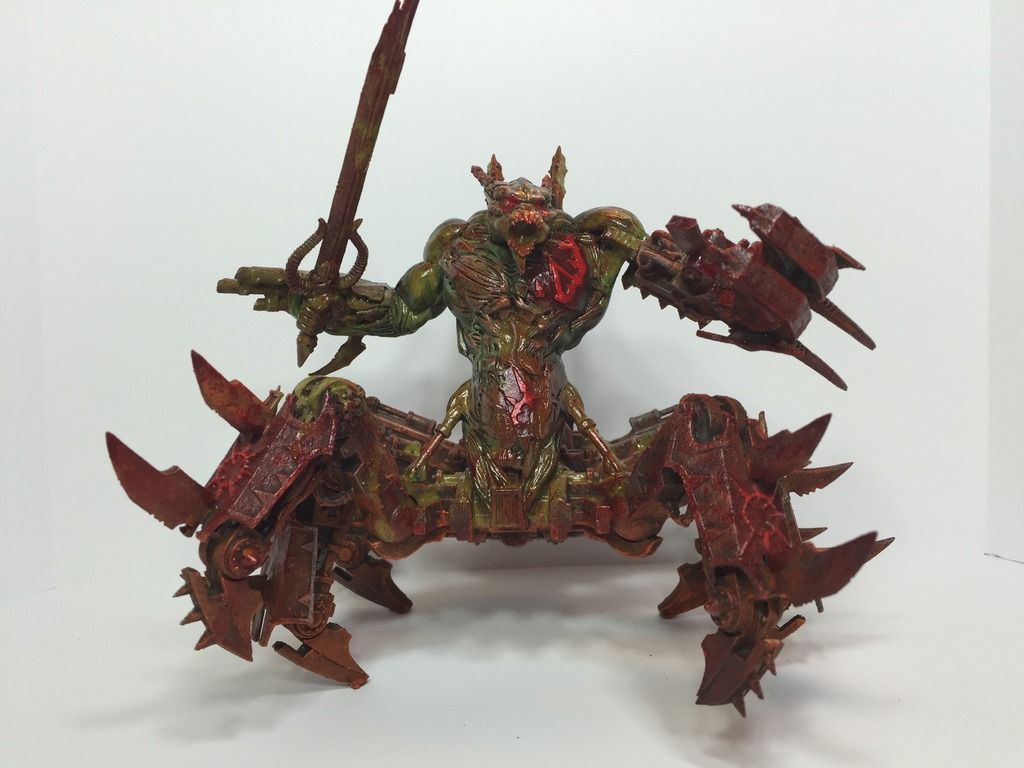
If you would like to check out a few examples of pictures I’ve taken with this set up, feel free to check out my gallery on my website. Here’s a picture of the model you saw earlier
I hope you learned something from reading this guide! If it helped you out do me a favor and share this with a friend who you think might benefit also! Below you will find the video form of this guide which I uploaded to my Youtube channel.
Nice idea! Have you tried to use some translucent/diffusing material as the ceiling and letting light through it, instead of lighting the model directly? That would give you simple shadeless tent and significant increase of the effect.
Ubl1k wrote:Thanks I have 2 pieces of foamboard at home which were waiting to be made into terrain but I think a nice lightbox is a great idea
Awesome! I am glad you can put them to use, I actually had the exact same situation going on when I had this idea!
Sotnia wrote:Nice idea! Have you tried to use some translucent/diffusing material as the ceiling and letting light through it, instead of lighting the model directly? That would give you simple shadeless tent and significant increase of the effect.
Thank you! That's a really good idea. I might have to give that a try I bet it would look awesome
Dude that's awesome. Brilliant idea! I also quite enjoyed your random puns and sound effects (ie Resolve and the "plop" of the Soul Grinder. I had anticipated they would make that sound if they were real).
Now I gotta find some foam board.
2015/11/24 07:26:02
Subject: Quick step-by-step guide for improving miniature photographs
anticitizen013 wrote: Dude that's awesome. Brilliant idea! I also quite enjoyed your random puns and sound effects (ie Resolve and the "plop" of the Soul Grinder. I had anticipated they would make that sound if they were real).
Now I gotta find some foam board.
Thank you very much! I am glad my humor isn't lost on everybody, sometimes I feel like I just crack myself up and look silly!
I hope you have success in making your own lightbox!