| Author |
Message |
 |
|
|
|
|
Advert
|
Forum adverts like this one are shown to any user who is not logged in. Join us by filling out a tiny 3 field form and you will get your own, free, dakka user account which gives a good range of benefits to you:
- No adverts like this in the forums anymore.
- Times and dates in your local timezone.
- Full tracking of what you have read so you can skip to your first unread post, easily see what has changed since you last logged in, and easily see what is new at a glance.
- Email notifications for threads you want to watch closely.
- Being a part of the oldest wargaming community on the net.
If you are already a member then feel free to login now. |
|
 |
2015/11/08 18:07:10
Subject: How do you paint crisp highlights?
|
|

Ancient Space Wolves Venerable Dreadnought
I... actually don't know. Help?
|
I was just walking around my FLGS, when I say the redshirts Golden Daemon 1st place models: a 5 man unit of stunning Imperial Fists. The thing was, they looked simple. Ordinary. The only thing was that they were insanely crisp. Their hihglights were beautiful. The colours were vibrant and alive. How do you paint that?
I talked to the guy who painted them, he said he only used Citadel paints... what is this witchcraft?
|
|
|
|
 |
|
2015/11/08 18:28:21
Subject: How do you paint crisp highlights?
|
|

Is 'Eavy Metal Calling?
|
For any kind of highlighting, the better your brush control, the better it'll look, and that goes double if you're talking about the GW-style hard edge highlighting. On top of that, choosing the right colours, having them appropriately thinned, introducing other methods like glazes and such all contribute. Often things that look very simple are actually a lot more involved than they first appear.
Don't suppose you've got a pic of the models? That might help work out exactly what was done (Although obviously, knowing how something is done and being able to do it are two separate things)
|
|
|
|
|
|
2015/11/08 19:33:37
Subject: How do you paint crisp highlights?
|
|

Incorporating Wet-Blending
|
There's nothing wrong with the gw paints aside from the price and the pots themselves, if you're on the kool-aid anyway it could be worse.
As para said, pics of what you're trying to replicate would be handy
|
|
|
|
|
2015/11/08 19:34:46
Subject: How do you paint crisp highlights?
|
|
Grizzled Space Wolves Great Wolf
|
If they were broad highlights, then there's a heap of blending techniques you can learn. Honestly I've mostly given up on blending acrylics  Aside from airbrushing if I want nice blends I've moved away from acrylics and toward oils. I just can't create nice blends with acrylics, they always look smudgy and ugly. Yes, oils take forever to dry, but I'd rather they produce a good blend in 5 minutes of work and then take forever to dry compared to an acrylic where it takes forever to create a good blend but only takes seconds to dry Colour selection is also pretty important for those award winning models. Skilled competition painters really know what colours to use to make highlights "work" in a way that makes the model look a cut above the rest. If it's specfically edge highlighting you're talking about, I think the trick there is to build up edge highlights gradually with multiple passes to avoid the cartoony look you can sometimes get. And of course having good brush control to make sure the lines are perfectly straight and not wiggly.
|
|
This message was edited 3 times. Last update was at 2015/11/08 20:05:18
|
|
|
|
|
2015/11/08 22:08:00
Subject: How do you paint crisp highlights?
|
|
Rotting Sorcerer of Nurgle
|
The right primer colour & the consistency of the paint is also really important.
|
Check out my gallery here
Also I've started taking photos to use as reference for weathering which can be found here. Please send me your photos so they can be found all in one place!! |
|
|
|
|
2015/11/08 22:17:40
Subject: How do you paint crisp highlights?
|
|
Decrepit Dakkanaut
|
Well mixed paint, clear brush, and practise. And also well mixed paint. Think of the difference in kicking a football and kicking a tin can. Both can be kicked, both go roughly where you expect, but one is far easier to do consistently with practise.
|
|
|
|
|
|
2015/11/08 23:47:54
Subject: How do you paint crisp highlights?
|
|

Longtime Dakkanaut
|
An other thing for highlights is knowing where to put them.
I'm not very good at this, so I save my highlighting for very sunny days where I can use the light of the sun to see where to place my highlights. I suppose you could use bulbs to get the same assistance.
|
|
|
|
|
2015/11/09 00:19:39
Subject: How do you paint crisp highlights?
|
|

Utilizing Careful Highlighting
|
experience, skill, and practice
Not saying I have those, just that I can see when others are painting (youtube etc) and from reading about how to do it, pictures of painted models and looking at warhammer visions etc - that's what those painters have. Of course some people simply have talent too! But I do think with the above three qualities, anyone can (eventually) get better at painting, period.
nareik wrote:An other thing for highlights is knowing where to put them.
I'm not very good at this, so I save my highlighting for very sunny days where I can use the light of the sun to see where to place my highlights. I suppose you could use bulbs to get the same assistance.
^^ I find this to be the hardest
I don't always know where highlights should go - or I get mixed up in the midst of highlighting. Models I've done a good bit, like plague rats, clan rats, are not as hard because I've had more practice. So presumably the more models in general you've painted, the easier it gets.
The second hardest thing I find is consistency. That is, sometimes on a model my hightlighting comes out exactly as I want it, sometimes it doesn't. Again, I think practice can account for a lot.
|
|
|
|
|
|
2015/11/09 02:47:04
Subject: How do you paint crisp highlights?
|
|
Regular Dakkanaut
|
If you want vibrant colors don't use washes. They're a quick & dirty way of shading a model but they'll make colors look muddy. The same can be said of dips.
Many colors have poor coverage and will require repeat applications to build up to their full saturation. So you may need to highlight a black model with yellow 3 or 4 times (or more) before that yellow really pops out.
Finally, the way the human eye perceives a color is partly based on the colors that surround it, and experienced painters plan out their color schemes accordingly to make areas of interest really stand out.
|
|
|
|
|
2015/11/09 03:01:43
Subject: How do you paint crisp highlights?
|
|
Dakka Veteran
Anime High School
|
I never really had a hard time actually doing highlights, but picking the right highlight color was always a tough decision. I also never got a good idea of when I would have too much highlighting. Realistically, you should only need two hard edge highlights, I think.
|
|
|
|
|
|
2015/11/09 03:27:20
Subject: How do you paint crisp highlights?
|
|
Longtime Dakkanaut
|
The best way to do highlights is to thin your paints and do many layers that gradually build up to a more vibrant colour. Also, don't be afraid to create a thicker highlight and then go back and darken parts of it so blends better. Sometimes you just need to redo parts more often than not in order to achieve the desired effect.
Edit: And as others have said the Citadel paints are actually pretty good, they just need a little thinning. Personally I like Vallejo more, not because of the paint itself, but because of the bottle as it's easier to distribute paint onto a pallet with them, as opposed to the Citadel line where I always feel like I'm wasting a lot paint on the brush when I mix paints... Probably doesn't help that I work with a very limited range of colours, so I end up mixing a lot of shades and the minor waste builds up over time x_x.
|
|
This message was edited 1 time. Last update was at 2015/11/09 03:30:50
|
|
|
|
|
2015/11/09 05:00:01
Subject: How do you paint crisp highlights?
|
|
Veteran Wolf Guard Squad Leader
|
 Matthew wrote: Matthew wrote:I was just walking around my FLGS, when I say the redshirts Golden Daemon 1st place models: a 5 man unit of stunning Imperial Fists. The thing was, they looked simple. Ordinary. The only thing was that they were insanely crisp. Their hihglights were beautiful. The colours were vibrant and alive. How do you paint that?
I talked to the guy who painted them, he said he only used Citadel paints... what is this witchcraft?
The other thing to point out that no-one has really mentioned is that a lot of display models or competition quality paintjobs will actually push their shadows all the way to black, and their highlights all the way to white.
The extreme contrast causes the main colours of the miniature to pop out more and look more vibrant.
|
|
|
|
|
|
2015/11/09 09:56:39
Subject: How do you paint crisp highlights?
|
|
Longtime Dakkanaut
|
Contrast is king. It's not quite as simple as just adding black and white - this tends to dirty the colour if you're adding black, or drop the saturation (strength of colour) if adding white.
With yellow, try using a little purple in the shade.
|
|
|
|
|
|
2015/11/09 10:11:48
Subject: How do you paint crisp highlights?
|
|
Is 'Eavy Metal Calling?
|
 Minimachine wrote: Minimachine wrote:If you want vibrant colors don't use washes. They're a quick & dirty way of shading a model but they'll make colors look muddy.
This is true, if you're using the 'apply all over' method for washing, but when used carefully washes still have a place. Apply them directly to recesses and they are still an effective way of adding contrast for you to then emphasise with highlighting, use them over layers to tie them together (essentially as a glaze).
As with all techniques, it's how you use them. The methods that were useful as you learned to paint for quickly getting stuff done should not be forgotten, as there will always be a place for them somewhere. For example. drybrusing is an oft-maligned technique, but for adding effects such as OSL or weathering without the use of an airbrush it's still perfectly valid. Washes, equally, can add depth to an area very effectively.
|
|
|
|
|
|
2015/11/11 14:35:18
Subject: How do you paint crisp highlights?
|
|
Longtime Dakkanaut
|
Or, if you are using the all over technique with washes you can repaint the original colour over the washed areas, just leaving the creases shaded.
Also, as Winterdyne says you can reduce the muddy look of washes by choosing a was on the opposite side of the colour wheel to what you are trying to shade, instead of using a generically dark colour.
|
|
|
|
|
2015/11/11 16:51:54
Subject: How do you paint crisp highlights?
|
|

Fixture of Dakka
|
kb_lock wrote:There's nothing wrong with the gw paints aside from the price and the pots themselves, if you're on the kool-aid anyway it could be worse.
Ironically, the pots are the main reason I use GW paints nareik wrote:Or, if you are using the all over technique with washes you can repaint the original colour over the washed areas, just leaving the creases shaded.
Also, as Winterdyne says you can reduce the muddy look of washes by choosing a was on the opposite side of the colour wheel to what you are trying to shade, instead of using a generically dark colour.
If you want really bright and shiny, it's really hard to repaint the original color over the washed area to the point of opacity. Either the paint has to be gooped on thick or it takes way too many layers. If the goal is to have solid color armor, I don't think that drowning the whole model in wash is the way to go. Of course, you *can* and have it turn out brilliantly. But it is many layers to do nicely, depending on the color, IMO. The problem with washing the whole model for me isn't so much that it looks muddy as it looks mottled. Regardless of what color you wash with, if the wash covers the entire model, unless you airbrush to apply the wash, it won't cover perfectly evenly. When you photograph a model and make a 1 inch tall model fill a 30" monitor, all those little color changes really stand out, so everything that is darker or lighter should be intentional, rather than incidental. It is worth mentioning that you CAN put a wash through an airbrush, and get much more even coverage than through a brush, for things like tanks (this way, you get wash into the crevices without having to paint into the crevices). I don't like it though, as it changes the color of the model, and you go through a ton wash, as compared to just applying the wash to the recesses.
|
|
This message was edited 1 time. Last update was at 2015/11/11 17:00:19
|
|
|
|
|
2015/11/11 17:01:19
Subject: How do you paint crisp highlights?
|
|
Longtime Dakkanaut
|
So if you do it with an airbrush it is almost more like a glaze than a wash?
|
|
|
|
|
2015/11/11 17:05:19
Subject: How do you paint crisp highlights?
|
|
Longtime Dakkanaut
|
In general you should direct washes into recesses, not splash them over the whole surface.
|
|
|
|
|
|
2015/11/11 19:37:06
Subject: How do you paint crisp highlights?
|
|
Grizzled Space Wolves Great Wolf
|
 Talys wrote: Talys wrote:It is worth mentioning that you CAN put a wash through an airbrush, and get much more even coverage than through a brush, for things like tanks (this way, you get wash into the crevices without having to paint into the crevices). I don't like it though, as it changes the color of the model, and you go through a ton wash, as compared to just applying the wash to the recesses.
I'd say it's pretty hard to apply a wash with an airbrush and get even coverage. Maybe I just don't have enough practice, but I found the wash just pools where ever the hell it wants when you airbrush it on and while you can blow it around to move it (which it will do whether you want it to or not!) it's hard to control.
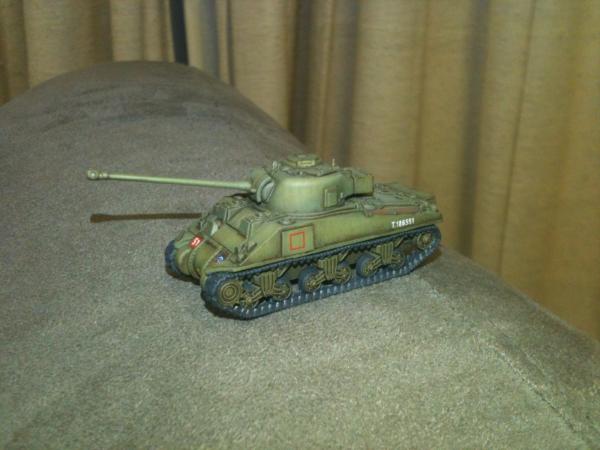
It's not bad as a speed painting technique though. These fellas were done by airbrushing a Devlan Mud wash on to them.
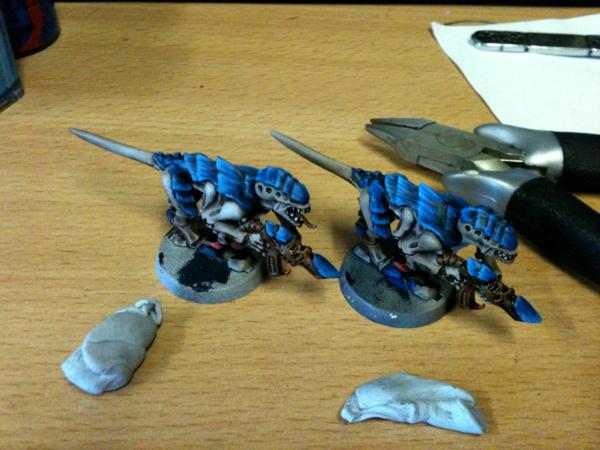
But in general I don't like acrylic washes when it comes to models that I want to look awesome. I spent quite a long time with retarders and flow improvers trying to figure out how to blend the transition between the washed area and the non-washed area and my conclusion was that it only works well if you want the model to look a bit rough because trying to make it look smooth and crisp is too hard Some of these tanks were done with an acrylic wash and others were done with an enamel wash, it didn't really matter because if the blend wasn't smooth it just makes it look more like dirt After a while I just intentionally did my blending in a streaky fashion because doing it smooth was too difficult and it looked fine being streaky anyway.
I found when I actually want the wash to blend nicely, like on a model I might consider entering in a painting comp, I've moved toward enamel and oil washes because after you've applied them you can take a clean-ish brush and blend the transition in like 2 seconds. Not matter my mix of paint/retarder/flow improver getting an acrylic to have such a smooth transition was a nightmare for me.... and yes I admit it's probably just because I suck, I'm sure winterdyne could do it in his/her sleep
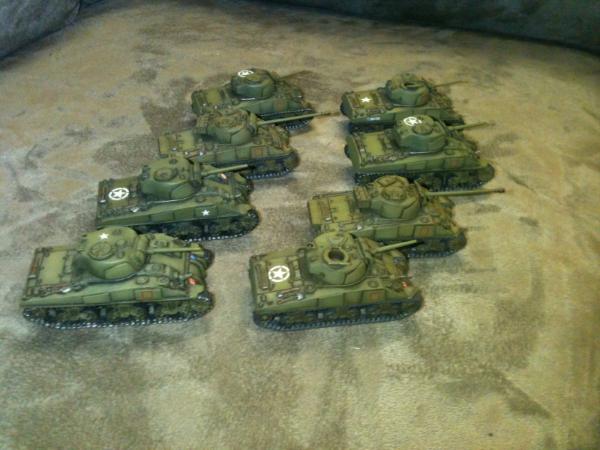
For my Space Hulk Terminators and Stealers, which I want to look as awesome as possible, I'm initially airbrushing my highlights. Because that doesn't give a stark enough contrast between recesses and raised areas I go back over it with an enamel wash, paint it directly in to the crevices and then blend it in to the panel, I can blend it well enough that (at least to my eye) the enamel wash blends in to airbrush highlight seamlessly or I can intentionally create a harsher transition if I want to make the crevice really contrast. That said... for future models I'm swapping to an oil wash instead of enamel because it's even easier to do with an oil (more time to work it, but takes longer to dry, which is fine for these models because the wash is the final step and I don't mind waiting an extra day or two for the models to dry).
I know these are still miles off competition winning models, but they're pretty much the best I can offer The only things I've painted to a higher standard are aircraft and they favour somewhat different techniques.

|
|
|
|
|
2015/11/11 23:45:51
Subject: How do you paint crisp highlights?
|
|
Fixture of Dakka
|
AllSeeingSkink wrote:I'd say it's pretty hard to apply a wash with an airbrush and get even coverage. Maybe I just don't have enough practice, but I found the wash just pools where ever the hell it wants when you airbrush it on and while you can blow it around to move it (which it will do whether you want it to or not!) it's hard to control.
I tried it once on a Russ or Chimera just to try it. The trick is to use really low air pressure and a big fat needle -- I think I was at 12 psi with a 0.66mm needle -- and also, if you paint your vehicles in subassemblies, the chances of blowing wash around is pretty small. You apply it really finely, like a thin mist, and minimize hitting any area twice. As it dries, it will pool in the recesses all on its own. IIRC I used Army Painter Dark ( = Devlan Mud). But... I don't think there's any point. It doesn't really take longer to just paint the crevices with a brush, at least for most models, and paint the model the color you want to paint the model. Makes touchups so much easier, that way.
|
|
|
|
|
2015/11/13 20:33:19
Subject: Re:How do you paint crisp highlights?
|
|
Ancient Venerable Black Templar Dreadnought
|
Best practice I know is putting a gloss coat on first and then apply the washes and they tend to wick into the crevasses better and less likely to pool on the surface.
I get the "crisp" edge highlights prior to the gloss coat, some "tooth" or roughness on that edge helps pick up the paint so I would suggest not sanding perfectly smooth the sharp edges.
|
|
This message was edited 1 time. Last update was at 2015/11/13 20:36:09
A revolution is an idea which has found its bayonets.
Napoleon Bonaparte |
|
|
|
|
2015/11/13 20:43:23
Subject: How do you paint crisp highlights?
|
|
Grizzled Space Wolves Great Wolf
|
Talys wrote:AllSeeingSkink wrote:I'd say it's pretty hard to apply a wash with an airbrush and get even coverage. Maybe I just don't have enough practice, but I found the wash just pools where ever the hell it wants when you airbrush it on and while you can blow it around to move it (which it will do whether you want it to or not!) it's hard to control.
I tried it once on a Russ or Chimera just to try it. The trick is to use really low air pressure and a big fat needle -- I think I was at 12 psi with a 0.66mm needle -- and also, if you paint your vehicles in subassemblies, the chances of blowing wash around is pretty small. You apply it really finely, like a thin mist, and minimize hitting any area twice. As it dries, it will pool in the recesses all on its own. IIRC I used Army Painter Dark ( = Devlan Mud). But... I don't think there's any point.
Yeah I used pretty low pressure when I tried spraying washes. Never really got an effect I liked and it was far too prone to pooling for my liking. It does naturally go in to the crevices but sometimes it doesn't and when it doesn't it just makes a mess. At least with a hairy brush I can guide it around.
As I said, I found it "okay" as a speed painting method and that was about it.
and paint the model the color you want to paint the model. Makes touchups so much easier, that way.
There's definitely a benefit to using filters and whatnot. I'm sure a lot of competition painters use filters to tie colours together. But I still don't know if airbrushing washes is the way to do it
|
|
|
|
|
|
|
 ~2800 points


