| Author |
Message |
 |
|
|
|
|
Advert
|
Forum adverts like this one are shown to any user who is not logged in. Join us by filling out a tiny 3 field form and you will get your own, free, dakka user account which gives a good range of benefits to you:
- No adverts like this in the forums anymore.
- Times and dates in your local timezone.
- Full tracking of what you have read so you can skip to your first unread post, easily see what has changed since you last logged in, and easily see what is new at a glance.
- Email notifications for threads you want to watch closely.
- Being a part of the oldest wargaming community on the net.
If you are already a member then feel free to login now. |
|
 |
2016/01/04 21:27:09
Subject: Is there ANY method other than with an airbrush for nuln oil over vehicles without blotchy results?
|
|

Grizzled Space Wolves Great Wolf
|
Thinning it down and applying multiple thin coats with a large brush should work. you could try the matte varnish as someone mentioned earlier (will let the wash spread more evenly over the surface).
Be careful not to go over the same area twice because you'll end up with a blotchiness where the fresh paint washes over the dried or partially dried paint. For that reason you kind of have to go panel by panel, make sure you completely coat a panel before moving on to the next one so you don't end up going over partially dried wash a 2nd time.
|
|
|
|
2016/01/06 19:32:07
Subject: Is there ANY method other than with an airbrush for nuln oil over vehicles without blotchy results?
|
|
Grizzled Space Wolves Great Wolf
|
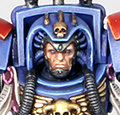
That's actually similar to a technique I use to weather aircraft... I didn't think to mention it in this thread because my mind was stuck on Nuln Oil. I'm not sure how well it'd work on Space Marine tanks though, it works well on aircraft because aircraft have large curving surfaces which you can work with a tissue to clean up the wash, as there's a lot of rubbing involved I use oil paints rather some fancy paint specifically designed for the task  You thin them down with white spirit (I don't thin too much, the more you thin it the more it'll tend to cling to the surface and won't rub off as the white spirit tends to dig in to the underlying surface), apply it over a gloss surface, wait a few minutes for it to start to dry (I usually just do 1 wing at a time on an aircraft). Then grab a tissue and start rubbing it off. Keep rubbing until you're happy with the results. However it's more of a method for doing panel lines in aircraft than anything, I used that technique on this wing, it's how I darkened the rivets, added the hint of gun smoke staining and also how I added the brown dirty look in to the wheel well and around the control surfaces (the panels toward the trailing edge of the wing). I adapted the technique from PLASMO's youtube channel, he uses it a lot on his aircraft. The main difference between my technique and his is that I don't thin my oils as much, I put them on as thick as I can and still have them fall in to the panel lines and rivets (if you don't thin at all they tend to sit on top of the panel lines instead of going in to them). That was I can create the blending effects you see in the wheel well and control surfaces. But otherwise the technique is the same. This video at 8:20 shows it: https://youtu.be/prPeSlciaLY?t=8m24s Or this video from around 13:00: https://youtu.be/RSzNMbrnR44?t=13m1s I'm not sure it's going to give you the effect you want on a Space Marine tank though. I still reckon you can get a Nuln Oil was to work, if I can find a vehicle to test it on when I get back from work I'll have a go. One thing that might work that I experimented with last night (not in the context of tanks, but again trying to get smooth finishes on aircraft) is mixing Army Painter inks (basically the same as GW's old washes) with Humbrol Acrylic Thinners. HAT have brilliant self levelling properties, it massively slows the drying, but the wash goes on much smoother. I haven't tested it on a large surface like a tank though.
|
|
This message was edited 2 times. Last update was at 2016/01/06 19:45:53
|
|
|
|
2016/01/07 04:11:55
Subject: Is there ANY method other than with an airbrush for nuln oil over vehicles without blotchy results?
|
|
Grizzled Space Wolves Great Wolf
|
kb_lock wrote:Rubbing white spirit over a painted surface sounds like a pretty terrible idea, it's specifically why i only oil was recesses, the finish is bad, assuming it survives.
Well I don't use a whole heap of white spirit and as with any of those weathering techniques you apply a gloss coat first and wait a couple of days for it to cure first. I haven't had any problem with it damaging the underlying paint work even though I rub quite vigorously. It works... on aircraft... but aircraft have big smooth surfaces that are easy to rub off. The advantage of using as oil to do it is that any unevenness gets blended together as you rub, that's why I used that method to get the brown staining on the control surfaces, it gives an almost-airbrushed finish.
I'm not sure it's going to give you the effect Orock wants though.
I'll test thinning down wash with humbrol thinner, I reckon that might be the ticket as it self levels beautifully, but I'll test it before suggesting you go out and buy it.
|
|
This message was edited 1 time. Last update was at 2016/01/07 04:16:35
|
|
|
|
2016/01/07 05:08:28
Subject: Is there ANY method other than with an airbrush for nuln oil over vehicles without blotchy results?
|
|
Grizzled Space Wolves Great Wolf
|
I use whatever I have on hand. That Spit was Vallejo PU primer (which I'll never use on an aircraft again because it doesn't hold up well to masking and can't be sanded). The underside was humbrol acrylic, the upper side was vallejo model colour in the brown areas and the green areas was vallejo model colour over coated with humbrol enamel. I did some weathering with tamiya acrylics. The whole thing was then over coated with humbrol gloss clear before doing the oil and rubbing technique and finished off with Vallejo satin PU varnish.
I've done the same technique over Vallejo air, reaper, gunze acrylic, gunze lacquer and testors enamel, they all hold up fine. The only one I had a problem with was when I did it over metals, Vallejo metal colour, gunze lacquer metals, testors lacquer metals... they're all very delicate and won't take any rubbing before they just lift off.
|
|
|
|
2016/01/07 05:53:11
Subject: Is there ANY method other than with an airbrush for nuln oil over vehicles without blotchy results?
|
|
Grizzled Space Wolves Great Wolf
|
I'm going to have a play when I get home from work in a few hours, I'm sure I can get something to work, because I've seen several tanks where filters have been applied with a brush and came out smooth.
|
|
|
|
2016/01/07 06:37:45
Subject: Is there ANY method other than with an airbrush for nuln oil over vehicles without blotchy results?
|
|
Grizzled Space Wolves Great Wolf
|
That's very blotchy, I'm certain I can get something that looks smoother than that and I'll post some pics. I reckon I might be able to get something smoother just using paint straight from the pot, it might be your application method. Automatically Appended Next Post: Prelim results... 1. Application brush needs to be large and ideally soft. I have a mop like brush floating around somewhere which I suggest would give the best results, but I can't find it If I can find it I'll report. 2. You need to thin it down *heaps* and apply several thin coats. I haven't spent much time experimenting but I put around 3 drops wash + 3 to 4 drops of Humbrol thinner + 3 to 4 drops of water. 3. That mix (compared to straight out of the pot) has very good self levelling properties, but it has a tendency to bead up, so the surface you're applying it to needs to be MATT rather than gloss, otherwise you'll get lots of little beads of wash. I didn't have any spare tanks ready to wash so I just used this plasticard panel which I painted a few days ago to test various camo schemes. 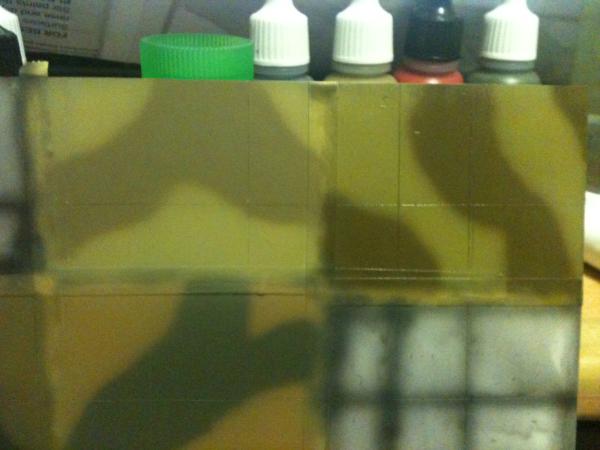 The lighter sand colour in the 2 upper squares is both the same colour, the one on the left is after 1 coat of wash, the one in the upper right is after 3 coats of wash. The first 2 layers was about 3 drops wash + 3 to 4 drops of Humbrol thinner + 3 to 4 drops of water, the final layer was 2 drops wash + 8 drops humbrol thinner (which was a bit too thin, it didn't really darken it much and was prone to pooling). I'm not saying those mixtures were ideal, simply that's the first thing I tested. The wash I used was Army Painter's Dark Tone, which behaves very similar to GW's Badab Black. You do have to be careful when applying it, thinner layers are smoother but obviously it takes more layers to build up. I used a 1cm wide flat brush because it's the largest one I had on hand, larger would be better. Think of it like sweeping, if you get a blotch you have to sweep it away. If you can't get rid of the blotch because there's too much paint dab the brush on a tissue to get rid of the excess and try sweeping it again. Automatically Appended Next Post: EDIT: I also had a crack of applying oil paint to a panel and then rubbing it off.... it sorta works, but I wouldn't recommend it. The surface needs to be glossy and if it's not consistent (some areas of the underlying paint are a bit grainier) then when you rub off the oils they'll be patchy because it won't rub off the grainy areas as easily.
So it can work if you have a perfect (and ideally reasonably glossy) surface to begin with, BUT it shows up even the tiniest of blemishes in the underlying paint (which when you think about it, is good for airbrushed aircraft models which have lots of fine panel lines and rivet detail, but bad for a hairy brush painted tank which is going to lots of unintentional blemishes from the brush work).
|
|
This message was edited 5 times. Last update was at 2016/01/07 10:37:29
|
|
|
|
2016/01/07 12:37:34
Subject: Is there ANY method other than with an airbrush for nuln oil over vehicles without blotchy results?
|
|
Grizzled Space Wolves Great Wolf
|
 Orock wrote: Orock wrote:Looks like from what I am gathering is the best method to undercoat with 2 layers of say testors dull cote, THEN add the nuln oil watered down in light layers?
I haven't actually used Testors dullcoat in spray can form, so I'm not sure how many layers of dullcoat it will need. You can't JUST thin with water, otherwise the surface tension will be too great and the wash will bead up. I used Humbrol acrylic thinners because it's what I have on hand, it also has a bit of drying retarder in it (so you have to wait longer between coats, but the coats will tend to come out smoother). You MIGHT be able to use something like Lahmian Medium instead, I haven't tried it to know if it'll work. But certainly not just water, you won't be able to thin it as far as you need to thin it and still have it flow across the surface properly. I'd say aim for a 2:1 thinner:wash ratio, 1:1:1 of water:humbrol thinner:wash worked for me (which works out 2:1 of diluents:wash), but that was just the first thing I tried, doesn't mean it's the best thing! If it's still splotchy you can try thinning it a bit more and/or apply thinner coats (less paint on the brush). What about submerging it in a 50/50 mix of water/oil? There would be no streaks, but I feel likeit would still come out crappy.
You're going to have a problem with pooling then. you can give it a shot but you'll need to have a brush on hand to clean up the pools and when you do that you may end up with the same splotchiness you had before. And again I wouldn't use 50/50 water/oil, I'd mix in some proper acrylic thinners to break the surface tension and let it settle better. Also it'd be hard/expensive to submerge a tank in a mix like that.
|
|
This message was edited 3 times. Last update was at 2016/01/07 12:40:21
|
|
|
|
2016/01/07 23:16:35
Subject: Is there ANY method other than with an airbrush for nuln oil over vehicles without blotchy results?
|
|
Grizzled Space Wolves Great Wolf
|
If you can find a darker spray and it gives you the results you like, go for that. Do whatever gives you the results you're happy with the easiest.
BUT, in general I'm going to have to disagree with you there Talys. The technique I described above is called filtering rather than washing.
Filtering is a very common technique to darken (or lighten or fade out) surfaces on tank models and it does NOT look the same as simply darkening the base colour, it gives you a result similar to washing but needs to be built up more.
With a filter, you're trying to avoid excessive pooling in the crevices (the opposite to a wash), BUT it still gives the surface subtle modulation that stops it looking unnaturally flat (without looking blotchy) and painting a transparent layer of paint (wash, filter) over the top of a base most definitely gives a different look to simply darkening the base coat.
By happy chance, that camo pattern I painted above were test panels for a desert camo scheme on an aircraft and I like the result of filtering it so much so that I now intend to do that on the actual model
But, Orock, do whatever gives you the results you're happy with. If a darker spray gives you the results you want, that's faster than applying filters 
 Talys wrote: Talys wrote:You can also use that pot to fix the problem of, "I've washed my whole model -- how do I fix this errant brush stroke I made during detailing?"
I always aim to clean up mistakes when they happen instead of waiting for them to dry and covering them.
|
|
|
|
2016/01/08 00:16:34
Subject: Is there ANY method other than with an airbrush for nuln oil over vehicles without blotchy results?
|
|
Grizzled Space Wolves Great Wolf
|
It's not JUST the modulation that makes filtering a good option, having transparent layers of paint over a basecoat it always going to look different to simply changing the basecoat colour itself. I've never been able to match a washed model's colour with a solid colour (and I have tried on my Cadians/ DKOK, in the end I satisfied myself with the fact they'd look slightly different).
As for the time it takes... I'm still learning, most the time just comes from learning how to do it. I have never really played with filters before. Once you know how to do it, I would suggest it wouldn't take more than 10 minutes to apply a filter to a large tank. Wait a few minutes for it to dry and then put another layer on.
I think most the time just comes down to finding a good mix of thinners and paint.... or you could just buy a MIG filter (I haven't tried them myself, but they're ready made filters).
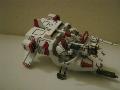
I actually just then experimented with enamel filters.... Using a Testors model master paint with Testors enamel thinner, probably about 1:10 paint:thinner (so very thin). It works extremely well, it just draws itself over the surface beautifully. So much so that I just threw a dark grey filter over a random Rhino model in less than 2 minutes
Seriously, I spend more time experimenting with techniques than I spend actually painting the models
EDIT: Enamels do go on a bit smoother but the downside is if you try and make it too thick then it becomes unpredictable, it might look like it goes on fine but then it dries a bit grainy. It also is attracted to dirt/dust on the model and brush like you wouldn't believe, both brush and model needs to be very clean otherwise the wash will pool around any particles. In the end it's probably not a huge benefit compared to the acrylics other than the fact it's less likely to bead up.
|
|
This message was edited 3 times. Last update was at 2016/01/08 06:10:10
|
|
|
|
|
|