| Author |
Message |
 |
|
|
|
|
Advert
|
Forum adverts like this one are shown to any user who is not logged in. Join us by filling out a tiny 3 field form and you will get your own, free, dakka user account which gives a good range of benefits to you:
- No adverts like this in the forums anymore.
- Times and dates in your local timezone.
- Full tracking of what you have read so you can skip to your first unread post, easily see what has changed since you last logged in, and easily see what is new at a glance.
- Email notifications for threads you want to watch closely.
- Being a part of the oldest wargaming community on the net.
If you are already a member then feel free to login now. |
|
 |
2016/03/31 19:43:48
Subject: Advanced/complex masking for airbrushing
|
|

Krazed Killa Kan
|
I'm trying to work a little more with my airbrush than doing just flat basecoating, and I think my biggest hurdle at the moment is that with the airbrush, I can't get a solid, defined line - there's always a little spillover. And I think that's natural - a spray will always have some outlier drops from the center of the spray. I guess my first question is - is it possible to get a perfectly straight line when airbrushing? If so, how?
So, next step is masking. I've got masking tape and low-tack Tamiya masking tape for the job, which is great if I want to paint straight lines.
Thing is, for any surface or detail that's not a perfectly straight line, I'm finding masking tape not worth the trouble. Takes too long to force the straight tape onto the contour of whatever I want to paint. I mean, if it will take me an hour to mask off what I don't want painted, and it'll take me 30 minutes to paint it by hand, I'll just paint it by hand.
I mean, take the picture of the sail at the bottom of this post, for example.
I want to paint the sail black, and the ork face white. White is a notoriously hard color to paint by hand, and there's a pretty large area to paint, so I'd think that airbrushing is a good candidate for it. However, there are a lot of lines, points, and curves around the ork face, and accurately masking it off completely is going to be a MASSIVE pain.
So, how would you airbrush the sail black, and the face white? Would you airbrush? If so, how would you mask off the face?
I've used silly putty for some masking purposes, and I think it does a great job. I think I could just roughly place silly putty around the shape I want to mask off, but how do I cut the excess silly putty off cleanly and quickly without scratching the model or basecoat? Do you just use a exacto knife and don't press hard enough to cut the model, or is there some kind of plastic putty knife I could use?
![[Thumb - 3.jpg]](/s/i/at/2016/3/31/898200c17cb724df3fbfce4b58a8e0ac_91290.jpg__thumb)
|
|
|
This message was edited 2 times. Last update was at 2016/03/31 19:45:58
"Hope is the first step on the road to disappointment." Words to live by. |
|
|
 |
|
2016/03/31 20:00:36
Subject: Advanced/complex masking for airbrushing
|
|
Colonel
This Is Where the Fish Lives
|
If you're having problems with standard Tamiya masking tape over curved surfaces, you can use masking tape for curves and both Tamiya and Scotch make some. It's essentially rubbery masking tape that can stretch to properly contour over curved surfaces.
|
 d-usa wrote: d-usa wrote:"When the Internet sends its people, they're not sending their best. They're not sending you. They're not sending you. They're sending posters that have lots of problems, and they're bringing those problems with us. They're bringing strawmen. They're bringing spam. They're trolls. And some, I assume, are good people."
|
|
|
|
|
2016/03/31 20:14:31
Subject: Advanced/complex masking for airbrushing
|
|

Mysterious Techpriest
|
Tried a liquid mask?
The Vallejo one that I have is basically natural rubber.
Paint it over parts you want covered, wait for it to set (an hour) and spray over and remove when the paint is dry.
You have about 24 hours to remove it once dried before it becomes hard and difficult to remove.
|
|
|
|
|
|
2016/03/31 20:21:03
Subject: Advanced/complex masking for airbrushing
|
|

Grizzled Space Wolves Great Wolf
|
Good masking does take time. It took me well over an hour to mask out this camo pattern... 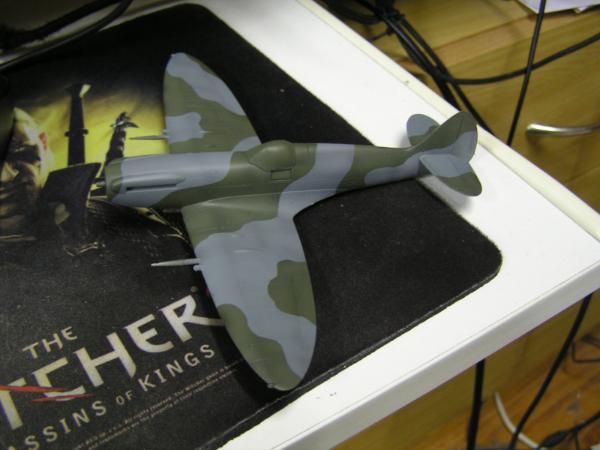 And even just something simply like the bottom of this Tempest probably took me about half an hour to an hour. 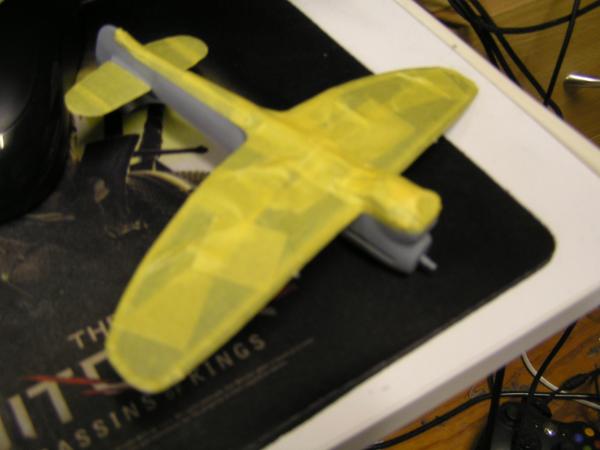 You do pick up some tricks as you go. For example, laying the masking tape down on the model, drawing your camo pattern (or design or whatever) then lifting up the masking tape, placing it on a cutting mat and cutting out the design with a fresh sharp blade can save you a lot of time. Making convex curved lines with tape isn't too hard unless you need a very sharp curve. Use thin strips of tape and tack it down with your thumb at one end and as you lay it down just gently curve it as you go. Leave a bit of slack between the thumb that is tacking the tape down and the hand that is guiding the curve to give you better control. If you look at the wings I masked on that Tempest (2nd image) you can see the outline of the wing was done with basically one long strip of Tamiya tape cut to about 3-5mm and I just guided it around the curve and then trimmed it off and filled in the middle with larger pieces. Eventually you get a curve that is too tight, so you can either cut the tape strip even thinner or partially cut the curve in to the tape so that you don't have to "force" the curve quite so much. The tricky one is conCAVE curves, because you can't do much of a concave curve before the tape wants to bunch up on itself. Sometimes I get around this by cutting the tape in to curved strips which are curved greater than the curve I actually want to follow, so that way when I manipulate the tape around the curve the tape bunches on the unimportant side rather than the side you care about. Apparently you can also get flexible tapes that will do it easier, things more like electrical tape, but I haven't tried those myself. I've used blutack to mask which I believe works similar to silly putty, I never try and *cut* it though, I use blutack when I want soft edged masking. Masking that face is going to take you time. If your goal is to save time just use a brush it'll probably be faster! The reason for using an airbrush is so that you can get a smoother finish and do more blending effects. The way I'd do it, it looks a bit like the face is a relief? If so, you could lay masking tape (or vinyl I guess) across the whole thing and then using a very fresh sharp blade go around the outline of it. If the blade is nice and sharp you won't have to push hard so shouldn't damage the underlying plastic (or you can just sand it out if you make a slip up). That technique is not dissimilar to how many people do canopy masking for aircraft. You could also try using a thin strip of tape, masking the outline and then filling the middle. A less time consuming way might be to use masking fluid, but I've had mixed results with masking fluid. So spray the white skull first, then just paint on a masking fluid to protect it and spray the black sail. But as I've said, I've had mixed results with masking fluid. I use Gunze's Mr Marking Sol Neo. The problem I've had with masking fluid is it tapers down to the thin edge (where as tape has a nice sharp square edge) so when you lift the masking fluid off, it's less likely to give you a sharp edge, you probably can't see it unless you zoom in but on the spitfire I used Tamiya tape everywhere except the tail section where I used masking fluid and you can see the lines aren't quite as sharp, they're slightly jagged because the paint didn't pull up smoothly when I removed the mask. You could also use blutack but in the end I don't think it'd save you time and since you want a hard edge it can be annoying (you can push blutack down to give you a hard edge, but it's easily to accidentally touch it and have it shift/lift which means paint will get under the mask when you spray. Blutack is usually better for soft edged schemes. Basically, yeah, masking is time consuming, it's not going to save you time over hairy brush painting it, you only bother with it if you think it'll give you a better result.
|
|
This message was edited 2 times. Last update was at 2016/03/31 20:27:39
|
|
|
|
|
2016/03/31 20:22:20
Subject: Advanced/complex masking for airbrushing
|
|
Krazed Killa Kan
|
I got a jar of liquid mask from my local hobby shop, and tried it for the first time on this specific project. The stuff I said on the bottle that it works best with petroleum based paint, so I tried a small amount on the sail, and I couldn't get it back up.
So, it went on just fine, but I couldn't remove it. Directions said to use a hobby knife (which just scratched the paint) or masking tape to adhere to the mask (which just didn't work).
|
"Hope is the first step on the road to disappointment." Words to live by. |
|
|
|
|
2016/03/31 20:30:03
Subject: Advanced/complex masking for airbrushing
|
|
The Daemon Possessing Fulgrim's Body
|
I've not had the best luck with masking fluid, but some advice I'll try next time I feel nothing else will work is to paint on several coats, the thicker you make it, the easier it lifts off.
|
We find comfort among those who agree with us - growth among those who don't. - Frank Howard Clark
The wise man doubts often, and changes his mind; the fool is obstinate, and doubts not; he knows all things but his own ignorance.
The correct statement of individual rights is that everyone has the right to an opinion, but crucially, that opinion can be roundly ignored and even made fun of, particularly if it is demonstrably nonsense!” Professor Brian Cox
Ask me about
Barnstaple Slayers Club |
|
|
|
|
2016/03/31 20:34:45
Subject: Advanced/complex masking for airbrushing
|
|
Grizzled Space Wolves Great Wolf
|
 Kap'n Krump wrote: Kap'n Krump wrote:I got a jar of liquid mask from my local hobby shop, and tried it for the first time on this specific project. The stuff I said on the bottle that it works best with petroleum based paint, so I tried a small amount on the sail, and I couldn't get it back up.
So, it went on just fine, but I couldn't remove it. Directions said to use a hobby knife (which just scratched the paint) or masking tape to adhere to the mask (which just didn't work).
What sort of masking fluid was it? Some get better or worse reviews.
It's important that the paint you are masking over is properly cured, wait a day or so for acrylics and couple of days for enamels. I could imagine it might have problems on matte surfaces as well, I've only used it on semi-gloss or gloss surfaces (not intentionally, it's just a lot of my paints are gloss or semi-gloss out of the bottle.
If I use masking fluid I literally just run my finger over the model and it pulls up nicely, no need to use a knife. Where it can be a problem is in tight crevices, which is why I'd paint the skull first and mask over it rather than doing the sail first, so that way you don't get masking fluid in to the crevice around the skull. Automatically Appended Next Post:  Azreal13 wrote: Azreal13 wrote:I've not had the best luck with masking fluid, but some advice I'll try next time I feel nothing else will work is to paint on several coats, the thicker you make it, the easier it lifts off.
The problem I have had with using several coats of masking fluid is as I'm applying my 2nd coat, it sticks to the first and actually lifts the first coat off as I pull my brush away  But I guess it depends on the masking fluid, I'm using Gunze's Mr Masking Sol Neo. I've also heard good things about Humbrol fluid but I've not used it personally.
|
|
This message was edited 1 time. Last update was at 2016/03/31 20:36:03
|
|
|
|
|
2016/03/31 21:03:31
Subject: Advanced/complex masking for airbrushing
|
|
Rampaging Furioso Blood Angel Dreadnought
|
If you can figure the exact/rough dimensions you could always...
Tape strips of painters/masking tape on a plasticard, re-draw your image with sharpy on the tape, then cut it out with exactos.
First paint the blending/fades on the model unmasked (the face part), then add the mask you made, and paint the background.
You're in for some work no matter how you shake it. 
|
|
|
|
|
|
2016/03/31 21:08:26
Subject: Advanced/complex masking for airbrushing
|
|
Grizzled Space Wolves Great Wolf
|
 Gunzhard wrote: Gunzhard wrote:If you can figure the exact/rough dimensions you could always... Tape strips of painters/masking tape on a plasticard, re-draw your image with sharpy on the tape, then cut it out with exactos. First paint the blending/fades on the model unmasked (the face part), then add the mask you made, and paint the background. You're in for some work no matter how you shake it.
If I'm correct in thinking the face is a relief and sits proud of the rest of the banner, it's probably easier to paint the skull first, then mask and trim on the model itself, then paint the sail. Getting the mask back in the exact same spot is going to be tricky so I'd just cut it on the model. If the face doesn't sit out from the surface of the sail and is just drawn on, then yeah, draw the face on some masking tape, cut it out, paint one part, put the mask in place, paint the other part.
|
|
This message was edited 1 time. Last update was at 2016/03/31 21:08:58
|
|
|
|
|
2016/03/31 21:39:56
Subject: Advanced/complex masking for airbrushing
|
|
Krazed Killa Kan
|
I'm not down with all them fancy artsy terms like 'relief', but the face of the sail is cut-out plasticard glued to the front of the sail, so it's a slightly raised surface.
|
"Hope is the first step on the road to disappointment." Words to live by. |
|
|
|
|
2016/03/31 22:01:35
Subject: Advanced/complex masking for airbrushing
|
|
Incorporating Wet-Blending
|
Next time, put masking tape on it when you're cutting it 
For now, there's a lot of ways to finish. Brushing the white actually looks good with orks (to me), but you could instead just go with your liquid mask - i use humbrol and it's pretty good.
Skink, have you seen the curving masking tape? Goes around a 5c piece with no kinks
|
|
|
|
|
2016/03/31 23:19:31
Subject: Advanced/complex masking for airbrushing
|
|
Veteran Wolf Guard Squad Leader
|
Airbrushing the white and handpainting the black is probably the most efficient way to do it.
If you are absolutely keen on airbrush the lot, it will be liquid masks on the raised areas. You mentioned you had some issues with lifting the mask, try using Blue-tac almost like a sponge and dabbing a piece of it on the mask.
|
|
|
|
|
|
2016/04/01 06:37:34
Subject: Advanced/complex masking for airbrushing
|
|
Grizzled Space Wolves Great Wolf
|
kb_lock wrote:Skink, have you seen the curving masking tape? Goes around a 5c piece with no kinks
People have described it to me but I haven't used it. Do you have recommendations on curving masking tape? Most people I know still just use the regular Tamiya tape and cut it when they need to. Even the pros I know working in modelling departments with car manufacturers just use thin strips of regular masking tape (though usually 3M rather than Tamiya!). My nightmare is having the mask lift slightly while spraying, like, lifts just 1-2mm, enough that you don't notice it until you remove the mask and see paint has gotten under it I've had it happen a couple of times in the past and it's a nightmare to clean up, as long as the flexible masking tape doesn't do that I'm happy.
|
|
This message was edited 1 time. Last update was at 2016/04/01 06:38:38
|
|
|
|
|
2016/04/01 08:17:58
Subject: Advanced/complex masking for airbrushing
|
|
Incorporating Wet-Blending
|
I have some on order, it is Tamiya Curve Masking Tape - never tried it, but it looks potentially good
|
|
|
|
|
2016/04/01 08:25:10
Subject: Advanced/complex masking for airbrushing
|
|
Grizzled Space Wolves Great Wolf
|
Yeah that was the one my local hobby shop owner mentioned but he didn't have any in stock  Looks like the hobby shop further away has it, might grab it next time and see if it works well. Looks like they have a 2mm, 3mm and 5mm.
|
|
This message was edited 1 time. Last update was at 2016/04/01 08:25:52
|
|
|
|
|
2016/04/01 08:57:58
Subject: Advanced/complex masking for airbrushing
|
|
Incorporating Wet-Blending
|
I'm importing some, I'll let you know
|
|
|
|
|
2016/04/01 09:21:29
Subject: Advanced/complex masking for airbrushing
|
|
Thane of Dol Guldur
|
if worse comes to worst you can always just mask as best as possible then tidy up the edges by hand. no shame in that.
|
  Heresy World Eaters/Emperors Children Heresy World Eaters/Emperors Children 
Instagram: nagrakali_love_songs |
|
|
|
|
2016/04/01 10:56:47
Subject: Advanced/complex masking for airbrushing
|
|
Hardened Veteran Guardsman
|
In this case i would still..
1. Airbrush it, no masks
2. Dark colors first so that you'll have to clean up with dark (easy) colors.
3. Only do clean up with brush
That still saves a lot of time. I usually block the base colors on all minis with airbrush. Even if it requires clean up will all colors that is still a lot faster than doing everything with the brush.
|
|
|
|
|
2016/04/02 21:18:54
Subject: Re:Advanced/complex masking for airbrushing
|
|

Regular Dakkanaut
|
I've done a spot of masking (although it doesnt look fancy theres a few bits i wanted to not get sprayed) using the only thing i had in the house. Electrical tape. Leave it under a light bulb and it gets nice and soft and malleable. Not the best solution but works for me i guess.

|
|
|
|
|
2016/04/02 21:58:37
Subject: Re:Advanced/complex masking for airbrushing
|
|
Colonel
This Is Where the Fish Lives
|
Doesn't it leave a residue on your model?
|
d-usa wrote:"When the Internet sends its people, they're not sending their best. They're not sending you. They're not sending you. They're sending posters that have lots of problems, and they're bringing those problems with us. They're bringing strawmen. They're bringing spam. They're trolls. And some, I assume, are good people."
|
|
|
|
|
2016/04/02 22:58:10
Subject: Re:Advanced/complex masking for airbrushing
|
|
Regular Dakkanaut
|
Cant say i've noticed. The areas masked were given a coat of varnish as i keep getting worried that the tape will pull off the paint but its not happened yet,
|
|
|
|
|
2016/04/03 06:43:13
Subject: Advanced/complex masking for airbrushing
|
|

Fixture of Dakka
|
kb_lock wrote:I have some on order, it is Tamiya Curve Masking Tape - never tried it, but it looks potentially good
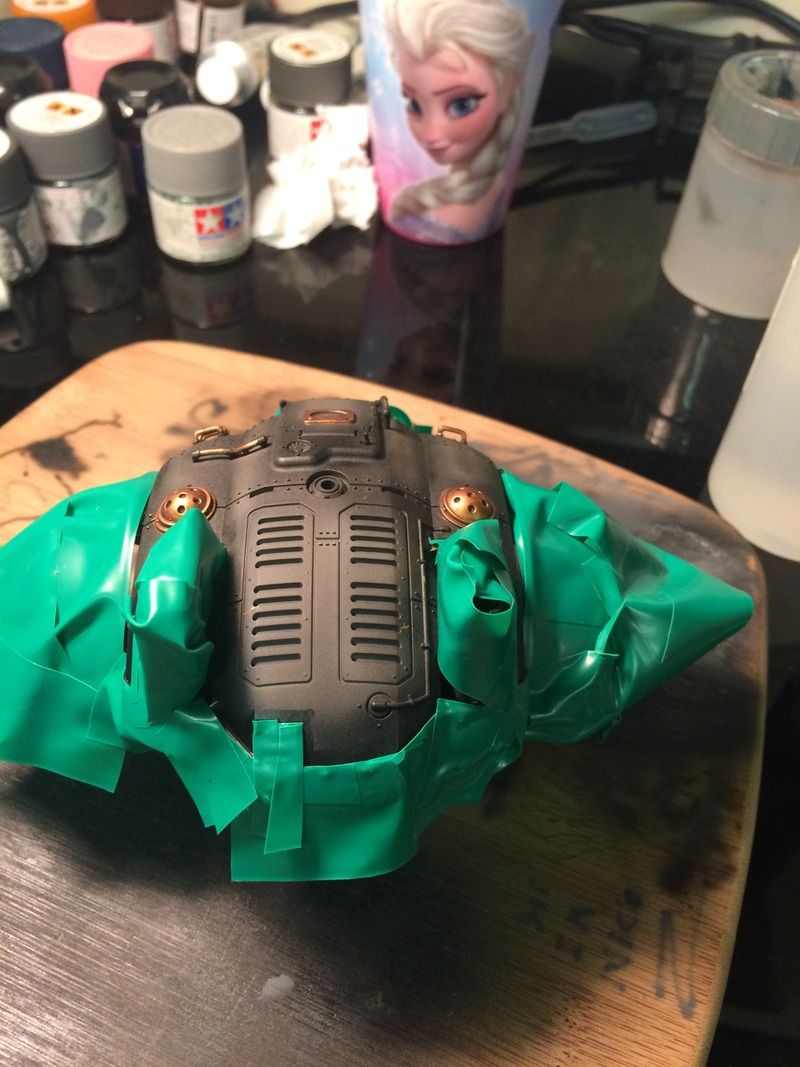
I have the 2mm and 3mm sizes. It was pretty expensive, IIRC, but it works really well in the right situation. Basically, it's masking tape that stretches. The gun part of this was masked using Tamiya tape for curves:
Normally, I like using the yellow Frog Tape. It's much cheaper per meter, and comes in many different (thicker) widths. I also have a Silhouette Portrait cutter -- these are fantastic, as you can put a piece of Frog Tape on a cutting board (or even cardboard), run it through the Silhouette with the pattern you need, and presto, perfect stencil.
|
|
|
|
|
|
|


