| Author |
Message |
 |
|
|
|
|
Advert
|
Forum adverts like this one are shown to any user who is not logged in. Join us by filling out a tiny 3 field form and you will get your own, free, dakka user account which gives a good range of benefits to you:
- No adverts like this in the forums anymore.
- Times and dates in your local timezone.
- Full tracking of what you have read so you can skip to your first unread post, easily see what has changed since you last logged in, and easily see what is new at a glance.
- Email notifications for threads you want to watch closely.
- Being a part of the oldest wargaming community on the net.
If you are already a member then feel free to login now. |
|
 |
2016/09/21 03:07:04
Subject: Help with eldar skimmer bases
|
|

Jovial Plaguebearer of Nurgle
|
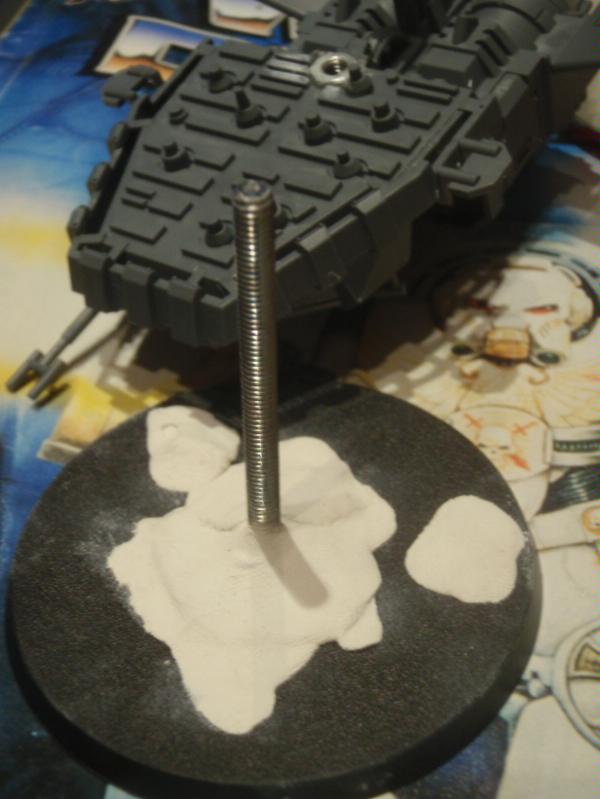
So I've started an eldar army with the start collecting boxes. Within the first day the fire prism snapped its basest the top of the stim. I did some googling and all I can find is to glue some magnets on to the stim and drill some magnets into the model. I did this and it works okay but gives the model a sloppy angle. I even double up'd thr magnets for a better hold. Long story short I'm looking for something stronger and more consistent for the rest of the army. Anyone have any better tutorials or ideas? There has to be a better way. Part of me is thinking of getting some metal rod from the hardware store and using that.
|
|
|
 |
|
2016/09/21 03:11:47
Subject: Help with eldar skimmer bases
|
|
Dakka Veteran
|
Metal rod sounds good, 1/8" brass rod from one of the large round bases into a hole drilled into the bottom of the model should work. I did this with a Riptide model that was jumping. She is as solid as a rock.
(Skimmer bases suck, GW really needs to beef them up, maybe make them an X like the flight bases.)
|
|
|
|
|
2016/09/21 03:34:43
Subject: Help with eldar skimmer bases
|
|
Jovial Plaguebearer of Nurgle
|
Yeah I'm thinking brass is easier to cut than steel rod.
|
|
|
|
|
2016/09/21 04:08:04
Subject: Re:Help with eldar skimmer bases
|
|
Basecoated Black
|
Hawk war games widgets glued to the bottom of the model will then fit on the peg nicely,and it can easily be removed for storage.
|
|
|
|
|
|
2016/09/21 05:21:52
Subject: Help with eldar skimmer bases
|
|

Anti-Armour Swiss Guard
|
Is it just the little 1mm-ish nubbin on top that snapped off?
Widen the hole on the skimmer to 3mm. The model will sit about 5-6mm lower down the stem and be much more supported (rather than having ALL of its mass supported by that 1 cubic mm of plastic.).
If that fails, use a secret weapon widget and post (3") or something similar. They use a 12mm acrylic post instead of the GW flight stand peg.
|
I'm OVER 50 (and so far over everyone's BS, too).
Old enough to know better, young enough to not give a ****.
That is not dead which can eternal lie ...
... and yet, with strange aeons, even death may die.
|
|
|
|
|
2016/09/21 06:25:51
Subject: Help with eldar skimmer bases
|
|
Powerful Phoenix Lord
|
May I suggest a simple solution?

This is something I used back in the early 2000's and have used it again recently. Skip the stupid, idiotic flying base altogether. I use a simple tri-pod method. Drill holes in the bottom, widen until you can fit the "bottom" of the flight stand in. Clip off the tiny little nub which would normally be at the top of the flight stand. Glue in place.
Vehicle sits perfectly about 1.5" off the table. Note that depending on where you drill you use two different size flight stand legs. My Wave Serpents sit completely flush. Using three pegs also allows them to sit easily on hills or difficult terrain etc.
You also don't see the large round base during the game.

|
|
This message was edited 1 time. Last update was at 2016/09/21 06:26:30
|
|
|
|
|
2016/09/21 06:43:50
Subject: Help with eldar skimmer bases
|
|
Ship's Officer
|
Simply pinning the broken off stem on back to the support stem.
|
|
|
|
|
2016/09/21 07:48:56
Subject: Help with eldar skimmer bases
|
|

Towering Hierophant Bio-Titan
|
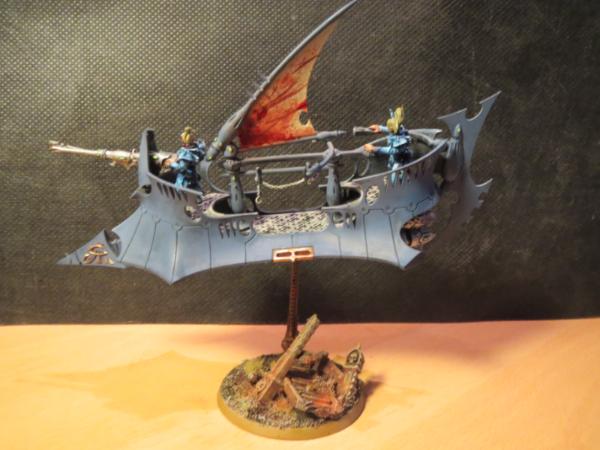
What about this?
It's super sturdy and easily removeable for transportation.
 Automatically Appended Next Post: Automatically Appended Next Post: Or there's always a nice scenic base with an off centre contact point.
 Automatically Appended Next Post: Automatically Appended Next Post: 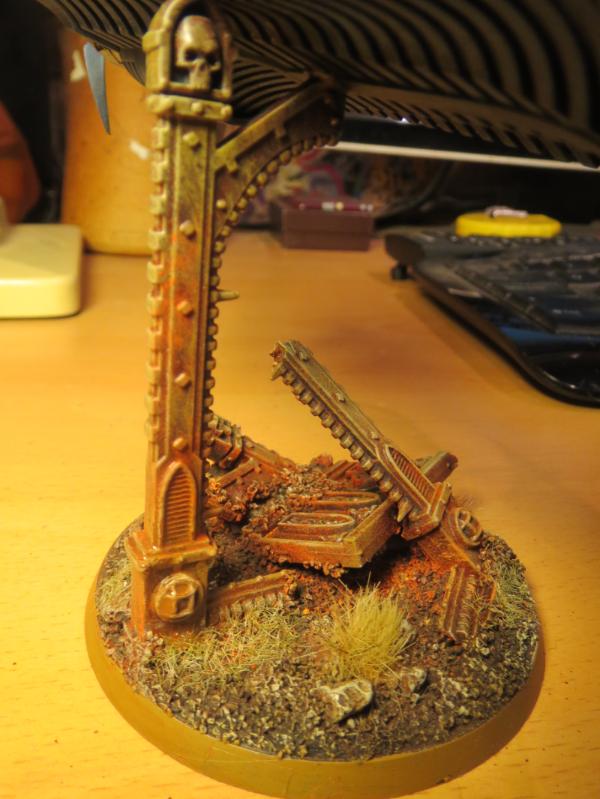
|
|
This message was edited 2 times. Last update was at 2016/09/21 08:02:39
Oli: Can I be an orc?
Everyone: No.
Oli: But it fits through the doors, Look! |
|
|
|
|
2016/09/21 09:26:36
Subject: Help with eldar skimmer bases
|
|
[DCM]
Moustache-twirling Princeps
Gone-to-ground in the craters of Coventry
|
I have used long flat magnets on my Land Speeders, but they have the underside sensor thingy to glue it to.
I stick a big magnet inside the floor before assembling, so it'll be too late unless you can open the back doors.
|
|
|
|
|
|
2016/09/21 21:32:00
Subject: Help with eldar skimmer bases
|
|

Dakka Veteran
|
I have my own relatively simple solution for my Eldar skimmers, what I did is took the two stand posts from the base, and put the shorter one in the original slot, Pre-Pinned to give it rigidity. The longer stem, I drilled a socket into the skimmer base, clipped off the original pin because it sits at a slight angle, and drilled a pin into the second stem, so that there's two points of contact on the model, and it's removable to avoid it breaking in transit.
|
|
|
|
|
2016/09/22 20:52:26
Subject: Help with eldar skimmer bases
|
|

Calculating Commissar
|
That is a very elegant solution indeed. The flight stems tend to break at the narrowest point, the top, and by inverting them you can build a much better contact area between the bottom of the model and the base, and as you say, the three legs let you balance the model far better on terrain.
|
The supply does not get to make the demands. |
|
|
|
|
2016/09/23 05:32:00
Subject: Help with eldar skimmer bases
|
|
Powerful Phoenix Lord
|
Thanks. With the holes drilled in and using the bottom of the pegs, the solutions ends up being extremely robust/sturdy. Very stable as well. I've been very pleased with the results. I used the tripod idea back in 2001 or so but I didn't drill them back then, just clipped them flat and glued them to the base. They were still robust but the drilled holes are added security.
The only minor issue is that you can't disassemble them for storage/movement, but the overall footprint is much smaller than the large flying base.
|
|
|
|
|
2016/09/23 08:20:54
Subject: Help with eldar skimmer bases
|
|
Dakka Veteran
|
I have to agree, Elbows, that's a pretty good idea. I'd have opted for it myself if not for my own solution that I'd gotten used to.. but then I got very good with my pin vise and kinda worked out the rest of things.
|
|
|
|
|
|
|


 6000 pts - Harlies: 1000 pts -
  4000 pts -
  1000 pts -
  1000 pts