| Author |
Message |
 |
|
|
|
|
Advert
|
Forum adverts like this one are shown to any user who is not logged in. Join us by filling out a tiny 3 field form and you will get your own, free, dakka user account which gives a good range of benefits to you:
- No adverts like this in the forums anymore.
- Times and dates in your local timezone.
- Full tracking of what you have read so you can skip to your first unread post, easily see what has changed since you last logged in, and easily see what is new at a glance.
- Email notifications for threads you want to watch closely.
- Being a part of the oldest wargaming community on the net.
If you are already a member then feel free to login now. |
|
 |
2016/10/28 08:42:57
Subject: Help a clean and bright color painter learn how to do gritty silver (And silver in general)!
|
|

Regular Dakkanaut
|
So I got the bright idea of starting Iron Warriors with the new Properos box, the only problems is, I have absolutely no idea how to work with silver beyond basecoat->null oil->dry-run, so all of the silver that I painted in the past came out flat and uninteresting.
I usually work with very vibrant colors and I like to do layers of very high contrast, here are my terminators, as you can see it's very vibrant with high contrast all over the place, and not a hint of silver anywhere

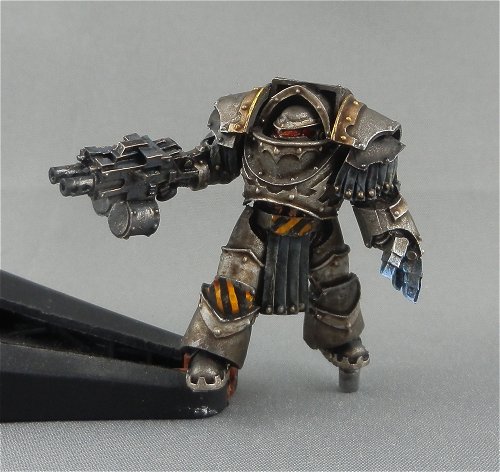
So I'm looking for any help I can get on how to do weathered silver, anything helps since I'm a complete novice in this area, things like preferred base-coat colors, best washes, technical paints, additional tools are all useful knowledge for me. Below is the kind of effect that I'm looking for, thank you for your time.
|
|
|
 |
|
2016/10/28 09:23:40
Subject: Re:Help a clean and bright color painter learn how to do gritty silver (And silver in general)!
|
|

Fresh-Faced New User
|
The quickest way is just to paint a darker metallic to start with, apply a wash and then when it comes to highlighting just have fine lines of the base metal colour at the edges. Standard washes already do a great job of dulling down silver. Just be sure to prevent pooling (and the resulting water marks) before the ink dries.
Another technique I'm growing fond of is "Flory Washes". These are primarily designed for scale model kits, but I've had some success on infantry at 28mm scale too. Essentially they're an apply/wipe off technique, but if you apply them over a coat of matt varnish, enough remains to darken the base colour in a pleasing fashion.
Similar techniques to the above can be obtained with burnt umber oil paint and turps mixed to a wash, then wiped off woth a turps dipped Qtip.
Might be a bit too dirty for iron warriors, but sponging and spattering on dark browns can add charachter, but can just make models look filthy, which might not be what you're after.
Finally Tamiya weathering master kits applied with one of those makeup sponges on a stick allow you to add subtly amounts of soot and dirt in a well scaled way, without it getting out of control.
Hope that's some help.
|
|
This message was edited 1 time. Last update was at 2016/10/28 09:25:20
|
|
|
|
|
2016/10/28 10:52:25
Subject: Help a clean and bright color painter learn how to do gritty silver (And silver in general)!
|
|
Is 'Eavy Metal Calling?
|
The key here is building up the impression of texture here, and that comes in how you apply the paint. Rather than applying smooth layers and building up highlights, you want to get a rough, natural look.
The drybrush is your friend here, though the thing is, it's not an excuse to be clumsy; it's often thought of as a beginner technique, but here it's perfectly valid at a more advanced level. The first step is to get the right brush for the job, you want an old one without a tip that you're prepared to dedicate to rough treatment. Preferably nothing too wide, as you'll still need to by quite precise with it.
Start with a black basecoat, and pick a nice, bright metallic. Personally, I find layering from darker to lighter metallics looks artificial, so you just want one here and the shading/highlights will come from the way you apply it. Drybrush the whole area with this silver, and as you do so, concentrate on the upper surfaces while putting less paint on the areas you want shaded. Thus, you get brighter/darker areas dependant on how much of the black is showing through, and texture from the way you've applied the paint as it's not uniform or smooth.
Then you want to get to work with some washes. Apply black directly to the recesses, and add the odd patch of brown or grey where you want it to look more worn. These should all be quite thin, you don't want to cover the silver. Finally, add some more pure silver in with a finer brush where you want scratches, or sponge it on.
Here's an examples of the method in action
|
|
|
|
|
|
2016/10/28 13:29:20
Subject: Help a clean and bright color painter learn how to do gritty silver (And silver in general)!
|
|
Fresh-Faced New User
|
First of all, I really like those terminators. I tend to paint my models like they would be at the start of a battle, having just passed inspection. Those look great!
For my grungy metallics, I like to build up with a drybrush too. One little trick I use is during the wash phase. I use a darker wash for the deepest shadows (Like Nuln oil of you use GW paints) and progressively lighter washes as I get to surfaces that will pick up a bit more sunlight. (Agrax Eathshade, Fleshtone, Sepia and a light yellow wash) I also have had some luck with the gloss versions of Nuln oil, Earthshade and Fleshtone on the very upper surfaces like pauldrons and the helm to make it look like the sun was reflecting, but the armor was still grungy.
One thing I used to do on metallic features of model cars, that also works on figures, is to start with my lightest wash, well thinned on the palette. I coated most of the figure with that wash. Then I added a drop, or a small brush dab of darker wash into the original puddle on the palette, mixed it up and coated the slightly darker sections. Then I added another drop of a darker wash, blended in the darker parts and finished up with a drop of my darkest wash and did the deepest shadows. By mixing the new drop into the existing wash, I didn't get the jarring look of four or five different washes, but a bit more blended effect. I also worked from washes that had a color to them, to washes that were more black. In the real world, colors tend to disappear in shadows and become more monotone. Going gradually from sepia to black shows this better than just a darker, more saturated brown would. Most of the time, I was using oil washes over lacquers for this, but it still works with acrylic washes. You just have to work a bit quicker due to the drying time. You may want to take an extra gradient step or two to make up for the fact that the acrylics won't blend as gradually as the oils will.
Colors also wash out on the highlights, so I usually took a fairly white silver/grey tone and lightly layered it onto the top highlights. (Even with brass, copper or gold parts) I would also use a dead flat varnish over my shadows, and a gloss varnish carefully applied to my edge highlights to create a little contrast. (I used a semi matte finish for most of my tabletop figures)
Good luck, and I hope it ends up looking as nice as those terminators!
|
|
|
|
|
|
|
|

