[size=18][size=12]So my seraphim have all been converted to have wings. You can see them here:
http://edwardmystcreations.weebly.com/sisters-seraphim.html
I went in with my buddies to get a Celestine and bodyguard set. Great models, not sure how often I will use them, but...In any case they need to have wings to fit into my army.
Here is my process, let me know what you think. (As a note, I have done this many ways so continue trying new things. I have used hawkrider wings, sculpted on top of hawkrider wings etc.)
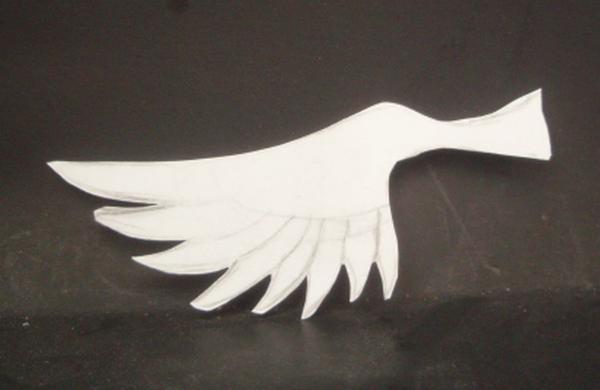
I first took a piece of plasticard, very thin (like .2mm) and drew a wing on it. Then cut it out. The size is up to you, but I go for what I think would be the right ratio with a figure by holding the mini against the plasticard and drawing. This plasticard can be bent to the desired curve by repetitive rolling motions. Here is a picture of stage 1.[/size]
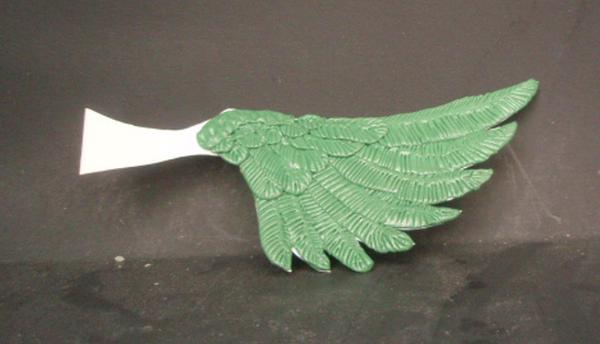
I then begin sculpting. I first sculpt what will be the inside of the wing (the side facing the body of the model if it were wrapped about it). On the inside, the feathers overlap from top outside tip, inward, so I start my sculpt on the inside bottom of the wing. I first do the outermost feathers (the largest) by placing a bit of
GS shaped roughly like a feather. This gs needs to be pressed so that it is less than 1mm thick. variety is ok, but over 1
mm can leave it chunky. I leave it covered in fingerprints as this adds the right texture. Once it is attached, I take my x-acto knife and use the edge to make a series of parallel but not uniform marks along one edge. I make the marks along the outside edge longer toward the center, so that the center gap (the center of the feather) is closer to the top/inside edge as this reflects the pictures I used as guidance. The secret is if you can be uniform where your lines end in the middle of feather, it leaves a raised line like the pinion of a real feather. I repeat this process working outward, letting each new feather slightly overlap the previous. Once the outer layer is done I immediately start the next row inside and repeat, making these much smaller. The size, shape, overlap etc is really part of the art process so no guidelines, sorry. Here is an image of this process. Please note, The wing can be bent into a curve if you wished after the sculpting and before the
GS dries. Notice on later pictures that the completed Wing is curved.
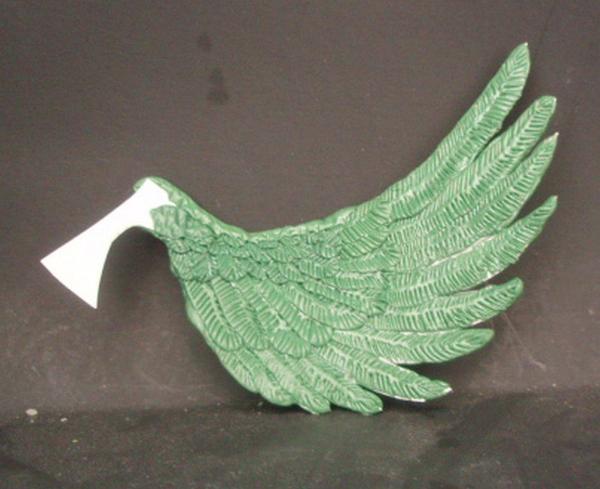
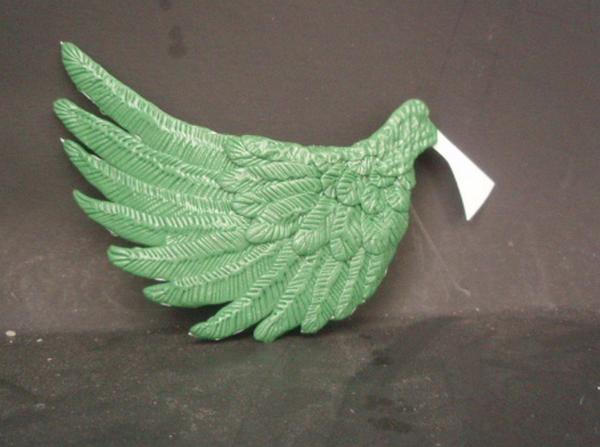
Once I reach the top edge and wing root area, I change slightly. The feathers here are really so small and interlaced, individual work is beyond me. Instead I shape a bit of
GS to cover it in a thin layer. Once applied, I use my pointed sculpting tool (I use nylon so it looks like a broad cone) to push in cone shaped points. I make sure the edge gets puched and shaped to be irregular, and I place each new mark from the edge of the
GS woorking toward the top of the wing. Each new row goes in the gaps between the last, and irregularities makes it look much better than uniform. I set this aside and let it dry over night before doing the back of the wing. The same process is used, but be aware that now the feathers will overlap from the inside of the wing outward (at least in the pictures I referenced). They stay top overlapping bottom. These pictures show Celestine's left wing completed front and back. It is strange, despite a thin layer of
GS on both sides, it remains slightly flexible.
Hope this helps. Ask any questions if you have them. Yes, a lot of work and such but hopefully looks good. I will attach them with pins and
GS. I work continuously, only breaking when one side of a wing is completely done. I move to another wing and let the first dry overnight, before doing the back. Since I have three sets to do, It has worked out fine. The work you see here is about 3-4 hours continuous.[/size]

